Materials and tools for making pipes
To make a wooden pipe with your own hands, we will need a rather impressive arsenal:
- sandpaper
- small wooden sleeve (diameter 1.5 cm and length 4 cm)
- ruler
- pencil
- tuner
- small vise (not necessary, but much more convenient with them)
- something that can be drilled with (drill, drill, engraver) and drills of different diameters: from approximately 0.8 to 4.2 mm
- needle file
- knife
- semicircular incisor
- pair of clamps
- PVA glue
- two wooden blocks 30x2x1 cm.
Reasons for the absence of whistle
A fairly common problem that happens with such cookware is the breakage of the whistle.
You can repair it yourself, since the mechanism is very simple.
First of all, you need to understand the cause of the breakdown. To do this, remove the whistle from the spout of the cold kettle and try to blow into it. If a whistle appeared, trouble happened to the kettle itself. If it is not there, then the problem is with the whistle - it is broken. If the whistle falls off, it is advisable to buy a new one - they are sold separately.
Making your own pipes
First, we take wooden blocks and mark them. You need to draw the boundaries of the internal channel of the pipe, on one side of the bar this channel is 1.5 cm wide, and on the other, 1 cm, that is, the channel will narrow slightly towards the end of the pipe.
Now we clamp one of the bars in a vise and begin to cut out a semicircular channel. On my workpiece, the area that will need to be removed with a cutter is shaded.
Carefully and slowly remove the chips, watching the direction of the wood fibers. They may not always go along the workpiece, so be careful, otherwise the cutter may go crooked.
We try to cut the channel to an even semicircle along its entire length. We do the same with the second block.
Once both halves are cut, you need to sand them. Using a piece of sandpaper we pass along the inner surface of the channel, achieving smoothness.
After sanding, we move on to the whistle. Having retreated 4 cm from the top edge of the workpiece (where the wide end of the channel is), draw a rectangle 5 by 7 cm, preferably exactly in the center.
Using a 4.2 mm drill, we make three holes close to each other, so that we get an oval window.
Now we take a file and bring the window to a rectangular shape, according to the markings made.
After this, use the same file to grind one side of the window at an angle of approximately 30-45 degrees. This is the most important part of the work: the sound quality will depend on the sharpness and smoothness of the edge.
It's time to connect the halves. We coat them with PVA glue and fold them, carefully aligning the channel. Press with clamps and leave to dry for a couple of hours.
When the glue dries, unscrew the clamps and take a knife. We cut off the top of the small wooden sleeve, about 1.5 mm, so that we get a flat, even edge. Look at the photo and everything will become clear.
After this, lubricate the bushing with glue and insert it from the upper end of the flute, forming a whistle. With the cut edge up, exactly to the edge of the whistle window.
We wait until the glue dries and take the knife. Carefully planing the workpiece, we give it a rounded shape, then smooth it with sandpaper.
To make it easier to play, we will make a cut at the back of the upper end of the pipe.
Now comes the fun part - the setup. Try blowing into the pipe, listen to the sound and check with the tuner. If you did everything carefully, you will get A sharp. This is the lowest sound that our pipe can produce. In total we will have seven notes and six playing holes. Let's mark them: the very first hole will be 6 cm from the lower end of the pipe, the remaining holes will be in increments of 2 cm.
Repair process
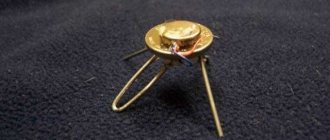
Straighten the bracket into a corner. Break off the ends that are too long.
We put the blank on the ring. We bend the ends of the wire.
Using pliers, we push the curved ends deeper into the hole in the whistle body.
Ready!
The whistle fits perfectly in the new loop. Still active and vocal!
How to make a flute?
join the discussion
Share with your friends
Many people want to learn to play a musical instrument. To make the process more fun, you can make some tools yourself. One of these will be the flute.
Kettle with whistle
In our family, we prefer to use regular kettles for a gas stove rather than using electric kettles, which seriously waste electricity. But we love teapots that are not quite simple, namely teapots with a whistle! Since we have already tried more than one kettle, I want to help you with advice on how to choose a stainless steel whistling kettle.
To begin with, I want to talk about some examples of scroll teapots that we had and which stand out from the rest in their design. Read these stories and you will immediately know some of the pitfalls when buying such kettles. Go!
Our first kettle with a whistle was given to us in a set with stainless steel saucepans with the inscription “bekker”. He whistled like a nightingale, you can listen. One drawback is that the lid was very difficult to open; you had to apply force, risking tearing off the little thing you were holding on to.
But while we were boiling water directly from the tap, it could be poured through a spout, which is also not very convenient. It became more difficult later when they began to pass the water through a jug filter. To pour water from a jug into a spout already required some virtuosity.
And even then, when the plastic on the lid of the spout was burnt and crumbled (let me explain: the whistle of this kettle was located precisely in the lid of the spout), and the screw with which the whistle was screwed regularly ended up in the cup, and then we were not immediately able to part with this kettle, because it was dear to us as a memorable gift, and we just got used to it over 5 years. But, I must say, it was not easy to find a suitable replacement.
Kettle No. 2 was bought on the market for 550 rubles. Also made of stainless steel. Well, we didn't like this one from the very beginning. Firstly, its volume was 0.5 liters larger than desired. The seller just turned out to be a rascal, showed me a smaller kettle, and in the end gave me another box.
Secondly, and this drawback is more significant, the spout of the kettle is covered with a plate that is movably fixed. I still don’t understand the engineer’s idea for this cap. Its edges are curved down, and if you don’t fold it back, then when boiling water is poured into a cup it simply follows an unpredictable route, splashing around the sides and flowing down the spout.
If it needs to be folded back, then this must be done with the help of something, or with a sharp movement of the hand, so as not to get burned. When you tilt the kettle further, it still falls. All this trick is needed for is to trigger the whistle, which is located in the lid of the kettle.
But if you consider that the whistle only worked a couple of times and fell silent forever, then you could just tear off the lid and not have to suffer. The only plus is the large, comfortable lid and a comfortable handle that presses the lid tightly to the kettle.
Kettle No. 3 has been in use for half a year, purchased for 300 rubles. So far there are no complaints. It whistles, though somewhat hoarsely, but loud enough. The whistle, like the first model, is located in the spout.
But for some reason the plastic on the lid of this very spout has already melted (maybe it got caught in the flame of a nearby burner, I somehow missed this moment), but everything is holding together, everything is working... for now.
Friends have the same kettle; they say the paint has started to peel off, but overall they are very pleased.
UPD. A year later, the teapot is still alive!
How to choose a kettle with a whistle
- Choose a kettle of the size you need - no less, no more.
- You must take a kettle with a whistle, which is located in the spout, since kettles with a whistle in the lid are less convenient to use.
- Check the quality of the whistle immediately in the store; to do this, simply remove it from the kettle and blow into it through your mouth.
Immediately check whether it is working or not, and besides, it will immediately become clear how loudly and in what key it whistles. - Choose a kettle that has a minimum of plastic on the whistle, as over time it will begin to melt!!!! This is usually due to carelessness in installing the kettle in such a way that the whistle is affected by the heat from the adjacent burner on the gas stove. You will get both a bad smell and a spoiled appearance of the kettle.
- Check immediately how the lid of the kettle moves, otherwise such kettles very often suffer from a very tight lid in terms of opening and closing it on the kettle.
- Visually check the design of the kettle for ease of pouring water into it through the top lid.
How to make a whistle for a kettle with your own hands
Users often ask, how to make a whistle for a kettle with your own hands??? We had similar ideas and some experiments and they all turned out to be unsuccessful.
Therefore, we recommend that you do not suffer and just buy a kettle with a whistle right away, otherwise such undertakings are bad, since there have been cases when homemade whistles for a kettle flew off and came under fire from a neighboring burner.
The market now offers a huge range of similar teapots that come with a scroll. You can choose both by appearance and price. And besides, our latest kettle costs 300 rubles and still works great! So it’s better to spend these 300 rubles than to get into a bad story.
Why doesn't a kettle with a whistle whistle?
And at the end of this article I would like to look at the case when a kettle with a whistle does not whistle. In order to figure out what's going on, you must first try to understand which way to look. There are only 2 options here, either the reason is in the whistle itself, or the conditions under which the whistle can whistle in the kettle are violated.
The first thing you should do is to remove the whistle from the kettle, and if it is cold, then put it to your mouth and blow into it. If the whistle whistles, but it didn’t do this on the kettle, then the reason is not in it, but if it doesn’t whistle, the whistle is ruined.
If the kettle whistle doesn't whistle
If after checking it was revealed that the whistle does not whistle if you blow into it through your mouth, then something has happened to it. The first thing you need to do is to examine it externally, there is a possibility that it is clogged with something or something else is interfering with it.
As a rule, such cases have some individual reasons and we cannot tell you anything - look and try to understand what happened to him. It happens that it becomes clogged with something, for example, something dripped into it from the outside, sometimes it is bent, sometimes the plastic on the whistle melts and deforms it.
The outcome may even come down to buying a new kettle because of the whistle, no matter how sad that may sound.
If the kettle whistle whistles
If, after checking, the whistle whistles when you blow into it through your mouth, then things are much better - the problem is in the conditions of using this whistle on the kettle. Typically, the problem usually lies in 2 conditions:
- You have poured more water than required, usually you cannot pour water into such kettles at a level higher than the hole from the pipe inside the kettle begins. It turns out that everything is flooded with water and air cannot pass to the whistle. The air will escape somehow through the lid.
- Air/steam leakage through the lid. It happens that they simply forget to put the lid on the kettle, or close it loosely, which allows steam to escape through the lid, while the pressure inside the kettle is not sufficient for the whistle to simply whistle. Close the lid better, or watch where the steam escapes while the kettle is boiling.
After reading this article from us, we hope you will be able to understand how to choose the right kettle with a whistle, as well as what you should not make a whistle for a kettle with your own hands, and you will also be able to figure out why the whistle on the kettle does not whistle.
A good kettle looks good in a good kitchen! But I, Arzamiss, recommend making a custom-made kitchen in Arzamas at the Alex Lux company. I ordered from them 4 years ago and the kitchen still makes me happy every day. I recommend to everyone!
How to make from paper?
You can make a huge number of things from paper: origami, useful household crafts, paintings, and even musical instruments. You can introduce children to flute making, because such an activity promotes the development of fine motor skills. So, in order to make a paper instrument, you need:
- cardboard, preferably thicker (you shouldn’t use thin paper, because the flute will be too soft);
- ruler;
- awl;
- PVA glue;
- gouache or any other paints.
You can create a flute with your own hands as follows.
- Using a ruler on a sheet of cardboard, mark the location of the holes of the future pipe. The distance between the holes varies from 2.5 to 7.5 cm. The sound produced by the musician depends on this. For a paper flute, the minimum distance is suitable, excluding the thumb hole. It is better to leave 4.5 cm between them. Counting is done from below.
- Then the cardboard is rolled into a tube so that the marked holes remain on the front side. The product is glued together with PVA.
- Next, holes are made with an awl, the topmost of which should be slightly larger in diameter than the rest.
- Paints are used to give the instrument a beautiful appearance.
Of course, a paper flute will not sound like a real one, but it is a great way to have fun and usefully spend time with children.
General information
A kettle with a whistle is made of the following materials:
- - glass;
- - aluminum;
- - stainless steel.
A glass teapot is a beautiful, but not practical option. The main disadvantages of this model are: high cost, impracticality of the material. In case of even minor damage, the kettle should be replaced immediately.
An aluminum kettle is not the best option, especially for people who are careful about their health. Since when water boils in it, the metal releases heavy salts that are harmful to the human body.
A stainless steel kettle is the most reliable and durable. The material is resistant to high temperatures and does not emit harmful or toxic substances. But it requires special care. It is not recommended to clean stainless steel with abrasive detergents, metal sponges, soda and salt.
An enamel teapot usually has an attractive appearance. The main disadvantage is that scale and rust constantly form.
PVC pipe flute
You can also make a pipe from PVC pipe. This will require more time and labor, but the sound of the finished flute will be very close to the original.
Tools and materials
The following items will be needed:
- PVC pipe (it is better that the internal diameter is no more than 2 cm and the length is 35-40 cm);
- PVC cap (suitable for the diameter of the instrument);
- pencil;
- thread;
- file;
- saw;
- machine;
- vice;
- sandpaper of different sizes;
- primer for plastic;
- polyurethane-acrylic paints or electrical tape.
Branch selection
It is best to make a whistle from brittle ones. But you should not destroy a living tree. Many branches can be collected next to it. Twigs no thicker than one centimeter are best suited. You can easily remove the bark from them with a knife.
Having collected enough branches, you should choose the only one from which you will make a whistle. To do this, find the most equal branch without knots or damage. Just 5-8 centimeters of a clean and level area on the branch will be enough. Pay attention to the bark: it must be perfect. The presence of kidneys will not be a hindrance - they can simply be removed.
After selecting a branch, you can cut off the excess part on one side until the smooth section begins. Having measured 5-7 centimeters from it, we make a circular cut. You will get a slot that resembles a ring. It should not be too deep, just cutting through the bark, touching the wood, is enough.
Other options
There are other various options for making a flute at home.
Made from bamboo
Making a bamboo pipe is a difficult task. In addition to tools, accuracy and patience are required. A mistake can lead to failure.
The following items will be required:
- a stalk of bamboo (you can buy dried bamboo or dry it at home);
- metal rod with a diameter of 12-15 mm;
- gas burner (you can also make a fire, if possible);
- grip or durable cloth;
- metal saw;
- felt-tip pen;
- sandpaper No. 2 or No. 1;
- old drill with a diameter of 4-6 mm;
- pliers;
- measuring tape;
- linseed oil and a rag.
The manufacturing technology is as follows.
- Cut a piece of bamboo 40-50 cm long so that at one end it is covered with a partition.
- Make a mark at a distance of 20-25 mm from the end. Retreat 1.5 cm. Make more marks, retreating 20-25 mm between them.
- Heat a metal rod until red hot to remove any unwanted fibers. It is imperative to use a grip, otherwise burns cannot be avoided. After the rod is hot, it is inserted into the open side of the bamboo and pressed to remove excess partitions. The section at the end should be left.
- The drill gets hot. The marked holes are unscrewed manually with a drill clamped in pliers. If you drill, the bamboo will crack.
- Using sandpaper, remove residues after burning holes.
- The finished flute is coated with a layer of linseed oil.
Principle of operation
An electric kettle, regardless of model and class, works on the same principle. In its lower part there is a heating element; it can be open or closed. It connects to a thermostat, which consists of a plate. When current is applied, the heating element begins to heat up, thereby heating the water in the container. When the liquid boils, steam is formed, which rises to the top of the device and enters a special channel where the thermostat is located, which controls the operation of the device and is responsible for turning it off after the water boils. But despite the simplicity of the work, many do not know how to properly disassemble an electric kettle and do it correctly. Because different device models have differently located latches that unlatch the handle of the device.
Making a wooden whistle using a lathe
Today I decided to show on our favorite site how I make wooden whistles using a wood lathe. Our brothers from the Middle Kingdom make a great variety of lathes and they are inexpensive. So, let's begin:
1. I decided to make this whistle from maple, since it is a very good, hard wood with a very beautiful texture. The size of the workpiece is arbitrary, in this case it is a dried piece of a maple branch.
2. We put on safety glasses and a respirator, make sure that nothing is loose on our clothes and sleeves, hide our braid and long beard, concentrate and turn on the machine. Initially, we process and strictly by eye, using a cutter, we mark the boundaries of the body, stand, neck and head of our bird whistle.
3. We grind out the shapes, sand them and burn out the rings with a thin splinter. The photo even shows smoke coming out.
4. Polish with sawdust.
5. I decided to put a crown on the head of our bird and carved it separately.