Cold porcelain is the cheapest, most pliable and accessible material for modeling. It is completely safe to work with it, and it is not at all necessary to have special skills and knowledge - even a small child can do such creativity. You don't need to look for something special in stores to create a unique decoration or other thing with your own hands. You can prepare cold porcelain at home.
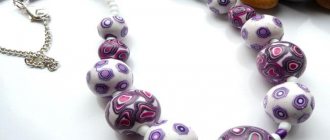
In appearance, cold porcelain resembles plasticine or clay, but after complete drying it is an absolutely solid substance. During sculpting, you can use any accessories, jewelry, beads, small beads, buttons, branches or dried flowers, as well as fabrics of any structure. The surface of cold porcelain products can be varnished, painted or sprinkled with beads, sparkles, sand, etc.
Recipe with cooking
Below is a method on how to make cold porcelain.
Prepare:
- starch;
- cream;
- glycerol;
- glue.
Preparation:
Before you start working, you need to lubricate your hands with cream; this is done so that the future mixture will come off well. Select dishes for cooking. Glass or Teflon containers are suitable. Aluminum cookware is not suitable for the job.
Turn on the heat (medium) and place the container in which the mixture will be prepared on the stove. Pour in 1 cup of PVA glue and immediately add 1 teaspoon of cream and a teaspoon of glycerin. Stir vigorously until all components are combined.
Gradually add 1 cup of starch. Mix. At first, the mixture may resemble granular cottage cheese, but as it heats up, it will acquire a homogeneous mass and form a single lump.
Take out the mixture and knead it with your hands for a few minutes. If desired, you can add dyes and start making crafts from cold porcelain.
History of the material
The first examples of such creativity appeared in the 19th century. The Argentines were called the discoverers. But at the same time in Russia, according to archival documents, Peter Ivanov created interesting floral compositions designed to add sophistication to perfume bottles for the imperial family.
The manufacturing technique has not lost its popularity to this day, delivering true pleasure and stimulating wild imagination. The only thing is that the specimens require special care; humidity softens them and the sun discolors them. High temperatures lead to drying, low temperatures lead to destruction. Their shelf life is extended by layer-by-layer application of varnish, which in addition to protection provides a sparkling, shiny appearance.
Cold porcelain painting
When the product dries, it has a slightly transparent texture; to avoid this, you can tint it with white pigments during preparation.
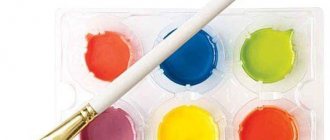
The following paints can be used for painting:
- powder;
- watercolor;
- acrylic;
- chalk;
- pastel;
- and etc.
Note!
- DIY ottoman: TOP-190 photos of the best diagrams and drawings. Do-it-yourself master class with a full description of the stages of work
- Do-it-yourself easel - varieties, drawings with dimensions for creating with your own hands. Step-by-step instructions for beginners
- How to Write a Screenplay: Tips and Best Practices for Writing a Screenplay. Step-by-step master classes for beginners with detailed descriptions of the stages
On the Internet you can find a large number of photos of cold porcelain painted with different techniques.
Once your product is completely dry, you can begin painting. Thanks to its structure, the material allows you to make smooth transitions between colors.
This material is soft and has no rough particles. Therefore, you can easily make thin elements from it (in the form of flower petals, or edging).
Craftswomen mostly make small elements, because the substance can crack. But this is not a problem either, since with the help of glue you can easily restore the part.
Complete drying takes about a day. For parts with a thickness of more than 10 mm. They take much longer and are prone to cracking.
As the mass dries, it loses 10-15% of its volume.
Note!
- DIY medical mask: TOP-140 photos of the best DIY options. Instructions for making a mask at home
- How to make a piggy bank with your own hands - the best ways to make a piggy bank with your own hands. Detailed master class for beginners with photos and videos
- Cake decorating: TOP-170 photos of the best ideas for decorating a cake at home + instructions for beginners with simple patterns
Decoration of dishes
Porcelain mass is unstable to temperature changes, so it is not used for making dishes. But a decorative mug decorated with a floral arrangement can become an enviable piece of kitchen furniture.
To create a designer cup you will need:
- Bright rose buds, forget-me-nots, leaves made from mass.
- The base is made of green porcelain, on which the composition will be attached.
- Glue (for strength, you can use E6000 glue).
The order of assembly of elements consists of the following steps:
- On the cup you need to stick a base in the form of a green porcelain stain.
- Large flowers should be strengthened in the center.
- The perimeter of the spot must be filled with green foliage.
- Between large inflorescences, you need to strengthen smaller flowers and unopened buds.
- The upper part of the composition can be decorated with a bouquet of blue forget-me-nots with a bright yellow center.
As a gift, you can give a tea set decorated with scarlet poppies and bright greenery. Fans of feasts will appreciate salt shakers, sugar bowls and other kitchen utensils decorated with floral arrangements.
Recipe without cooking
Cold porcelain without cooking, prepared using a microwave oven.
Compound:
- starch;
- PVA;
- glycerol;
- lemon acid;
- water;
- cream and Vaseline.
Step-by-step instructions for beginners:
Step 1. Pour 1 tablespoon of water into a container and add a pinch of citric acid.
Step 2. Add one cup of starch (potato/corn) and 3 tablespoons of glycerin to the mixture.
Step 3. Pour one glass of glue (it is better to use furniture glue). And mix everything very well.
Note!
How to make a house out of cardboard: 140 best photos of children's crafts with your own hands + step-by-step manufacturing instructions with simple diagrams
- DIY rose lamp - step-by-step instructions for creating a lamp with your own hands + original design ideas with photo reviews
- Furniture decoupage: TOP-140 photos of non-standard decoupage options. Step-by-step instructions for decorating furniture with your own hands
Step 4. Place in the microwave for 30 seconds, remove and mix everything thoroughly. Set it to heat again, but for 60 seconds. Repeat again. Mix everything very well.
Step 5. Then put it back on heat 3 times for 20 seconds.
Step 6. Next, you need to heat the mixture three more times for 10 seconds. The mixture should take on a milky tint.
Step 7. Heat the bowl a few more times, but for 4-7 seconds.
Step 8. Place the surface on the table, greased with cream. Knead the whole mass very well.
Step 9. Let the mixture rest and lubricate with Vaseline. Then wrap in cling film and put in a dark place for 6 hours.
Step 10. After the required time has passed, take out the mass and grease with cream and knead for 5-10 minutes.
Step 11. In order for the material to quickly acquire the required consistency, place it in the microwave several times for 5 seconds, after each time knead it well.
Step 12. It is better to use oil paints for painting.
How to make color
Porcelain can be painted in different ways. The first is when paint is added during the preparation of raw materials for work. Thus, the product is ready-made, without further processing.
Suitable food pigments, crayons, paints, gouache, watercolor, lipstick. Based on what kind of saturation you need, the raw material will be kneaded for as long as possible.
The second option is when you paint a finished product with a brush. The choice is always yours. It all depends on personal experiment. Try it and find out what suits you.
Operating rules
Making cold porcelain with your own hands requires meeting certain conditions:
- Do not leave the material outdoors for a long time. It sets quickly, and it is no longer possible to return to its original state.
- painted porcelain hardens much faster. Therefore, you should not prepare in reserve.
- When adding chemicals, protect your hands with gloves.
You should not leave the material in a visible place if there are children in the house. A child may confuse it with something and bite off a lot.
Tools
Large investments in tools are not required; the most common devices used for sculpting will do:
- oilcloth to protect the surface;
- set of knives;
- various shapes, stencils.
- decorative elements;
- paint brushes;
- glue (for fastening parts).
Secrets.
After drying, the volume decreases by 20-25%.
To prevent the dried part from cracking after it has been prepared and cooled down, formaldehyde is added. This is a toxic substance, do not forget about precautions.
Do not place the remaining mixture in the refrigerator. And to remove moisture, it’s worth changing the bag.
The better the kneading process, the less likely it is that the finished product will crack.
To prevent fungus from appearing on the surface, the surface can be lubricated with oil.
For a more saturated color after the first coat of paint, the part is held over steam. This allows the cold porcelain to be well saturated with coloring pigments.
Acrylic paints will give more realistic colors. Painting can be done with any paints. It is worth remembering that the painted mass hardens much faster.
To give different shapes and textures, you can use any convenient tools at hand. But the most important tool when working with cold porcelain is your hands.
Organize a place for the finished product to dry.
The products will help dry from 24 hours to a week. It all depends on the thickness of the part.
Flowers made from cold porcelain should be placed in safe places, as the material is very fragile and can easily be damaged.
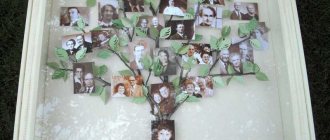
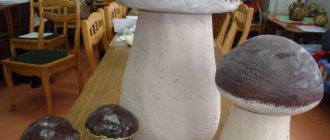
What can you mold?
Porcelain crafts are distinguished by their beauty and grace. Plastic mass can be used in various fields.
The most popular products made using the modeling technique are:
- costume jewelry (pendants, earrings, bracelets);
- hair decorations (hairpins, elastic bands with decor, headbands);
- interior items (decorative flowerpots, boxes, vases, lamps);
- cartoon characters, figures of animals, insects, people;
- gift souvenirs;
- decorative decorations for vases, mugs, flower pots and wall panels;
Recipe with added formaldehyde
A recipe for cold porcelain with the addition of formaldehyde helps strengthen the material.
Prepare:
- starch;
- powder chalk;
- vinyl based adhesive;
- petrolatum;
- formalin (formaldehyde).
Step-by-step preparation:
Step 1. Place one cup of chalk and one cup of starch in a bowl. Pour in the glue and check the consistency (you should get thick sour cream).
Stage 2. Add 7-8 drops of formalin. Don't forget about safety precautions.
Stage 3. If the mass has thickened, dilute with a small amount of water.
Stage 4. Mix everything well and put it in a bag.
Coloring
You can color the material in two ways: by adding a dye when making the mass, or by coloring the finished product.
The first option is preferable if the mass is being prepared for a child to work with - in this case it is better to use safe food dyes.
We recommend reading:
Crafts made from epoxy resin - stylish, original and beautiful products and decorations made from epoxy (110 photos)- Crafts from seeds: step-by-step instructions and tips for choosing the most beautiful ideas for crafts
- Crafts from airy plasticine - ideas for creating beautiful crafts, the main steps and a description of how to make a craft correctly (100 photos)
If the material is intended for making flowers, then it is better to apply the paint directly to the product - this is the only way to achieve a transition of halftones, adding realism to the craft.
High-quality acrylic paints are best suited for painting.
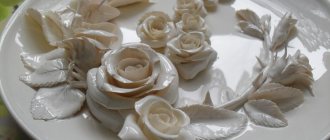
Cold porcelain modeling
Master class on making a flower.
Prepare for work:
- oil paint (red, white, green, yellow);
- red acrylic paint;
- dry pastel green and red;
- floral wire;
- glue;
- brushes;
- brushes;
- dowel; - scissors and knife.
Fragile beauty with your own hands
Porcelain crafts for beginners will include such basic items available for home creativity as:
- Photo frames,
- Stand,
- Honey jars,
- Cups,
- Beads,
- The simplest toys.
Making crafts from porcelain is easy and simple if you have the habit of manual labor and a rich imagination. You can rely on your own developed imagination and experience, or collect suitable images from thematic albums or the Internet.
Video instructions with a detailed recording of the entire technological process are an ideal option for those who are faced with the need to make a craft for the first time.
To make highly artistic porcelain crafts, it is better to go to a thematic master class or consult with an experienced craftsman.
Then the efforts made will not be in vain. A pleasant-looking thing will remain a memorable souvenir for many years, giving joy about the days spent together in creativity.
Preparing cold porcelain
Prepare:
- soda;
- glue;
- petrolatum;
- starch.
Pour two tablespoons of starch into a plate and add Vaseline. Connect the components. Add a pinch of soda and grind everything together.
Add 3 tablespoons of glue in small portions. The dough is ready to use. You need to let it rest for 5-10 minutes.
Completing of the work
Prepare two pieces of wire, no more than 7 centimeters long. On one side the wire must be bent like a hook.
Mix a small amount of porcelain with oil-based white paint. Make a ball with a diameter of approximately 1 cm.
Lubricate the hook with PVA glue and put the ball on it. Make small indentations on top of the ball from four sides to the center. This is necessary to give the heart shape volume.
Make another one like this. The second blank can be made smaller or larger.
Prepare green pastel and paint the base of the bud. In the same way, paint the top only red.
Mix a small amount of the mixture with green pastel and stick around the stem. The wire must be lubricated with glue. For a smoother surface, the stem can be rolled between your fingertips. Leave 1 cm of empty wire at the end. Repeat the same steps with the second bud.
Prepare a ball with a diameter of 2-3 cm. Mix with white and red oil paint. Prepare a petal about 1.5 cm.
To give the petal veins, you can use an impression. Prepare 3 petals. Using a dowel, give the flower a three-dimensional shape. Fold the petals and glue them in the center with a drop of glue. Add the top two petals.
You will need 3 blanks. Prepare a small red lump. Give the mixture a heart shape. And use glue to secure it in the center of the flower.
All that remains is to put all the elements together and the flower is ready.