Those who are just beginning to learn the basics of knitting still have no idea how many tools and skeins of yarn will appear if they like the type of needlework they are mastering. Where should this good go? It’s a shame to throw it away, but it’s also inconvenient to keep it in a box or large bag. Perhaps someone will say that you can use a large basket or a home-decorated box to store leftover knitting threads. Granted, but what to do with the tools?
Recently, experienced needlewomen have been using a homemade organizer for this purpose. The knitting needles and hooks placed in it will not only be safe and sound, but also in a complete set will always be at hand. If you liked the idea so much that you also wanted to get a similar thing, we offer a detailed and step-by-step master class on how to implement it!
Studying the features
In order to please yourself with an interesting and useful product, you don’t have to be a professional seamstress. It is enough to have a desire. And also carry out proper preparation. It implies quite accessible actions.
Photos of various options for organizers for needlework show a fabric canvas with pockets in which existing knitting needles and hooks neatly lie. However, despite the fact that the principle of operation is similar in most options, it is not recommended to carry out the planned thing according to someone else’s template.
We carry out preparations
Each needlewoman has her own set of tools. Some people like to work with long tools, while others are more comfortable with short ones. Some knitters use large needles, others use hooks.
Also, your tools will differ in size from those used by another craftswoman. For example, many needlewomen have preserved their grandmother’s knitting needles, which are much longer than those presented in the store today. Therefore, preparation is an elementary process. Basically, you just need to lay out all the knitting needles and hooks you have in front of you.
Phone pockets: “Owlet” applique
Knitted pockets for phones are especially popular among young needlewomen.
They serve as a soft protective shell for your mobile friend and decorate the stylish image of its beautiful owner. Knitted pockets for phones can be worn fastened on the belt of trousers, tied with a rope and worn around the neck, or simply thrown into a bag. A short master class will show you how to create such a convenient pocket with an appliqué in the shape of a small owlet.
It is recommended to watch a video from a foreign needlewoman accompanied by pleasant music. The video is in English, but everything is clear and accessible!
In the course of step-by-step work, you get a wonderful owl that will serve as a convenient pocket for a valuable mobile phone.
The owl is a symbol of wisdom! And a girl with such an accessory will definitely give the impression of a smart and modern fashionista.
Choosing material
In fact, even experienced needlewomen do not undertake to strictly determine the fabric suitable for making the product under study. Largely because it is sewn from what is at hand. But most often thick fabric is used. For example, denim. It is better to use it on the outside of the organizer. But to accommodate a set of crochet hooks and different types of knitting needles, cotton or linen fabric is more suitable. Although you can also take an unnecessary waffle towel. The main thing is that the finished craft looks organic.
Panel with pockets on the wall
To create such a wonderful thing, you will need some yarn of different colors, a hook No. 3, eyes for fish, small decorations and a bright flight of imagination.
The work begins with a chain of 99 air loops - 94+3+2 lifts. Next, the cells of the fillet mesh are made, of which there should be 31 pieces along the length of the entire canvas. Next, 70 rows of the main part are knitted in forward and reverse directions.
When the main canvas is ready, the work returns to the first row. From the central chain, a fillet mesh is made up, which will serve as a future capacious pocket.
All that remains is to connect all the interesting things! Using the presented diagrams, create fish and sea creatures, add stars and green algae. It is important to make a neat band around the perimeter, which will add the final finishing touches to the bright panel. At the top of the organizer, a wooden knitting needle is passed through the mesh cells to give shape to the hanging canvas. And for beauty, you definitely need to sew shiny sequins onto the appliques.
Advice! Mesh wall organizers can serve not only as pockets for a variety of items. Hairpins, jewelry, sewing needles and various reminder notes are attached to the mesh.
Distributing hooks and hosiery needles
To make a beautiful and convenient organizer for handicrafts, you need to draw a sketch of the craft. To do this, you need to prepare a paper template. Its dimensions must correspond to our idea. And to determine its parameters, you should take the longest tool. The pocket for it should be a little longer so that the knitting needles or hook do not stick out, fall out and spoil the beauty of the organizer. This way we will find out the height of the product that we plan to cut and sew. Now you need to figure out the width.
Experienced needlewomen advise using a ruler and a simple pencil for these purposes. Next, we simply lay out the tools on a piece of paper and draw cells - pockets of the planned organizer made of fabric or other material. They should be a little wider so that the knitting needles and hook can be easily reached. This process is a bit like Tetris; you will also have to arrange the tools, trying to take up as much space as possible and not leave any empty space.
Preparing space for ring knitting needles
This type of tool differs from the previous ones not only in size, but also in the presence of a rubber tube, fishing line or metal cable. Therefore, no one stores it in an unfolded state. This means that such knitting needles should be placed in a pocket of a different shape.
Experienced needlewomen advise when making an organizer for knitting needles and hooks with your own hands to delimit the common space. It is most convenient to occupy the right side with long tools, and place folded ring knitting needles on the left. However, again, it is worth noting that the creation of the product being studied is a creative process that you must manage yourself. That's why we recommend starting the job by preparing a sketch. This will allow you to think through all the details, organize the place and arrange the tools.
Knitted pockets for dad, mom and baby
Using one simple pattern, it’s easy to create slipper pockets for all family members.
It all started as usual! The needlewoman knitted one slipper for dad, but decided that it was very beautiful and should not be worn, but rather hung on the wall for a good mood.
Using the same pattern, but reducing the size, the craftswoman made pocket slippers for the whole family.
The work is very interesting and creative! The remains of any yarn will be used; for density it is better to knit in 2 threads. To adjust the size of the sole, it is enough to reduce the number of air loops in the central chain.
Next, according to a simple pattern, the toe is made and sewn to the sole with a contrasting thread. Using knitted parts and small accessories, personalized faces are decorated, and pendants are sewn on the reverse side.
It turns out fun, funny and practical at the same time. Let everyone decide for themselves what to store in a knitted pocket, and now the hidden item will definitely not be lost!
Working with a pattern
Having brought the paper version of the organizer for storing knitting needles and hooks to perfection, you can begin to transfer the pattern to the fabric. To do this, you need a simple pencil or a piece of soap, a convenient ruler and large cutting scissors.
Having prepared everything you need, lay the fabric in front of you and outline the resulting template. Add one centimeter on the sides - seam allowances, and on one side - 10-15 cm to make a valve that will not allow the tools to fall out. Then proceed to the next stage of making an organizer for knitting needles and hooks with your own hands.
Cut out the base of the product and set it aside for now. Now you should cut the template into its component parts, which are important to number first. Slightly shorten the pockets intended for long hooks and hosiery needles. After all, tools should be visible and also convenient to get out. Then we mark new details on the fabric, placing them as close to each other as possible. If they are the same size, you can not bother yourself with unnecessary actions, but immediately cut out a large fragment and make demarcation notches on it by hand.
Pockets for ring needles are in most cases squares of the same size. Therefore, next prepare the required amount of these parts.
This completes the process of cutting out the organizer for knitting needles and hooks with your own hands.
How to connect the wall and pockets of the organizer
As mentioned above, the wall and pockets of the organizer are two rectangular shapes. It is better to knit them crosswise. That is, for the wall we collect a chain of air loops along a length equal to the height of the bucket and knit a rectangle equal in height to the diameter of the top of the bucket. In my case, 25 loops were enough.
We are already making the pocket details. Approximately 2/3 of the wall size. I have 15 loops. The parts of the wall and pockets are equal in height. I didn’t count the rows...
The pockets will look more interesting if you knit the piece with multi-colored stripes. Ksati, this will make the work of sewing them in much easier.
Depending on the selected yarn and your own knitting density, choose the width of the multi-colored stripes. I have one stripe - 6 rows. After finishing knitting the “pocket” part, you should tie one side with single crochets. At the same time, we hide the ends of the threads remaining from changing colors.
After both rectangles are connected, they need to be connected to each other again with single crochets. Just put the two parts together and connect.
pockets and wall
The next step is stitching the pockets. This operation is done using ordinary connecting posts. How to make a connecting stitch and why it is used in knitting, read the article
The most versatile of all crochet techniques
or just look at the picture below... In this way you need to sew all the colored stripes, thereby creating small pockets for the hooks.
crochet pockets
After this operation, the result is a part very similar to a pencil case...
Attention! do not forget to secure the stitching threads by tying strong knots. This must be done so that the seams do not unravel while using the organizer.
the wall and pockets are sewn into one piece
Well... the main work is done. All that remains is to connect the parts together and get your knitted hook organizer
Let's start assembling
To assemble all the elements into a single thing, you should use a sewing machine or a needle and thread. The principle of operation is quite simple. First, take the base and fold the protruding part - the valve - in half. Iron thoroughly. Fold the upper edge of the pockets intended for a set of crochet hooks and hosiery needles and iron them. Place the pieces on the base and sew along the demarcation lines. Moreover, it is important to make 2 seams at a short distance from each other.
Don't touch the sides of the organizer yet! This is the final stage of work. Instead, take the pockets for the circular needles, fold the edge, press and sew, starting with the one at the top.
Now all we have to do is process the edges of our product. They can be folded, ironed, and then stitched. Or decorate it with a satin ribbon or fabric of a different color. You must choose the desired option yourself.
In addition to the craft, we recommend making a doll organizer for knitting needles and hooks. This product is convenient, interesting and beautiful.
Hanging pockets for a baby crib
For mothers whose babies are growing up, hanging organizers for cribs make their work much easier. Openwork fabrics with patch pockets combine practicality, functionality and bring delicate beauty to the interior of a children's bedroom.
It’s easy to knit such a convenient little thing! It is advisable to use white or beige cotton threads for the base and multi-colored yarn for bright pockets. The width and length of the organizer depends on the height of the crib.
On the main openwork fabric you can place 4 or 6 pockets, which are knitted according to the presented patterns. To reduce the size of the pocket, just knit it with a smaller crochet hook (for example, replace No. 3 with No. 2 or 1.5).
In the pictures, an empty cell means a column of s/n and 2 air, and a cell with a cross means 3 columns of s/n. Next, according to the openwork pattern, the four sides of the organizer are finished and long pendants are attached, which are fastened with buttons.
Advice! To prevent the pockets from stretching and deforming, it is advisable to sew light fabric on the wrong side. The fillet pattern will look even brighter and more beautiful!
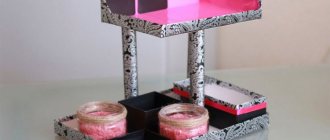
Organizer made of plywood
A man can prepare the next interesting and useful thing for his beloved.
Its implementation technology also completely depends on the performer. The main thing when preparing is to take into account the size of the products for which the craft is intended. For the rest, you can rely on your own imagination and taste. However, we still recommend planning the appearance of the idea on paper. And then you will be able to make a really impressive organizer for knitting needles and hooks from plywood.
In addition, it is important to note that such a product can be made by the whole family. For example, dad will prepare the frame and assemble the base, and mom and the children will sew a fabric cover or cover the craft with material or paper and come up with an interesting decor.
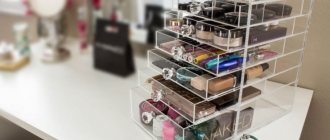
Organizer basket
We recommend considering another very simple, but no less creative version of the product. The only thing is that you will need any container to complete it. This could be a bucket of sour cream, an unnecessary tub, or even an empty can of paint. The size should be selected based on the length of the tools and the amount of yarn leftover.
To sew this organizer, you need to outline the circumference of the bottom and measure the height of the prepared container. Based on the obtained parameters, it is necessary to mark a strip on the fabric, the length of which is equal to the dimensions of the side of the base, and the width is twice its height. After this, we prepare pockets of the required length and width. We cut out the side part of the container and two bottoms from fabric. On the first one we sew the pockets, placing them on the bottom of the fabric. Then we fold the base in half and sew the bottom on the inside. Apply a little glue to the bottom of the container and lightly press the fabric frame. Then we manually sew on the second bottom, trying to make the seam as invisible as possible.
It is important to note that with a large number of tools, pockets can be made not only outside, but also inside. But this must be decided before work begins. Otherwise, the modification will be sloppy and will spoil the beauty of the product.
That's all the instructions on how to sew a basket organizer for knitting needles and hooks. However, it is important to note that this product is more convenient than the previous ones in that it stores not only tools, but also material. Beginners who do not yet have a large amount of leftover yarn can put a ball in it while knitting so that it does not roll around the room.
Universal pocket
To begin with, the needlewomen are presented with the simplest pocket of two parts. The upper and lower parts of the accessory are knitted using the same pattern. The differences are that the large part is made with a regular mesh, and a fillet pattern is added to the upper triangle. It is only important to start the work correctly:
- Using hook No. 2.5, cast on a chain of 10 air loops - 4 bases + 2 + 4 loops.
- Knit a chain loop with 1/2 yarn overs in 10 stitches.
Next, knit strictly according to the instructions!
The pattern reveals in detail the secrets of simple knitting, and the result is sure to exceed your wildest expectations!