Beading is a fascinating activity that does not take much time, but requires perseverance and accuracy. It has won the hearts of needlewomen all over the world. Having the necessary materials at hand, you can create any decoration: both simple and complex.
Sakura, bonsai, brooches, baubles, toys, and beaded keychains can be excellent gifts for relatives and friends. Using products made from small beads, you can decorate clothes, fill your home with objects dear to your heart, and create a special atmosphere in the interior. To make it you will need: thin wire, nylon threads or fishing line and bags of beads.
The value of manual labor
Many people like to receive handmade items as gifts. They are very individual. After all, a master puts his soul into his work. Color, appearance, size are selected according to the preferences of the future owner.
The keychain itself is a fairly universal gift. This accessory can be given to any person, regardless of gender, age, occupation and hobbies. It can become a harmless decoration, or it can also be a very practical thing.
Keyrings can be either flat or three-dimensional shapes. For example, you can weave a beaded keychain for a man with the logo of his car brand or the logo of his favorite football team, in the shape of a ball (soccer, volleyball, basketball).
For a glamorous girl, a keychain in the shape of scarlet lips or a shoe with thin heels is suitable. Kids will be happy with keychains in the shape of fruits (or their slices) and cute little animals. Diversity is limited only by the imagination of the master.
In 2022, a very relevant gift is a beaded mouse keychain.
How to make a keychain from beads
Before starting work, you need to choose a bead weaving pattern for the future keychain, as well as stock up on the necessary tools and materials.
There are a huge variety of patterns for creating keychains from beads on the Internet, both free and paid, for every taste. For starters, color photos of diagrams with step-by-step drawings and descriptions are suitable.
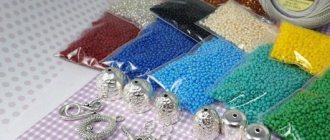
You will need to purchase the following materials: beads, beads of different sizes, monofilament, thin wire. You also need the following tools: a thin bead needle, scissors, pliers, a ruler, a sheet of velvet paper so that it is convenient to work with beads and it does not slip.
Note!
- Beaded trees: beautiful and unusual DIY beadwork. Detailed diagram of tree weaving + photo examples of finished work
- Beadwork for beginners - step-by-step instructions for weaving with beads with your own hands. Tips for beginners + photo reviews
Crafts from beads - TOP-160 original ideas for creating crafts with your own hands. Bead weaving patterns for beginners with photo reviews
What you need for weaving
For weaving you will need beads of different colors (depending on what kind of craft will be made). Japanese and Czech beads are valued the most: they are smooth and have a uniform color. For some products, you will additionally need beads of different sizes and shapes, as well as faceted bicone crystals.
As additional materials and tools, synthetic (nylon) threads, monofilaments, thin brass or copper wire or fishing line, elastic band, bead needle, scissors, tweezers, ruler, small pliers, saucer, cotton pads, cellophane or padding polyester for filling figures are used, as well as a piece of fabric on which the beads will not slip.
Monofilament resembles fishing line, but is similar in thickness to regular sewing thread, only much stronger. Beading needles are thinner than sewing needles; they fit freely into the holes of the beads.
In addition, you will need carabiners, chains, buttons, fasteners, rings, ribbon, laces for hanging, and tassels. For beginning craftswomen, weaving patterns with step-by-step descriptions are needed.
Tips for Beginners
How can you not discourage yourself from bead weaving the first time and end up disappointed?
- It is worth choosing beads and beads of good quality. They must be even and of the same caliber.
- a beading needle with the thinnest eye will do.
- The workplace should be well lit - you should protect your eyesight.
- For the first product, it is better to choose a simple pattern and practice weaving simple flat keychains.
- It makes sense to put next to you a photo of a beaded keychain that is currently in work. This will inspire and help psychologically.
Christmas tree
On the eve of the New Year, everything is imbued with a festive atmosphere. It is customary to decorate homes and workplaces. Personal belongings can also be temporarily transformed if they are supplemented with such crafts. Do you want to make a New Year's keychain out of beads, but don't know how?
- On one side, the wire is folded with pliers into a small ring.
- Three red beads are strung (a star at the top of the festive tree).
- Then multi-colored parts of arbitrary diameter are added.
- The work continues until a flat product is obtained in the form of a spiral with stringed beads.
- The lower part is fixed. Pulling gives the desired shape.
- Attach a lace. Hang a Christmas tree for him.
You can weave a snowman, Santa Claus, a symbol of the coming year.
Flat keychain mandarin slice
The following is a step-by-step instruction on how to make a keychain from beads.
You will need beads of three colors: white, orange and dark orange. It is better to give preference to first-class Czech beads - they have a good price-quality ratio. You also need to prepare monofilament, a beading needle, scissors and a cotton pad.
For the first row, put 6 white beads on a thread and close them in a circle, threading the thread through the first bead.
For the second row, string orange beads one at a time and thread them through the white beads of the first row.
Third row - white beads are woven one at a time between the orange ones.
Note!
Butterfly from beads: TOP-100 photos with simple patterns for weaving a butterfly with your own hands. Unusual bead ideas + step-by-step master class
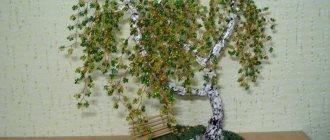
Beaded birch: beautiful and original DIY products. Detailed technology of weaving with beads at home + photos of finished works
Weaving with beads - instructions for making it yourself. Clear weaving patterns and technology reviews + photos of finished work
Fourth row - 2 orange beads are woven between the white beads of the third row.
Fifth row - the white beads should match the white ones between the two orange ones in the previous row.
In the same way, you need to make several more rows (the number of rows will depend on the desired size of the slice). Next is one white row without increments and two more rows of dark orange beads also without increments.
Next, a slice is formed by folding the circle in half, and a cotton pad, also folded in half, is sewn inside. If the size of the slice is larger than a cotton pad, then the slice is simply filled with cotton wool or toy filler.
And if it’s smaller, then the disk can simply be cut to the size of the slice. The piece is sewn up with a brick stitch. And then the mount for the key rings is sewn on. This could be, for example, a chain with a ring.
Note!
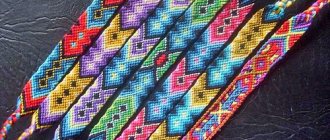
Beaded bracelets: TOP-120 photos with simple weaving patterns for beginners. Ideas for ready-made beaded jewelry + step-by-step master class
How to embroider with beads: TOP-200 photos with simple patterns for beginners. Bead embroidery technologies + step-by-step master classes
Beaded keychain with inscription
A keychain with an inscription is a great idea for a personalized gift. Using special letter beads, you can create any inscription - a name, a favorite slogan or an expression of emotion.
You can sign the keys to some extent, so you will never mix them up again.
- If you want to make a keychain for a gift, add colorful tassels, funny pendants, any beads strung on a string to the inscription, and you will get a great gift for both a little girl and an avid football fan or competitive cycling enthusiast.
The lettering on the keychain can also be made from tiny peyote beads, using a brick technique, or using a loom. A simple inscription made of shiny multi-colored beads will surely appeal to many.
Bead weaving methods
There are several ways to weave with beads.
Brick weaving in finished works looks like brickwork. The beads in the rows are arranged horizontally and each row is shifted relative to the previous one by half a bead. Both flat and three-dimensional products are made using this method. The fabric turns out to be quite dense, the beads are closely spaced and there are no gaps between them.
Mosaic weaving in finished products looks very similar to brick weaving, but the only difference is that the beads are rotated 90 degrees. However, the weaving technique itself is very different: the beads are arranged upright and each of them lies in a checkerboard pattern relative to the previous row.
The product also comes out very dense. The work uses monofilament. This technique has options - weaving in a circle or cylindrical weaving.
Hand weaving (square stitch, tapestry weaving) when finished looks like a fabric made on a bead weaving machine. The difference between this method is the position of the beads strictly above each other. Each next row in the position of the beads corresponds to the previous one. The canvas is also thick. Monofilament or fishing line is used for work. This method is used to create both flat and volumetric products.
Monastic weaving is also called cross weaving. The main component of this method is a cross with four beads. The product is made up of many crosses. At first glance, the technique seems complicated, but in reality everything is quite simple. This method is used for flat and three-dimensional products. The work uses mainly monofilament. In rare cases, wire.
Volumetric parallel weaving. With this method, the beads are not in the same plane, but above each other. The work uses wire, less often fishing line. This technique is the most common for creating three-dimensional beaded items, such as animals.
For beginners, the easiest way to weave is flat parallel weaving. The work is carried out on wire. The finished products look like they consist of parallel rows, and any row includes beads placed in a row.
As mentioned above, there are a lot of patterns for weaving with beads on the Internet. You can also use cross stitch patterns to work with hand weaving techniques. With this method, the beads are placed strictly on top of each other, just like in cross stitch embroidery.
Geometric figures
To weave a cube of beads, you first need to weave a rectangular fabric using monastery weaving or, in other words, a cross. Take a thin wire to work with to shape your product.
Weave a cube from a square rope, but use more even and high-quality beads for it. At the end of the work, add beads of the same or contrasting color to align the walls.
You can place a bead inside such a cube without finishing the product beforehand and of such a size that it does not fall out.
Beaded balls are also made in several ways. The first is braiding a wooden bead using the mosaic method, which involves the use of more expensive beads.
Products using not only beads, but also other beads, larger sizes or bicones, turn out beautifully. These keychains will look quite glamorous. The balls are woven in a circle using the monastery cross method. Add tassels on chains.
Related article: DIY computer speakers
To create beaded keychains, it is better to use good Japanese beads. The product will look smooth and will only please the eye, even though the beads are expensive, but a large amount will not be required for the product. Quality work done can be given as a gift.
Volumetric keychain
A short instruction on how to make a volumetric keychain from beads:
- You will need a step-by-step photo diagram of the desired product. According to the text description, it is very difficult for a beginner to make a three-dimensional keychain. So the first step is to find a suitable scheme on the Internet.
- You need to prepare the necessary materials: beads, wire, beads... All this can be bought at a handicraft store.
- It’s better to put a photo of the finished product in front of your eyes, which is to be worked on. This will be inspiring and it will be easier to understand the photo diagram.
DIY New Year's wreaths: 60+ master classes of New Year's wreaths for the door
Published: October 2, 2020
An Advent wreath is a traditional New Year’s decoration. Usually it is hung on the door, but it will look no less original on the wall or above the fireplace. If the wreath is light, then it can be used to decorate a window opening or attach it to a curtain. You can make such a New Year's decoration with your own hands, using any materials that you have in your home. New Year's wreath made of tinsel Bright [...]
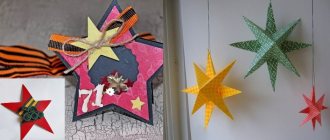
#9 Beaded star: do-it-yourself New Year’s craft masterclass
You can make such a cute bright star with your own hands using our step-by-step master class. You will need wire and beads of different colors and sizes.
Volume keychain cube
Even a novice craftswoman can weave the finished product from this master class in 3 hours. For the first time, it is better to weave a single-color cube - it will be easier.
Required:
- beads (preferably Czech first grade with even beads)
- monofilament
- beading needle
- cotton wool or foam rubber
- chain with a ring for attaching a keychain
- good mood and patience
Step-by-step weaving instructions
The work uses the mosaic weaving method. You need to weave 6 identical squares.
The width of the square will be 12 beads, and the height needs to be woven 10 rows. You will get a square measuring 2 by 2 cm.
Next, 5 squares are carefully sewn together to create a cube with one wall missing.
It is necessary to fill the cube with cotton wool or foam rubber and carefully sew on the 6th wall.
All that remains is to attach the keychain chain to the finished cube. Voila! The keychain is ready!
Bead weaving with children
It is very useful to get kids interested in bead weaving. Working with beads develops fine motor skills, teaches concentration and perseverance. And it’s just interesting and fun to weave a beautiful keychain together. It’s better to start with simple and understandable diagrams. Children will be interested in figuring them out for themselves.
But we must be ready to help them so that they do not lose interest at the first difficulties. Weaving a keychain from beads with your own hands as a gift for a friend is exciting!
Horseshoe
Such a product, created with your own hands, will protect and bring good luck to the owner. Put only positive energy into it:
- Thread four brown (white or gray) beads onto the fishing line and arrange them in a square.
- Add two more pieces on both sides.
- The row is closed and secured by threading the fishing line through the outermost element.
- Continue weaving in the same way to the desired size.
- The ends are wound to each other.
- All that remains is to give the product a semicircular shape and add fittings.
Useful tips
If you run out of wire when working with the parallel or volumetric weaving method, it is easy to extend it. Another piece of wire is taken and passed through the previous woven row. After this, the ends of the broken wire need to be twisted with the frame of the product. Now you can continue weaving on a new piece of wire.
This method is also suitable for working with fishing line. If the entire product requires a fairly long fishing line, then it is better from the very beginning to take a piece that will not get tangled and will be convenient to work with. Then the line can be lengthened in the manner described above.
If you need to create a product larger than it is described in the master class (diagram), then you will want to increase the number of beads in each row. However, this is wrong, because at the same time an increase in the number of rows is required. This is not always within the power of a novice craftswoman. You can simply use larger beads.
Regular sewing needles are not suitable for weaving with beads - even the thinnest sewing needles have an eye that is too thick and the beads will not pass through it. Therefore, it is worth taking bead needles, and the larger the needle number, the thinner it is.
You don't need a needle to weave with wire. But when weaving on a fishing line, you need to look at the situation whether a needle is needed or not. Often it’s easier and faster with a needle. We need to try options.
Working material
In the process of work we will need the following material:
- beads in white, black, gray (12), light green (2) and pink (6) shades;
- ring for keychain;
- needle;
- black thread;
- scissors.
Having prepared all the necessary material, you can begin the exciting creative process.
Brick weaving master class
I bring to your attention a detailed master class on panda brick weaving.
Panda diagram
First we study the weaving pattern. We will start weaving from the head. The column on the right shows the required number of beads in each row. On the left are the rows.
Beginning of work
We will skip the first row for now and start weaving from the second row, and then we will come back and finish the two beads of the first row.
We take a needle and thread and string a black bead, lowering it almost to the end.
Next, from the tip side, we pass the needle through the bead and tighten the thread.
We collect the next black bead. We pass the needle through the first element from the side opposite the working thread and tighten it.
Next, insert the needle into the second bead.
We collect one white piece of glass and insert the needle into the hole opposite the thread exit and tighten.
- Now we insert the needle into the white bead, as in the bottom photo.
- We put on another bead and insert a needle into the hole of the previous element.
We pass the needle through the last bead, pointing upward. Don't forget to tighten the thread.
- We take another bead and do the same steps as before.
- We continue to knit according to the pattern using the same technique.
- The first row is ready!
Head braiding
Next we will weave the third row. Having reached half, we will go up and weave the initial row, go down and continue what we started.
- We collect black glass and insert a needle into the thread between the beads.
- Now insert the needle from above and tighten the thread.
Take another bead and thread the needle through the same loop as before. We do this to create brickwork.
- We insert the needle into the hole from above and tighten the fiber.
- We take a white bead, hook it to the underlying thread, and pull it up.
- We insert the needle from top to bottom.
- Using the same principle, we weave two more beads.
- We pass the needle through the bead and weave two beads of the first row.
Thus, we knitted the first row. This is the top of the panda, where there will be a loop for attaching the keychain ring. So that we don’t have to come back, we’ll make the loop right away. We string ten black pieces of glass and lower them to a white bead.
- We pass the needle into the previous bead and tighten the thread.
- To be safe, we draw a circle with thread again.
- Then we pull the thread in the unfinished third row and continue to work.
- Following the schematic image, we weave further.
- Using the same method as before, we weave three white and two black beads.
- Subsequent rows are narrowed, so we will weave, grabbing one thread at a time between the beads.
- When the row begins to expand, we will need to thread it twice into one loop from the two extreme sides.
In this spirit, we continue to engage in an interesting type of creativity, strictly following the provided scheme. So we got the first element - the panda's head. It turns out very beautifully.
Torso
- We will weave the body, adhering to the sketch: one row for narrowing and the rest for expansion.
- With a little effort and perseverance, we were able to create a cool souvenir - a miniature panda.
- We hide the tails of the threads by threading them between the beads and cutting them off with scissors.
- Next, we attach a connecting ring to the loop on the panda’s head.
- The gift keychain turned out fabulous.
- Having understood the proposed description of making beaded trifles, it will not be difficult to make any other trinket.
Patterns of earrings using brick weaving technique
I would like to offer you sketches of various earrings using the same technique.
By creating such handmade earrings, you will captivate those around you with femininity and mystery. Homemade jewelry has always been valued by the female part of the population. Such jewelry will be a pleasant gift for a friend on her birthday or on another occasion, because hand-made earrings retain the warmth and care of a craftswoman. Create, create, give warmth!
Video master class Panda made of brick weaving beads
Source: https://podelkiruchkami.ru/kirpichnaya-tehnika-pleteniya/
Bead selection
As mentioned earlier, for weaving keychains it is better to choose first-grade Czech beads. It has a good price-quality ratio and fairly even beads of the same size.
There are also Japanese beads. Its quality is higher than that of the Czech one and, accordingly, the products may turn out more equal. However, the price of Japanese beads is higher.
Chinese beads are the cheapest, but they are not suitable for weaving keychains, since their beads are very uneven and require serious calibration before work. And here each craftswoman chooses beads according to her wallet.