Soft toys are the constant companion of every child, and if they are also made by parents, they definitely turn into the most favorite mascots. Making a soft toy is not as difficult as it seems at first glance, the main thing is to put a piece of your soul into the process, and suitable materials and tools can be found in every home if desired.
These can be various scraps left over from sewing clothes, leftover yarn for knitting, in general, everything that can be found in grandmothers and mothers’ bins. There are a lot of creation options, you can choose any animal, plant, inanimate object or favorite cartoon character.
This article presents variations on the theme of the ladybug toy.
What will you need for a volumetric applique?
- Green cardboard;
- Colored paper red, black, yellow, white;
- Scissors, glue stick, ruler, pencil, compass, moving eyes.
As always, the compass remains inactive; improvised objects with a round bottom are usually used. This time I used a cup.
If you don’t have ready-made eyes, you can make them from black and white paper. Cut out a white circle and a small black one and glue them together. It's funny when black pupils look slyly to the side or squint.
DIY ladybugs for the garden: master classes with photos and videos in photos
DIY ladybugs for the garden are a real decoration for any homestead. Every experienced gardener strives to make his garden especially cozy and beautiful. To diversify your summer cottage, you need to decorate it with original crafts, which with their brightness will lift your spirits every time. One of the simplest and cutest crafts is a ladybug. It’s not for nothing that these insects are called “God’s”; according to legend, they bring happiness and great joy to the house. In addition, this wonderful creation can be made from almost any material. Ladybugs can be made from ribbons, plastic spoons, felt, and even salt dough!
These wonderful master classes for beginners will tell you how to make ladybugs for the garden.
From paper
The simplest craft option is a cow made of paper or cardboard. To do this, you just need to fold red paper using the origami technique and draw eyes with spots. You can also glue a ladybug from several parts of different colors.
You can decorate trees and bushes in your dacha with these crafts:
Country tomato sandwiches
You can have a delicious and original snack in the garden thanks to sandwiches made from cherry tomatoes and olives. Tomatoes will do for the body; heads, points and antennae can be made from black olives. The sandwich can have any filling.
From beads
These cute ladybugs made from beads, which can be made in this master class, will not leave avid lovers of needlework indifferent. You won’t get a large figure, but even these very small cows can decorate your garden by gluing them to tree leaves. The weaving pattern looks like this:
Photos of finished beaded cows:
From plastic spoons
This wonderful craft from plastic spoons can be made with children. For each such cow you will need three spoons. Paint two red and draw black dots on them; they will be wings. And paint one spoon, which will become the body, black. Glue all three spoons together. All that remains is to add a head - made of buttons, clay or a button.
The finished craft looks like this:
From a construction helmet
Ladybugs made from helmets can be used to decorate a flower alley in the garden or courtyard. A helmet is the main material when working on a product. A black marker is useful for drawing dots and faces. Draw spots, eyes and wings on the helmet - that’s it, the figurine is ready for the garden!
From clay and stones
Cows made from polymer clay are very easy to make. It is enough to mold the figures in the shape of an oval and paint them with paints.
Ladybugs made from stones and sea pebbles will make your garden look bright and homey. The craft is done simply - paint the stone red, paint the wings with black paint, not forgetting the antennae and eyes. Such ladybugs can also be drawn on a large stone.
Such a cow using the kanzashi technique can not only be placed in the garden, it can also be placed on the nightstand in the bedroom or kitchen.
Video on the topic of the article
The videos below will help you get even more ideas for new products:
At what age should it be used?
Fabric books must be made taking into account the age of your child:
- Children under 1 year old can only be offered options that do not contain small fastening parts.
- Starting from 1 year old, you can already place large parts on the pages that can be removed and attached back, for example, on linden trees.
- At the age of three, the content of pages can expand. There is already a much larger variety of fasteners and fasteners; the plot of the book may include simple games that can be played together, role-playing games in the form of a fairy tale.
- Children of older preschool age will like a more complex option that develops logical thinking. Here you can place a finger theater based on a specific fairy tale or cartoon, complicated games and tasks.
To sew a children's book from fabric, natural materials are used - felt, fur, leather, woolen threads, chintz, silk, linen, etc.
It is better to choose bright colors (red, blue, green, purple, white, black, etc.), they are more attractive to children, especially at an early age.
Make sure that the color of the plot matches reality. For example, a dog cannot be blue, and the sea cannot be yellow.
Choose a suitable pattern on the fabric. If the balloons can be “floral” or “polka dot”, then for the spruce you need a plain green fabric, the pattern in this case will be inappropriate.
You may also need:
- cardboard;
- padding polyester;
- cotton wool;
- threads of different thicknesses;
- ribbons of different colors and widths;
- different types of fasteners - linden, magnetic buttons, zippers, buttons, etc.
- fabric applications;
- beads;
- laces of different colors;
- rustling candy wrappers;
- cereals;
- small pebbles;
- bells.
Your imagination, shown when creating the layout of each page, will tell you what else you need to purchase.
To learn about what materials can be used for sewing educational books, see the following video.
Cucumber snake
This cute snake can be not only a craft, but also a cute vegetable appetizer on the holiday table. It’s not easy to make, but very simple! Take a couple of cucumbers of approximately the same diameter. Carefully peel one of them. Cut the cucumber into slices of equal thickness.
(Click on photo to enlarge)
If you want your snake to bend (and you probably will), cut a few cucumber slices at an angle. Then create a snake by simply placing the slices next to each other. The “head” and “tail” (the first and last pieces) can be carefully secured with a vegetable skewer. The “table” version of the craft can be sprinkled with vegetable oil and balsamic vinegar. For the tongue, use a vegetable peeler to cut a thin petal from the carrot.
(Click on photo to enlarge)
Cut the forked tip and insert it into the slot on the “snake head”. For a more sophisticated and dangerous look, several cucumber slices of the body can also be wrapped in carrot slices. Two stars are stuck in as eyes.
(Click on photo to enlarge)
Concrete ladybug: DIY mosaic
A similar way to make a ladybug, but this time we will use artificial stone and multi-colored tiles. Making a ladybug out of concrete is very simple. We will need cement, which can be bought at any hardware store, an old basin or bowl - a mold for crafts, polyethylene and red and black tiles or something from which we can make a mosaic. This is what we get:
Mosaic: concrete ladybug master class
headings
- bottles (1)
- valentines (1)
- video (2)
- video master classes (30)
- patterns (1)
- decor - ideas (4)
- jar decor (12)
- decorative plaster (1)
- decoupage (33)
- decoupage (2)
- dessert (1)
- pincushions (1)
- toys (8)
- toys in stocking technique (1)
- knitted toys (6)
- fleece toys (2)
- pictures for decoupage (14)
- round (11)
- dolls (2)
- cooking (7)
- plaster magnets (1)
- modeling mass (1)
- master class (3)
- master class (1)
- my works (27)
- mold and cabchon (2)
- New Year's (2)
- New Year's (5)
- New Year's decor (3)
- new year (1)
- amulets (2)
- Easter (9)
- candlesticks (1)
- congratulations (5)
- polymer clay (1)
- festive table (2)
- painting (2)
- One Stroke painting (1)
- salads (2)
- pigs+ (1)
- textile toys (2)
- topiary (8)
- foamiran flowers (4)
- tea house (2)
- boxes (6)
- we sew ourselves (1)
- (1)
Ladybugs taking off?
And now some tips on how to make flying ladybugs. Try using spoons to make wings. Regular disposable plastic spoons are stuck into the concrete at an angle. The takeoff simulation will be quite good. Steel spoons can also be used, but they are more suitable for steel crafts. For a welder, such work will be simple. Fans of working with metal can give you a lot of other ideas for making ladybugs: welded crafts, embossing sheet metal, wire products and much more.
The largest and most original ladybug is made from plastic drink bottles.
Take colorless bottles and fill them with tinted sand. Watercolor paint, gouache or other available dye can be used as a pigment. Filled bottles are turned upside down and placed on a convex surface so that only the bottoms of the bottles protrude above the ground. It will look interesting and bright. But for a small area it is better not to make such a large and bright decoration. As an alternative - a flowerbed in the shape of a ladybug.
How to sew parts: seams used
The seams on such toys are not just a way to hold parts together, but an additional decorative element, so before sewing a bull for the New Year 2022, you should master the most popular stitches:
- seam “forward needle” - it is used to grind small parts or sew decorative elements along the edge;
- “back needle” seam – the reliability is not inferior to machine stitching, it can be used like the “forward needle” seam;
- seam “over the edge” with a slope to the left or right - to sew two parts together, it is important to ensure that the slope along the perimeter of the entire part is in one direction;
- a looped or overcast seam and its varieties will firmly and neatly connect the parts of the bull, further decorating it.
When sewing a toy with your own hands using any chosen seam, you need to make sure that the distance between the stitches and their length are the same, otherwise the work will look untidy.
For voluminous crafts, before completely sewing two parts together, be sure to leave a small hole through which the bull will be filled with holofiber. It is convenient to distribute the filler inside with a pencil. Watch the video:
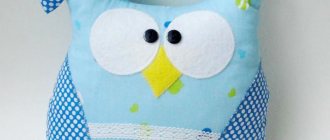
Ladybug made of felt - how to sew as a gift for a child?
Everyone loves ladybugs. These small bright bugs with black dots on their backs can be seen not only in the forest or meadow, but also in city flower beds. Usually children treat these bugs with care and, having caught them, always release them into the sky, saying a familiar rhyme. You can also put ladybugs made of felt in the children's room. Children will love these decorative elements in the room.
To make a ladybug we will need the following materials:
- - felt in red, black and dark green colors;
- - thick felt of light green color;
- - padding polyester;
- - threads of black, red and green colors;
- - pencil and paper;
- - scissors and needle.
The procedure for making a ladybug
1. Let's make a ladybug pattern from paper. Let's redraw the following details onto paper from the screen:
- - upper body;
- - lower part of the body;
- - front part of the body;
- - back of the body;
- - mustache;
- - speck;
- - large sheet detail;
- - small detail of the sheet.
2. Now you need to cut out the details of the ladybug from felt. First, let's cut out the upper part of the ladybug's body from red felt. To do this, place the upper part of the body on red felt, outline and cut it out.
3. Take black felt, place the lower part of the ladybug’s body on it, trace it and cut it out. In order for the outline to be visible on black felt, the part must be outlined with chalk or a piece of soap. We will also cut out eight small circles from black felt.
4. We will also cut out the front and back parts of the body from black felt.
5. Let’s also cut out the antennae from black felt.
6. To cut out a large piece of the sheet, we will need thick felt of light green color.
7. To cut out a small part of the sheet, take dark green felt.
8. Take the upper part of the body, cut out of red felt, symmetrically place small black circles cut from black felt on it, and sew them with black threads using small basting stitches.
9. At the bottom we will attach the front part of the body, cut from black felt, to the red part and sew it with red threads. After this, we will attach the back part of the body to the red part and also sew it with red threads.
10. Take the lower part of the body, cut out of black felt, and sew the upper part of the body to it. We will sew it on with red threads, slightly pulling the upper part of the body along the edge. We will leave a hole in the head area.
11. Fill the body of the ladybug with padding polyester.
12. Use black thread to sew up the hole on the ladybug’s head.
13. This is what the ladybug’s body looks like from the underside.
14. Turn the ladybug over with the red side up and use black thread to embroider a line separating the wings. We will embroider using a stem stitch.
15. We will also sew on the antennae part with black threads.
16. Take a large leaf piece cut from light green felt, put a smaller leaf piece cut from dark green felt on top and sew it with green thread along the edge. The sheet for the ladybug is ready.
17. Place the ladybug figurine on the prepared sheet and sew it with small hidden stitches.
The decorative ladybug on a green leaf is ready. The ladybug can be placed on a crib, mounted on a wall, or placed on a shelf. If you sew a wide ribbon to the sheet, then the cow can be used as a curtain tie in a child's room. Also, this ladybug figurine can be used by handicraft lovers as a pincushion.
Cute toy
You can make this version of a ladybug together with your child of primary school or preschool age. In the process, you will get a lot of pleasure, and the child will have the opportunity to reveal his creative abilities, develop attention and perseverance.
In order to make such a toy, we will need:
- needle and thread;
- scissors;
- PVA glue or glue gun;
- filler – pieces of padding polyester, cotton wool or small scraps of fabric;
- pieces of fleece in red or pink and black;
- a small piece of black leather or dermantine;
- beads for eyes or ready-made plastic eyes.
Read this: How to sew a dress with your own hands quickly and easily
We cut out the body of our cow from red fleece - it will be a round piece with a diameter of about ten centimeters (the dimensions can be increased or decreased as desired). From a piece of black fleece, cut out a head - a circle with a radius of 2.5 cm. Using a pen, draw out the contours of the legs and the lower part of the abdomen on a piece of skin, and cut it out with scissors.
We assemble the head part with a needle and thread, stepping back a few millimeters from the edges, fill it from the inside with padding poly, creating a rounded shape, and tighten the thread. We fasten the end of the thread and cut it.
We perform the body of the ladybug in the same way as the head. After securing the thread, we make another large stitch along the entire body with black thread to indicate the left and right wings.
- We attach the head to the body using hidden stitches.
- After this, cut out several small circles from leather and glue or sew them onto the back of the ladybug, as shown in the photo:
The final stage is to glue the legs to the bottom of the abdomen, and the eyes to the head. The cutie is ready!
Red backpack bug
In this version, the toy also becomes functional. Inside, the baby can put the little things he needs or other toys.
To make such a backpack with your own hands, you will need the following materials:
- approximately half a meter of red and 30 cm of black fleece, raincoat fabric or other dense fabric - of your choice;
- threads, scissors;
- sewing machine;
- a sheet of paper for a pattern;
- one-piece red zipper;
- decorative elements - buttons, beads - optional.
We sew a bug using this pattern, it can be printed and enlarged to the desired size:
First, we sew together the halves of the smaller parts - the legs and antennae, fill them with synthetic padding or other soft filler, leaving a little space unfilled at the points of attachment to the body. Then we assemble the head and connect it to the body, sew the antennae to it and glue the eyes (they can be purchased ready-made at hardware stores or made from pieces of leather or felt).
- We sew a zipper between the halves of the back, add black circles and spots and connect the belly to the back, inserting paws on the sides, and half rings for straps at the bottom and top.
- For decoration, you can make a keychain in the shape of a smaller bug using the same technology, using pieces of lace or soutache for the paws, and small beads or buttons for the eyes.
For the little ones
Making such a useful toy will not take much time; even beginners can handle it. This adorable bug will help your baby learn about different fasteners.
Materials and tools:
- red and black felt or other fabric;
- a little padding polyester or foam rubber;
- fabric for lining;
- buttons for eyes;
- 12 cm Velcro tape, about 2 cm wide;
- paper;
- threads;
- scissors;
- glue.
First, draw an oval of the desired size on the sheet, mark the location of the head and the line between the wings. We cut off the head and cut out parts from black and red felt, padding polyester and lining fabric, adding a little at the edges for the seams.
We attach the head to the body and sew it in a zigzag pattern; we also divide the back in half with a decorative stitch. Then we cut out six small circles from the Velcro. We sew the fluffy halves onto the back of the ladybug, attach the eyes and embroider the mouth with threads. Glue the halves of the circles with hooks to the bottom of the buttons.
- We fold the top, filling and body lining together and sew with a zigzag along the edge, cutting off the excess fabric.
The toy is ready! Now you can teach your little one to attach dot buttons to a ladybug, developing fine motor skills.
Video on the topic of the article
Source: https://knittochka.ru/shityo/igrushka-bozhya-korovka.html
Master class on making ladybugs for decorating a summer area
Natalia Chernikova
Master class on making ladybugs for decorating a summer area
You can make ladybugs . They are perfect for decorating a kindergarten area in the summer , as well as for organizing games for the development of speech breathing.
To work you need:
• Red and black gouache, brush
For work we need 3 disposable spoons.
Using scissors, cut off the handles of the spoons, leaving about 1-2 cm. You can break them off. They are fragile and break easily.
Use scissors to trim the edges.
From the obtained parts we construct the body of a ladybug . The bottom part will serve as the body, and the 2 parts on top will serve as wings.
Using Moment glue, smear the body on the top left and apply the wing, pressing.
We also spread the body on the top right and apply the second wing.
From a ball of thread we cut a thread approximately 20-25 cm long. The color of the thread can be any.
Using Moment glue, glue the end of the thread at the top of the wings in the middle.
Let's take a decorative stone. And with the help of a glue gun we will glue it in the place where we glued the thread.
This will be the ladybug's .
Paint both wings red using gouache.
Let's color the head black.
Let's color the body that looks out from under the wings also black.
Apply black dots to the right wing. There can be any number of them. Our ladybug has 3 of them .
We apply black dots symmetrically on the left wing.
Turn the ladybug over and paint its body black.
Paint the inside of the wings red.
The decorative stone turned out to be heavy. He outweighs the torso. To avoid this defect, the idea came to make the ladybug's from a lighter material.
To do this, you need to take a bottle of detergent.
We cut off the moving part from the cork that allows you to open the detergent.
Just as in the case of a decorative pebble, use a glue gun to glue the part to the body of the ladybug .
Where to start?
Before you start sewing a book for your baby you need:
- Consider the number of pages.
- Show your imagination and work out the plot of each page in detail;
- Think about what each spread of the book will teach your little one, and what elements are needed for this.
- Choose the shape and size of the future book. The easiest shapes to sew are square or rectangle. For those who have sewing skills and are confident in their abilities, you can choose more complex shapes - a circle, an oval, a boat, a flower, a sun - it depends on your imagination, sewing ability, and the thematic content of the book.
- Decide how the pages will be attached to each other - you can fasten them with ribbons, strips of felt, using rings or laces. The most convenient size is approximately 20 cm wide and 25 cm long.
On small pages you will not be able to place all the material that you would like, and when looking at large pages, the child will get lost, get tired quickly, and attention will be scattered.
Let's assemble a three-dimensional applique from colored paper quickly and easily
Let's take a closer look at the technique of making a three-dimensional ladybug from colored paper. This craft is suitable for making by children in the middle group of kindergarten.
You will need:
1) Colored paper;
2) Scissors;
3) Glue;
4) Pencil and felt-tip pen.
Manufacturing stages:
1) Cut out two red circles and one black from colored paper. And another smaller dark circle. We make a leaf out of green paper and glue it to the base.
2) Then we attach a small black circle to the green leaf, which is the head of a ladybug. Glue a large black circle on top with an overlap.
3) Fold the red circles in half. These are the wings of the future beetle.
4) Glue the wings on top of the body in one half. We draw black spots on them with a felt-tip pen.
5) Attach the eyes to the ladybug, add antennae and legs.
A very frequent guest on children's clothing in the form of appliques are ladybugs, both in fabric and crocheted. In fact, there is nothing complicated in doing this craft, you just need to follow the diagram, one of many of which is presented below.
You can also make a ladybug from fabric, such as felt. This material is pleasant in its softness and convenient in that it does not require processing.
The manufacturing procedure is simple. You need to find an image of a ladybug and prepare stencils with all the parts. Then attach the templates to pieces of felt of the corresponding colors and cut out the parts. Sew the head onto the base, then the body with spots. Lastly, the antennae, eyes and paws are made. They can be glued or embroidered directly onto the base.
Blog Archive
- ► 2022 (3) April (2)
- February (1)
- ► 2022 (12) December (2)
- November (1)
- September (2)
- August (1)
- July (3)
- March (2)
- January (1)
- ► 2022 (6) December (5)
- October (1)
- ► 2022 (27) December (4)
- November (2)
- October (3)
- September (3)
- August (3)
- July (1)
- June (1)
- May (3)
- April (2)
- March (3)
- January (2)
- ▼ 2022 (57) December (4)
- October (2)
- September (1)
- August (2)
- July (2)
- June (6)
- May (5)
- April (11)
- March (10)
- February (10)
- January (4)
- ► 2022 (14) December (14)
Heartfelt handmade gifts by Lidia Kostina © all rights reserved. Theme "Venetian Window". Blogger Technologies.