Every hiking enthusiast knows how delicious food cooked over a fire can be. And the advantages here are obvious. At home, a stove is used, but a fire gives dishes a special flavor. And there is no need to take even a small tile with you - where can you find electricity in camping conditions? During your lunch break or dinner you will have to use what you have. Some people prefer folding barbecues, camp barbecues, smokehouses, cauldrons and other options. But often people take a camping pot with them. You also need something that will hold it over the fire. A tripod will be useful for this. This useful device is easy to make yourself from different materials.
Features of using tripods
It is easy for any experienced tourist to make a device for cooking food over a fire. The design is suitable for hunters, fishermen and all outdoor enthusiasts. The best choice for a stationary tourist camp or traveling by car is a barbecue. However, when hiking, such “equipment” will cause more trouble than benefit. Therefore, a tripod would be the best choice here.
Metal tripod
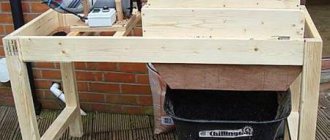
Using only the barbecue frame allows you to hang 2, 3 or more containers over the fire at once. However, such a design will result in inconvenience, since it is difficult to carry, and excess weight is undesirable.
There are any number of suitable materials in forest areas - as a rule, various branches and wooden crossbars are used. But in some cases you have to improvise. For example, you need to cook something in winter in snowy areas. How to act in the absence of special devices?
Anyone who goes on a winter trip has at least three ski poles. They will just serve as stands for an improvised tripod. All that remains is to tie the elements together, and the dishes can be hung with a rope, which can also be found. Any suitable item can become a hook.
Second way
Surprisingly, you can build a homemade tripod from an ordinary bottle. For this you will need:
- A bottle with a lid (preferably a large one).
- A screw with a diameter of 0.5 centimeters.
- Construction washers (2 pieces).
You need to make a hole in the bottle cap and then insert a screw there. It is better to make the hole with a drill of a smaller diameter than the screw, so that it can be screwed in and fixed. The screw should be screwed in from the inside, after placing the washers inside the cover. Now the structure is ready to install a camera on it. It needs to be screwed onto the screw that protrudes from the outside of the cover.
The bottle must be covered with sand or stones so that it does not tip over along with the camera. Now you just need to screw on the cover with the camera. The homemade tripod is ready.
This design can be attached to a pole or tree using straps or rubber bands so that shooting can be done from a higher place.
How to make a tripod out of wood
In order not to waste precious time, you can set up the purchased tripod and immediately proceed to cooking. There are many different options available for sale at appropriate prices.
But not every vacationer will want to spend their savings on such a purchase, because nature itself can provide everything that is needed. And he will not require any remuneration for this. There are several ways to build a useful device. Subsequently, you can burn it, since it hardly makes sense to take it with you. It is easy to find other branches in a new location.
Option of two flyers and a crossbar
The most common way is to hang one pot, or even several containers, over a fire. It is simple and reliable to use. In the forest, on the bank of a river or other body of water, it is not difficult to find two branches with a fork. To attach the entire device, it is better to sharpen the ends of the flyers so that they can be easily immersed in the ground. But you can just bury it in the ground.
When preparing for a hike, you should always take with you one hook, or better yet several of different lengths. The dishes will be hung on them to the required height above the fire. It is advisable to keep in stock the wire from which the hook of the required length is made. It won't take up much space in your backpack and weighs very little. But there are a lot of benefits from it.
Tripod option made of two flyers
Option of one flyer and a long pole
Among nature lovers, this is another preferred way to cook food over a fire. However, in terms of reliability, it is inferior to the option discussed earlier. The parts of the device will be one flyer and a long thick branch. Moreover, both need to be chosen in fairly large sizes.
Sharpen the stick at one edge and drive it into the ground to a decent depth. Also, place a large stone on the side of the fire to the fixed branch to give additional strength.
Important! Before its intended use, it is better to test the structure without lighting a fire and fill the container with water.
Wooden tripod made from a flyer and a stick
Three pole option
To do this, you will need three long and strong branches, which are laid in a pyramid. At the top, the device is tied with wire, a hanging chain or a strong thick thread. Then the entire structure is placed above the place where the fire will be lit.
Homemade stand for feeder
If it is not possible to purchase stands for the feeder in the store, then you can make homemade stands for any spinning rod. Most fishermen make stands from metal wire, the diameter of which is on average 5-6 mm. You can make a single support or a structure with several supports and designed for 2 or more fishing rods.
Be sure to wrap the places where the fishing rod comes into contact with the wire with electrical tape. Or you can put a cambric on the wire. You can choose different lengths and diameters, depending on the size of the structure you are going to make.
A tripod can be made from a plastic hanger. To do this, just remove the hook and cut off all excess. The lower part should be carefully wrapped with thread, which is filled with glue for strength. This type of winding on the hanger should be done every 5 centimeters.
For night fishing, you can make another version of the feeder stop, where a regular bell attached with a clothespin will act as a signaling device. You can install the bell on any stand that is available.
Structures for holding a feeder rod are much cheaper than store-bought devices, especially when compared with a rod-pod. Homemade racks will cost very little, and if you try, the result will be the same as using professional equipment.
How to make a tripod out of metal
With skillful hands, making a tripod yourself will not be difficult. The process itself can be performed by anyone who has the slightest knowledge of tools. You don’t need any drawings with complex contours, or any special skills. There is also no need to use rare materials, since everything you need is in the access zone. You can choose any design dimensions, but within reason.
In order not to waste time searching for suitable materials during the hike, it is better to build a tripod in advance. True, you will have to carry it with you later, but sometimes this option is justified. Prudence never hurts, although situations may be different and no one is immune from unforeseen circumstances.
Required materials and tools
To create a durable structure, fittings, aluminum or steel pipes are suitable. From them you need to make three segments of the same length. Regarding steel, it is better to choose pipes with thin walls, which will reduce the weight of the entire structure.
Among other materials you will need:
- bolt with eyes and nuts - 3 pcs.;
- S-shaped hook – 2 pcs., but more is possible;
- metal chain - used to hang dishes.
The tools you will need are a hammer, a hacksaw or a grinder, pliers or pliers.
Reinforced tripod
Preparation of material
The first step is to decide on the size of the tripod. To do this, you need to consider what kind of dishes will be used for cooking. The main thing is that the pot is freely located inside the structure. It is also worth assessing what size the tripod will be when folded, because if it turns out to be too bulky, then carrying it will be very problematic.
Cut the pipes to the required length - it is better to choose a range from 150 to 200 cm. The longer they are, the higher the tripod will be. As practice shows, it is more convenient to cook food on a fire with a high structure.
The loop of one of the bolts must first be slightly bent. Immediately screw the nuts onto each bolt. And after such simple manipulations, all that remains is to move on to assembling the structure.
Step-by-step instructions for making a tripod
Let's consider the option of manufacturing a structure using steel or aluminum pipes. You need to act according to the following algorithm:
- Place the eyes of the remaining elements and the chain itself into the loosened loop of the bolt with the screwed nut.
- The loop is clamped with pliers (pliers) or a hammer so that all the parts do not fall out. This will also give the structure strength.
- To attach the tripod legs, the ends of the bolts with pre-screwed nuts are inserted into each tube.
- If the bolt moves freely inside the cavity, it is advisable to use a hammer to flatten the pipe in places above and below the nut.
- Install one hook at the top of the 3rd chain link. It will adjust the lifting height of the dishes.
- The second hook is attached to the end of the chain. To secure the hinges of both parts, tighten them with pliers. This will prevent the hook from jumping out of its place at the most “opportune” moment.
DIY aluminum tripod
The result is a tripod that can be easily folded for transportation. If desired, the design is equipped with an additional “option”. Holes are drilled in the legs to install several more hooks. It will be possible to dry shoes next to the fire or place dishes so that food does not cool down for a long time.
What is needed for construction. Required materials and tools
A tripod can be easily purchased in a store; the price of a cheap model as of March 2022 is a little more than 200 rubles. Such a tripod consists of three pieces of a hollow profile of rectangular or round cross-section, fastened together with a screw and nut. A steel chain with a hook is put on the screw. Profile thickness is about 1 mm. The tripod weighs a little and is stored in a case.
A more reliable design consists of three legs passed through a triangular plate with cutouts. The fittings are secured with screws. There is a hole in the center of the plate through which the chain for the pot is passed and secured at the top.
The robust design consists of three legs threaded through a triangular plate with cutouts.
The disadvantages of this product include the difficulty of adjusting the height of the pot. Theoretically, this is done by hanging the hook with the pot on another link in the chain. In practice, doing this is hot and heavy. Two people have to work: one lifts the pot, the other hooks the hook at the required height.
Therefore, for those who use a tripod constantly, it makes sense to make the device themselves. A thing made conscientiously will serve for a long time and will not let you down in difficult times.
A self-made metal product will eliminate the need to look for a suitable tree at the resting place. There is no need to cut down young trees. For this alone, it’s worth making a tripod in advance.
To make a reliable support, a drawing is not required. To make a simple but high-quality tripod you will need 3 pieces of aluminum or steel pipe. If steel blanks are used, the walls should be thin to reduce the weight of the finished product.
To make a simple but high-quality tripod you will need 3 pieces of aluminum or steel pipe.
To fasten the tubes together and form a suspension point, you will need 3 steel bolts with nuts and eyes. 2 S-shaped steel hooks and a chain to hang the pot.
From the tools you need to prepare a hammer, a metal saw - hand or grinder - and pliers. The manufacturing process is simple and does not take much time.
How to hang a pot over a fire
A tripod acts as an easy way to hang cookware over the fire. However, there are several other options:
- A single rack with several horizontal rods that can accommodate 2, 3 or more containers. This design is also made of metal.
- Two slingshots with a crossbar also allow you to accommodate several vessels.
- A rope stretched between vertical branches.
- A perch located on a slope and supported by a large boulder.
You can also use two tripods, between which you place a pole or stretch a rope. In this case, both the spears and the stands must be stuck or driven into the ground. The tripod is a universal tool because it is suitable for any type of soil. The device can be easily installed even on a rocky surface. This distinguishes it from other designs.
If you are smart, there is one alternative that can replace the hook. Find a branch with a fork and break off one of the branches, leaving a short fragment - you will get a suitable solution.
Share in the comments what is your favorite way to cook over a fire!
Price
It is no coincidence that we placed this indicator only in third place. Although the cost of a manicure plays a vital role for people. It’s just more important to start by making sure that you are not being deceived and that they are showing you real photos and not ones stolen from the Internet.
There are two rules regarding cost: expensive is not necessarily high quality, but cheap is not 100% of the same quality.
If you're looking for below-average prices, you'll likely have to put up with low to average quality workmanship/materials. Not a single self-respecting master who:
— underwent expensive high-quality training,
- purchases good materials and equipment,
— takes care of sterilization and disposable consumables,
— invests in advertising and professional development —
will not put low prices. This simply means working at a loss.
Recently, Nastya’s friend, having spared money for a manicure in our studio, went to another one. Sent the result:
There was also an audio message under the video, which cannot be reproduced here, since it would have to be “beeped” almost entirely. As a result: the desired savings turned into double costs, because she had to immediately make an appointment with us in order to get rid of this nightmare.
But paying dearly does not mean getting high quality. Therefore, price is not always an indicator. You don't have to look for an expensive salon to get excellent service. That’s not why the salons are expensive, you’re just paying to “sit in a beautiful interior.”
Assembly sequence
In schools, in chemistry lessons, they begin to learn the importance of a laboratory tripod. To understand the purpose of using the device, the first step is to assemble it.
It is recommended to follow a certain sequence of actions:
- A heavy base is placed on the table surface.
- The stand is screwed in and the connection is securely secured with a key.
- The turntable mount is threaded onto the stand first.
- The further sequence is selected by the laboratory assistant independently for a specific operation.
- When tightening fasteners, it is not recommended to use excessive force. The reliability of the resulting connection should be checked by pressing before placing dishes with chemicals on it. Using standard elements for purposes not intended by the manufacturer entails possible risks of tripod damage. It is also not worth exceeding the established load, the stand will not support it, and the entire structure will fall on its side.
You should pay attention to the mounting surface of the tripod. It should be level relative to the horizontal
For laboratory experiments, it is prohibited to place any objects under the legs of the base in order to level the structure. The table for experiments must have good rigidity and have a flat top.