Don't know what to do with your child? Teach him how to make crafts using the origami technique. This exciting activity promotes the development of fine motor skills, develops visual imagination, and teaches patience and perseverance. Children at any age love to make things and make gifts with their own hands. After all, what could be better than an original thing created with your own hands. Paper crafts are a great option because they are very easy to make, even without special skills. Invite your child to make a paper wallet as an introduction to the technique. A master class for beginners will help him cope with the task. With the help of step-by-step instructions, it will be easy for him to figure out the assembly diagram himself. You will learn how to make a wallet by studying the detailed MK.
In it you will find a step-by-step description of the process, diagrams of step-by-step assembly of paper figures, photos and videos, with tips from experienced craftsmen.
Origami wallet
The origami wallet master class is suitable for children of any age and beginners. Despite the fact that all the assembly patterns are very simple, they will be interesting even to those who have been doing origami for a long time. Making paper crafts is very convenient because you don't need scissors or glue. An origami wallet is created by correctly and consistently folding paper. We offer you several craft options.
Option 1
This is how the diagram looks like, according to which we will add the first option:
Look carefully at the photo, fold the paper correctly and you will get a nice, useful thing.
To make an origami wallet you will need a sheet of A4 paper (white or colored). If you want to make a small wallet or, conversely, a more voluminous one, then use other sizes. You can take a regular notebook sheet (folded). The paper should not be too thin or too thick. You can take beautiful wrapping paper, then you won’t need additional decoration.
Option 2
Step-by-step instruction:
Video master class wallet using origami technique
If, following the diagram, it is difficult for you to collect a wallet, then you can watch video tutorials. They clearly show the entire process of creating origami crafts. Having studied them from beginning to end, you will be able to make wonderful crafts with your own hands.
Craft materials
First of all, you need to select material for crafts. You can make an incredible number of crafts from paper, the main thing is to have imagination and available tools:
- scissors or stationery knife;
- paper, cardboard A4 white, multi-colored;
- glue, tape, stapler;
- multi-colored thick threads with a needle;
- simple pencil, ruler;
- paints, markers, pencils;
- beads, bows, pasta, cereals, ribbons.
Drawing tools and accessories are chosen as desired.
Designer origami wallet
If all the proposed options seem too simple, then you should definitely take a design approach. Don’t be lazy, spend a little time and you will be surprised by the unusual stylistic design of this model. The main idea is a fantasy ornament obtained by sequential folding of paper. To create a wallet, you will need a square-shaped piece of paper, preferably with different colored sides. We fold it in half (diagonally), unfold it and do the same in the other direction. The result should be two lines intersecting in the center. Then you need to bend the right corner to the center.
Let's do the same on the opposite side. Then we bend two small triangles on both sides at the same distance from each other. Turn the sheet over and fold the paper toward the center so that the small corners meet.
The next step is to bend the ends of the corners towards the center and then unfold them outwards. Then we return them to their original position and bend the corners a little further so that their tips peek out (see photo). And bend it outward again.
We turn the workpiece over to the reverse side and fold the tops, as shown in the figure.
All that remains is to smooth every fold well and our stylish wallet is ready.
Thanks to a special folding method, an original design in the form of a geometric pattern is obtained.
This master class will be useful for both children and adults. Children can decorate their wallet with stickers and decorative elements (rhinestones, sparkles). You can show your imagination and decorate it with different paper elements. Cut out flowers, stars, circles from multi-colored paper and make an original applique out of them. In addition to all this, you can initially choose beautiful paper for your wallet with an original design and a variety of textures. Crafts made from white paper can be colored with felt-tip pens or pencils. An origami wallet can be used as a joke birthday gift, after putting money in it.
Today in the master class we will tell you how to make a paper wallet with your own hands. Creating this craft will take very little of your time, and step-by-step instructions with photos and a diagram will allow you to do everything correctly the first time.
Master class on creating a book for dolls. Dolls love to read too
In my house, a book can be found in every room. It is strange that in miniatures dolls are rarely given the ability to read. When creating another roombox, I decided not to miss such an important detail.
Some people use book substitutes - miniature notebooks. I wanted to make a “real” book with my own hands. So my desktop became a printing house for one day.
Many handmade masters create lessons based on personal experience. So I want to share a small master class on creating a book for dolls.
Before creating something in miniature, I try to study the original. Having studied the assembly principle, I get to work.
Tools and materials Time: 30 minutes Difficulty: 4/10
- 2 sheets of patterned A4 paper;
- pencil;
- ruler;
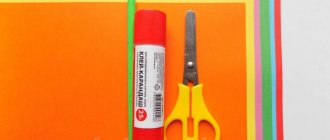
- scissors;
- Double-sided tape;
- self-adhesive film.
Everyone needs wallets, don't they? We made this beautiful paper wallet using leftover colorful gift wrapping. Of course, you can make it from any patterned paper of your choice, but just keep in mind that to create 1 wallet you will need 2 standard A4 sheets.
This wallet took us approximately 30 minutes to make. In any case, before starting work, we recommend practicing on plain paper. Let's be honest - we have no idea how durable it is, but it may be the best looking wallet we've ever seen. If you are concerned that the paper may tear, cover the joints with additional self-adhesive film. This will make it more durable.
Purse
What do you need:
- A4 paper.
- Scotch.
What to do:
- Fold the sheet to make eight pieces.
- Cut out such a hole on one side and cut the marked lines on the folds.
- Stagger the cut folds.
- Cover the cut shown in the picture with tape.
- Bend the extreme parts.
- Then bend the resulting workpiece in half to form a rectangle.
- After this, wrap all the protruding ends inside. For reliability, you can secure them with tape.
Step-by-step instructions with photos
So, if you have already practiced folding paper beautifully, then you will make a paper wallet without much difficulty! Let's get started.
Step 1: Fold the paper
- Take the patterned paper and turn it over. If your paper is double-sided, place it with your desired design facing down.
- Starting from the bottom, divide the sheet into 3 pieces of 9 cm each. Fold the bottom of the paper up along the first mark.
- Fold the top of the paper down, using the second mark as a guide. Make sure your sheet is folded as close to the edge of the paper as possible.
Step 2: Trim the excess
- When you turn the craft over, you should have a slight overlap on top. Turn the paper over and fold this piece overlapping down. Don't worry, this part doesn't have to be too precise. Cut off the overlap piece.
- Open the paper back and place it in front of you as a whole sheet. Now it should be divided into thirds. Fold the edges of the 2 long sides over the sides by about ½ centimeter.
Step 3: Glue the Flaps
- Make cuts along the sides on the 0.5 cm folded sections on the first flap on the underside. Do this on both sides.
- Place strips of double-sided tape on the middle third of the side ½ cm flaps. Remove the protective film from the tape and fold the top third to the second. Press down and press firmly.
- Add some more double sided tape to the last 2 flaps. Remove the protective film from only 1 flap. Fold from bottom to top and glue so that your document is open in one direction. This will help you make a nice, neat fold in the next step.
Step 4: Make the Base
- On the non-glued side, align the edges and fold the paper in half.
- Remove the last piece of tape from the paper wallet and glue the craft together by folding it in half. You should now have a basic wallet with a pocket in your hands.
Step 5: Make the folds for the card holder
- Take another piece of patterned paper, fold it and cut it into half a sheet.
- Take any of your plastic cards. Place it on the paper strip and fold the bottom of the paper so that it covers about ¾ of the card.
- Fold the top of the craft down and back, leaving a small piece of paper above the card.
Step 6: Glue the Holders
- Fold the paper back onto itself, leaving a small gap for a gap. From the outside it will look like lightning.
- Trim off the excess paper, leaving only a small flap on the back side. Using double-sided tape, glue the shield to the craft from the inside.
- Place your cards inside a folded piece of paper and fold both sides to the wrong side of the craft.
- Glue a strip of double-sided tape to the edges folded to the wrong side. Glue a card holder inside the base base.
- Repeat steps 5 and 6 to make a second holder and glue it on top of the previous one.
How to make an origami wallet? There are many ways. We will look at one of them today. All you need is a piece of paper and some free time.
Little things for a dollhouse. Part 1.
When the renovation in the dollhouse is completed, and there is a sufficient amount of furniture in each room, it is time to create comfort in each of the rooms. Today I will talk about the little things for a full-fledged doll life, those that I made for my house. I made doll furniture for my house from plywood and designed it the way I thought it was necessary for my dolls - the furniture turned out to be large, so I came up with the “small things” for the house and made it relatively large in size.
So, I call the first very necessary things for a doll’s life “cut and paste.” This group includes any crafts, the details of which can be cut out from all kinds of advertising booklets, magazines, packaging, etc., the main thing is to choose a suitable base for these pictures/photos. For example, to make a computer unit like this (monitor, keyboard and mouse), I glued photos of these items onto plywood: I cut out the necessary photos, sawed out the corresponding parts from plywood (3 mm), painted them, glued them and covered them with acrylic varnish.
But our doll family likes to solve crossword puzzles like this - the easiest way is to glue the desired picture/photo onto cardboard, with tape on top on both sides.
For my mother’s workshop I came up with paintings with frames made of toothpicks. I glued blank paintings, which I took from advertising magazines, onto thick cardboard, and the cardboard should be larger (3-4 mm) than the paintings, because then you will need to glue a frame of toothpicks around it (you must first paint them with acrylic and cut them into pieces diagonally). Then you will need to carefully cut off the unnecessary edges of the cardboard protruding beyond the frame, cover the sides with putty, sand it when it dries and paint the frame again with acrylic.
I printed a modular picture for the bedroom of the doll parents. Each piece was glued onto a ceiling tile of the same size and covered with tape on top.
For preschoolers, in addition to mini-hardcover books and coloring books (which I already talked about), I made mini-albums for drawing, a set of white cardboard and colored paper. Sketchbook (etc.) covers are sometimes found on the back of actual sketchbooks.
We assemble mini-colored paper and mini-albums like real ones, using suitable thicker paper for the cover, onto which we glue our cut-out (advertising) mini-cover on the front.
I made mini-folders for papers according to a drawing that I found on the Internet. Inside these folders are patterns that I came across in a knitting magazine (glued on cardboard, covered with tape) and mini-magazines on needlework (the pages were assembled like an accordion).
Drawing of a folder for papers.
The washing powder is also homemade.
I made a large package of washing powder for machine washing using an advertisement for store products. The packaging is the same on both sides. I cut out 2 identical pictures of powder (with large allowances on all sides), glued the sides of the blanks to each other, and glued cardboard in the form of an oval at the bottom. Then I poured some small beads inside the package (to make the craft heavier and add volume). And sealed the packaging on top. Then I covered the mini-package with tape and pressed it a little, giving it the shape of a real package of washing powder.
I made the washing powder boxes from large real boxes, using small advertising pictures on these boxes. The top of the mini-boxes was varnished.
Napkin packaging can also be made using advertisements. Inside them I placed the same napkins, folded in several layers, and glued the edges of the packages with glue and tape.
I make tubes with shampoo, hair dye, etc. from the same advertisements, only I put several pieces of beads inside, and these caps were taken from gel pens (I put them on the end of the tube, after smearing them with glue).
But my daughter and I made such a perfume from what we found in our supplies. Of course, the bottles turned out to be very simple, but my daughter took an active part in their making and is very proud of her crafts for the dollhouse
I needed a mannequin for my mother's workshop. For it I used the body of an old doll, a pencil and a medicine cap.
I made a trash can from a plastic medicine bottle.
The mini threads are lollipop sticks with real sewing threads and floss threads wrapped around them. So that the threads would not slide off the sides, but would form a beautiful thickness, I cut out circles from plastic (from toy packaging), pierced them with an awl and put them on the ends of lollipops cut to the required length and began to wind threads on them.
I made the yarn like this: I twisted and glued hollow cylinders from thin cardboard, threaded Iris knitting threads or Turkish cotton into a gypsy needle, wrapped thread and needle around these cylinders, and glued strips of wrapping paper on top of the yarn.
A bathroom faucet is a thick wire with a hollow plastic tube attached to it. The valves are beads placed on a thin wire and secured at the bottom. This wire allows you to turn the valve.
There are two types of cornices in my house. In a nursery for preschoolers, this is a simple cornice.
I made simple cornices for the house from thick wire, wrapped with knitting thread and painted with acrylic. Curtain rod holders are rectangles made of 6 mm plywood. with a cut where the cornice is inserted. There are beads at the ends of the cornice.
Curtain rod hooks are paper clips.
Simple cornice.
A more complex cornice is the same simple one, but on the front and sides it is covered with strips of plywood. And, of course, here the wire with hooks is inserted inside (from below) and is smaller in size (the main thing is that it lies quietly inside - in the holders - and does not fall out along with the curtain) and without beads at the ends.
stranamasterov.ru
Paper selection
Origami is the art of folding paper. It is this simple material that we will need to make a wallet that will be large and strong enough. To make an origami wallet, you need to make sure the material is of good quality. For this art there is special durable paper, which is also easy to fold. It is available in a wide range of color options. Of course, origami paper costs a little more than regular paper. You can also use thin cardboard or a thick sheet of glossy magazine.
Baby book: creating a miniature accessory for a doll
Today I have prepared for you another little master classic, literally ten minutes, on doll miniatures. We have already sewed a sweatshirt and several handbags, and today we will complete the set by making an accessory for the doll - the book “Scarlet Sails” by A. Green. The book will measure approximately 3.5 cm by 5 cm.
As usual, I prepared everything “turnkey” :) We print the layout for the book, it can be on plain paper, but it can also be on self-adhesive paper.
In addition to the printout, we will need a small piece of binding cardboard, from which we need to cut out two rectangles 5 cm by 3.5 cm and one rectangle 0.7 cm by 5 cm. From the printed sheet we cut out the cover, endpapers and all the pages.
Glue the cardboard cover onto the printed one, as shown in the photo:
Fold the cover onto the cardboard:
Now let's move on to the pages. Fold each page in half and glue them together. If you use self-adhesive, the process will be very quick and simple.
When all the pages are glued, we glue the endpapers in the same way on both sides:
This is what a notebook should look like. If during gluing some pages do not lie quite evenly, it doesn’t matter, cut them with a knife along the ruler.
All that remains is to glue the inner paper block to the cardboard cover using the endpapers:
Source
How to make an origami wallet?
- Step 1
Take a square piece of paper and fold it in half vertically. Make a good fold in the center and then unfold it back to its original state.
- Step 2
Fold the sides of the paper towards the center. After you have ironed the folds thoroughly, open the sheet back. You should now have three folds and the paper is evenly divided into four sections.
- Step 4
Fold the edges of the paper at each corner so that they match the folds made in the previous step. Make sure all four corners are folded. This time there is no need to unbend.
- Step 5
Fold the left and right sides of the paper to the center of the fold. They must be symmetrical. Now you have two doors with the corners folded inward. Once you have done this, turn the paper over with the flaps facing down.
- Step 6
Fold the top of the paper about one-third. The triangle, which should be completely visible, will help you make sure of this. At this stage, you can use a ruler or something else to help press down the paper to make the fold line more distinct and deep.
- Step 7
Do the same with the bottom. This fold should slightly overlap the other sash. Then, using a sliding motion, insert the bottom corners of the triangle into its top corners. It should look something like a diamond.
- Step 8
Fold the paper in half to complete your origami wallet. Now you will be able to store cards and coins there, depending on how large your wallet is.
Once you're done, you can also decorate your origami paper wallet with designs or stickers to make it more original or help remind you of what's in there.
Cover design
The cover should be designed especially brightly and beautifully, since the child will associate it with a pleasant pastime.
Therefore, to design the cover you need to use bright, pleasant colors and textures that the child likes most.
The following techniques are suitable for decorating the cover:
- Baby's name made from felt letters on buttons.
- For boys - cars and planes, for girls - flowers and bows.
- Figures based on the child’s hobbies: chess, plants, fruits.
- Zippers for a secret.
- Ties made of wide satin ribbons so that the book does not swing open.
- Bookmarks with brushes.
- Figured border made of felt of a different color.
- Flaps with buttons, stylized as ancient books.
- Figured chains made of felt.
Such bright, unusual and mysterious decorations will attract the attention of a child. This means that he will be interested and pleasant to study with his educational book.
Paper wallets
You can make anything from paper - New Year's toys, airplanes, boats, frogs, cars and many other interesting things. An origami paper wallet can become an indispensable assistant in children's games. You can also make a ton of paper coins with numbers from 1 to 10 on them, so the game of shop doubles as a hidden learning activity. You can store more than just money in these wallets. Girls can hide their personal secrets there in the form of candy wrappers or stickers. The simplest origami wallet can be made from a regular notebook page as a practice, and you can also use colored and durable paper, this will make your wallet even prettier.
An origami wallet is an original and useful craft that will certainly delight little fashionistas. With such a wallet it is very convenient to play in the store, make your first independent purchases or store your pocket money. And if you choose the right paper, the wallet can also come in handy for your mother, becoming a bright individual accessory.
Contents of the educational book
A children's educational book is a special book with colorful pictures, games and exercises that is suitable for a child from 1.5 to 3 years old. The child will be interested in touching and going through adventures with the characters of the book.
When using it, he will be able to learn:
- Colors;
- Geometric shapes;
- Letters and numbers;
- Elementary mathematical operations.
In addition, the child will enjoy different tactile sensations, sounds and smells. The book will become a pleasant companion on the road, a good accompaniment before bed, and simply a favorite toy.
Advice. When making books with your own hands, you can make several toys that can be changed as the child gets bored with them or as he grows and learns new knowledge.
Children's origami wallet with two compartments
As children, most of us knew how to make amazing and interesting crafts out of paper, although hardly anyone knew what origami was. Among these crafts, there was probably a wallet. This thing is useful for storing not only money, but also candy wrappers, stickers and other children's treasures. A detailed master class will show you how to make a wallet using the origami technique in just a few minutes; thanks to the step-by-step photos, it will be clear even to novice needlewomen or children.
Materials:
- sheet of A4 paper (white or colored);
- decorative elements.
Step-by-step instruction. First of all, the sheet is folded lengthwise and in half in order to mark the fold lines. This will make it easier to work on the origami craft in the future. Place the paper sheet on the table with the wide side facing you and bend all the corners towards the fold line. The resulting triangles are folded inward so that the outer corner touches the base of the triangle.
Then the edges are folded inward again, touching the vertical fold line. The origami blank is turned face down.
Top and bottom are folded in a horizontal line. The resulting figure remains to be folded along a vertical line. The origami wallet is ready. If you pull out a triangle from any compartment, it becomes the flap of the wallet.
You can decorate the finished origami craft with stickers, sequins, rhinestones, or let the children paint it themselves. The opportunity to realize their own ideas with their own hands will certainly inspire them to further exploits. You can also watch this MK in video format, where the author describes all the steps step by step.
Making a coin box
Recently, the coin box has become very popular. This is a small wallet that is not intended for storing paper bills, but is ideal for subway tokens or cash coins. Not many people know what can be made from paper.
All you need to prepare is:
- empty juice packaging or similar;
- ruler;
- core glue;
- pencil;
- scissors.
You can add a template to this list.
Template for coin box 1
The finished product will be very practical, and most importantly convenient. Why do we use juice packaging? This paper has increased strength, and the packaging has an important advantage - its lid.
Let's get started:
Template 2
- if you are working with a template, then print it out or immediately redraw it on the packaging;
- cut out the “pattern”;
Making a coin box - using a ruler, draw lines for folding; for clarity, press them with the corner of the ruler;
- cut a hole for the lid;
- bend the product along the marked lines;
- We fix all the elements with hot glue.
The product is almost ready. Place it under a press to level it. If desired, the finished coin holder can be decorated.
Origami - business card wallet
Paper crafts are suitable not only for children's games. Thanks to the wide variety of origami paper, you can choose a material that is suitable for adults. A simple, laconic origami wallet or business card holder will not take up much space in your purse or will be a full-fledged replacement for a regular wallet that was suddenly forgotten at home. You can make it in literally two minutes, and such a paper wallet will look stylish and unusual. It will be possible to put business cards collected at an exhibition or meeting, bank cards, discount cards, whatever!
The assembly diagram for this wallet using the origami technique is presented in several step-by-step photos. They use the standard origami alphabet. Not all beginners are familiar with it, so before starting work it is better to study the conventions so as not to get confused in the description of the master class.
Materials:
- white or colored A4 paper (or larger).
Instructions for the assembly diagram. The sheet is folded in half along the long side and unfolded back. Each half is folded inward towards the longitudinal fold line and unbent.
A scar is made on both sides (about 5-6 mm wide). The upper corners are folded inward, touching the fold lines marking a quarter of the sheet (see photo).
Now the sheet is folded along these same lines. The edges, due to the scar made, will not meet in the center. The upper part is folded back according to the template:
The origami blank is turned over. Fold in half, connecting the top and bottom edges, iron the fold. The flaps are tucked into the pockets, resulting in wallet compartments.
The wallet is folded along the vertical fold line.
The business card holder is ready! Assembling it was not at all difficult, but the craft will probably come in handy more than once.
Video: Origami business card holder
Book on glue
Before you learn how to make a book for dolls, you need to prepare the materials:
- Sheets of white or lined paper (for a doll notebook), sheets with text (for a book).
- Paper napkin.
- PVA glue.
- Cardboard.
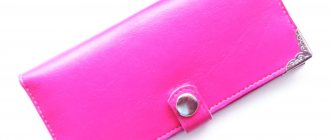
- Cover material (leather, fabric, paper, foil, etc.).
- Paints.
- Ruler.
- Pencil.
- Scissors.
What do we have to do:
- From paper, cut pages of the required size (approximately 1.5 by 2 centimeters).
- Place them together to form a book. Coat the future crust with glue and apply a piece of napkin.
- Make the cover details from cardboard. Two large rectangles the size of the book itself and one small one the size of the crust.
- From the material prepared for the cover, cut out pieces 3-5 millimeters larger than the prepared cardboard. Leave a small gap between the cover sections and the crust to allow the book to open and close. Glue the protruding parts inside.
- Make a flyleaf by cutting out two book-sized rectangles from paper, folding them both in half and gluing one side of each rectangle to the inside of the cover so that the other side can then be glued to the main sheets.
- Fold the cover. There should have been fold lines. If the cover is made of leather, then they are probably not noticeable. Therefore, the relief can be created by extruding it with a knitting needle.
- Paste the sheets into the book.
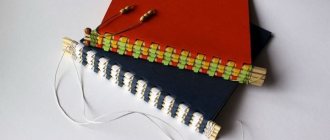
- To create the appearance of finishing braid, glue a thread on the bottom and top where the sheets touch the spine.
Once you know how to make a book for dolls, you can start experimenting.