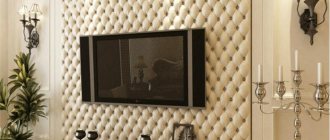
On holidays in kindergarten and school, boys like to wear a hussar costume. The cost of rental outfits is quite high, and it’s a pity to pay a lot of money for one grand appearance in it. If you know how to sew, then making such an outfit yourself is not difficult. It consists of several elements:
- dolman;
- mentik;
- trousers;
- boots;
- shako.
Let's briefly figure out what it is. For a child, you can significantly reduce the outfit by sewing only a uniform jacket with epaulettes and a hat with a visor. Any dark or white trousers will do. Instead of boots, you can wear Czech shoes. They would be more appropriate for the assembly hall of a kindergarten.
How to make epaulettes on a tunic photo tutorial
photo:
fashion.onblog.at
This photo tutorial will show us how to turn an ordinary gray tunic into a stylish tunic with chic fringed epaulettes and military-style chains.
Photos before and after. Do you like?
What we need:
- Tunic or long T-shirt with short sleeves
- Material for fringe. In this photo tutorial we used a material similar to the tunic itself, only a few tones darker.
- Scissors
- Chains
- crochet hook
- Pliers (pliers)
We cut out strips of material for the fringe. The strips should be different in length, but the same in width, approximately 2.5 cm. And also, they should taper at the tips.
We prepare the chains; they should also be of different lengths. We remove one link from each chain and widen it so that we can thread it into the tunic.
In the shoulder area, using nail scissors, we make small holes for the fringe.
Using a crochet hook, we thread the fringe into the holes on both sides of the shoulder seam and secure it on the back side.
In the very center between the fringes we make holes for the chains.
We thread a separate link into the hole, and then thread the chain itself into the same link. Next, we secure it with pliers.
This is such a stylish tunic, with magnificent epaulettes that you can easily make with your own hands.
I hope now you know how to make shoulder straps and epaulettes with your own hands)))
Post Views: 3,749
Why might you need a police suit?
Modern children are selective when it comes to costumes. The stores offer outfits for all characters. Most often, kids want to transform into heroes of their favorite fairy tales and cartoons, while older children choose the appearance of superheroes. However, in some situations a children's police costume may be required:
- At a matinee dedicated to professions.
- To participate in a theatrical production.
- To study life situations in life safety lessons.
- In order for the child to better understand the features of the chosen profession.
- For any children's events that include a masquerade.
Adults also love to dress up and transform. At some parties there is a dress code where you simply won’t be allowed in without a suit. For example, a Halloween police costume will help you stand out from the crowd of witches and ghosts. In addition, this is an interesting transformation option for a home New Year or Birthday celebration.
Delay in assignment
(the next special ranks)
Employees who are at the disposal of the relevant internal affairs body or who have disciplinary sanctions (except for those announced orally), as well as in respect of whom a criminal case has been initiated or an internal audit is being conducted on facts of violation of official discipline, are not submitted for assignment to the next special ranks for violations of official discipline, respectively, until appointment to the position. , removal of a disciplinary sanction, termination of a criminal case on rehabilitative grounds or until the end of an internal audit.
The assignment of the next special rank to an employee of the federal fire service is suspended in the following cases:
1) the employee is at the disposal of the federal executive body in the field of fire safety or a unit - before appointment to a position in the federal fire service;
2) suspension of service in the federal fire service in accordance with paragraph 4 of part 1 of Article 37 141-FZ (election of an employee as a deputy of the legislative (representative) body of state power of a constituent entity of the Russian Federation, deputy of the representative body of a municipal formation, head of a municipal formation or appointment of an employee to the position of head local administration);
3) unknown absence of an employee due to official circumstances for reasons beyond his control;
4) involving an employee as an accused in a criminal case, initiating a criminal case against him - until the termination of criminal prosecution;
5) the imposition on an employee of one of the disciplinary sanctions provided for in paragraphs 2 - 5 of part 1 of Article 49 141-FZ (reprimand, severe reprimand, warning of incomplete official compliance, transfer to a lower position in the Federal Border Guard Service) - until the disciplinary sanction is lifted.
After the termination of the circumstances provided for in paragraphs 1 - 3 of part 1 of this article, the next special rank is assigned to the employee from the next day after the expiration of the period of service in the existing special rank.
In the event of termination of criminal prosecution on grounds giving the right to rehabilitation, the next special rank is assigned to an employee of the federal fire service from the date of expiration of the period of service in the existing special rank.
You can DOWNLOAD infographics in high resolution (design of the stand of special ranks) for the classroom using the button after the article.
Special ranks of justice
Special ranks of justice are assigned to citizens of the Russian Federation appointed to positions of ordinary and commanding personnel in the internal affairs bodies of the Ministry of Internal Affairs of the Russian Federation, serving in investigative units
Russia. The same special ranks are assigned to employees of investigative bodies of the Investigative Committee of the Russian Federation.
The prefix “justice” is added to the special ranks of justice (not to be confused with the military ranks of justice assigned to military personnel of the military prosecutor’s office, military investigative bodies, military courts and military legal service). For those who are retired, the words “retired” are added.
How to sew chevrons and stripes onto a new police uniform | Embroidery Ulyanovsk
Current and future police officers need information about what chevrons are used on their uniforms and how to properly sew on such patches.
How to sew on new police chevrons is regulated by Order No. 575 of the Ministry of Internal Affairs of the Russian Federation dated July 26, 2013, Moscow. The full text of this order can be viewed here
The chevrons should be sewn onto the police uniform on the outside of the sleeve, at a distance of 80 mm from the top edge of the chevron to the shoulder.
Left sleeve: sleeve insignia indicating membership in the Ministry of Internal Affairs of Russia
Right sleeve: sleeve insignia indicating affiliation with a specific unit.
The chevron is worn on a summer shirt with short or long sleeves! General - on the left sleeve, about belonging to the unit - on the right.
Chevron patch on police uniform
- Aviation Division
. The sleeve insignia is not worn. - Camouflage
. The sleeve insignia is not worn. - Special police rank
. Stripes on the back and left front of the suit. - Combat units of the traffic police
. The chevron patch “DPS traffic police” is on the left side of the suit. “Police” and “DPS” stripes and reflective materials are on the back. - Special forces units
. “OMON” and “SOBR” stripes on jackets. - Special police regiment of the Special Purpose Center for Private Security of the Ministry of Internal Affairs
. “Police” patches in camouflage gray colors. - Police Regiment of the Special Purpose Security Center of the Ministry of Internal Affairs
. “Police” patches in camouflage green colors.
How to sew a police patch on a shirt?
Sleeve insignia are worn on both long-sleeved and short-sleeved shirts. The same applies to women's uniforms: the sleeve insignia is worn on all blouses.
On white shirts and blouses a patch with a white background is worn, on blue ones - with a blue background.
The distance from the top edge of the patch to the shoulder seam is 8 cm.
Tip: If you sew the chevrons yourself, then first measure the distance from the shoulder (the same 8 cm), approximately position the chevron exactly vertically under the shoulder strap and grab it at the upper corners with thread.
After making sure that the chevron is positioned correctly on the sleeve, carefully sew it on with white thread.
The badge is worn by traffic police officers and employees on external duty. The latter also have a badge on the right pocket.
For more information about which chevron should be sewn onto which item of uniform, see the article about the police uniform. All models of modern uniforms and the location of chevrons on police uniforms are presented there. You can find the specific shape that interests you and see how the chevrons are located on it!
Location of police chevrons: badges
On jackets, raincoats, vests. The patch is attached to the left breast pocket with a pin.
Popular articles Classic Christmas tree wreath: step-by-step instructions with photos
On shirts, blouses, jumpers, sweaters. The patch is attached to the flap of the left breast pocket using a folding button fastening or a pin.
On the jacket. The patch is attached to the left side of the chest 1 cm below the order ribbons or in their place using a pin.
On coats, woolen jackets, demi-season raincoats. The patch is attached to the left side of the chest 8 cm below the lapel ledge using a pin.
On a sheepskin coat, a sheepskin jacket. The patch is attached to the left side of the chest 4 cm below the “Police” patch using a pin.
The “Police” patch is an important element of police uniform. It is a rectangular strip 11 cm long and 3 cm wide. The edging is red, the background is blue. The inscription, size and color may differ for different units, but they are still sewn in one place - on the left side of the chest, 1 cm above the top seam of the pocket.
Knowing how to sew police chevrons on the back will also be useful, because the markings are there too. There is nothing complicated here - the inscription is fixed 1 cm above the red horizontal line.
It is better to secure the part with a pin while working to prevent displacement and uneven sewing.
Location of chevrons on police uniforms
We still have the right side of our chest free. What is sewn there?
On the right side of the chest are the badges of the Ministry of Internal Affairs of Russia. They are located horizontally in one row from left to right with intervals of 5 mm, to the right of the badge of graduation from an educational institution. The total number of badges in a row is no more than three.
Badges for commanding officers are located 1 cm above these badges.
Now do you understand how to properly sew on police chevrons? This is it, the arrangement of the Ministry of Internal Affairs chevrons!
Making a costume with your own hands
It is not always possible to buy everything in a store. Sometimes there is no suitable size, style, or the price is simply too high. But making a police costume doesn't require any special creative skills. As a basis, you need to take plain trousers or a skirt, depending on what kind of look you need - female or male. You will also need a white shirt. It is better to choose a model made of thick fabric. You can choose short or long sleeves, depending on the season and personal preference. The shirt can be paired with a vest or jacket to complement the trousers.
There is no point in sewing trousers, a jacket and a shirt yourself. If desired, you can find many styles and patterns in magazines, but you can find a suitable option in a store for a reasonable amount. If the costume is being made for a child, you need to carefully take all the child’s measurements before purchasing.
When you have decided whether a jacket will be used, or whether you are limited to only a shirt, you need to decide what the shoulder straps will look like. A policeman costume for a boy allows you to play out this moment in a free form. Firstly, shoulder straps can be purchased at a military supply store. Their disadvantage is that they have a standard size, which will be too big for a small child. This option can be used for an adult fancy dress. Secondly, you can make shoulder straps from cardboard.
Nuances of fastening for different types of uniforms
All the nuances of how shoulder straps are sewn onto a uniform are considered when a man serves in the army. Even so, many still have questions regarding this process. But first you need to decide where and how to attach the shoulder straps.
On a shirt
The process of attaching shoulder straps to a police officer’s shirt is not at all complicated. And it doesn’t take much time. Indeed, in this case, the shoulder straps are simply fastened with a button, but not sewn on. The same method is suitable for attaching the insignia to the shirts of children studying at the Suvorov School, police school, and so on. For cadets, you can also use pins and matches.
On the jacket
The jacket is part of the uniform not only of the new model of the Ministry of Emergency Situations and the police, but also of the military personnel. This wardrobe element can be casual, field or formal. Securing distinctive signs is work that requires attention, effort, and in addition, it takes a lot of time. To sew shoulder straps on a jacket, you must follow the instructions:
- Correctly position the attribute: during sewing it should be in one position and not move.
- Baste along the edges with several stitches, it is best to add a couple of additional seams in the place where the button is attached.
- Pull the lining slightly and stitch the edges of the shoulder strap along the entire perimeter.
- The stitching should be strong and inconspicuous. If, being nearby, it is impossible to notice it, then this means that the insignia is correctly sewn to the jacket.
Not everyone knows how shoulder straps are sewn onto a police jacket if one of their sides is rounded. It's difficult, but quite doable. Recommendations on how to sew shoulder straps onto the uniform of the Ministry of Internal Affairs:
- The length of the stitches should be no more than 2 mm.
- The thread is brought out pointwise to the surface of the material, and the rest remains inside.
The rounded section on the police jacket is the only difference between the process of sewing on attributes and a similar procedure for military personnel. In general, the entire algorithm is the same.
For a uniform jacket
As for the uniform jacket, the method of attachment depends on the material from which the distinctive attributes are made:
- if it is soft, the shoulder straps are simply sewn on;
- if it is hard, they are fixed with a clamp or improvised means.
A person who does not know how shoulder straps are sewn onto a shirt or jacket will find it very difficult to keep his uniform in order. In this case, he can contact a tailoring shop or try to do it himself. True, first you need to understand how to wear insignia correctly, and only then how to attach shoulder straps to your uniform. After all, any uniform, be it a junior sergeant or a junior lieutenant, requires distinctive markings. Attaching them is not an easy task. How to do this is clearly stated in the general military regulations of the Russian Federation. Violation of the requirements specified in it can lead to quite serious consequences.
Cut the lace into two parts, sew it near the button hole. Put on shoulder straps, thread one end of the lace through the hole and the leg of the button. Pull the end of the lace to the inside. Tie it off.
Basic wearing rules
In Russia, employees of the following organizations wear shoulder straps on their uniforms:
- RF Armed Forces;
- prosecutor's office;
- police (they have the same insignia that they had in the days of the police);
- Ministry of Emergency Situations;
- Inspectorate of the Federal Tax Service;
- State Environmental Inspectorate;
- maritime inspection.
Despite the fact that the insignia of the departments of the governing bodies is different, they also have something in common: shoulder straps need to be sewn only on a peacoat, tunic, uniform jacket or coat made of thick cloth.
The identifying marks are not sewn onto the shirt. This is because the outer uniform can be worn on top. But in the summer, shoulder straps on a shirt are a mandatory attribute, because when warm days come, coats and jackets are taken off. During this period, temporary stripes are used. They just need to be fastened with a button located on the shirt using a small loop attached to the wrong side of the shoulder strap.
Rules for sewing shoulder straps:
- Find out what type of shoulder straps they are: soft ones are sewn on, and hard ones are fastened on.
- Determine the type of fabric you want to sew on.
- Place the military attribute exactly and press it as close to the material as possible.
- Make an indent from the top edge of the shoulder strap to the shoulder seam exactly 10 mm.
- Maintain the distance between the side seam and button (it should be no more than 5 mm).
- Sew with small stitches - this way the seam will not be visible (otherwise the shape will look untidy).
The most important thing is that before washing you should always tear off or unfasten the sewn insignia.
Star with patterns
Now a capacious section about the stars.
Let's start with a very beautiful, but rather simple present.
Cut out a part from thick cardboard. Below are two star templates, choose any one.
We make a St. George ribbon from thin strips. But you can replace it with the colors of the Russian flag.
We make a tank using the quilling technique. We roll up three rolls and wrap them with a strip of paper - this is the “caterpillar” of the tank.
We prepare the remaining elements.
We assemble the tank and decorate the star.
You can stick a strip of magnet on the back side if you wish.
As promised, here are two star templates.
You may also need a star using the origami technique in your creativity. And so I’ll give you some step-by-step instructions for folding them.
Option known in the USSR.
A beauty with a through center.
This applique option is also suitable for younger children. It consists of two sheets of paper. A drawing is applied to one of them and cut out along the lines. On the second background. And both sheets are glued together.
You can also decorate the applique with letters and inscriptions.
- https://brunet-ka.ru/publ/odezhda_i_stil_brjunetok/epolety_svoimi_rukami_kak_sdelat_pogony_v_stile_militari/2-1-0-283
- https://prizivaut.ru/zvaniya/kak-prishit-pogony.html
- https://fb.ru/article/415205/epoletyi-svoimi-rukami-poshagovaya-instruktsiya-s-fotografiyami
- https://odezhda.guru/voennaya/1069-kak-prisit-pogony
- https://mognotak.ru/podelki-k-23-fevralya-dlya-detej.html
Medal
Additionally, you will need 50 cm of satin ribbon.
- Two circles of equal diameter are marked on a sheet of cardboard.
- Circles are cut out.
- A hole is pierced in one of the cut out circles so that the prepared tape passes through it without effort.
- Leta is threaded into the hole and tied
- The remaining tape folded like an accordion is glued to the circle with a hole along the edges.
- The second part of the medal is glued on top, so that the knot and the glued frame are hidden.
- The front part of the medal is decorated with a picture or other cut-out figures: a star, a tank, an airplane, etc.
Making epaulettes (epaulettes)
You can always look beautiful and original without having to spend money on expensive things and unusual jewelry. You can make unusual and original decorations for clothes with your own hands and they will look no worse than store-bought ones. Today, world-famous stars and fashionistas from all over the world use epaulettes in their ingenious outfits. In order to unusually decorate a simple sweater, denim or leather jacket, you can make your own epaulettes. They will be a very original addition to your image.
What we need to make epaulettes:
- Shoulder pads (shoulder pads).
- A piece of black satin fabric.
- Needle with black thread.
- Thin chains of two colors.
- Decorative ribbon in dark blue.
- Metal accessories for jewelry: bead huggers, fasteners for ribbons.
- Any metal elements for decoration.
- Scissors.
Let's start making epaulettes. First we need to give the hangers the correct and desired shape. I used scissors to cut the hangers and gave them a rectangular shape. We check that they are the same.
Next, take a piece of black satin fabric and cut two identical pieces so that they are larger than the hanger. We wrap each piece of fabric around the hangers and sew them in the middle. We try to sew tightly, so that the fabric does not unravel, but holds its shape.
Here are two black rectangles ready. Now that the base is ready, it needs to be beautifully decorated.
First, cut two pieces of ribbon. This ribbon can be purchased at a fabric and accessories store. You can take a ribbon of any type and color, as long as you like it. We sew the cut pieces of ribbons with a needle and thread in the middle.
Popular articles Coconut oil
Now we sew one bead hugger on both sides of the ribbons. I thought they looked really good here.
Next, at the front corners of the shoulder strap we attach one fastener for the tapes. They are good because they attach perfectly and tightly thanks to their teeth and have a ring on which you can attach something else. In our case, I put two chains on the rings and an additional metal stick, which also look good.
Now all that remains is to sew the metal elements to the shoulder straps. Mine were square in shape. I first placed them on the shoulder straps, saw how it would look, and then sewed them tightly.
You can sew the finished shoulder straps tightly to a certain item or put them on a pin and then you can remove the shoulder straps and attach them to other outfits.
Ammo box
- Two sheets of cardboard are drawn with alternating straight lines every centimeter.
- Using scissors and office glue, a box without a top is made from lined cardboard and painted light green.
- The top part is made from a second sheet of cardboard in the same way, but it should be slightly larger in width and also painted light green.
- The upper part is superimposed on the lower part and fastened on one side with two strips of paper painted yellow, with black dots in the middle (nail heads).
- A small strip is cut out and the inscription “AMMUNITION” is applied with a red felt-tip pen.
- The strip is glued diagonally over the top cover.
Classification by color and decor
Color, material, and the presence of stars served to distinguish regiments and ranks. Fellow officers and soldiers had the same color scheme; it was determined by the number of the regiment in the division. For example, in the infantry troops, the shoulder straps and epaulette field of the first regiment were red, while the second regiment was white. The general's epaulettes did not have encryption.
The design of the fringe in a gold or silver shade depended on what color was chosen for the regiment. Guards insignia had a field of both colors, general ones were completely in gold. Under Nicholas I, stars appeared on the field next to the monogram of the monarch or a code indicating the regiment. They were the same in size, the difference in ranks was indicated by their number.
| Number of stars | Chief officers | Staff officers | Generals |
| 1 | ensign | – | – |
| 2 | second lieutenant | major | major general |
| 3 | lieutenant | lieutenant colonel | lieutenant general |
| 4 | staff captain | – | – |
| No stars | captain | Colonel | infantry general |
Now the Russian army does not use epaulettes, and what they are can only be learned from historical films and reference books. In modern fashion, some designers have become interested in this element of military uniform and decorate civilian clothing in military style with it.
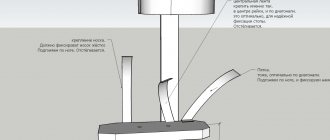
Cap visor
It is better to cut the visor separately. It is drawn with a compass at the rate of 1/3 of the circumference of the head. The visor can be either narrow or wide. However, do not forget to additionally leave a strip on the side of the concave inner part for cutting triangles.
The visor of the headdress, after being cut out according to the drawn template, is attached to the inside of the band in front of the military cap. Each triangle must be coated with PVA glue.
When the craft is put together, start decorating it by covering the outside with colored paper. The visor is made black, and the remaining parts can be covered with green elements.
Types of epaulettes
Fashionistas often experiment with styles. Epaulettes began to decorate both ceremonial suits and elegant light dresses. Eclecticism does not harm any appearance. Epaulets can be:
With a claim to naturalism, created according to the template of past centuries.
A unisex model that is suitable for both the stronger and weaker sex. They make the image more strict and serious.
Heavy and brutal, which are more suitable for socialites, as well as brave and determined women.
Delicate, graceful, epaulettes for coquette girls and charming fashionistas.
They can not only be part of a costume, but can also be worn separately on women’s shoulders. Such epaulettes look more like jewelry, which is why jewelers have developed their own collection.
They can also be found decorating the collection in the Military style. They add decisiveness to the costume and, as it were, complete the overall picture.
Epaulets can be applied or sewn to the base of the dress. Metal, fabric, beads, leather and even precious metals.
You can also make epaulettes with your own hands; today there are many patterns and master classes on needlework on the Internet. By the way, this decorative detail changes any thing very well. If you're tired of an old dress or jacket, don't hesitate to get rid of them, try sewing them onto epaulettes. This is the right decision that will refresh your things, because they will not go out of fashion any time soon.
Children's crafts
An item made by a child on his own will never go unnoticed, and for sure, the person to whom it was given will always remember this touching moment with warmth and a smile...
A workspace for a child’s creativity must be chosen that is comfortable, spacious, and well-lit. Items should be freely laid out, which will make it possible to carefully make children's crafts for February 23rd with your own hands.
The main tools include a standard set for children's creativity:
- Paper scissors.
- Stationery glue.
- Paints or gouache.
- Markers and pencils.
- Ruler.
- Plasticine.
- Colored paper or cardboard.
Location of shoulder straps on military personnel's jackets
The rules for wearing shoulder straps contain a direct requirement that they be clean, not wrinkled and without foreign inserts. Metal insignia of military personnel should not be deformed, and also not have chipped enamel or abrasions.
How to sew shoulder straps on a jacket: step-by-step instructions
Before you start sewing on shoulder straps, you should make sure that the equipment on the shoulder straps of military personnel has already been done correctly: they are equipped with the required insignia, which are securely fastened. It will be almost impossible to correct a possible defect on a sewn shoulder strap.
Using a ruler, the distance is determined and marked exactly 1 cm above the shoulder seam, which is a line from the collar to the sleeve.
The shoulder strap is applied to the place of its intended location so that its flat side is close to the transverse seam connecting the sleeve to the shoulder of the jacket.
To prevent the shoulder strap from moving during sewing, you should first fix its location on the jacket with several stitches. It is enough to make them at three points: along two edges on the shoulder side and in the center near the collar. It is recommended to make fixing stitches with threads of a contrasting shade to make them easier to remove later.
After securing the shoulder strap, it is finally sewn on: with threads of the same shade, along the perimeter of the shoulder strap. On the upper part of the shoulder strap, the stitch size should be small so that the seam is not noticeable. The optimal option can be considered when, in the process, the outer fabric edge of the shoulder straps, hiding their base, is slightly moved back, and the needle is threaded exactly into the seam holes.
Author of the article:
Nikiforov Vladislav
Crafts workshops on February 23 for the preparatory group
For a kindergarten, the choice of crafts for creativity is to ensure that the process is uncomplicated and can be completed within a certain time interval. In the preparatory group, children are already quite agile, so you can choose more complex figures for them. Look at the prepared master classes and perhaps educators and teachers in creative workshops will also be interested in these ideas.
How to make an airplane out of matchboxes
I present to you step-by-step instructions on how to make a simple airplane from a matchbox and cardboard.
For the craft we will need:
- Colored double-sided cardboard
- Matchbox
- Glue
- Scissors
- Drawing pin
We make blanks for an airplane from cardboard:
- The fuselage (body) of the aircraft measures 29.7 by 2 cm. The length is determined by the size of an A4 sheet of cardboard.
- Wings 22 by 4 centimeters - 2 pieces
- Elevator (tail) - 8 by 2 centimeters
- Rudder - 8 by 1.5 centimeters
- Wheels with a diameter of 5 centimeters
- Identification stars - 4 pieces
We turn the longest strip into an airplane body. To do this, bend it in half and glue it to the box on one side and the other.
Similarly, but glue the wings across
We put strips on the box so that it does not stick out from the sides. It can also be pre-pasted with paper or painted.
Now we push the elevator through the tail section and also glue it well on the inside.
The rudder needs to be given the desired shape. Remember that for us it was a simple stripe. Now we bend it in half and bend a small part inward from each edge. So that from the side you get a volumetric triangle.
A plane cannot fly without a propeller. Therefore, we cut out the blades. One or two as you wish. We found this pushpin. It seemed to me that this was an ideal option, since in this case the blades can even be rotated, like on a real airplane.
At this stage, it is more convenient to glue identification marks, both on the wings and in the tail.
Initially, the idea was to make the chassis using toothpicks or a skewer. But since the glue was only a pencil, this idea was dropped. If you have hot glue on hand, then the wheels can be glued to such sticks. By the way, the plastic part of the cotton swabs will also work.
But in the end we decided to use the same cardboard. We cut out strips with a bend at the top and glued the wheels.
This is what the assembled airplane turned out to be like.
The test flight was successful.
Do-it-yourself eternal flame made of paper and cardboard
I also suggest you make a beautiful and literally reverent craft - an eternal flame.
For the craft we will need:
- Colored cardboard of any color. But better than golden
- Thin napkins in red, orange and yellow colors
- White paper
- Glue
- Scissors
- Ready-made star template (see below)
Print or draw a five-pointed star template yourself. For convenience, it shows guides along which you will need to make a bend both on the outside and on the inside. Transfer the workpiece to cardboard
Next, using a ruler, draw with the sharp tip of scissors or a non-writing pen in all directions, connecting the internal and external corners.
We make a hole in the center of the star.
If everything was done correctly, you should get a voluminous star like this. Note that the long guides represent the outer edge, and the short ones the inner edge.
Now let's start assembling the fire. To do this, you need to make a base in the form of a bag, as grandmothers used to do for seeds. There should be no holes at the bottom so that in the future you can easily place it in the center of the star. In order for the shape to hold well, you need to glue the cone along the edge and fix it.
Cut strips from napkins. Moreover, the napkin does not need to be unfolded.
Glue the folded side from below so that the strips branch to the sides.
Be extremely careful when working with glue, especially if you are using a glue stick. The napkin is very delicate and may tear
We go through this on all sides, alternating colors. The top can be slightly torn or the edges trimmed unevenly to imitate the look of a real flame.
We place the resulting torch vertically in the hole on the star. And the eternal flame is ready.
Template for a volumetric star
Preparation of insignia
Signs on shoulder straps (stars, sewn or metal squares) must be present. They are intended to indicate military ranks, service status, as well as membership in the type of military force. Insignia are attached in a special way. Before attaching to shoulder straps, you need to make sure that their location is correct. The stars are attached using a variety of devices. To do this, it is enough to measure the required gap, approved by the order, and use a sharp needle mounted on the handle to make a hole where the insignia is inserted (the legs must first be bent). Next, attach the star to the fabric. As for the serviceman’s field uniform, fake attributes come to the rescue, on which stars are sewn on in a factory way. Such products are used in field conditions, because during military exercises real insignia can fly off. Every employee should know how to attach stripes to shoulder straps. The number of sewn or metal squares depends on the rank, and on clothing they are fixed like stars.
What tools will you need?
The work requires endurance, the ability to concentrate and a place with daylight. You also need a set of tools:
- sewing items - scissors, thimble, needle and black thread (ideally if their color matches the color of the piping);
- ruler;
- tweezers;
- pliers.
A thimble is necessary to protect the finger from a prick, because the material of the military attribute itself is quite dense, and the needle is difficult to push through it. When attaching such a product to outerwear, pliers and tweezers will be excellent helpers. They are necessary to pull the thread with a needle through the resulting hole. You may also need other tools for work (depending on the chosen method): pin, paper clips, match, tape, cutter.
Shoulder strap tattoos: meaning, photo, sketch, prison, in the zone, among prisoners, on the left
Nowadays, most tattoos are done for beauty and rarely carry any meaning. But even now there are prison tattoos, which are mostly done by people close to the criminal world, for example, epaulettes on the shoulders. However, few prisoners can get an epaulette tattoo on their shoulders. In the article we will analyze the detailed meaning of the tattoo that it bears on the zone.
Who can get epaulets tattooed?
Since ancient times, people have decorated their bodies with various tattoos. Patterns on the body could tell a lot about a person: where he comes from, what he does, his social status, etc. In the 20th century, tattoos became the prerogative of prisoners. Using them, prisoners “read” the history of those new to the zone.
The fact is that epaulets are the most controversial tattoo in the world of thieves. Shoulder straps are worn by military and police officers - the main enemies of prisoners. But at the same time, only thieves, whose authority is not subject to the slightest doubt, can get such a tattoo.
The thieves' stars on their shoulder straps can tell you how many walks the prisoner had.
Also, such a tattoo can be made for those who served time in a maximum security colony. Ordinary prisoners are prohibited from getting tattoos of shoulder straps - this can lead to forced correction of the design with homemade machines or even cutting off a piece of skin with the image applied.
Popular articles Beautiful congratulations on the first Day of Spring
Putting an image of shoulder straps on your body is a big responsibility, for which you will have to answer harshly, according to prison laws.
This type of tattoo is rare among juvenile criminals - they lack experience and authority. An exception is made only for those who spent more than 50 days in a punishment cell: in this case, the right to shoulder straps appears.
What does an epaulet tattoo look like?
An epaulet tattoo can look different. The most popular are those that look like hussar epaulettes, or like military or police shoulder straps. They are tattooed more often by men, but in rare cases, this type of tattoo is found on representatives of the fair sex, convicted under serious charges, serving time in maximum security colonies.
The thieves' law clearly regulates what this or that person can inflict on himself.
The shoulder strap tattoo is usually applied to both shoulders. But if the question is about applying it on one side, then the tattoo is done on the left shoulder. Often, an epaulet tattoo on the shoulder consists of empty epaulets, into which additional symbols are subsequently tattooed to indicate something.
It is worth noting that those who wear such insignia on their shoulders will never take the path of correction. These people dedicated their lives to crimes. They do not know any other life, and even when leaving the zone they will continue to lead a criminal lifestyle. They cannot work and earn a living by honest labor - authority will not allow it.
What do the epaulets mean in the zone?
Historically, epaulettes and shoulder straps on the shoulders of convicts were considered a badge of honor. Such tattoos mean that the prisoner has already been to places that are not so remote more than once. Or that the article that got him into the zone is considered elite. As a rule, these are articles for serious crimes - theft, murder, and so on.
The swastika depicted on the epaulette means the denial of God, observance and respect only of prison laws and adherence to fascism.
Pinned suits of playing cards, a wolf or wings mean that this is not the first time the convicted person has gone to jail for theft or theft.
An eagle on shoulder straps indicates that a person denies laws and hates informers. This is a kind of symbol of a free spirit that does not tolerate any restrictions.
Some prisoners decorate their epaulettes with a skull and crossbones, signifying the commission of mass murder.
Those people who commit ideological crimes prefer to have a cross on their shoulder straps. They don't feel remorse or regret what they did.
The inscription ELEPHANT stands for death by a cop by a knife. It is very dangerous to apply such inscriptions. From them, the colony staff can understand that the prisoner is aggressive and take measures to pacify him. Only desperate criminals who are confident in their impunity can add such an abbreviation to their epaulettes.
Shoulder straps pierced with a knife with the inscription BB (internal troops). This type of shoulder straps is awarded to those who openly go against any representative of the state - a guard in a colony, a zone commander, etc.
Wolves, cats, tigers, various predators, barbed wire, and clawed paws are also pricked. All this is a symbol of strength, cunning, wisdom and independence. These elements also serve to intimidate fellow inmates.
Sewing technique
To ensure that the shoulder straps are well fixed and do not move out, before finally sewing the shoulder straps on, they need to be attached to the jacket in several places. It is necessary to sew to the uniform along the entire perimeter of the shoulder strap
During the sewing process, you need to pay attention to such an important detail of the jacket as the lining. The needle must be threaded so that it does not go into the lining
The thread in the needle should not be longer than 20 centimeters, otherwise there is a high probability that it will get tangled in the process, which could interfere with the process.
Sewing seams have special requirements. It should be strong enough and invisible. To meet these requirements, thick cotton thread with the addition of polyester is suitable. In this case, the presence of synthetics will only improve matters. The thread should match the tone of the shoulder straps themselves.
The success of the process largely depends on the skill level of the person doing it. The stitches must be straight and 3-4 millimeters long. It is necessary to ensure that the seam cannot be seen at a short distance. When receiving the next military rank, a photograph is taken in uniform. A neat appearance should be a prerequisite for a military personnel, and evenly sewn shoulder straps are an integral part of the military uniform.
Find out: What uniforms do soldiers and officers of the Aerospace Forces wear?
It doesn't hurt to use some tips:
- The shoulder strap is not sewn quickly, so the form must be prepared in advance.
- The needle does not pass through the shoulder strap easily, so you must use a thimble so as not to injure your finger.
- If it is difficult to thread the needle through the shoulder strap, you can use tweezers or pliers. Just don't press too hard to prevent the needle from breaking.
What to gift?
Although a self-made present will undoubtedly evoke positive emotions, you should still take into account the age of its author. So, for example, a children’s craft made by an adult will not be entirely appropriate or will be misunderstood; in this case, self-made gifts can be divided into two categories:
- Children's crafts.
- Made by older loved ones.
Photos of crafts for February 23 are freely available on the Internet.
How to sew shoulder straps on officers' jackets
First you need to prepare all the tools, the actual clothes, and also know the general rules of compliance with the charter. So, for work you will need:
- The shoulder straps themselves;
- Dense and strong thread (number 10);
- Strong but thin needle;
- Military clothing.
Old jacket with soft fabric shoulder straps
Modern military clothing assumes the presence of two seasonal sets: summer and winter. Rank insignia and rank must be present on all types of uniforms. Not all military personnel are ready to entrust their work to strangers. That's when you need to pick up a needle, thread it and start sewing yourself.
USSR Air Force ceremonial shoulder straps
So, first you should grab the shoulder straps with auxiliary stitches. Instead, you can use needles for fixation. Having placed the part correctly, you can begin to carefully sew it on. When finished, the thread is discreetly cut and fixed
It is important to remember that all metal insignia and buttons must be sewn on before the product is fixed on the shoulder of the tunic or coat
Special ranks of employees of the Federal Border Guard Service of the Ministry of Emergency Situations of the Russian Federation
Important! Before attaching the shoulder strap, stars and other insignia should be installed in their places in a clear sequence. Senior comrades in service should teach this
If you don’t fix them before you start sewing, it will be difficult to do it afterwards and the work will be ruined
Senior comrades in service should teach this. If you do not fix them before you start sewing, it will be difficult to do so afterwards and the work will be ruined.
Police uniform
The police also wear shoulder straps, but here the method of sewing on is slightly different. The shoulder straps are straight on one edge and semicircular on the other. When sewing, the element should be positioned evenly along the shoulder seam, and the rear edge of the shoulder strap should be one centimeter away from this seam. Because of this, it turns out that the product is slightly shifted forward. As with other types, the first step is to make a few stitches to check the evenness of the overlap, and then even stitches are laid around the entire perimeter of the seam. Again, do not forget to first record the signs of rank and affiliation on the surface.
Shoulder straps and ranks of Russian police officers of the Ministry of Internal Affairs of the Russian Federation
How to properly sew shoulder straps onto a FSIN jacket
Sewing FSIN shoulder straps is essentially no different from securing other types. There is one point. When the shoulder strap is sewn on, the distance from it to the chevron on the hand should be exactly 8 centimeters. In the same way, everything is grabbed and sewn. Similarly, you can fix various chevrons.
Chevrons of the Federal Penitentiary Service
Thus, every serviceman, regardless of the type of military service, rank and position, as well as civil servants whose uniform requires such insignia, should be able to sew on shoulder straps. To do this, you need to have some experience and carefully follow the step-by-step instructions.
From the history
A form element similar to shoulder straps appeared during the reign of the kings. At first it was necessary to secure a bag with a strap, which was worn on the shoulders; it often slipped off. Later, insignia began to be sewn on them to determine whether a soldier belonged to one or another branch of the military. In tsarist times there were many different shoulder straps, but after the 1917 revolution they were abandoned. They were returned only in 1943, again for all branches of the military. Based on them, the rank of an employee was and is determined today, and without them it is no longer possible to imagine any military uniform.
System of military ranks in the Russian Imperial Army
And although sewing on shoulder straps is not a difficult task, it is still necessary to understand some points. During the period of their service, soldiers and officers master this skill exactly.
Different types of Soviet shoulder straps for different structures