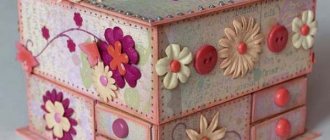
At many weddings, an interesting custom is observed: the newlyweds should have “wedding bulls” on the table - these are a couple of bottles of alcoholic drinks (usually champagne), which are stored and opened during the first anniversary or on the day of discharge from the hospital. Traditionally bottles are elegantly decorated. For decoration, satin ribbons, beads, and seed beads are most often used.
Photo of how you can decorate champagne ribbons for a wedding with your own hands
Recommendations for decorating bottles with ribbons
Decorating wedding champagne is easy to do with your own hands. The main thing is to know some nuances and strictly follow the step-by-step master classes. The design should be festive and bright - satin ribbons are best suited for this.
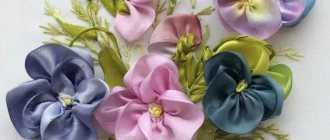
You shouldn’t limit yourself to just ribbons; you can add colored feathers, rhinestones, artificial flowers and lace, beads and beads to them
General rules on how to decorate champagne for a wedding with your own ribbons:
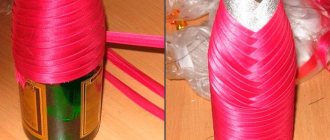
- Any such decoration begins with the ribbon being attached to the surface of the bottle using bias tape. You should start from the neck or just below its level.
- There is no need to immediately cut a certain number of pieces, since their length will vary depending on the bends of the bottle shape.
- The bottom edge of the last glued tape is hidden under the edge of the previous tape. Thus, the decoration is built over the entire surface, to the very bottom.
- The decorative element does not have to be located at an angle. You can wrap the bottle crosswise and hide the imperfections with thin lace.
- The neck can be left open, or you can wrap it completely.
- Only transparent glue is used. You should coat it carefully so that after drying you do not find unsightly stains.
If the decor with ribbons will only partially cover the bottle, then you need to remove the labels in advance . To do this carefully, the bottles need to be briefly immersed in warm water - the glue and paper will soften and be easily removed.
Photo of decorating champagne for a wedding with your own hands using ribbons
Original wedding decor on bottles with satin ribbons
Origins of the tradition
The word “bulls” for the beautiful bottles on the table, of course, is not the most beautiful one chosen. But it takes its roots from the Don Cossacks. In their villages, it was customary to give a wedding gift of a cow and a bull, tied by the horns with beautiful ribbons. They were given by parents so that a young family could feed itself in the first year, and a year later give relatives fresh milk. This was considered a sign of a strong family, a sign that the young were coping with family life.
Of course, now it would be strange for city residents to receive livestock as a gift. But the tradition, although modified, remained firmly in our heads. And the current “bulls” look much more beautiful. The alcohol used is usually champagne or wine, but you can also take different types of alcohol: one bottle is the bride’s favorite drink, the other is the groom’s.
Related article: Crochet stool cover for beginners: patterns with photos and videos
Also, wedding traditions, along with “bulls”, include a wedding loaf, “shishki” - small buns that are distributed to guests in order “not to cause problems in family life”, bonbonnieres - gifts or compliments to guests (as a rule, these are small candies or chocolates with notes of gratitude), drinking glasses, and so on.
DIY champagne decoration for a wedding with satin ribbons
Decorating a bottle with ribbons is the simplest and most affordable way that does not require special skills or high costs . Despite this simplicity of the decor, the result will be spectacular and bright if you carefully follow all the steps in the master class for decorating a champagne bottle with satin ribbons.
What you will need for work:
- ribbon: blue and golden brocade;
- heat gun;
- a bottle of champagne;
- scissors;
- additional decor: beads, lace.
The colors shown are taken as an example. They can be replaced with other shades that suit the wedding design, but it is better to use no more than 2-3 colors
Step by step execution:
- Try the blue satin ribbon on the neck of the bottle and cut it to the desired length. Apply glue and attach around the throat, placing the right end of the decorative item over the left.
- The second tape will be longer, as the bottle begins to expand towards the bottom. Cut the required length and glue it in the same way, slightly covering the edge of the first tape. Attach 2 more ribbons in the same way.
- The fifth and sixth row will be made of brocade ribbon. The technique is absolutely the same.
- Glue a layer of brocade ribbon to the very bottom of the bottle, wrapping the champagne crosswise. Cover the remaining space between the top and bottom of the bottle with a blue piece of paper - its ends should connect to the back of the champagne.
- The joint is unlikely to be neat, so you need to cut off the blue tape (about 10 cm). Coat the edge with glue and push it under the very bottom layer, press. Then stretch it upward and glue it, covering the joints.
- Add additional decorations to the front of the bottle, arranging them in a random pattern.
The wedding champagne made from ribbons is ready - you need to wait until the glue has completely dried and you can bring the “bull” to the holiday.
Champagne in blue and gold with peacock feather
What you need for work
As a material, you can use almost any decor that can be found in every home on the eve of the holiday:
- New Year's tinsel and serpentine;
- costume jewelry;
- corrugated and colored paper;
- New Year themed paper napkins;
- sweets in beautiful wrappers;
- special covers for bottles that you can sew with your own hands;
- satin ribbons;
- sparkles and other decor.
You also need to prepare tools and supplies:
- glue;
- scissors;
- threads;
- acrylic paints and primer;
- tassels;
- glitter;
- foam sponge;
- colored, shiny and corrugated paper;
- pieces of fabric;
- ribbons.
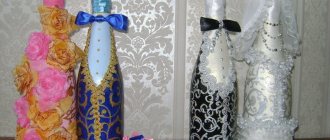
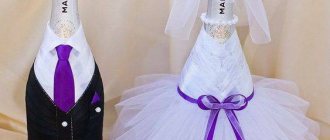
Master class: bride and groom made from champagne bottles
The bride and groom made of satin ribbons on champagne bottles is a common attribute of a wedding celebration. Previously, this craft was ordered from decorators, but now anyone with minimal handicraft skills can make such a decoration.
You can decorate champagne in the form of newlyweds using different techniques: entwining bottles with ribbons in the simplest way or using the more complex kanzashi technique.
Champagne wedding couple decorated with ribbons
Groom made of ribbons on a bottle of champagne
To make a groom, you need to prepare materials :
- white and blue ribbons;
- white half beads of different sizes;
- heat gun;
- lace;
- organza;
- small artificial flower;
- champagne
Step by step execution:
- Cut a white satin ribbon 2 cm wide so that it is enough to wrap the neck of the drink. Fold along and carefully iron the fold line. Lightly scorch the edges with fire.
- Apply glue to the bottle and glue the tape, first one edge, then the other. Please note that on the back side the tape should be positioned slightly higher than on the front side so that it fits tightly to the surface of the glass.
- Raise the ribbon along the fold, like raising a collar, before putting on the tie. Glue the same white piece from below, close to the fold line of the first tape. Repeat the steps one more time.
- From a blue ribbon - it should already be white, tie a tie in any convenient way. The tie can be replaced with a bow tie from the same ribbon.
- Place a tie under the white decorative “collar” and tighten. Lower the collar and attach the free end of the tie to the bottle with glue.
- Below the shirt, braid the bottle with a blue ribbon until the shape of the champagne begins to change dramatically. At this point you will need to glue several tapes on top of each other to level the surface.
- Continue covering the drink with tape all the way to the bottom. The joint should be located on the front side. It will need to be covered with half beads, similar to buttons.
Under the shirt, a little to the side on a drop of glue, plant a boutonniere flower, and the bottle groom is ready!
Champagne bottle groom with bow tie
Bride made of satin ribbons on a wedding bottle
You need to make a bottle with ribbons in the shape of a bride from the same materials that were used to make the groom’s craft.
The bottle of champagne representing the bride may be a little shorter, then the couple will look very beautiful and gentle
Step by step execution:
- Wrap a white ribbon around the bottle from the level where the “groom’s” jacket begins (made of blue ribbon). The technique is the same as when making a shirt.
- Then wrap the bottle crosswise with the same ribbon, overlapping the ribbon slightly, going down to the very bottom.
- Wrap the flat part of the bottle with lace, the edges should meet on the back side.
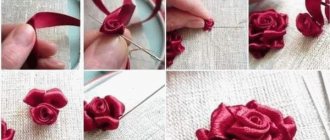
- Make a bow from satin ribbons. How to tie a ribbon: prepare a blue or white ribbon (2.5 cm wide) and a white ribbon (0.7 mm wide). Glue the blue ribbon in the center of the bottle above the lace. Wrap a thin white ribbon on top and tie a bow with 2 knots. Trim the ends.
- On the reverse side, cover the joints with white tape.
- The front part can be randomly decorated with beads or seed beads.
Decoration of the bride and groom with ribbons in classic colors.
This is how you can decorate champagne with your own hands in an original and simple way and observe the traditions of the holiday. You just need to use your imagination and have some free time. You can also decorate the newlyweds’ glasses - you’ll get a beautiful set that also acts as an additional wedding decor.
To make everything clearer, watch the video of making clothes for champagne for a wedding with your own hands from ribbons:
How to decorate with glitter?
An original and elegant bottle for the New Year can be decorated not only with pieces of fabric or themed napkins, but also with shining sparkles. This simple component can give the base a very bright and festive look, which will elegantly emphasize the holiday atmosphere.
Along with glitter, you can use other decorative components. In a single combination, they will make wonderful bottle decorations. Let's consider what positions should be used to decorate such an interesting New Year's homemade product:
- spray can with golden paint;
- glitter;
- adhesive composition (ordinary PVA glue will be sufficient).
Let's consider the correct sequence of decorative design of a bottle using the listed components.
- At the first stage, it is advisable to carefully prepare the workplace for all creative manipulations. The table on which the bottle will be decorated must be covered with newspapers. You should do the same with the nearby area so that it is not stained with golden paint.
- Next, take a bottle. You can remove paper labels and stickers from it, or you can leave it. Different masters act differently. If you decide to remove the labels, it is important to remove all remaining adhesive on the glass walls, otherwise they will be visible on the gold paint.
- The bottle will need to be covered with a continuous layer of beautiful golden paint. After this, you should wait until it is completely dry. Until this moment, you cannot begin further manipulations, otherwise the craft can be ruined.
- As soon as the golden layer on the bottle has completely set and becomes completely dry, the surface of the workpiece will need to be completely coated with a layer of PVA adhesive solution. To make applying this component as convenient as possible, it is recommended to use a brush.
- After this, the prepared bottle, coated with glue, is sprinkled with glitter. They should be beautifully distributed over the surface of the bottle to make it more aesthetically pleasing.
Using a similar scheme, you can decorate the bottle with rhinestones. The only difference in the decoration technique will be in the features of fixing the decorations. For each shiny pebble you will need to select a specific place on the prepared vessel. As a result, you can form a very beautiful pattern, designed in a New Year's theme.
Heroes of the occasion
One of the most common design options is champagne, symbolizing the bride and groom. For this purpose, bottles are dressed up in a tailcoat and a wedding dress. Not real, of course, but symbolic.
The dress and tailcoat can be sewn separately and stretched over champagne bottles
It is important here that they do not bunch up and cover the entire surface of the glass. Materials can be any fabric from organza to felt
A veil looks especially symbolic, and the bottle-groom can be given a top hat.
An outfit made from ribbons is neat and beautiful. In this case, the costumes will definitely be on time and, if necessary, you can add a couple of ribbons to cover the entire surface. To make a groom bottle, you need to make a collar from ribbons:
A tie will also come in handy:
Next, glue several overlapping ribbons to make a shirt:
Then make a tailcoat from ribbons. Colors as desired. The second half of the bottle can be glued not diagonally, but wrapped with wide tape. Complete the decoration with rhinestones imitating buttons, as well as a symbolic scarf or boutonniere.
The bride's outfit is done in a similar way. The top is glued from short ribbons, but it is not necessary to make a collar. The bottom can be covered with a wide ribbon and lace, or you can also use a narrow ribbon to reach the bottom of the bottle.
It is advisable to make a full skirt, for example, from organza. Decorate it as desired.
Well, veil:
Beautiful decoration with ribbons:
Decorate in the shape of a pineapple
Turn a New Year's bottle of champagne into a pineapple, like in the photo! This is not at all difficult, and the finished souvenir will look festive and original.
You will need:
- green and orange tissue paper for pineapple leaves,
- round candies in gold foil (such as “Ferero Rocher” or “Evening Kyiv”),
- glue,
- glue gun,
- twine.
Process of creation:
- So let's get started. Cut orange tissue paper into squares measuring six by six centimeters.
- Drip glue onto the flat side of the candy and place the candy in the center of the paper square. After the candy is securely attached to the paper, fold the edges of the paper so that they “envelop” the candy.
- Start by using a glue gun to cover the bottle of champagne with candies in a circle. Since we are not gluing foil, but tissue paper, there should be no problems. When gluing, follow these two principles: place the candies as closely as possible to each other so that there are no gaps between them. The second secret to successfully making a souvenir is to glue the sweets from bottom to top in concentric circles. Of course, you can attach candies in different colors, but then the “pineapple” will look sloppy.
- Using scissors, cut out thin long leaves from tissue paper to decorate the neck of the glass container in a circle. For this we also use glue.
- Wrap it with twine in the place where the candies meet the leaves.
This master class will make you a real specialist in the field of creating an extraordinary souvenir, especially since it will not take much effort and time, and the material you need is the simplest.
Fabric bag
Ready-made fabric bags for bottles can be found in many stores or ordered on AliExpress.
In most cases, factory products are produced in one color or with unobtrusive thematic patterns (snowflakes for the New Year or hearts for Valentine's Day). This design in most cases looks rather monotonous, but ready-made bags are very convenient to use as blanks for subsequent decoration.
You can, of course, make such a decor from start to finish, but in this case you will have to get a sewing machine and stock up on fabrics, needles, threads, cords and other similar attributes.
A purchased or sewn piece can be decorated with flowers, lace, ribbons, buttons or beads.
Non-standard decor can also be used: coffee beans, legumes, painted pasta, etc.
If a bottle of champagne is not the only gift for March 8, then you can combine all the elements of the gift set into one composition. For example, by making a pseudo bag from a gift napkin or towel.
Knitted New Year's outfits
If you have basic knitting skills, use them to create a unique outfit for New Year's champagne. You can knit a cover in the shape of an elegant Christmas tree - with balls and a bright star on the top.
You can use knitting needles to knit a “sweater” in the shape of a snowman or Santa Claus. Knit the main part in stockinette stitch, and decorate the top in the form of a stand-up collar, tying it with an elastic band. A pom-pom nose, beady eyes, a little jewelry and imagination - here we have a charming guest at the feast.