In every housewife's house there is sure to be a tablecloth of a single color and without any pattern. This product should be used as a training base for your embroidery skills. Since satin stitch and cross stitch embroidery are considered everyday and common handicrafts, we suggest you decorate your home textiles with satin ribbons. This is exactly what this article will discuss. A training photo master class will be offered to your attention.
Features of the technique of embroidering roses with ribbons
To make the embroidery of a rose from ribbons beautiful, voluminous and pleasing to the eye, follow the following step-by-step instructions when creating a rose:
- It is better for a novice craftswoman to try making her first rose from ribbons without attaching it to the base.
- Take a wide satin ribbon (2.5-3 cm) 15 cm long, burn the ends with a lighter so that they do not unravel.
- Wrap the edge of the ribbon in a little bag and sew in two layers with thread matching the color of the ribbon.
- Roll the bag into a tube, forming the middle of the rose. Folding the ribbon as you like, wind it around the center of the flower, stitching it with a needle.
- The further from the center, the larger the petals.
Try embroidering the following ribbon rose on regular canvas:
- Secure a knot on a thin (1 cm) ribbon at the very edge.
- Not far from the end of the ribbon, twist a small bud with your hands and sew it with thread - this is the basis of the future flower. Secure the base to the canvas.
- Thread the ribbon into a special needle and start winding it around the middle, making small stitches. Make sure that the shiny side of the ribbon is always on top - this will make the rose brighter.
When you start to get such simple roses, you can start embroidering full-fledged “pictures” with ribbons.
Combined embroidery method
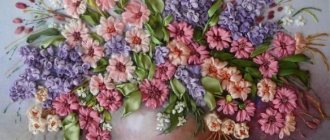
This is an interesting way to combine several types of embroidery. Experienced craftsmen often make paintings with three-dimensional elements embroidered from ribbons. For example, a picture depicting a flower field and a forest is cross-stitched. From above in the field area, the master embroiders flowers from ribbons.
For thread embroidery, select ribbons that match the overall tone, and mark the location of the flowers in small pieces. Embroider in the same way as on an empty canvas. The results are beautiful panels and paintings with three-dimensional patterns.
Step-by-step preparation for beginners
I recommend embroidering peonies with ribbons step by step and you will be convinced that there is nothing complicated in the creation of this flower. With a great mood and anticipation to see our results, we get to work. So, what do we need to create a peony!?
Necessary materials
1. Fabric – it’s better to use thick fabric. Thick fabric options such as moire, silk taffeta, jersey, felt, cotton, linen, canvas. Thin fabric is combined with narrow and light ribbons. The transparent one should be reinforced with a lining. Be sure to wash, dry and iron the fabric before use so that it does not shrink!
2. Hoops - they can be of different sizes (square, round, rectangular)
3. Tapes – have different widths and different densities. Satin ones are best suited for peony, but choose the color yourself. Of course, you can also embroider with ribbons made of silk, organza or polyester. These flowers require a choice of three ribbon colors. Buy three pink shades and also a green ribbon for the leaves.
I am attaching these tape sizes
2 m – 5 mm wide pink – peony center
1m 40 cm – 1 cm wide – peony petals
70 cm – 2.5 cm wide – peony petals
70 cm – 4 cm wide green – peony leaves
4. Select floss threads to match the ribbons
5. Needles are suitable for tapestry, darning, quilting, and knitwear. There are special sets of needles for embroidery on sale.
6. Pencil, ruler, scissors, lighter for singeing the ends of the ribbons.
Selection of materials
The choice of equipment in any needlework matters. To work you will need:
- Ribbons - can be used from satin, silk, thin nylon materials. It is better to buy special embroidery materials. They have a certain width, rich colors and proper quality. Satin 2.5-16 mm ribbons are used.
- Needles - you need special ones, with a wide eye for easily threading the ribbon into the hole. The selection depends on the width of the material used. A certain sharpness is important, since a needle that is too dull will not be able to pierce the fabric, and a sharp one can ruin the ribbons.
- The hoop is used to tension the base fabric. This makes it easier for the needle to pass through, and the design lies neatly. You need to choose a high-quality hoop, smooth to the touch, ideally wooden, with good clamps and the optimal size.
- Fabric base. Aida canvas is recommended for beginners. Over time, cotton and felt, linen or silk bases will be used. Fabrics with high transparency are not suitable because they do not hide the seams.
- Markers - they help to accurately draw a sketch of the future product. They can be washed off or disappear. If the work is progressing slowly, then it is better to use washable markers, which can be easily removed after the product is ready. Experienced craftswomen often use a simple pencil when embroidering on canvas, but it is better to apply a design to other bases with a water-soluble marker.
Beginners should start with complete kits, which already include the necessary tools and materials. They come in a variety of themes and come with patterns, which simplifies the creation of embroidery.
How to embroider a rose with ribbons
What master classes are there on how to embroider roses with your own hands?
Embroidering with ribbons is an incredible pleasure. The flowers look as if they were alive.
In order to embroider a rose, we will need a satin ribbon about two centimeters wide, canvas (it is convenient to embroider on it), and a hoop.
You should start embroidering a rose from a bud. To do this, you need to twist the ribbon in your hands to make a bud. Like this:
Then we sew the bud to the canvas and make a petal from the tail of a satin ribbon. The petal is easy to make when you thread the ribbon into the needle. Each subsequent petal must be formed with your fingers and then secured to the canvas. Like this:
We sew like this until the rose becomes the size you need.
By the way, you can embroider roses from ribbons of different colors.
A good lesson for beginners here.
I offer several visual step-by-step diagrams for creating a delicate rose bud using ribbons, threads, a needle, scissors and a piece of fabric on which the rose will be attached.
I also suggest considering the possibility of creating an unopened rosebud.
For roses, ribbons of any width and even any structure are suitable: silk, satin, tapestry, regular cotton, chintz. But it is best to take satin, this ribbon holds its shape perfectly, has the shine necessary for a rose on one side of the ribbon, is elastic, but soft, pliable for giving the desired shape to the petals of the future voluminous flower. If you decide to use a transparent ribbon made of tulle, keep in mind that the rose will look good to everyone, but it will be transparent, this hides the effect of the volume of the flowers, they get lost somewhere, turning into an airy ghostly pattern, where there will be glimpses of the rose.
To prevent the tape from moving from its assigned position, you need to hold it from behind with your finger, at this time the front part of the tape is carefully laid out on top, the exit from the fabric should also be leveled and the direction of the petal should be immediately set. In order for the petal to hold its three-dimensional shape, you need to bend the tape diagonally, as if you folded a sheet of paper diagonally in half. If the fold is forward, then the needle with the tape is inserted before the exit from the petal tissue; if the bend is backward, then the tape is inserted from behind under the exit at approximately a distance of 2-3 millimeters. Make sure that the tape does not shrink or change shape when tightening the petal; the bend angle should be clear.
For a small rose, it is enough to make 5-6 petals in a circle so that the center of the previous petal is the beginning of the next one. In other words, having made one petal, they begin to form the next one from the middle of the previous one, bringing the needle and ribbon behind the petal, everything should be tightly laid in front. 5-6 petals go to each tier of the flower. All subsequent ones are made from a wider ribbon or from the same one, but they tighten it less to the base in order to give the rose more volume in height. When creating a petal, the distance at the exit point and the entry point of the needle and tape is also increased; for large elements you need to retreat up to 5 millimeters, they look at the situation and how the petal lies. No matter how hard you try, each rose leaf will be individual and will lie in the way that is most convenient for it, so you need to adapt to the situation.
The article was written based on materials from the sites: myhobby.guru, www.joxin.club, podelkiruchkami.ru, nacrestike.ru, www.bolshoyvopros.ru.
Variations of festive arrangement of paper napkins
Paper napkins can be folded beautifully in a variety of ways, even thematically. Depending on the type of celebration, you can choose the appropriate option for laying out the napkins.
For the New Year
The main attribute of the holiday is the Christmas tree. So you can put a beautiful Christmas tree out of a napkin on your holiday table. For this you need:
- Fold the green napkin in half, then in half again - you get a small square;
- Place it in front of you in the shape of a diamond and bend each layer of the napkin upward, leaving no more than 2 centimeters between the folds;
- Turn the workpiece over, holding its bent parts;
- Bend the right and left corners towards each other so that the ends overlap each other;
- Turn the workpiece over again and, starting from the top, bend each corner and lay it under each other to the bottom.
For Valentine's Day or Wedding Anniversary
Serving napkins in the shape of hearts is perfect for a themed holiday dedicated to love. To make a heart you need:
- Fold a square of paper napkin in half to form a triangle;
- The right and left corners of the triangle must be bent towards the middle and up;
- Turn the napkin over and bend the top corner to the center, and on the contrary, bend the remaining corners to the sides.
- Round the heart by bending the top corners and turn it over to the other side.
On Defender of the Fatherland Day
On men's day, you can serve napkins in the form of a tie, wrapping a fork or spoon in it. The color scheme is best defined in blue, purple, green or light blue. It's good if you have blue checkered napkins.
- Place the napkin with the front side (where the design is) down in the shape of a diamond;
- Fold the top left edge about a third towards the center and do the same with the top right part so that they are folded symmetrically
- Now fold the lower left corner up to the middle, and do the same with the right;
- Fold the top part diagonally to the right perpendicular to the bottom part;
- Turn this part and go around the tie so that it is already turned to the left;
- Place this part to the bottom, forming a knot on the tie, now you can fold the device into this knot.
For Easter
For Easter, you can make an Easter bunny, which is also suitable for children's parties.
- Fold the napkin square in half to form a rectangle, fold it in half again to determine the center;
- Bend the top corners along the center;
- Also fold the bottom corners, and bend the left and right diagonally;
- Turn the workpiece over and bend the bottom corner, and wrap the left and right corners into each other, like in pockets;
- Pull out the ears and place on a plate or table.
On the eighth of March
A woman will be pleased to receive not only fresh flowers, but also creatively folded roses, lotuses and other flowers made from paper napkins.
Rose and basic postulates
On the canvas you need to create five loops that resemble a star. Through these loops we tighten the ribbon in the same color in a circle, but so that it passes either under the loop or above it. As a result, you get a rather beautiful bud, which can be complemented with elegant leaves, beads or beads, which will symbolize drops of dew.
Cobweb rose in 5 minutes in MK, instructions for making amazing roses
Examples of schemes supplemented with lilac branches.
Accessories and materials for embroidery
- Canvas, base fabric
- Hoop
- Ribbons
- Scissors
- Awl
- Multi-colored threads
- Two needles: one tapestry needle with a large eye and the second a regular sewing needle for thread
To begin with, you can use any fabric, color too. For beginners, it is better to take canvas as it is easier to learn. In the future, you can choose a base of better quality so that the composition can decorate your interior or a gift that could pleasantly surprise others. It is necessary to thread it into the stretch, into the hoop. They can be rectangular or round. We embroider a rose from satin ribbon.
This activity is quite simple, the main thing is to have patience. And things that, in your opinion, have outlived their usefulness can be decorated in the same way as in the picture.
You will find one example for beginners in our section. Schemes for creating a future painting can be found on the Internet. Photos of finished products amaze with their magnificence.
Markers
To carefully transfer the outline of the drawing onto the canvas, you can use simple pencils of hardness B, B2 or B3. For other fabrics it is better to use special water-soluble markers.
They can be purchased at craft stores. The design is transferred to the fabric, embroidered according to the markings, and when the product is completely ready, it is washed in cold water and all drawn lines are completely removed from the fabric.
Ribbon embroidery in a master class for beginners step by step
Napkin embroidered with ribbons
The plot for the first napkin embroidered with ribbons will be simple and easy for beginners. Let it be a flower arrangement with chamomile and two spikelet inflorescences. At the same time, we will learn how to embroider daisies with ribbons and master how to make a stem using floss threads. This step-by-step ribbon embroidery for beginners will help you quickly understand the features of this needlework.
To work you will need:
- a piece of gabardine measuring 20 cm by 20 cm, sea green;
- satin ribbons: white 12 mm wide, pink – 7 mm, green – 4 mm and 7 mm;
- green and beige floss threads for sewing;
- beads of beige and green colors;
- scissors, hoop, needles for ribbons with large eyes in 2 sizes and for sewing.
We cut the fabric for the napkin with zigzag scissors so that not only the embroidery with ribbons is beautiful, but also the napkin itself. Using a simple pencil, we apply (redraw) the pattern of the future embroidery pattern onto the fabric.
Ribbon embroidery pattern for napkins with chamomile
We stretch the fabric onto the hoop with the part on which the sketch is applied and beginners plan to embroider with ribbons. Using floss threads in three folds, we embroider the stems with a seam “by the needle”.
We embroider chamomile stems with threads
Steam the embroidery from the reverse side. Be careful when choosing the temperature and degree of moisture to prevent the fabric from “pulling.” After the steaming or ironing procedure, in the process of embroidering with ribbons for beginners, we will step by step explain how to embroider a daisy.
Embroidery with daisy ribbons for beginners
To embroider daisies with ribbons, take 30 cm of wide white ribbon and a needle with a large eye. To easily thread the ribbon into the eye of the needle, cut it at an acute angle. We thread it through the eyelet and pierce the ribbon 2 cm from the beginning, pulling the needle to the end. The tape is secured. We make a knot at the other end: we fold the straight edge of the ribbon twice by 0.5 cm, pierce it in the middle with a needle and pull it through. The result is a knot and our “tool” is ready for work. By the way, this is how a needle and ribbon are prepared for almost any ribbon embroidery. Beginners should remember this.
We bring the ribbon out from the wrong side at the starting point of the flower petal near the middle of the flower and make a stitch along the entire length of the petal. Pulling the ribbon through, we form a petal using the eye of a needle, carefully straightening the folds. We embroider 5 more petals.
Embroidering the first chamomile petal
We embroider the inflorescences with straight stitches using pink ribbon. We start from the top in the same way as embroidering chamomile petals and go down in a herringbone pattern.
Embroidering chamomile inflorescences
Using the narrowest green ribbon we embroider chamomile leaves. We form the central vein of the leaf from a twisted ribbon using a straight stitch. You can see how to form a twisted ribbon and make the initial knots in our other lesson. We continue to work with an even ribbon, laying straight stitches one next to the other in a herringbone pattern.
Embroider chamomile leaves
We embroider the main chamomile leaves using a ribbon stitch. Having straightened the ribbon, we pierce it to the length of the leaf and stretch it to the wrong side. Embroidery with ribbons for beginners at the first stage requires step-by-step execution of all elements in order to understand the very principle of working with ribbons, to feel how ribbons behave with different stitches.
Large Ribbon Stitch
Now let’s add a little decor to the napkin embroidered with ribbons; to do this, sew beige beads into the middle of the daisy, and green ones near the leaves. We make a bow from a piece of pink ribbon and sew it at the base of the bouquet. In our step-by-step master class, our ribbon embroidery for beginners acquired the volume and completeness of a floral composition.
Decorating an embroidered napkin
The original napkin, made by yourself, is ready! Such a beautiful textile decoration will create a special atmosphere in your interior design. Since you already know how to make simple stitches in ribbon embroidery and know quite a bit for beginners, maybe you can try to embroider another one for this napkin with a chamomile?
Beautiful embroidery with ribbons on a napkin
Napkin flower
Everyone knows the purpose of serving napkins; with their help, you can beautifully decorate any feast. But most often, serving napkins, folded in an original way, are laid out on plates. But from them you can create a larger decorative element that will decorate the festive table. For example, you can make the flower shown in our master class.
To create such a flower we prepared:
- 10 light pink paper napkins;
- 1 dark pink paper napkin;
- stapler
From each light pink napkin we will make a petal of a future flower. Let's start our work by making the first element. To do this, fold a light pink napkin diagonally. Photo 3.
Now we bend one of the corners of the napkin down. Photo 4.
On the left side we do the same. Photo 5.
We turn the blank of the future petal over to the other side. Photo 6.
We need to bend the corners protruding from below upward. Photo 7.
Now fold the pink petal blank lengthwise. Photo 8.
Carefully straighten it, it should look like this. Photo 9.
Similarly, from another light pink napkin we fold the second petal of the future flower. Photo 10.
We will connect them using a stapler. We do this from the wrong side. Photo 11.
This is how we connected 2 petals together. Photo 12.
We continue to work on creating a flower from paper napkins. Photo 13.
As a result, we must connect 10 petals from the wrong side, each of which is made from one paper napkin. Photo 14.
And on the front side, our decorative decoration is almost ready. Photo 15.
For the core of the flower we will use a dark pink napkin. We fold it as we did the petals earlier. You just need to further straighten the layers. Photo 16.
After this, we bend the opposite side of the workpiece down. Photo 17.
Place the resulting core in the center. Our table decoration - a flower made from paper napkins - is ready. Photo 18.
Video on how to quickly make a beautiful rose from napkins:
Another option for folding napkins with flowers:
On the New Year's table, it is better to fold napkins in the shape of a Christmas tree:
In order not to forget the page address and share with friends, add to your social networks:
Simple scheme
For needlewomen without experience, it is better to start with the simplest patterns, for example, try to embroider a simple daisy flower. To make a beautiful voluminous bud, you will need:
- white, yellow satin ribbons, the width of the strips should be no more than 10 mm; blue canvas;
- needle with a wide eye;
- scissors;
- hoop;
- marker for drawing, it can be replaced with a simple pencil.
After all materials and devices are prepared, you can begin to work directly. The step-by-step technique for doing ribbon embroidery is as follows:
- To begin with, you should draw a sketch of the design that you plan to embroider on a regular sheet of paper, and then carefully transfer it onto the fabric. This can be done using a marker or a simple pencil.
- Now you should choose a convenient place, and embroidery will begin from there. Experienced craftsmen recommend starting with a bud. Place the material in the hoop and you are ready to begin.
- Embroidery begins from the core of the bud; to do this, insert a needle from the wrong side, into which a white satin ribbon is threaded, and pull it through. Then it is necessary to form a petal, moving from the core to the edge, and the strip must lie freely, otherwise the fabric will wrinkle. Moving in a circle, all the remaining petals are embroidered; in the end, an empty core should remain.
- Next, they begin to embroider the core of the flower, this is done using the French knot technique. To do this, you need to take a needle and wrap it twice with yellow ribbon and pull the needle through the fabric. These knots are made until the core is completely filled.
Methods for processing the edge of a canvas in 1 minute
The canvas can be carefully stitched by hand or processed using an overlocker. But there are 3 ways that won’t take more than 1 minute.
Methods for processing canvas:
- Coat with PVA glue.
- Apply clear nail polish.
- Cover with masking tape or tape.
Such methods of processing the edge of the canvas are suitable only for small jobs or for those products that are not planned to be washed. In other cases, it is necessary to stitch the edges.
Selection of fabric for the base
Embroidering flowers with ribbons may seem difficult for beginners. Therefore, you should start learning from the basics. To make flower embroidery with ribbons high-quality and beautiful, you must first select the right tools and materials for the work. The result primarily depends on this.
It is very important that the base fabric on which flowers will be embroidered with ribbons is strong enough, because the stitches must be securely fixed. But we should not forget that the material should easily allow the needle and ribbon to pass through
Most often, craftswomen use tapestry, linen, and embroidery canvas.
Sometimes a color design is already printed on the canvas. It is very easy to embroider flowers with ribbons - no patterns are required in this case.
Framework
Special frames are purchased to tension the fabric on which embroidery will be done. The device that holds the fabric is called a hoop. They can be round or square. When purchasing such frames, it is better to give preference to wooden products.
It is important to inspect and check the quality of the paint, and also make sure there are no defects (small chips and burrs). Poor quality painting can ruin the work, leaving stains on the canvas, and small flaws in the frame often damage the fabric and tapes.
the easiest job for beginners
We invite you to master the basics of this wisdom with the master of the Club on Osinka, Svetlana Gerasimova. Who knows, maybe with this seemingly simple work, one of you will discover something wonderful. the magical, bewitching world of ribbons and the beauty they create.
01. I apply the design to the fabric. I like to embroider the spikelet with a 3 mm wide ribbon. But 6 mm is also possible.
I start embroidering from the top of the spikelet with a straight stitch.
02. Then, on one side of this seam, I look for the middle and bring the needle to the face, then on the other side, too, the middle. I bring the tape with the needle to the wrong side, then through the resulting loop I bring the needle to the face. I tighten the loop and grab it a little lower. This creates a chain stitch.
03. This is what it looks like.
I repeat several times. The next loops should be wider to convey the shape of the spikelet.
04. The tape can be twisted.
05. I embroider stems and leaves using twisted stitches.
06. I embroider the second spikelet in the same way as the first.
07. Next we embroider the spines of the spikelets. For the spines, I take three different shades of floss threads, insert them together into a needle. I embroider the spines with long stitches like this.
08. For the second spikelet (it’s in the background), you can use two threads of floss.
This is what happened!
LiveInternetLiveInternet
—Categories
- FOM (flowers) (63)
- lampshades, lamps (49)
- owls (25)
- autumn (10)
- crazy-wool (6)
- Charging (4)
- repair (4)
- manicure (1)
- applique, clothing decor (8)
- affirmations, simoron, conspiracies, etc. (57)
- runes (2)
- costume jewelry (205)
- wire (46)
- Soutache (28)
- beads (273)
- necklace (64)
- pendants, pendants (31)
- books on beads (31)
- Bead embroidery (30)
- cabochons (30)
- Harnesses (30)
- beading utilities (21)
- earrings (19)
- brooches (17)
- bracelets (16)
- knitting (12)
- flowers (11)
- beaded beads (8)
- beads (7)
- felting (27)
- embroidery (1086)
- original works (152)
- Embroidery with ribbons-4 (107)
- satin stitch, volumetric embroidery (83)
- Ribbon embroidery-5 (32)
- cross stitch (10)
- ribbon embroidery (101)
- embroidery with ribbons-2 (107)
- Embroidery with ribbons-3 (100)
- Pictures for embroidery (124)
- books about embroidery (57)
- Useful tools for embroidery (97)
- fabric flowers (238)
- seams (27)
- crochet (144)
- knitting (57)
- guilloche (6)
- interior decor (41)
- kitchen decor (11)
- clothing decor (38)
- decoupage (33)
- children (62)
- for Dummies! computer, programs, wisdom.. (7)
- health, diets (46)
- From cardboard. (43)
- interesting (71)
- tested on myself (5)
- paintings, art (60)
- quilling (19)
- cinema (2)
- books (10)
- rugs (8)
- leather (42)
- boxes, caskets (16)
- DIY cosmetics (79)
- leather beauty (11)
- beauty! (38)
- dolls, toys (78)
- personalities (26)
- makeup (16)
- furniture, remodeling (21)
- fur (26)
- my works (78)
- music (2)
- New Year (71)
- shoes, slippers (65)
- postcards (4)
- post design (7)
- parchment (2)
- repurposed from old T-shirts, jeans, etc. (87)
- plastic bottles (15)
- gifts (13)
- packaging (6)
- pillows (13)
- useful things (110)
- wash, clean, bleach (20)
- patchwork (24)
- crazy (14)
- various master classes (26)
- recipes (302)
- side dishes (16)
- cook meat (25)
- jelly, aspic (2)
- preparations, sauces (15)
- casseroles (8)
- salting (fish, lard, etc.) (10)
- from lavash (20)
- microwave (15)
- dairy products (24)
- drinks (10)
- quick snack (sandwiches, etc.) (5)
- fish (8)
- salads (19)
- soups (1)
- dough, baking (53)
- cakes, sweets (76)
- decorate food (27)
- fondue (2)
- Health Recipes (39)
- glass painting (9)
- fabric painting (26)
- garden and vegetable garden (23)
- Wedding (12)
- do it yourself (84)
- salt dough (16)
- poems (33)
- handbags (163)
- comfortable living (12)
- learning to draw (13)
- Photography (50)
- cold porcelain (31)
- flowers (37)
- templates, stencils (7)
- hats (14)
- let's sew! (128)
- humor (10)
—Quote book
Miracle - decoration - dandelion.
Winter New Year's owls. | Inga Izmailova Previously, paintings by this artist were HERE https:/.
The author of the American analogue of the Unified State Exam was convicted of sabotage in the education system 1. Completed in the USA.
Floral creativity on a black background from HAZEL LYNN https://f23.ifotki.info/org/6a746483fb0c78ee.
Denim handbag "August". I really like colored denim, so when they pop.
Source
How to embroider a heart from roses with ribbons - a method for beginners
Work should begin with the preparation of all necessary materials. Once the entire set is assembled, you can start crafting. The roses will be located on the fabric in the shape of a heart, so first the surface should be measured. The fabric is placed on the table and smoothed out with your hands, then a heart is drawn on it with a pencil. Do not press the pencil too hard, otherwise it will be visible after embroidering. Work begins on the right side of the product. The method of such embroidery is called “spider web”. The ribbon is threaded through a needle and 5 rays are made on the fabric, looking in different directions, as if the sun is being drawn. Then a knot is made, and the needle pierces each “sun” from the edge to the center. The material must be held in order to tie a tight knot at the end. Embroidery of a rose occurs in this way: the needle is pulled out onto the face and consistently wraps around all the rays of the “sun”
An important rule: the ribbon should face up with its shiny side. Do not tighten the tape too much, otherwise the work will not be voluminous. When one flower is embroidered, it is worth burning the ribbon at the wrong side of the work and securing its end to the fabric. After this, you can start embroidering other roses along the contour of the heart, but the “suns” must be made so that their center is always on the drawn contour.
The heart will turn out very tender and beautiful
Video: Embroidering peony flowers
Scarlet chrysanthemums
Autumn chrysanthemum flowers perfectly complement this period of the year. Especially if you embroider them on a canvas that will resemble autumn. To do this, take a ribbon 0.5 cm wide and start embroidering:
- Chrysanthemums are complex on the outside, very easy to embroider. First of all, we begin to embroider the inner tiers of the flower. We do this using ribbon stitches. The petals are made thin near the base, and the transition to the upper part expands;
- each new tier of petals should outshine the previous ones. Basically, chrysanthemums consist of five rows;
- at the end we embroider leaves and stems, as well as patterns. The work on the chrysanthemums is completed.
Blue cornflowers
Cornflowers can be found exclusively growing somewhere in the fields. Their blue blooms are visible from afar. People also call them the eyes of the sky. Take blue ribbons no more than 0.6 cm wide and get to work:
- draw a sketch on the canvas;
- embroidery from ribbons of petals, done with ribbon stitches, around the center of the base of the flower. Their length should differ from each other. And the stitches are overlapped. Thus, their appearance will resemble the original;
- for the center, cornflowers, are embroidered using knots similar to a lilac bud;
- We have finished making cornflowers, in the middle of which, instead of knots, you can make beads.
Read
Passe-partout and cross-stitch design in a frame
Ribbon embroidery ideas for beginners
This craft uses satin or silk ribbons. An artist who wants to master this embroidery technique has a choice: he can create a pattern on canvas or other fabric, or he can create it on clothing, a bag, and so on.
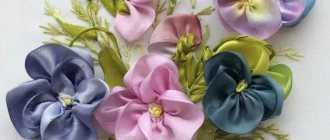
When it comes to ribbon embroidery, the image of flowers comes to mind for most people. Yes, indeed, flowers from this material turn out incredibly beautiful! Especially if you make roses, violets or lilies.
Each flower has a ribbon of a different color, for example, a rose is embroidered from red or pink material, and a violet is embroidered from purple.
This material is also used to make embroidered birds, such as owls or parrots. But, probably, the best picture of the ribbons will be a rooster. Although this is a matter of taste, many people embroider a peacock or dove from them.
This article will present step-by-step the best master classes for working with ribbons.
History of origin
It is generally accepted that ribbon embroidery originated in the Middle Ages, and its homeland is Italy. But the main admirer, lover and distributor of this type of needlework is considered to be the French court, headed by His Majesty Louis XV. There is even an opinion that the august master embroidered some things with his own hands. The splendor and luxury of noble toilets of that time, as well as the then passion for decoration, are known to almost everyone. In the twentieth century, this art turned out to be forgotten for a long time, at least in our country, but now everyone is successfully catching up.
Master class on embroidering a bouquet of roses on fabric made of satin ribbons
The technique for embroidering roses is already more complex than the master class with a bouquet of daisies, which was discussed above. Read everything carefully to the end so that you have an accurate idea of how much work you have to do and what you will have to face during the execution of the composition.
Materials
To embroider roses you will need:
- Ribbons of rich pink and green colors.
- A needle with a long narrow eye for embroidery.
- Scissors.
- Hoop.
Algorithm for embroidering roses with satin ribbons on fabric:
Before you begin to include rosebuds in the composition, you need to learn how to embroider them separately from all the flowers.
Rose embroidery is very complex. Cut a piece of tape approximately 60–70 cm. Make a diagonal cut at an angle of approximately 45 degrees. On the reverse side, the straight end of the tape needs to be slightly burned with a match or lighter. Take a needle with a wide, long eye and insert the slanted end of the satin ribbon into it. Pull the ribbon through a little, then stick the needle into it and tighten the knot at the end. Once you have made the knot, you can begin by inserting the fabric into the hoop and piercing it from the inside and bringing the needle and ribbon out. Make a stitch to the side, but make sure that it is not too tight
Please note that whatever the stitch is, the diameter of the rose will be the same. So if you want a big rose, make big stitches.
Look carefully at the photo, you need to make three stitches in different directions, diverging from one point
This way you will have three rays that will serve as the base for our rose. For greater clarity, at the beginning of the work, you can draw a circle around the rays, this will make it easier for you to start embroidering a rose with ribbons. Place the needle and ribbon in the middle between the rays on the circle. Look carefully at the photo, it will be clearer and clearer. Bring the needle and ribbon to the front side. Pull it through the farthest beam, according to the photo instructions in our article. After you thread the needle under the stitch, you need to insert it into the circle that we drew at the same level as the hole that we inserted the needle into initially.
Now we have the base of the rose with five rays, we can begin to create the flower bud. We bring the needle exactly to the center of the flower under the ribbons and tie it in a circle under the stitches, without pulling too much. The direction of the needle should be counterclockwise. Please note that as soon as you reach the beam, change the direction of the needle, first below it, then above it. So, we make a flower bud by alternating the direction of the needle. We thread the needle and ribbon around the entire perimeter of the flower and finish tying the rays only when they are completely invisible. We fasten the ribbon by threading it down under the bud, and cut it there, after tying a knot. Next, we make as many flower buds as you need for the composition, and begin to form leaves with stems. We embroider the stems in the same way as for daisies, and form the leaves using air ribbon stitches.
Additional composition elements
At the end, iron the work and therefore fix the petals properly
It is very important to iron the product only from the wrong side. The thin texture can stick to the iron and the sunflower will literally burn. Most people do not complement the composition with other colors, considering it unnecessary
It’s a great idea to highlight the composition using wildflowers and herbs. They must be made using the same olive iris thread. You will get a spectacular bouquet of wildflowers that will decorate any room in your home in the form of a picture and will certainly attract interest. And even more so if you decorate your coat or blouse with them.
Don’t be afraid to experiment and add something new to traditional techniques, this is how new directions appear in the world of HAND MADE. There are a huge number of specialized sites on the Internet where lessons for beginners will allow you to improve your skills and become a real professional.
There are countless different seams and stitches in needlework. See our sections on embroidery of various kinds of flowers and pictures. I wish you success and patience in creating masterpieces with your own hands! Have a good mood and inspiration.
Design of an embroidered picture
If you have finished, but still have the feeling that something is missing, you need to improve your work by turning on your imagination. You can complement the picture, for example, with buds. The base is made with green straight stitches, and the upper part is decorated with white or milky shades. As for their quality, what you will use, then you decide. Silk ones, of course, will look much more impressive, but their cost is much higher; satin and synthetic options are considered an economical option. They go well with almost all types of fabric; they can even be used to embroider on leather if you make holes with an awl. Only experienced craftswomen use organza, since the fabric is transparent and the seams must be neat, but novice needlewomen do not always succeed.
After the main components of the picture are ready, decorate with beads, rhinestones, bows or sequins. If the composition looks unfinished, add flowers of a smaller size and the opposite color. There are no rules in choosing additional flowers, the main thing is that it looks beautiful. The finished picture is placed in a dark frame, because white flowers in a light frame will look dull.
If you don’t succeed at something the first time, don’t be sad, everyone starts somewhere. Be patient, you will definitely achieve the expected result, and you will certainly amaze your friends with the created composition. With each new job, you will improve your skills and before you notice, you will start giving master classes yourself.