Before inserting the drill into the hammer drill, it must be lubricated. To do this, take a drill and lower it into a jar of lubricant, rotate it a little and take it out. When the drill is inserted into place, you may notice excess lubricant, which, when turned on, will scatter across the walls, and this is undesirable. It is for this purpose that you need a homemade oil can.
How to do this - watch the video
To create an oiler we will need: - two paper capacitors; - pliers; — soldering iron 65V; - lathe; - drill; - brush.
We will make our oiler from the steel body of a paper capacitor. To do this, clamp it with pliers and heat it over an open fire. Once it warms up, the condenser cover can be easily removed.
We do the same with the second capacitor. We remove the insides and we are left with only metal cases, which we close with lids. We press well and solder the joints in both cases. The tinned body is easily soldered.
Rosin can be used as a flux.
This is our building. Now we need to machine an adapter, a cap and a plug from a piece of metal.
For the adapter we use an old bronze tube from an old chandelier. Using a die, we grind the M12 thread in increments of 0.75 mm. We bore the hole to a diameter of 10 mm. We make a notch for the hole in the body and cut it off.
We make a plug from brass. We grind it into the desired shape for the hole in the body. We drill a hole in it, insert the chain and roll it. Cut off the excess.
We make the cap from duralumin. We grind out the required shape and knurl. We drill and bore, cut the M12 thread, in increments of 0.75 mm. We process the reverse side and cut off all excess. We fasten the chain.
Everyone is familiar with yellow-legged mushrooms with an oily brown cap. These are boletus, of which there are 14 species in Russia. They grow in families on forest edges, bathed in sunshine, prefer a cozy place under a pine tree, they can be found along roads and near industrial enterprises, and they appear three to seven times a year after warm rains. Hurry to the forest to collect them. Three days after the rain, the mushrooms will begin to age and deteriorate.
Boletus mushrooms: how to collect them?
Usually boletus appears in its former places of growth. Every mushroom picker knows them well. If you are a beginner and have gone to the forest for mushrooms for the first time, pay attention to the tubercles under the leaves, this is where the boletus lives. Carefully removing the foliage will reveal a large mushroom family. Collecting them is a pleasure; the basket fills up quickly.
Remember: mushrooms should be cut with a knife. If you pull them out by the roots, you can damage the mycelium, and next year there will be no butter there. It is better to collect young, small-sized, strong mushrooms.
There are a lot of stuck leaves, pine needles and other debris on the oily cap. Feel free to clean the mushrooms right in the forest; at home there will be less hassle about how to process the boletus.
Do not pick mushrooms near highways or big cities. Butterfly, like other mushrooms, well absorb salts of various metals, including heavy metals, from the soil and air. Therefore, collect them only in the forest, away from roads and enterprises.
Butterfly got its name because of the slippery mucous cap, the surface of which protects the mushroom from drying out. However, it is precisely because of the Maslenitsa surface that these mushrooms are difficult to peel.
How to process boletus? Different mushrooms are processed differently. Therefore, when you come home, sort the mushrooms you have collected and begin primary processing, which consists of cleaning, washing, sorting and cutting.
To thoroughly clean such mushrooms, place them in a bucket or basin of water for a few minutes and put pressure on top, then they will not float. Dry grass, leaves, branches on the surface of the caps will become wet and easily separate. After that, start cleaning. It is necessary to cut off the remains of the mycelium from the stem, scrape off all the dirt from the mushroom with a knife, free the cap from the film, which can be easily removed, cut out, if any, rotten places.
Start washing the oil. The fact is that, no matter how you select mushrooms, when collecting them in the forest, you will definitely come across wormy ones. So that the worms float to the top and the larvae sink to the bottom, place the mushrooms in salted water for three hours. After this, rinse thoroughly again with running water.
How to properly process boletus? After cleaning and washing, you need to start sorting by size: leave small mushrooms whole, for medium mushrooms separate the cap from the stem, and cut large ones into pieces.
To prevent the pieces from falling apart, you need to boil them for two minutes in water. You don’t have to cook the butter until cooked, but immediately fry or marinate the raw butter. After initial processing, they are dried, pickled, fried, stewed, boiled, and salted.
Planting material
You can find artificially grown mycelium of various mushrooms on sale. Mycelium from boletus costs from 120 to 300 rubles, depending on the type - the regular one is cheaper, and the cedar one is the most expensive. You can buy it in specialized stores. Despite the abundance of choice of ready-made planting material, experienced mushroom growers prefer to independently grow mycelium from spores of overripe fruiting bodies taken from the forest.
IMPORTANT! Mycelium mycelium, obtained artificially in the laboratory, may not produce fruiting bodies under natural conditions, even if the mycelium develops well.
Processing oil by drying
How to process boletus by drying? This method is not very common, but it has found application. Despite the fact that butter beans become brittle and thin after drying, all the beneficial substances are retained in them. For processing, choose young, freshly harvested ones. Wash the mushrooms without damage, peel and remove the skin.
Dry them in the air, in the sun. To speed up the process at a temperature of 50-70 degrees. Butterflies are strung on a thread and hung on the roof, attic or laid out on trays, a table, or in a sieve. The main thing is that the drying area is protected from dirt, dust and wind. In unstable weather, combine drying - in the sun and in the oven. You can dry boletus over a stove or oven on metal frames or in bulk on wooden shavings. After two days, the mushrooms will become brittle and brittle, which means the drying process is complete.
Before the sacrament of marinating, selecting spices, properly prepare the mushrooms, following the above methods of pre-processing them. Clean and rinse the boletus. Then place them in a saucepan with water, salt and add citric acid to taste, which prevents the mushrooms from browning. Once the water boils, reduce the heat and simmer for 20 minutes. Drain the water and wash the mushrooms.
Next, you have to choose how to process boletus mushrooms according to culinary recipes. Here is one of the easiest to prepare: add salt (50 grams), 80 grams of sugar, 100 milliliters of six percent vinegar, a few peas of black and allspice, cloves, and bay leaves into a saucepan with one liter of water. Cook the prepared marinade for three minutes, add two kilograms of the butter you prepared to it and cook until tender for another twenty minutes.
As soon as the mushrooms settle to the bottom of the pan and the marinade becomes transparent, place them in warm, dry, clean jars. Fill with marinade to the very top. Add 1 tbsp to each jar. a spoonful of vegetable oil. Once the marinade has cooled, place it in the refrigerator, covered with parchment paper and tied.
If you will not be storing your marinated butter for a long time, but plan to eat it quickly, then a quick recipe is quite suitable. Place the pre-treated 5 kg of lightly boiled butter into dry, heated jars, after placing a dry sprig of dill and a piece of lemon zest on the bottom of the container.
The marinade is prepared separately: 2 tbsp. l. salt, 3 - sugar, 5 peas each of black and allspice, bay leaf, chopped garlic - 2 cloves. Pour in a liter of water, after boiling, cook for 5 minutes. Fill the jars of butter with hot, freshly prepared marinade. Pour 1 tbsp into each jar. l. vinegar. Close the jars with ordinary lids. When they have cooled, put them in the refrigerator, after a few days the butternuts are ready to eat.
Operating principle
Once the wooden oil press (or metal) is assembled and equipped with replaceable attachments, you can begin to use it for its intended purpose. To extract oil using such a unit (for example, from sunflower seeds), you must perform the following steps:
- Raw materials are poured into the loading ladle of the device.
- The rollers, the surface of which is covered with a grater cloth, are driven into rotation by means of a handle.
- Due to the rotation of the rolls, the raw material is drawn into the gap between them, where the peeling occurs.
- After peeling, the sunflower kernels and the husk from which they are freed end up in the lower bucket.
- The mixture consisting of sunflower kernels and husks is winnowed.
- Rollers with a grater cloth are replaced with rollers with a smooth surface, with the help of which vegetable oil will be squeezed out.
- The cleaned seed kernels are placed in the upper bucket and sent to rolling.
- To reduce the size of the gap between the rollers, which is necessary so that the seed kernels passing between them are compressed with the required force, a special lever of the hand press, which is moved to the second position, allows.
- The result of rolling is a mushy mass, which must be pressed to extract the vegetable oil from it.
Manual type wooden hydraulic oil press for squeezing oil from seeds and nuts
Since a manual squeezing press is not able to provide the high pressure exerted on the raw materials used, the percentage of oil yield is lower than when using specialized equipment. If you use an electric motor or a hydraulic press to drive such equipment, you can correct this shortcoming.
A manual oil press has a number of advantages. We present the most significant of them.
- Due to the simplicity of the design, such a press can be made by hand.
- The finished product has excellent taste and high nutritional value.
Manual screw press for home oil extraction
At home or in a small production workshop, you can use both a wooden and a screw press to produce vegetable oil, which are highly efficient. It should be kept in mind: if you do not make such devices for extracting oil yourself, but purchase ready-made models, then a wooden press based on a hydraulic mechanism will cost much more than a screw press. If you take such a unit to organize a small business producing and selling environmentally friendly vegetable oil, it will pay for itself quickly enough. Such equipment will pay for itself even faster if you use it to produce not only sunflower, but also olive or even cedar oil.
Storing butter
Fresh mushrooms are considered a perishable product. But if you have learned how to process boletus correctly, you can save it for consumption in the winter. How should boletus be stored?
- Boiled mushrooms are already ready to eat. Cool them, put them in bags, freeze them, so they will be stored all winter.
- You can also freeze butternuts fried in vegetable oil.
- Marinated in jars covered with parchment paper or an ordinary lid, placed in the refrigerator, mushrooms can be stored for several months.
- Dried boletus should be stored strung on a thread or in a tightly closed container in a dry place. When the mushrooms become damp, dry them in the oven, otherwise they will become moldy and disappear.
You have learned how to collect, clean and pickle boletus, so feel free to go to the forest during mushroom season and collect as many mushrooms as possible. Boil, stew, salt, marinate, dry boletus, and your table will always have a variety of dishes made from them. Bon appetit and be healthy!
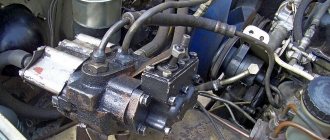
While carrying out this task, we come across components that require lubrication during assembly. And here the need arises for some mysterious reservoir for storing oil - an oil can.
Companies that sell tools offer a number of grease fittings, all of them perform the same function, but have a different design.
The oilers have a modern hemispherical design. Available in 2 configurations: lever style and pistol style. Equipped with a pump and a rigid or flexible steel extension.
Master class on making a Maslenitsa patchwork doll
Galina Shinaeva
Master class on making a Maslenitsa patchwork doll
Russian folk music is a fertile source of spirituality.
A hand-made patchwork figurine performs a communicative function; it is a means of communication and familiarization of preschool children with folk cultural experience.
During Maslenitsa week this year, I decided to introduce my students to another Russian traditional rag doll - Maslenitsa Homemade .
DIY car oiler
Now let's talk about how to make a car oil can with your own hands (if this is really necessary). The chemical industry will help us with this.
We go to the store or household chemicals department. We find a shelf with detergents. And now the most important thing is to select a bottle of liquid soap that is convenient for your hand (the most convenient bottle is a cylindrical shape). We buy it, wash our hands, and then use the used bottle to make an oil can; to do this, fill the reservoir of the bottle with motor or transmission oil.
That's all, the car oiler is ready. This oiler will serve you for a long time.
Before inserting the drill into the hammer drill, it must be lubricated. To do this, take a drill and lower it into a jar of lubricant, rotate it a little and take it out. When the drill is inserted into place, you may notice excess lubricant, which, when turned on, will scatter across the walls, and this is undesirable. It is for this purpose that you need a homemade oil can.
How to do this - watch the video
To create an oiler we will need: - two paper capacitors; - pliers; — soldering iron 65V; - lathe; - drill; - brush.
We will make our oiler from the steel body of a paper capacitor. To do this, clamp it with pliers and heat it over an open fire. Once it warms up, the condenser cover can be easily removed.
We do the same with the second capacitor. We remove the insides and we are left with only metal cases, which we close with lids. We press well and solder the joints in both cases. The tinned body is easily soldered.
Rosin can be used as a flux.
This is our building. Now we need to machine an adapter, a cap and a plug from a piece of metal.
For the adapter we use an old bronze tube from an old chandelier. Using a die, we grind the M12 thread in increments of 0.75 mm. We bore the hole to a diameter of 10 mm. We make a notch for the hole in the body and cut it off.
We make a plug from brass. We grind it into the desired shape for the hole in the body. We drill a hole in it, insert the chain and roll it. Cut off the excess.
We make the cap from duralumin. We grind out the required shape and knurl. We drill and bore, cut the M12 thread, in increments of 0.75 mm. We process the reverse side and cut off all excess. We fasten the chain.
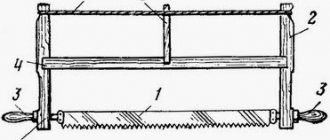
Everyone knows that all sorts of metal things, such as tools or mechanisms, love affection, cleanliness, and lubrication. The better they are lubricated, the longer they last and the better they work. There are a large number of different lubricants available in aerosol cans. However, they are also expensive (200 ml of an oil + filler mixture is sold to you for the price of a liter of excellent high-quality machine oil). And they are quite specific in their composition. It has been noticed that the lubricant from the cans dries out quite quickly and, instead of having a lubricating effect, after a while it creates increased friction. And “thin” mechanisms can even jam from such lubrication. And finally, they are not always at hand. Therefore, we’ll make ourselves a simple homemade oiler, or better yet, several. Because different mechanisms require different types of lubrication.
The main task of the oiler is to ensure that oil is delivered to the right place and in the right quantity. Excess oil will add nothing but dirt. It will just go to waste and disappear. This means that our oiler should be able to dispense minimal portions of oil (we can always get a large amount by dispensing many small portions). And, besides, she must be quite nosy. To be able to lubricate even places inaccessible to the eye and hidden cavities and parts, bearings of power tools without disassembling them, etc.
Despite such a “formidable” technical task, you can make a homemade oil can from any plastic bottle. The only condition is that it must have flexible walls so that it can be squeezed with your fingers and squeeze out a portion of the oil, creating pressure in it.
To minimize the amount of oil dispensed, take a fairly thin plastic tube and insert it into the bottle cap. The tube inside the bubble should go all the way to the bottom, but be cut there at an acute angle. And so that the oil can does not “poison” the air, we will seal the place where the tube inserts into the plug. For example, using hot glue.
Pour some machine oil into the bottle and our oiler is ready for use. It is enough to lightly squeeze the plastic bottle with your fingers, and a drop of oil will appear at the tip of the tube. And you can precisely lubricate mechanisms and tools that need lubrication.
If you do not pour too much oil into the bottle, then such an oil can also has a “non-spill” effect. If the bottle is placed on its side, the oil level will be below the level of the tube inside the bottle. And oil will not leak out of it. This is a very important advantage, since machine oil, despite its apparent viscosity and thickness, can leak even into microscopic holes and saturate any porous material.
Another version of the oiler can be made from bubbles equipped with a spray bottle. Such an oiler can be useful for lubricating very hard-to-reach places, as it “spits” oil or sprays oil throughout the volume. For example, for lubricating the insides of locks or gearboxes. This type of oiler dispenses lubricant strictly in portions. When you press the head of the spray gun, a strictly limited portion of oil enters the tube under pressure and shoots out of the tube.
To make such an oiler, you will need to drill a hole in the head of the spray gun with a drill of the appropriate diameter for a thin tube. We insert the tube into the hole with a slight tension (for fixation) and the oil can is ready. All that remains is to fill it with machine oil. So, in a few minutes of work, we can make ourselves the required number of oilers for different types of lubricants.
Another use for such an oiler is strictly dosed “dispensing” of oil for preparing the fuel mixture for two-stroke engines. For them, as you know, you have to prepare a fuel mixture of oil and gasoline. This procedure is not complicated and the mixture is prepared in advance and in quantities of several liters. Oil and gasoline must be mixed in certain proportions, usually 1:50 (for one volume part of oil, add 50 volume parts of gasoline). A lack of oil will lead to oil starvation and overheating of the engine, and an excess will lead to the deposition of excess carbon deposits in the engine. Therefore, it is necessary to measure the oil quite carefully, with an accuracy of several milliliters. This is exactly what a similar oil can will help with.
Using the same principle, you can make filling bottles for the fuel mixture for two-stroke engines. Gas tanks of two-stroke engines on chainsaws or lawn mowers are very modest in volume and, as a rule, have a fairly narrow neck. Therefore, pouring fuel mixture from large canisters into it is very inconvenient. There is always a risk of pouring more mixture than necessary. But if you make a special refill bottle (from a PET bottle) with a thin tube inserted into the cork, the refill procedure will become absolutely waste-free and safe. Fuel can be poured even down to the drop, carefully monitoring the amount in the tank. In addition, the risk of getting dirty is sharply reduced.
With the approach of autumn, mushrooms appear in the numerous stocks of housewives: pickled, frozen, salted, dried. There are cute and tasty mushrooms on a yellow stalk with a brown oily cap - boletus.
The Latin name for the oiler is Suillus luteus (late or yellow oiler), the word luteus means “yellow.” People call the mushroom differently: maslukh, chalysh, maslyuk, the British call it “Slippery Jam”. It received this name because of its oily, sticky cap, red-brown or dark brown in color. In rainy weather, more mucus is produced.
The stem is golden yellow or lemon in color. It reaches a height of 10 cm, a thickness of up to 3 cm. Adult mushrooms have a white or grayish-purple ring. Above the ring the leg is white, the lower part of the leg is brown. The color of the pulp is white or yellow, with a pleasant smell and sour taste. There is a white film on the back of the cap of young butterflies.
Boletus grows in pine forests near young pines. They love a sunny place, so they are not found in overgrown forests. It is easier to find on the edge of pine forests, on the side of roads near a pine forest, on fire pits or old fire pits. The collection lasts from June until frost. The mass harvest occurs in July.
Homemade oil press – Homemade machines
I received a question from Instagram about the cold-press technology of EcoFarm YAKUSHEV. A good question deserves a good answer and gratitude, so we provide a link to the author’s profile: rodnoy_medok
Question from rodnoy_medok: Tell us how you can fry using extra cold-pressed oil?) After all, there are only three methods of extraction - an oak barrel, a screw press and extraction. You can buy it from a screw press in a store - “cold” pressing and the smell of roasted seeds. Do you have the same?
The answer was prepared with the support of Alexey Yakushev: Dear rodnoy_medok, thank you for the wonderful question, because many people only know about the existence of refined and unrefined oil, and even unrefined oil can be different. So let’s put harmful refined oils aside and consider the technologies for the production of unrefined vegetable oil.
Like presses made from other types of wood, oak presses are very beautiful, and during the production process they emit an incomparable aroma and the oil flows so deliciously that you can admire it, but everything is so rosy only before they begin to be actively used.
The main disadvantages of wooden oil presses:
- low performance. On average, 1-3 liters per hour, which means even with a 12-hour working day you can’t get more than 36 liters of oil
- low oil yield - about 20% of the weight of the seed
- rancidity, drying and fungus. When the cash press is idle, it must be cleaned and treated with beeswax. If this is not done, then the oil remaining on the surface of the wood will dry out, go rancid, and the new smell will no longer be eradicated from the old barrel. If the press is not dried, then mold may grow on wooden surfaces, which also will not make the oil useful and environmentally friendly.
- High cost or low quality oil. If the equipment is used regularly, without downtime and is cleaned and dried in a timely manner, then problems with its damage can be avoided, but who can vouch for an unknown manufacturer, especially when every preventive maintenance means equipment downtime, a waste of time, and therefore an increase in cost.
Screw oil presses are more technologically advanced and can operate in continuous mode for a long time. They also require cleaning, but metal is easier to clean than wood. However, screw presses have no fewer pitfalls than wooden ones.
DIY cold pressed oil press
A business idea for the production of sunflower oil is based on an oil mill. From an investment perspective among professionals, the idea has not lost its popularity and is still in demand and profitable.
However, for many, the issue of income in this area is quite controversial, which is in vain. Let's take a closer look so as not to rely on the opinions of the majority, but to base our own conclusions on specific numbers and facts.
In this business you won’t be satisfied with just butter.
The profit from its sale is hardly enough to reach the cost level.
But we must not forget about the additional products obtained from the creamery, which bring a significant net profit.
Equipment for the production of vegetable oil
The production of vegetable oil at home is limited by financial resources. This type of business is attractive for its flexibility of rapid development.
You can start with a minimum set of production workshops, and then expand with additional equipment for the production of by-products. Thus, the range expands, and profits grow progressively.
A full-fledged plant for the production of vegetable oil must be WASTE-FREE!
The minimum configuration of the line consists of the following equipment:
- Mini oil press. The power of such an oil press is 2 kW. per hour, 220 V. Capacity = 13 liters per hour. Press weight 45 kg. The average cost is $800.
- Food filter. The oil must be cleaned using a special filter with a capacity of 0.5 m2. at one o'clock. Productivity = 5 liters per hour. Filter weight 100 kg. Cost 1100-1300 dollars.
By and large, these two components are already quite enough to produce and sell two products: good sunflower oil and meal.
By the way, meal from oilseeds is widely used to feed animals and birds in agriculture. Therefore, it sells much faster than the main product.
In addition, there is much more of it at the output of processed raw materials - 65%.
But if you plan to earn more, then you should think about expanding production.
Additional technological equipment for the production of vegetable oils allows us to obtain several products from one oil mill at once:
Peculiarities
Butterfly is an edible mushroom of the 2nd category. Professional mushroom pickers believe that it is second only to boletus, and is ahead of it in terms of fat and carbohydrate content. In terms of productivity in coniferous forests, boletus has no equal; it ranks 1st.
Energy composition:
- Carbohydrates – 46%
- Fat – 18%
- Belkov – 18%
Butter protein is absorbed by humans by 75-85%. Young mushrooms have more protein than old ones, just as there is more protein in caps than in stems.
Ingredients
Servings: – + 4
- butter (boiled) 500 g
- onion 3 pcs
- vegetable oil 40 ml
- salt, spices to taste
Calories and BJU per 100 g
Calories: 60 kcal
Proteins: 3.24 g
Fat: 5.32 g
Carbohydrates: 1.12 g
30 min. Video
- I pour the oil into a frying pan and heat it up. I lay out the butter, cover with a lid and fry over low heat until they stop “shooting” (during cooking you will understand what we are talking about).
Add the onion and continue to fry, adding a little heat.
Fry, stirring occasionally, until there is no liquid left in the pan and the mushrooms have darkened.
I prepare it for the winter in the same way, only I don’t add onions and fry it longer, about an hour. I put it in sterilized jars. I pack the mushrooms tightly, approximately up to the shoulders of the jar.
To avoid molding (this happens from poor processing of cans or insufficient time for frying), pour melted lard on top.
I don’t roll them under iron lids, but close them tightly with nylon ones. I store it in a cool place and for quite a long time. I serve it with potatoes or buckwheat.
Marinated boletus
Marinated boletus with onions and herbs is included in the New Year's menu, becoming a traditional snack and a piece of home comfort.
Recipe No. 1
Ingredients:
- for 1 liter of water 2 tablespoons of salt and 3 sugar;
- 10 large allspice peas;
- 1-2 cloves;
- garlic clove;
- a few pieces of bay leaf (optional);
- a pinch of dry dill seeds.
Preparation:
- I usually remove the skin from the cap to marinate. After cleaning, I rinse it in a large container so that the sand settles and light debris floats to the surface. I wash it in several waters.
- I cut large boletus into several parts and boil it in salted water. I cook for no more than 10 minutes. I first add a few drops of vinegar or citric acid to the water on the tip of a knife so that the mushrooms do not darken.
- I drain the water, add the same mixture, and cook for 15 minutes.
I pack the butter tightly into liter jars (I pre-sterilize the jars and lids), fill them with marinade, and add a tablespoon of 9% vinegar. I roll up the lids and store them in the cellar or basement.
Recipe No. 2
For the next canning option you will need:
- 1 kg of butter of approximately the same size;
- a tablespoon of sugar;
- 10 large black allspice peas;
- citric acid (10 g);
- bay leaf – 5 pieces;
For the marinade:
- a third of a glass of water;
- 2/3 cup 3% vinegar;
- a tablespoon of salt.
I bring the marinade to a boil, add the pre-washed and cleaned butter. I remove the foam. I turn off the stove as soon as the marinade boils again. I add bay leaf, citric acid, sugar, pepper, mix and let cool. I put the mushrooms in jars, fill them with marinade and cover them with parchment (it’s better not to cover them with metal lids). I store it in the refrigerator.
Salty boletus
For pickling butter, just like milk mushrooms, I use freshly picked mushrooms, not wormy and small in size. I leave the larger ones for freezing. Some housewives salt only the caps; the stems are cut off when the mushroom is medium or large in size. Some salt the caps and legs separately. As they say, it depends on the taste and color... If the boletus is small, I don’t remove the film from the cap.
Ingredients:
- 1 kg butter;
- 2 tablespoons salt;
- 5 peas of black allspice;
- 4 pieces bay leaves;
- 3 cloves of garlic;
- fresh dill;
- black currant leaves (optional).
Preparation:
- I boil the peeled and washed boletus in plenty of salted water for 20 minutes. As soon as it boils, I skim off the foam.
- I rinse the boiled mushrooms in cold water and place them in a colander to drain.
- Pour salt into an enamel pan or bowl and place the mushrooms with the cap down. I add bay leaf, pepper, chopped garlic and dill, sprinkle with salt. I add a layer of mushrooms and spices on top, doing this several times.
- When the mushrooms are laid, I put a flat dish on top and press down with pressure so that the butter mushrooms release their juice and are completely in the brine. If there is not enough brine, I add boiled salted water and leave for a day.
- I place the mushrooms tightly in steamed jars so that they are completely covered with brine. To be on the safe side, I pour vegetable oil on top and leave it in the refrigerator.
- The mushrooms will be salted in 3 weeks. They will turn out strong and tasty.
Range of use
The oiler has a universal range of use. Due to the thinness of the needle cone of the insulin syringe, the oil does not pour out, but is supplied in a thin stream. There are two options for lubricating mechanisms:
- Without removing the cone with the needle. The oil is added in small drops. In this way, narrow grooves and small parts of household appliances are lubricated, and the mechanisms of a sewing machine and watch are processed. It can be used to lubricate the pegs of stringed musical instruments.
- The removed cone increases the amount of oil coming from the bottle. This option is suitable for lubricating large parts of household appliances, car mechanisms, door and window hinges, and furniture hinges.
Butter for freezing
I clean the mushrooms from pine needles and leaves, rinse them in running water, and place them in a colander for 20 minutes to drain. I recommend dipping it with a paper towel to dry it faster.
I cut large boletus into 2-3 cm pieces and place them in plastic bags or special containers. I don’t recommend putting a lot of oil in the bag.
Don’t forget to sort the mushrooms: put the chopped ones in one bag, the small ones in another.
Place in the freezer. Stored for a year.
You can boil or fry before freezing, but fresh frozen mushrooms retain more nutrients than boiled or pickled ones.
How to defrost correctly
Defrosting is a long process.
- Transfer the mushrooms from the freezer to the refrigerator and leave until completely defrosted. Remember, thawed mushrooms are used immediately, otherwise they will become a place for bacteria to accumulate.
- There is no need to defrost quickly. After quick defrosting, they look unsightly and lose their taste.
- Let the boletus get rid of the crust that formed during freezing, then you can start cooking. Cook thawed mushrooms in salted water for 15 minutes.
Cultivation on an industrial scale as a business
It is unprofitable to grow boletus on an industrial scale, since it is impossible to do this indoors, and in open areas large areas with young coniferous forest plantations will be required. For this reason, only the cultivation of boletus at an amateur level has become widespread.
Having the opportunity to sow several dozen myceliums on a personal plot, it is quite possible to organize a small private business for growing boletus with their further sale. However, it will not be possible to make a big profit from selling butter to procurement points - prices in stores are too low.