Tools and materials
Remodeling will require a minimum set of tools:
- drill;
- Phillips screwdriver;
- scissors or nippers;
- thin soldering iron 30-40 watts;
Necessary materials for constructing Bluetooth speakers, in addition to speakers:
- 3.7V lithium-ion battery;
- bluetooth module BLK-MD-SPK-B (costs $10 on Ali);
- 3.5 mm jack;
- 3.5 mm plug;
- Wires, ideally - 4 different colors;
- Switch.
Additionally, you will need electrical tape, solder, soldering flux and hot glue (a good superglue will also work).
Speaker manufacturing
Video instructions for production
Materials and tools
We need these following parts and tools to make this Bluetooth speaker.
Materials
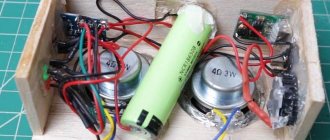
- Stereo amplifier module PAM8403;
- 3W stereo full range speaker – 2 pcs.;
- Micro USB charging module;
- Bluetooth module;
- 18650 li-On battery – 2 pcs;
- DC switch;
- Boost Converter;
- wires;
- Acrylic sheet 4 mm thick.
Tools
- Metal saw;
- Bor machine / Dremel (optional);
- soldering iron;
- Glue gun;
- Wire cutters and strippers;
- duct tape.
- Super glue.
- Marker.
- Crown.
- sandpaper or file
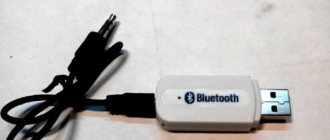
Connecting the wireless module
The image shown shows a chip for assembling a Bluetooth speaker with your own hands using BLK-MD-SPK-B. Pins 3 to 5 will be used for audio output, 13 and 12 for power.
3 - Speaker common wire.
4 - Positive wire left.
5 - Positive wire right.
12 - Power (+).
13 — Power (-).
The contacts of the module that I used are very small, so I had to solder very carefully so as not to damage them. The soldered board can be mounted inside the structure.
Briefly about the acoustics design
The first devices for extracting sound were simple: gramophone records were listened to through bells or mica membranes. The quality of this sound can be heard in old films: against the background of high frequencies, noise, crackling and the rustle of a needle. The next stage in the development of sound transmission equipment was the appearance of the speaker (an electrodynamic emitter with a conical diffuser) - it was invented in 1924.
The first devices were large in size and had a limited frequency range. But for those times it was know-how. Over time, speakers have been upgraded and manufactured using modern technology. Their frequency range was assessed as broadband, and later multiband ones appeared.
To produce high-quality acoustics, it includes not only speakers that better transmit high frequencies, but also massive subwoofers for low frequencies. The minimum number of emitters in a normal column is 2 pcs. Higher class acoustic music system contains up to 6 pcs. and 1 subwoofer. Modern speakers operating in mono sound mode are practically not produced. The exception is acoustics for military and federal purposes.
“Mono” was replaced by:
- "Stereo". This mode is provided by two channels that contain the entire frequency spectrum.
- "Sound around." The speakers have a larger number of channels (4 and above), which create a surround sound effect.
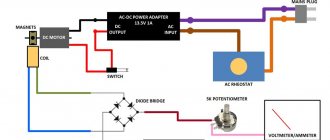
Battery connection
The next step is to attach 3 wires to the battery: a positive contact, a negative one and another wire to control the charge. All three will go to the 3.5 mm power connector, and the positive one will also go to the second contact on the power button.
Important! For charging, a constant voltage of 3.5-4 V and a charging current of at least 500 mA are suitable. You can use any suitable charger from an old mobile phone.
What can you assemble a column from?
Gaming headsets discarded after so many years of service also became a good “donor”. The membrane part of the headphones simply cannot last forever - over time it fails, and the voice coils burn out. However, the headphone housing can be used as part of a homemade Bluetooth speaker.
The housing of such devices, as a rule, has sufficient dimensions and allows you to place a speaker that reproduces sounds in a fairly impressive range. Even a homemade Bluetooth speaker from a broken old speaker has a right to life.
In addition to consumables, you should purchase a set of regular bolts, washers and nuts. You also need to purchase glue that can dry in a couple of seconds; it is better to take the universal “Moment-1”.
Don't forget the materials for the lower part, buy several plugs. Almost all the goods from the list above can be safely purchased in the same supermarket with a construction or plumbing department.
Functionality check
Once the assembly is complete, it's time to turn on bluetooth on your phone or other source and start searching for wireless equipment nearby. If you are asked for a password when connecting to a new gadget, use the standard four zeros. By the way, such a speaker can easily be connected to an Honor phone or other device.
That's all, you've made a fairly powerful Bluetooth speaker with your own hands, and then a new life begins without wires.
Power type
As a rule, portable speakers operate autonomously from built-in batteries. It is clear that they need to be recharged from time to time. But it is possible to recharge from a power supply or connect to a laptop via a USB cable or to a power bank. When purchasing, it is advisable to ask the seller about the battery life. The longer the speaker can work without recharging, the better.
There are devices that have a mixed type of power supply - both from batteries and from an alternating current network of 220 V. Mains power is useful for those who do not plan to move the smart speaker to different places in the house, but have found a permanent home for it on a shelf or on the refrigerator in the kitchen.
There are also devices that are only self-powered by batteries that need periodic replacement.
What you have to put up with on HomePod
Many shortcomings, limitations and annoying disadvantages make an expensive speaker not the most advisable purchase.
1. HomePod is still not officially sold in Russia
While foreign Apple fans have been making full use of the smart speaker since the end of winter, we are forced to look for the gadget from resellers or gray dealers.
Finding a device on sale is not that difficult, but the price tag is frankly not encouraging. American $349 in our realities turns into 28-30 thousand rubles .
Not the fairest price for a device that is frankly average in sound quality.
2. Design and colors are for everyone
If the HomePod design is quite universal, then the pair of color options greatly limits the buyer.
This is not the smartphone market, where all devices are now very similar. There are a large variety of speakers and wireless speakers for every taste and color.
3. Sound quality could be better
True audiophiles would never choose HomePod to listen to their music collection, and for the average user the sound output will be at an acceptable level.
Another thing is that it’s quite possible to get similar sound from speakers that are twice or three times cheaper.
Even Chinese speaker manufacturers have learned to make worthy alternatives and sell them for 5-7 thousand rubles.
4. Siri in HomePod is very limited and does not understand Russian
Another limitation from Apple. You will have to communicate with the column in English.
At the same time, the voice assistant is much inferior in comparison with the assistant from the iPhone or Mac.
Many usual actions and operations will be unavailable; they will have to be performed from a smartphone.
5. The system is linked to Apple Music
For those who are used to listening to music from VK or YouTube or subscribe to other streaming services, you will always have to connect a smartphone to use HomePod.
A banal sound broadcast from an iPhone, which can be done with any speaker from AliExpress.
Perhaps, with the official release of HomePod in Russia, the speaker will gain support for other services, but this is not certain.
Installing Google API on Raspberry Pi
1. First, you need to register on the Google Console Actions dashboard.
2. After you register and log into your Google account, you should see the following window.
Click on Add/Import Project (add/import a new project).
3. In the next window, you need to enter a project name (Project Name) and then click on Create Project.
4. Then, in a new browser tab, open the Google developers console and search for the Google Assistant API. Make sure your project is selected there, then check the Enable checkbox. After that, click the Enable button.
5. Now open the previous browser tab with Google Console and scroll to the very bottom. There you will find the Device Registration option, click on it.
6. In the next window that opens, click on Register Model. After this, you will need to enter the Product Name, Manufacturer name and set the Device Type. You can enter any of these names at your discretion.
After this, write down the Device Model Id (device model identifier) - we will need it later, and click on Register Model.
7. On the next screen you will be prompted to download the certificate (Download Credentials). To download the certificate, click the Download OAuth 2.0 credentials button. This downloaded certificate file is very important, so keep it in a safe place. Then click Next.
8. Next, you can set some features/traits of the project, but we will not do this, so click the Skip button.
9. Once everything is done, you should see the following screen:
10. Next you need to open the page with Activity Controls. On this page you need to activate the following settings (activity controls) to make sure that the Google Assistant API will work correctly: - Web & App Activity; — Location History; — Device Information; — Voice & Audio Activity.
11. Next, switch back to Google developers console. Click on it on Credentials on the left side of the screen. Click on the OAuth consent screen.
12. Enter your Email address and any name in the Product name field and save the entered data.
This completes the Google API installation.
Authorizing Raspberry Pi in Google Assistant
1. First, let's install the Google authorization tool on our Raspberry Pi board using the command:
Shell
| 1 | python -m pip install --upgrade google-auth-oauthlib[tool] |
2. After this, you need to launch the Google Authentication library. This can be done using the following command:
Shell
| 1 2 3 4 | google-oauthlib-tool --client-secrets ~/googleassistant/credentials.json \ --scope https://www.googleapis.com/auth/assistant-sdk-prototype \ --scope https://www.googleapis.com/auth/gcm\ --save --headless |
This command will generate a URL, copy this URL and paste it into your web browser.
3. In your browser, log in to your Google account; if you have several such accounts, then select the one in which you installed the API key.
After logging into your account, you will see a long authentication code. Copy this code, paste it into the term window and press enter. If your authorization code passes verification, you will see the line shown in the image above appear on the command line.
Shell
| 1 | credentials saved: /home/pi/.config/google-oauthlib-tool/credentials.json |
4. Now our authorization certificate is verified, but Google still wants to verify us through the pop display. But currently it is blocked by the CORS (Cross-origin resource sharing) service, so we need to disable this service using the below command.
Before executing this command, make sure that your chromium browser is closed, only then open a terminal window and enter the command. This command will launch the chromium browser with the CORS security service disabled, so do not surf the Internet while this service is disabled.
Shell
| 1 | chromium-browser --disable-web-security --user-data-dir "/home/pi/ |
After opening the browser, go to the previous terminal window from which you installed Google assistant.
5. After that, enter the below command to launch Google assistant for the first time. In this command, replace with the id of your project.
If you forgot your Project ID, go to the Actions Console on Google, click on the project you created, then click on the gear icon in the upper left corner of the screen, then click on Project Settings.
Also replace it with your device ID number that you received earlier.
Shell
| 1 | googlesamples-assistant-pushtotalk —project-id --device-model-id --display |
This command will open a new tab in the Chromium browser.
6. Now press Enter in the terminal window so that you can ask your assistant any question.
When you enter your first question, the following picture may appear on the screen:
Click on Continue -> I understand -> Allow. If this screen (picture) does not appear, then everything is in order.
7. Now you can ask your questions to the Google Assistant and receive informed answers (responses).
When you press Enter in a terminal window and request the action you want, you should hear a verbal response and a new tab should open in your browser and display the action you requested.
You can disable opening a new tab by removing the –display argument from the above command.
How to connect to a laptop on Windows 10
Laptops have a built-in module for wireless communication with other devices. To activate it on Windows 10, you need to open the control panel and select the corresponding icon (bottom right, near the Internet connection indicator).
Inclusion
Once the Bluetooth icon is found, you should click on it to enable the option on the laptop. On some versions of laptop PCs, the function is activated by pressing the Fn key. You can check the correct connection by turning on any musical composition on the speaker.
Driver update
The lack of Bluetooth connection with a laptop is often due to an outdated driver.
Press Windows and S, enter “Device Manager” in the line that appears. Next, select the Bluetooth menu and the driver update function. The system automatically finds the desired product on the Internet and installs it on the PC.
The second option is to use special utilities.
They can be downloaded from the Internet or purchased on an installation disk in a store. The kit includes a full package of updates for the OS.
Settings
To accurately adjust the wireless pairing, go to the Bluetooth settings section on the laptop. Find the control center using the Windows and S key combination, activate Bluetooth technology and select the required device from the list of available connections.
You can also set up a new connection there. The system automatically finds all available devices. To do this, you need to right-click on the column, examining the interaction status, properties and other technical information.
Selecting the right connection
If the laptop's wireless connection system does not find the necessary accessory for pairing into a single network, but other devices are visible and ready to interact, perform several steps:
- Reboot Bluetooth on the connected gadget.
- Enter a new column name manually (via a PC or smartphone).
- Start the Bluetooth search again.
Instead of a name in the list of available devices, a column can be indicated by a serial number. You can find it out from the instructions.
Switching sound to a Bluetooth speaker automatically
You can adjust the speaker volume directly from your laptop. To do this, use the device's keyboard keys. This method will simultaneously mute or increase system sounds.
The second option is to use a mixer. To access it, right-click on the speaker image and select the option to open the volume mixer. The program of the connected speaker is displayed in the window that appears. Use the slider to set the required sound level.