How to learn to cut at a 45 degree angle with a circular saw - tips for beginners
Probably everyone who makes repairs on their own has encountered the need to cut a board or pipe or trim a baseboard.
In practice this turns out to be quite simple. The most convenient tool for this is a circular saw. In this article we will tell you how to learn how to cut at a forty-five degree angle with a circular saw - tips for beginners.
A circular saw, compared to some other electric tools, is more efficient.
Types of saws
Several types of saws are produced, differing in scope and characteristics. The main use of a circular saw is cutting boards.
Let's get acquainted with some types of circular saws:
- 12.5 cm pruning saws with fine-toothed blades. As a rule, the blade is located on the left side of the motor, which would make it more convenient to observe how the blade moves. There is a 120V AC model, as well as a battery that works with different DC voltages;
- saws about 17 cm for cutting lumber to length. Works well with longitudinal cutting, cuts plywood, composite material;
- saws measuring 19 cm or skill saws. They are used to cut materials more than 5.5 cm thick. They are intended for sawing materials of load-bearing structures, as well as for longitudinal cutting. Available with a set of blades that can be used for cutting composite material, concrete, metal, etc.;
- saws of 20 and 25.5 cm in size are designed for cutting large lumber of wood up to 10 cm thick to length. Such instruments are heavier and larger in size. They are mainly used on an industrial scale;
- 22 cm models with a worm drive, equipped with a gearbox and motor. They are often used for longitudinal cutting of lumber or for cutting plywood sheets for formwork. Here the blade is located on the left side of the motor.
Why does it cut crookedly?
The disc cuts the line it is directed towards. In this case, the tool should be held or pressed against the guide firmly enough so that it does not move to the side.
If, despite all efforts, the cut turns out to be crooked, the reason is a waste disc. A scorched disc with blue spots on both sides may begin to wobble at the slightest heat. If the teeth on one side are normal, but on the other they are knocked out or blunted, dust may be introduced in one direction, no matter how hard you try to hold it.
Sources:
https://stroyvolga.ru/%D0%BA%D0%B0%D0%BA-%D1%80%D0%B0%D1%81%D0%BF%D0%B8%D0%BB%D0%B8% D1% 82% D1% 8C-% D0% B4% D0% BE% D1% 81% D0% BA% D1% 83-% D0% B2% D0% B4% D0% BE% D0% BB% D1% 8C / https://dnipro-m.ua/news/pravilnaya-rabota-czirkulyarnoj-piloj/ https://benzopilok.ru/rabota/kak-rovno-pilit-tsirkulyarnoj-piloj.html
Tips for beginners when choosing
It is important that when purchasing, pay attention to the characteristics of the saw.
So, for example, most models can be adjusted from 90 to 45 degrees, which makes it possible to saw beveled ends, hip rafters and cut at an angle of forty-five degrees. Almost all saws have a screw with a lever to loosen the bolt, which holds the blade at the desired angle for cutting. Some models have a scale showing the blade angle from 0 to 45 degrees.
When purchasing, be sure to pay attention to such an indicator as saw depth
Note: The cutting depth of circular saws varies from 30 to 130 mm.
You need to know what thickness of boards you will be working with. The choice of saw blade is also very important. For a neat cut, a disc with a larger number of teeth is suitable. If the disk has sparse teeth, the cutting will be faster, but the cut will be rougher.
Cuts with such a saw, as a rule, are smooth and there are practically no chips
Technology and equipment for trimming lumber
Work pages
The content of the work
TECHNOLOGY AND EQUIPMENT FOR CUTTING TIMBER
Trimming (trimming) is the formation of the end surfaces (ends) of lumber by dividing them transversely for the purpose of:
-removal of defective areas;
- obtaining a given length of pm.
In this regard, a distinction is made between preliminary and final trimming.
Preliminary trimming
carried out with the aim of removing obvious defects and defects of wood on the surface of the pm (pf). These are, as a rule, pointed (pintail), curved and facet boards.
Final trimming
performed to form specified (standard) dimensions of PM along the length. The final formation of the length is carried out, as a rule, after drying.
Cleaning the butt ends is also practiced.
pm. When the operator (end-cutter) doubts the depth of the spread of a processing defect or a defect in the wood from the butt end of the board, he “cleans” it: he saws off a piece of board 3...5 cm long, assesses the condition of the “opened” end and makes a decision on the final trimming of the butt end. end of the board.
Nominal length dimensions pm:
– 1. 6.5 m with a gradation of 0.25 m – for the domestic market;
– 1.5...6.3 m with a gradation of 0.3 m.
Maximum deviations from the nominal dimensions of lumber along the length are +50 mm; – 25 mm.
In sawmill production, single-saw cross-cutting machines and multi-saw cross-cutting units are used for cross-cutting lumber. Single-saw cross-cutting machines can be divided into four types: with a fixed support, pendulum, balancing and with linear movement of the saw. (Fig. 13.1). The classification of machines according to their design allows us to distinguish two main types among them: with a movable and a fixed support. In machines with a movable support, designed for precision and preliminary trimming, the feed is carried out by the support onto a stationary workpiece.
The boards are trimmed using positional and passing methods. In the first case, when performing a technological operation, the material being processed is motionless, and the cutting tool is fed. In the second case, the transverse division of lumber occurs during their movement.
Positional cross-cutting machines
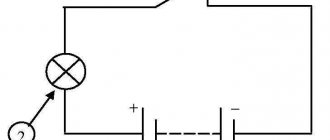
Fig. 13.1. Schemes of machines for positional trimming of lumber and blanks:
a- pendulum; b and d - with straight forward extension of the saw; c-balanced.
Single-saw cross-cutting machines with a fixed caliper are part of the cross-cutting units and lines. Pendulum cross-cutting machines and machines with linear movement of the saw are rarely used in sawmills; they are widely used in cutting and woodworking shops.
Balancing cross-cutting machines are most widely used in the production of lumber.
Position type installations
are equipped with single-saw circular saws of various models: balancing (type TsKB), pendulum (type TsME), with straight-line saw extension (type TsPA and ST), the technical specifications of which are given in Table 1.
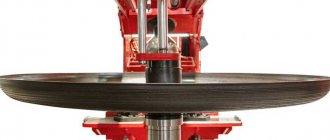
Fig. 13.2. Balanced cross-cutting machine TsKB40-01:
A
-general form;
b
- hydrokinematic scheme; 1-fence; 2-table; 3-guide ruler; 4-bed; 5.6-electric motors; 7-pedal control; 8-board; 9-saw; 10,14-hydraulic distributors; 11-frame; 12,16-hydraulic cylinders; 13-hydraulic pump; 15-throttle; 17-guide; 18-shaft; 19 V-belt transmission.
TsKB type machines with pedal operation of the saw and its movement during the cutting process using a hydraulic drive are designed for sawing boards up to 300...400 mm wide with a saw diameter of 500...700 mm. They are most widespread in sawmills that practice the positional method of trimming.
Fig. 13.3. Cross-cutting machine with straight saw motion:
1-bed; 2saw; 3-clip; 4-hydraulic cylinder; 5-pedal.
Fig. 13.4. Scheme of the pendulum cross-cutting machine TsME-3A:
Table 13.1. Technical details of machines for positional cutting of PM.
Double-sided positional trimming machines
Fig. 13.5. Scheme of double-sided trimming installation:
1-belt conveyor transporting boards from the edger; 2 hatches; 3-cross-cut machines; 4-cross-cut roller table; 6-beam table with 5 brackets on both sides; 6-roller cross-cutting table; 7-belt conveyor for transporting trimmed boards.
From the belt conveyor 1, the boards are transferred to the cross-cutting table 3, from which workers move them to the cross-cutting table 5. The trimmers determine the location of the cut at the butt end of the board, and then at the top end, and trim the board using saws 3, which are lifted by pneumatic cylinders. Before trimming, the worker installs the butt end of the board along swinging measuring stops mounted in the fender 7. To remove trimmed boards, the installation is equipped with a pneumatically driven ejector (Fig. 1). The throughput of the installation is 10…12 boards per minute. Prism is determined by timing data. On UL_Tsu 8...15 boards per minute.
Cross-cutting machines of the pass-through type: slashers and trimmers
Slasher-
This is a multi-saw installation for cross cutting of lumber, in which the saw shafts are installed permanently. The sawn material is fed to the circular saws by a cross-chain conveyor with stops.
Trimmer
is a multi-saw installation for cross-cutting lumber, in which each saw mechanism comes into operation at the operator’s command. The saw carriage is moved onto the material to be trimmed by a chain conveyor with stops.
Cross-cutting machines of pass-through type: slasher and trimmer
Fig. 13.8. Diagram of the three-saw cross-cutting machine TsT3-2M:
1-end stop; 2-butt saw; 3,4-dimensional stops; 5- drive electric motor; 6.7-vertex saws; 8.9-non-drive rollers; 10-vertex end stop; 11, 12-drive conveyors with oblique rollers; 13-chain conveyor.
Fig.3.9. Raw PM trimming line LT-1
Shift productivity of cross-cutting machines and installations (A, pcs./shift):
– for positional type machines
– for through-type installations
where T –
shift duration, min;
t
– time of processing (trimming) of one board, s (set by time-keeping observations, can be taken for preliminary trimming t=10 s, for final trimming t=12...15 s);
u is the speed of movement of the working conveyor chains;
a - the distance between the stops on the conveyor chains, m;
kt is the coefficient of working time use, taken equal to 0.9;
ki-coefficient of computer time use, can be taken equal to 0.8...0.9, depends on the filling of the conveyor circuits with boards.
Source: vunivere.ru
How to make a cut at an angle of 45 degrees?
This angle is found in the manufacture of various products. Let's start the cutting work. First, the saw blade moves ninety degrees. Depending on the model, there is a bolt with a red handle on the side of the sole that needs to be loosened.
After which the sole is shifted at an angle of forty-five degrees and the bolt is fixed back. We take a piece of chipboard as a blank. We fix it with clamps on the tabletop so that the part that we will cut off extends beyond the table.
Afterwards the ruler is set. It is usually included with the circular saw. The saw has 2 marks zero and 45. We will cut off 30 millimeters, for which we combine the three on the ruler with the mark forty-five on the sole. Then you need to tighten the bolt that secures the ruler.
Next, the sole must be positioned so that the ruler rests against the edge of the workpiece. The saw is started and after it is fully untwisted, pressing the ruler tightly against the edge of the workpiece, they move in the forward direction.
How to make a simple guide and removable device with your own hands?
Diagram of the bearings of the circular saw assembly.
It makes sense to make a simple reference book. To make cuts with a portable circular saw, you can purchase an expensive guide at the building's supermarket, or make a few homemade projects in a workshop if you need to cut a large number of sheets. However, you should know that there is a simpler solution - to make a device from scraps that are not used.
A simple homemade miter template for a circular saw
To make your own saw manual, you need to select a factory edge strip of plywood or hardboard 25-30 cm wide. The strip is fixed along the cutting line so that the base of the tool moves along the flat edge. If foam padding is used to protect the saw blade, it must have cutouts for the jaws.
You can also make a cutting device for this type of saw. A clean and even intersection in some cases is quite difficult to do with the introduction of a circular saw. It's almost impossible to fully control the tool, and pieces of material fly off more often than not, leaving behind chips and jagged edges. So it makes sense to try to make a cross-cut design out of a few pieces of wood and an angle of aluminum.
Tips for using a circular saw
If, when cutting, the edges turn out to be torn and chipped, you need to do the following:
- We take a small sheet of hardboard 6mm.
- We glue this sheet to the base with tape.
- With the saw turned on, we immerse the disk into the hardboard to obtain a cut with zero clearance.
Precision cutting template
How to make a straight cut? A certain device is made with a small allowance, after pressing the circular saw against the stop, we saw off the edge of the base to the required length. The sawed edge determines the line for cutting with a circular saw.
A mark is placed on the board where the cut was made. By pressing the lower stop of the device against the board, the edge is leveled. Due to the fact that the saw first passes through the device, cutting the boards is more accurate.
Making a straight cut using a circular saw
To make a guide, take a piece of plywood from twenty-five to thirty centimeters wide. It must be secured along the intended cutting line.
If it is necessary to cut long materials, a lot of time is spent on measuring and installing a straight guide on the marking line. To simplify this process, it is possible to make a template with your own hands, for example, from fiberboard. The edge of the template is aligned with the mark on the workpiece, and a straight guide is attached to the reverse side, which must be secured with a clamp.
A similar template can even be used to work with a jigsaw or router.
Source: domsdelat.ru
How to make a cross-cutting device for a circular saw:
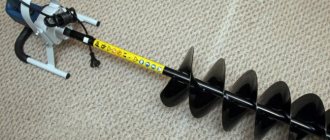
In the metal rod, on the underside of the rod, drill two holes with a diameter of 6 mm and at a distance of 60 mm from each other. Use a larger diameter drill and drill countersunk holes through the holes, they will help hide (recess) the bolt heads in the rod.
Step 1: Inserting bolts.
Install a washer and an engraver on each bolt and tighten the nuts on all bolts. Each bolt is 40mm long.
Step 2: Preparing fixture parts.
The next step is to cut a disk with a diameter of 80 mm from a piece of wood, then cut a small piece from the disk, less than half the size of the disk, as shown in the picture. Drill a hole in the center of the disk equal to the diameter of the bolt. Make a recess in the bottom of the disk (for the nut). Glue the disk to the rectangular block as shown in the picture.
Note: To avoid slipping, after the glue has completely dried, you can sand the wood at the junction of the disc with the rod with fine sandpaper.
Step 3: Assembling the fixture.
Before assembly, you need to make a connecting strip that will connect the two bolts together, as shown in the figure. Install the tension bar, washer, engraver and tighten the locknut on the disc axle bolt. Tighten the nut tightly so that you can adjust the fixture in the next step. Screw the wing nut onto the other bolt.
Step 4: Adjust the device.
In our case, we will adjust the trimming device at an angle of 90 degrees. Using the calibration angle, set the initial angle to 90 degrees.
Step 5: Aligning the fixture with the saw blade.
Install the rod into the slot (groove) on the table - behind the saw blade. Use a corner to check the 90 degree angle at the end point of the saw blade cut on the workpiece. If you follow all these recommendations, the angle should still be the same 90 degrees.
Source: woodjig.net
Combination miter saw - both lengthwise and crosswise
ImhoDom › Forums › hands from shoulders › Combined miter saw - both along and across
- This topic has 2 voices and 1 reply.
- The science
Manufacturers of such tools rightly expect that they should be constantly used not only by workers in specialized workshops, but also by household users. Therefore, there are a significant number of modifications of combination miter saws on the market of varying power, capabilities and prices. Nevertheless, structurally all these devices are approximately the same, and consist of the following components:
The bed is made of high-strength aluminum alloys and has a developed surface for securely securing the saw to a workbench or table.
A rotary table with which you can angularly move a workpiece to a given angle.
Adjustable guides ensure adjustment of the unit for processing workpieces of the required width.
A tool head equipped with a measuring scale that can be adjusted to the required cutting angle.
An electric motor on the axis of which a saw blade is mounted.
Pulling mechanism. Saws with broaching of the source material allow you to process workpieces of increased width.
Measuring laser head, with which the accuracy of the cut is controlled.
Control panel (some versions of combined miter saws provide a soft start function for the engine).
Saw blades with different diameters, thicknesses and tooth pitches are used as replaceable technological equipment, with smaller pitches designed for cutting non-metallic workpieces.
Among the manufacturers of combined miter saws are foreign brands Bosch, Metabo, DeWolt, Makita, as well as domestic brands Enkor, Zubr, Interskol (the latter produces products of joint Chinese-Russian production), etc.
Professional equipment
Now let's talk about professional equipment. Let's consider the cross-cutting saw ZUBR ZPTP-255-1800. The tool is used for cutting wooden parts and thin-walled metal. Why combined? This is because it can be used to both trim workpieces and work like a circular machine.
Main advantages of the model:
- Mobility;
- Compactness;
- Functionality;
- Safety system.
This machine combines a crosscut and a circular saw at the same time. The adjustable head position allows for high quality cuts. The machine allows you to make longitudinal cuts at any given angle. The equipment is equipped with a locking mechanism for turning on the drive and raising the protective casing. This model has the ability to connect an industrial vacuum cleaner to keep the workplace clean.
You can buy a circular cross-cutting machine for around 15 – 20 thousand rubles.
Another good option from all the gray mass of equipment is the Makita MLT100 table miter saw.
It is used both in everyday life and in professional production in workshops and workshops. The design of the machine allows it to be moved on a special trolley and can be easily mounted in a designated place on a workbench. The sliding table allows you to work with large workpieces. The table can be rotated both to the side and forward. The long service life of this equipment is increased due to the high quality of parts and materials used during assembly.
Allows you to make cuts both vertically and at a specified angle. The high precision of cutting parts is due to the presence of clamps, guides, scales with degrees and a ruler. The equipment combines a cross-cutting machine and a circular saw at the same time.
A separate advantage is the presence of an engine speed stabilization system, which in turn plays an important role during the initial start-up of equipment.
Electric brake included. There is a connector for connecting a dust removal device, useful for large volumes of work.
Classification
In fact, all types of trimmers can be divided into two groups - household and professional. They differ in their dimensions, weight and capabilities. Finding out which instrument is in front of us is quite simple. To do this, it is enough to determine the diameter of the saw blade: if it is less than 250 mm, then this saw model belongs to the household class, and is characterized by its small size, the ability to process workpieces with a width of no more than 240...250 mm, as well as a relatively low-power drive (up to 1200...1500 W ). Combined miter saws, designed for professional use, are equipped with a more powerful electric motor (up to 2500 W), an electronic start system, and - most importantly - a significantly increased service life.
An important parameter of combined miter saws is the design and dimensions of the saw blade (all manufactured equipment has a standard range of diameters: 210, 250, 305 mm). In particular, there is a relationship between the diameter of the saw blade and the engine speed: as the thickness and diameter increase, the speed decreases. This is due to a sharp increase in the moment of inertia of the rotating parts of the drive, which negatively affects the starting conditions of the engine. However, as the speed decreases, the quality of the cut deteriorates. Therefore, manufacturers have to find a compromise between the above parameters. Typically, with a disk diameter of up to 250 mm, the speed is 5500...6000 min-1, and in professional models it is reduced to 3500...3800 min-1.
Dissolving the first board after adjusting the position of the saw blade
If the task of splitting a thick board into two completely equal parts is not worth it, that’s one thing. But if identical elements are required, then the width of the cut part should be perfectly adjusted. When all the settings have been made, you can start cutting. The board is passed through the circular saw twice, on both sides.
PHOTO: YouTube.com The second side is run through, after which the cutting will be completed
How to learn to cut at a 45 degree angle with a circular saw - tips for beginners
Probably everyone who makes repairs on their own has encountered the need to cut a board or pipe or trim a baseboard. In practice this turns out to be quite simple.
The most convenient tool for this is a circular saw. In this article we will tell you how to learn how to cut at a forty-five degree angle with a circular saw - tips for beginners.
A circular saw, compared to some other electric tools, is more efficient.
Types of saws
Several types of saws are produced, differing in scope and characteristics. The main use of a circular saw is cutting boards.
Let's get acquainted with some types of circular saws:
- 12.5 cm pruning saws with fine-toothed blades. As a rule, the blade is located on the left side of the motor, which would make it more convenient to observe how the blade moves. There is a 120V AC model, as well as a battery that works with different DC voltages;
- saws about 17 cm for cutting lumber to length. Works well with longitudinal cutting, cuts plywood, composite material;
- saws measuring 19 cm or skill saws. They are used to cut materials more than 5.5 cm thick. They are intended for sawing materials of load-bearing structures, as well as for longitudinal cutting. Available with a set of blades that can be used for cutting composite material, concrete, metal, etc.;
- saws of 20 and 25.5 cm in size are designed for cutting large lumber of wood up to 10 cm thick to length. Such instruments are heavier and larger in size. They are mainly used on an industrial scale;
- 22 cm models with a worm drive, equipped with a gearbox and motor. They are often used for longitudinal cutting of lumber or for cutting plywood sheets for formwork. Here the blade is located on the left side of the motor.
Tips for beginners when choosing
It is important that when purchasing, pay attention to the characteristics of the saw.
So, for example, most models can be adjusted from 90 to 45 degrees, which makes it possible to saw beveled ends, hip rafters and cut at an angle of forty-five degrees. Almost all saws have a screw with a lever to loosen the bolt, which holds the blade at the desired angle for cutting. Some models have a scale showing the blade angle from 0 to 45 degrees.
When purchasing, be sure to pay attention to such an indicator as saw depth
Note: The cutting depth of circular saws varies from 30 to 130 mm.
You need to know what thickness of boards you will be working with. The choice of saw blade is also very important. For a neat cut, a disc with a larger number of teeth is suitable. If the disk has sparse teeth, the cutting will be faster, but the cut will be rougher.
Cuts with such a saw, as a rule, are smooth and there are practically no chips
Disadvantages of this method
It is clear that it will take a lot of time to dismantle thick boards, especially if the amount of work is significant. However, sometimes this method remains the only possible one. Then the amount of time spent on work no longer matters.
Another disadvantage is the possible mismatch of cuts. But here all the blame will lie with the operator: incorrect guidance, tilting - mistakes of the master.
PHOTO: YouTube.com These are the thin, neat boards you should get
How to make a cut at an angle of 45 degrees?
This angle is found in the manufacture of various products. Let's start the cutting work. First, the saw blade moves ninety degrees. Depending on the model, there is a bolt with a red handle on the side of the sole that needs to be loosened.
After which the sole is shifted at an angle of forty-five degrees and the bolt is fixed back. We take a piece of chipboard as a blank. We fix it with clamps on the tabletop so that the part that we will cut off extends beyond the table.
Afterwards the ruler is set. It is usually included with the circular saw. The saw has 2 marks zero and 45. We will cut off 30 millimeters, for which we combine the three on the ruler with the mark forty-five on the sole. Then you need to tighten the bolt that secures the ruler.
Next, the sole must be positioned so that the ruler rests against the edge of the workpiece. The saw is started and after it is fully untwisted, pressing the ruler tightly against the edge of the workpiece, they move in the forward direction.
Tips for using a circular saw
If, when cutting, the edges turn out to be torn and chipped, you need to do the following:
- We take a small sheet of hardboard 6mm.
- We glue this sheet to the base with tape.
- With the saw turned on, we immerse the disk into the hardboard to obtain a cut with zero clearance.
Precision cutting template
How to make a straight cut? A certain device is made with a small allowance, after pressing the circular saw against the stop, we saw off the edge of the base to the required length. The sawed edge determines the line for cutting with a circular saw.
A mark is placed on the board where the cut was made. By pressing the lower stop of the device against the board, the edge is leveled. Due to the fact that the saw first passes through the device, cutting the boards is more accurate.
Correct flooring
It was a beautiful July day. I decided to make the flooring under the canopy. In other words, there was already a roof of some kind, and I wanted to walk on a flat wooden floor. You can, of course, level and compact the ground, but the choice was made in favor of wood.
I’m not good at working with cubes of wood (of course, I can multiply the length, width and height to get the volume), I made the calculation simpler, since boards in our markets are sold by the piece, so I counted in pieces.
Based on the fact that boards are usually sold six meters long, I decided to make the flooring three meters wide. Then simple arithmetic, knowing the length and width of the boards, it was not difficult to obtain the required amount of building materials.
Anyway, enough of the lyrics, let's get down to business. The boards have been delivered (I bought them from the market, as usual, I chose something simpler, in other words, cheaper), the joists are installed, all that remains is to fill the boards.
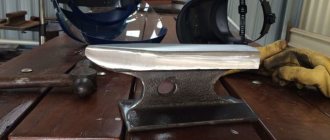
Laziness is the engine of progress, so in order to work less I sawed boards with a jigsaw. But I regretted spending money on the hammer, but I found a beautiful hammer in the store.
Correct flooring of boards ">
What could be easier, put the board down and score. I already tried on the first board, cut it and nailed it. But then there was a break, a neighbor came in. I must say that my neighbor is a wise and experienced person. At first he praised him, well done, and then asked: “You, neighbor, know which side of the board should be laid?” . And I answered: “Wide, of course, it’s not right to put it on the edge.”
“Here, of course, you are right,” said the neighbor, “but there is one nuance, how will you place the basin so that you can walk on it, as it should stand, or, after all, upside down”? Of course, I liked the comparison of the board with the basin, all that remains is to find out what the neighbor means.
To clarify all the subtleties, the neighbor was offered a chair, a decanter of kvass appeared on the table, and as a result, the break in work extended until the decanter ran out.
I won’t go into the whole conversation over kvass, otherwise we’ve reached space, but I understood the essence of his question about the basin.
Of course, if you buy wood that has been properly dried and stored, then you are unlikely to have to think about which side to lay the boards on the flooring. Otherwise, you need to understand that the board will “lead” over time. It will either bend or “helicopter” it, it all depends on how the tree trunk was sawed.
The most annoying thing is that the nails are unlikely to hold such a board in place, and if the board is laid incorrectly, then later it will begin to “play.” As one of the greats said: “It is better to see once than to read a hundred times.”
Correct flooring of boards ">
This is how a board can bend over time. If you look closely, you can understand that the so-called “annual rings” are trying to straighten out. Therefore, in order not to make a “trough”, it is necessary to position the board in such a way that over time, if the board begins to bend, we end up with something like an umbrella.
In this case, the board will still rest on its edges and will not wobble (play, wobble). Plus one more point: water that gets on such a board will drain from it.
All blog posts
Karcher with your own hands or how a freebie almost went sideways
You can't see a thing in sight. The wipers are operating at the highest speed and, in my opinion, are already tired of throwing water off the windshield. The wheels keep falling into broken ruts, well, at least the power steering is present when traveling to the village... I went to the store, fortunately it’s not far, the choice of any product is limitless. I approached the seller, explained what I needed, and all the components appeared before my eyes. Then everything... Read more.
Toilet repair in five minutes, which took 3 months.
And that time it was not possible to win the victory over the toilet. It turned out that the diameters of the fastening unit of the old and new fittings do not match, and that’s what I hoped for. Well, I think we’ll go to the area and look there. Having covered twenty kilometers to the regional center, to my surprise, I discovered Read more.