Where to store hair combs? Hair combs and brushes come in many different types and can be used for different purposes, so every girl usually has a lot. You have a place for your makeup, a place for your toothbrush, and a place for your jewelry. But what about storage space for your hair brush? Often we throw our combs around willy-nilly, allowing them to simply land wherever there is free space. But why? Why not create the perfect place to store your brush? Today we will talk about how to store hair combs. The best ideas are on the pages of the magazine.
Desk organizer stand
To create a tabletop stand, you don’t need to look for expensive blanks in specialized stores. It is quite possible to make do with improvised means.
What can it be made from?
The design of the stand directly depends on your imagination. Most often it is made in the form of a glass or several containers of different sizes. The following available materials can be used.
Attention! The depth of the stand for combs should be at least 10 cm so that they do not fall out. The model itself should have a wide bottom or be quite heavy, since large combs can overwhelm a light container.
Making a stand for combs
A stand made of three boxes connected to each other will be practical and compact.
Materials
For manufacturing you will need the following.
Operating procedure
Initially, we select boxes or make them ourselves from thick cardboard. The most convenient base sizes:
We paste the first two boxes with one color, and the smallest one with another. If you are using wallpaper, you can paste over two blanks, placing the pattern horizontally and vertically on one blank .
Attention! To ensure that the paper does not peel off and is less likely to bulge, fold the edges of the decor inside the container and secure them there with glue.
Important! The box for large combs should be located in the center so that the organizer does not fall over.
There can be any number of small sections, and you can store not only combs, but also hairpins in them.
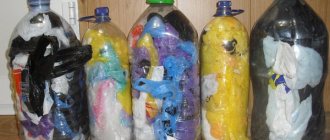
How to store sponges and washcloths - 5 ways and organization tricks
We tell you how to store sponges, rags and dishwashing detergent conveniently and neatly.
- To reduce “visual noise” in the kitchen interior, remove the sticker from the bottle of dishwashing liquid;
- Remember that nothing spoils the look of a kitchen more than dirty rags, sponges and towels. Try to change them in a timely manner;
- It is advisable to select sponge rags in a neutral color (white, grey, beige, brown) or to match the color scheme of the interior. This way the work area will not attract attention and spoil the kitchen design;
- You should not keep more than one towel, one potholder, one rag and one sponge in the kitchen, otherwise the interior will look cluttered. Moreover, if possible, it is better not to keep all kitchen textiles in sight;
- If you are just about to furnish your kitchen, we advise you to take a closer look at sinks with a built-in dispenser for dishwashing liquid;
- A life hack for practical but busy homeowners: to fix kitchen accidents quickly and easily, cut up a supply of rags from old T-shirts and use them on a wipe-and-throw basis.
Wall mounted comb organizer
An organizer for combs located on the wall next to the mirror is a very practical solution.
Materials that may suit the organizer
The organizer is located on the canvas. Thick fabrics, knitted fabric, plywood, and plastic boards are suitable for it
The pockets are placed in a convenient order and secured with glue, thread or nails. They come from absolutely any material. If the base is hard, then it is better to use small boxes attached with glue or nails for pockets.
How to make a wall organizer
Denim is a great material for a wall organizer .
Source
Overview of species
The cheapest models are those suspended from a faucet (more precisely, from a faucet spout). They are quite convenient and practical. But there is no place for detergent, and there is no way to attach it. Stationary versions will cost a large amount. However, this problem is justified:
- more attractive appearance;
- the presence of a hanger for drying rags;
- presence of a nest for the cleaning mixture.
It should be emphasized that such products themselves require systematic cleaning. Suction cup versions can be attached to the walls of sinks. This allows them to become “visually lost.”
Variations with a dispenser and a bath look beautiful. We are talking about the use of accessories that are traditionally purchased for the bath - and apparently, the majority of consumers have nothing bad to say about such a decision. Using accessories made from natural materials helps optimize the appearance even better.
A kitchen sponge holder is sometimes made of stainless steel. The cost of such models is at least 200 rubles, and they are usually attached with double-sided tape. The fact that they are noticeably heavy is an advantage rather than a disadvantage. When selecting, it is critically important to ensure that nothing is bent and that all corners are even. To apply adhesive tape, you must first degrease the surfaces using gasoline or a construction solvent.
Experts consider the “Frog” model to be a good choice. This cute device is made of high-quality ceramics. Characteristics:
- gross weight – 0.228 kg;
- height – 95 mm;
- width – 80 mm;
- stand included;
- Country of origin: China.
Another Chinese product from the Berossi brand is designed in a mix color. Its height is 115 mm. The width is 88 mm. Packed weight: 0.045 kg. Plastic (food grade polypropylene) is used to make the stand.
Fabric organizer options
There are different types of storage organizers. They differ in the area of their use, the form of fasteners, and for what purpose they are used.
Depending on whether the module will move in space or not, they are divided:
The following types are determined by the type of fastener:
If we consider models created to contain a certain group of objects, we distinguish:
List of original ideas for an organizer:
MK sew an organizer for needlework with your own hands step by step
2. With exactly the same dimensions, I cut out one rectangle from quilted padding polyester. It will serve as a substrate and give a rigid shape to the base of the organizer.
3. Putting padding polyester between the pillowcase teak. Layers: teak - padding polyester - teak.
4. I fasten all three fabrics together with pins. Now you need to quilt them. I draw a pattern for quilting with a marker (pencil).
5. I sew on a machine along the lines. I make sure to make fastenings at the beginning and end of the lines so that the line does not unravel later.
6. I take the bias tape and smooth one edge with an iron.
8. I go around the corners, slightly rounding the bias tape.
9. I overlap the edges of the bias tape.
10. Trim excess fabric
11. I fold the bias tape over to the right side. I sew the free edge of the binding to the base of the organizer using hand running stitches.
12. I sew on the bias tape. Notice how I laid the fabric in relation to the machine foot. The stitching should go 1 mm. from the edge of the bias tape.
13. I cut out two pockets - a rectangle with sides 32 * 13 cm. I trim the upper edges with bias tape. I overlock the remaining open sections with an overlocker (zigzag).
14. I bend the edges of the pockets 1 cm inward. I stitch on a typewriter.
15. I measure 5.5 cm from the bottom of the organizer base and draw a line across with a marker
16. I attach the bottom pocket to the drawn line, as shown in the photo. I make a fold on both sides.
17. I sew the bottom pocket on the machine, retreating from the edge by the width of the foot.
18. I measure 19 cm from the top of the base. I draw a line with a marker. I sew the top pocket on the machine along this line.
19. I turn the pocket pieces right side up. I attach the pocket details to the base of the organizer on the sides over the existing stitching.
20. I ended up with three pockets at the top and two at the bottom. You can do the same. Or you can come up with your own version.
21. I cut 3 pieces of grosgrain ribbon. I burn the ends with matches to prevent them from unraveling.
22. I pin pieces of tape onto the base and secure with pins.
23. I sew the ribbons on the front side using a machine.
24. I insert a wooden pipe into the resulting holes. This is all I have on hand for now; the pipe from Bethlehem came in handy) I tie a cord to the pipe. Ready!
Sewing a handicraft organizer from Aliexpress with your own hands turned out to be not difficult. For a beginner, this creative process will be interesting, because here you can give free rein to your imagination. And the thing is very useful; in the same way you can sew a shoe organizer for your closet; Can be used for masks, gels, shampoos and other things in the bathroom or on the dressing table.
And the thing is very useful; in the same way you can sew a shoe organizer for your closet; Can be used for masks, gels, shampoos and other things in the bathroom or on the dressing table.
LiveInternetLiveInternet
—Categories
- knitting (644)
- crochet (457)
- sewing (206)
- for children (177)
- painting (135)
- cooking (133)
- DIY crafts (121)
- drawings, illustrations (43)
- beauty and health recipes (41)
- apartment design (33)
- DIY decorations (30)
- music (22)
- embroidery (20)
- positive person (20)
- contemporary art (19)
- how beautiful this world is! (18)
- color combination (16)
- Clipart (14)
- animal world (13)
- poetry (13)
- woman is a mystery (12)
- art (6)
- Palmistry (3)
—Quote book
New oversized!
Pullover cut pillowcase. https://1.bp.blogspot.com/-hiRoLGtSDCM/X6AIOv81_HI/AAAA. Hayward: Knit all variations of this sweater based on the basic description! https://vsesviazano.blo.
Bunnies. The girl Larisa knits these fabulous bunnies; she couldn’t pass by. Description in her bl.
Beige bear from tiana-vladi MK Beige bear with a pink bow 1. .
Amigurumi. Bears and mice by Elena Nikitina Amigurumi. Bears and mice by Elena Nikitina ElenaNi.
—Links
—Tags
-Music
—Search by diary
—Subscription by e-mail
-Statistics
How to sew it yourself
If for some reason you are not satisfied with the purchased product, you can sew an organizer with your own hands, practically without a pattern. Below are master classes that will help you with this.
Preparatory stage
We decide on the location for attaching the sachet; the size of the future product depends on this. The width of the accessory should not exceed the dimensions of the crib wall on which it will hang.
The fabric for the pockets should be dense, hold its shape well, not fade or shrink. The color depends on your preference. It can be either bright or calm, pastel. Bright print or plain fabric - it's up to you.
Let's start with the simplest thing - small bags with flat sections.
1. Cut several rectangles from fabric: 2 pcs. 60x4 cm – these are ties, 4 pcs. 30×12 cm – pockets, 2 pcs. 30x40 cm – base (see the photo below for guidance).
2. Folding the edges inward, sew the back and front parts of the base, leaving the top unstitched. We lay the line as close to the edge as possible.
3. Fold the ties in half lengthwise and iron them. We bend the edges to the middle, iron them again, and fold them so that the edges are inside. We sew along the entire length. We make pockets like the base, but we lay the stitching along the entire perimeter.
4. Insert the double-folded ties into the unsewn part of the base and stitch them together.
5. Stepping back 9-10 cm from the top, sew on the first pocket. At the very bottom we have the second one.
6. Place a stitch exactly in the center from top to bottom. Thus, instead of two compartments we get four.
Now you can hang the sachet on the crib and fill it with the necessary little things.
If you are confident in your abilities, you can sew a model with voluminous sections and lace ruffle trim.
For this model you will need the following:
1. Cut out a 60x60 cm rectangle from the main fabric. We do the same with padding polyester.
2. Pockets are cut with allowance for folds: for the bottom two rectangles 66x23 cm, for the top - 70x22 cm.
3. We decorate the upper and lower sections with bias tape.
4. Fold the face part and the seal, marking the places where the pockets will be located. There is a distance of 7 cm between the lower and upper tiers.
5. Let's start with the pockets. Divide the strips into the required number of parts. We lay the seam according to the outline. Next, we sew on the bottom sides, making folds in the right places for volume.
6. Lay the lace ribbon.
7. It turns out like this.
8. Place the front part on the back part. We make sure that the lace is tucked inside. Sew along the sides and bottom.
9. Turn it inside out and carry out heat treatment.
10. We make ties in the same way as in the previous MK.
11. Bend the finished ties in half. We sew up the top of the sachet, having previously inserted fastening parts between the layers.
We hang it on the crib and admire the job well done.
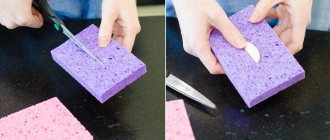
Idea 5. Serving board-tray
But the idea of an unusual serving board-tray, which, although not a cutting board (intended for displaying food only in dishes), can nevertheless be very functional. For example, it can be used to beautifully serve snacks, drinks (olives, pistachios, nuts, chips, etc.), sauces, honey, sour cream, jam. Thanks to the slate part, while the board is not being used for its intended purpose, it can simply be hung on the wall and used for writing.
To make this DIY kitchen craft you will need:
- Wooden board 5 cm thick;
- Stain of the desired color (for example, to match the countertop);
- Sponge, rag or brush;
- Chalkboard paint;
- Two furniture handles and wood screws for fastening them;
- Jigsaw or saw;
- Screwdriver or screwdriver;
- Masking tape;
- Ruler, pencil.
- Cut your board to the desired size using a hand/power saw or jigsaw. In this master class, the board is 60 cm long, but you can make it shorter or longer.
- Stain your board according to the manufacturer's instructions and let dry.
- It's time to paint the inside. To do this, first apply masking tape along the edges of the board to limit the painting area. Next, apply slate paint (in this case, you use paint in a can) and let it dry.
- Screw the handles to the edges of the board.
You can replace furniture handles with leather straps, paint the board a bright color, burn a design onto it, or attach two “legs” to the back of it.
Hanging organizer
Method for making an organizer for needlewomen:
Necessary components for making a hanging fixture for the bathroom:
Design method:
Textile organizers with pockets
Organizers for storing things with pockets are not difficult to make. To make the basic version you will need simple materials.
Execution order:
Option for making an organizer for the hallway:
Car organizer made from jeans
This device is characterized by increased reliability and simplicity, because it is made of dense and strong denim fabric. You can buy a special piece for this, but it would be much more practical to make a product from old pants. In this case, you can use not only back pockets, but also belt loops, which will serve as fastening elements for round objects.
You might be interested in this: How to sew a beautiful bow from fabrics yourself
Seat back option
There are many options for making a device made from pants. You can leave the back part to the knees, and cut off the remaining legs and sew them in the form of additional pockets. Another option involves sewing the pants into a rectangle and sewing on the compartments. In any of these cases, it is necessary to provide for mounting on the rear surface of the car seat or on its cover.
Advantages and disadvantages
Buying (or making your own) a holder for a sponge for washing dishes in the kitchen can be very useful. This device makes the space much neater and more attractive than usual. It is immediately obvious that the house is inhabited by decent and responsible people who know a lot about organizing their space.
However, if you buy it, you will have to spend money, and if you assemble it yourself, you will have to spend time and effort. However, this is such an insignificant minus that it is worth mentioning only for the sake of order. The pleasant appearance of the organizer allows you to compensate for all the problems that arise.
DIY wall organizer made from jeans
This option is similar to the one made for a car. It uses torn or cut pockets, which are then sewn onto a piece of denim from old pants. Such a thing helps not only adults, but also children, who can not throw their toys around the room, but carefully put them in pockets. This accustoms people to cleanliness and order.
Wall denim option
Important! The fabric organizer can also be used in the bathroom. It holds shampoos, toothpaste or combs. For wet places, of course, it is preferable to use maple or leather instead of fabric, since the canvas will quickly get wet from water and steam.
Idea 8. Universal knife holder
A knife holder is a very useful kitchen gadget that helps keep your workspace tidy and keeps your knife blades sharp for longer.
Making a knife holder with your own hands is very easy - just pick up a small vase and fill it tightly with bamboo/wooden skewers, colored beans or... colored spaghetti, as in our master class.
To make a knife stand, prepare:
- A container or vase is the height of the blade of your largest knife. The shape of the container can be any, but without any bends;
- Spaghetti, lots and lots of spaghetti;
- Several large ziplock bags (or just large bags that can be tightly tied in a knot);
- Alcohol (for example, vodka);
- Liquid food coloring in the desired color (or several colors if you want to make a multi-color filling);
- Baking trays;
- Aluminum foil or old oilcloth tablecloth;
- Paper towels;
- Kitchen scissors.
- Make sure your container is clean and dry, then fill it tightly with spaghetti. When the container is full, remove the spaghetti and add a couple more bunches of pasta to the pile as a reserve (in case you make up for broken sticks).
- Divide the spaghetti evenly between the bags and pour enough alcohol into the bags to wet all the sticks. Next, add 10-40 drops of food coloring to each bag.
Organizer “plates” for the closet
photo: blog.spoonflower.com If your closet does not have enough compartments with shelves, you can add them by sewing a similar organizer. It will come in handy in the bathroom, for example, for towels, in the nursery - for toys, and in the hallway - for hats and scarves.
You will need:
Step 1
photo: blog.spoonflower.com Cut out the fabric and cardboard according to the diagram in the picture (the number is the number of parts). 12 pieces 23x23 cm (lining fabric); 2 pieces 23x32 cm (main fabric); 2 parts 20x23 cm (main fabric); 2 pieces 32x69 cm (main fabric). Don't forget to add allowances of 0.5 cm. Photo: blog.spoonflower.com Sew, as shown in the picture, pieces 20x23 cm. Turn out, iron, sew on Velcro.
Step 2
photo: blog.spoonflower.com Mark the middle of this part and sew two lines to the middle of one of the parts of the main fabric 23x32 cm. photo: blog.spoonflower.com Connect this part with one of the lining parts. Sew the parts together as shown in the photo. Insert cardboard between the shelf parts.
Idea 9. Jars for storing spices and bulk products
When you don't have enough storage space in the kitchen, the bottom of a wall cabinet and a few glass jars with tin lids will help you out. Depending on the volume of the jars, you can store spices, cereals, sugar, salt or any small items in them.
- Make three holes in the lids using a nail and hammer.
- Screw the lids to the bottom of the wall cabinet using self-tapping screws. It is best to choose a cabinet that is closest to the stove and work area.
- Fill the jars and screw them onto the lids. Voila, the organizer is ready!