For humanity, since ancient times, wood has been the main building material. It was widely used for the construction of buildings, the manufacture of various household items, decorative items, toys, etc...
In the process of developing modern woodworking production, humanity has invented such new lumber as plywood and chipboard.
The improvement of woodworking tools and devices has expanded human capabilities to use these materials. Making objects from plywood is one of the common uses of this material.
In modern photographs of private farmsteads, apartment decor, household utensils and toys, you can see a diverse range of plywood crafts.
Specifics of plywood
The key feature of this material is its multi-layer nature. A plywood sheet consists of several layers of veneer (3, 5 or more), glued together in a certain way.
The type of impregnation affects the moisture resistance indicators. The strength properties of plywood are quite good. This is due to the specifics of gluing wood plates.
Varieties
Wood of different densities can be used to make plywood. Each type has its own purpose and service life. Also, plywood may differ:
- the type of wood used;
- number of layers;
- by water resistance;
- by processing method (can be conventional or laminated);
- by quality;
- by price.
Wall panels
Cladding the space with materials that can not only imitate stone, brick, wood, but also perfectly cover all the imperfections of the walls, are easy to maintain and are relatively inexpensive, one might say, has become a revolution in the construction industry. Fiberboard wall panels can be placed horizontally, vertically, or at an angle.
And even a person who is not experienced in construction can work with them. Manufacturers make special panels from fiberboard, one side of which has a special decorative coating. MDF, as a type of fiberboard, is the leader among wall panels in quality and price.
Fiberboard sheet panels are similar to plywood, only one side has a decorative pattern. For the kitchen it can be a smooth or embossed texture. The standard length of such a panel is 3 meters, but the thickness ranges from 3 to 6 millimeters.
All types of fiberboard do not require special care. But their main problem is the fear of moisture. That is why it is better not to make wall panels near the kitchen sink from fiberboard. Although they would be quite appropriate in any other place in the kitchen.
The appearance of the panels is quite original, installation is simple, there are few joints. The average price of one square meter is 600 rubles. Such panels can last at least one decade. But provided that there is no direct contact with water, and the percentage of humidity in the kitchen does not exceed the norm.
Photo examples of using fiberboard wall panels
Example No. 1 Example No. 2 Example No. 3 Example No. 4
Required Tools
To make crafts from plywood with your own hands you will need:
- jigsaw;
- drill and drill bits;
- vice;
- miter box;
- Sander;
- set of files;
- - awl;
- — burning device;
- — fasteners;
- - glue;
- - paints, varnishes.
You should also take care of stencils - you can print them from the Internet or draw them yourself. For more complex products it is worth making drawings.
Pros and cons of a wooden pointer – How to make a pointer
The laser was invented as a result of testing the theoretical assumptions of scientists involved in quantum physics, which was then just beginning to emerge. The principle underlying the laser pointer was predicted by Einstein at the beginning of the 20th century. It’s not for nothing that this device is called a “pointer.”
More powerful lasers are used for burning. The pointer makes it possible to realize creative potential , for example, with their help you can engrave a beautiful high-quality pattern on wood or plexiglass.
The most powerful lasers can cut metal, which is why they are used in construction and repair work.
All about the dacha
A thick 50-gauge pine board was chosen as the building material. I just took a pencil and sketched out the outlines of the future machine by hand, using a picture from the Internet as a guide.
I went through the corners with a router and in the end I got something that already resembled that same Kalashnikov! Then I polished everything with a sander.
Now you can work on the barrel of the machine gun. To do this, I used a cylindrical blank purchased in advance at a hardware store. At the same time, I cut out the barrel part, the front sight and drilled all the necessary holes.
Operating principle of a laser pointer
According to the principle of operation, a laser is a photon generator. The essence of the phenomenon that underlies it is that the atom is affected by energy in the form of a photon. As a result, this atom emits another photon, which moves in the same direction as the previous one.
These photons have the same phase and polarization. Of course, the emitted light is intensified in this case. This phenomenon can only occur in the absence of thermodynamic equilibrium. To create induced radiation, different methods are used: chemical, electrical, gas and others.
The word “laser” itself did not appear out of nowhere. It was formed as a result of abbreviation of words describing the essence of the process. In English, the full name of this process is: “light amplification by stimulated emission of radiation,” which is translated into Russian as “light amplification by stimulated emission.”
Scientifically speaking, a laser pointer is an optical quantum generator .
Preparation for production
As mentioned above, you can make a laser yourself at home. To do this, you should prepare the following tools, as well as simple items that are almost always available at home:
- screwdriver;
- knife;
- soldering iron;
- file;
- a failed DVD drive with a working laser diode;
- low-power laser pointer;
- 2 resistors per 1 ohm;
- 3 AAA batteries;
- capacitors of 100 µF and 0.1 µF.
These materials are enough to complete all the work on making both a simple and a powerful laser with your own hands.
The process of making a simple laser cutter
The main working element of a homemade cutter of the proposed design is the laser element of a computer disk drive.
You should choose a writing drive model because the laser in such devices has a higher power, which allows you to burn tracks on the surface of the disk installed in them.
The design of the read-type disk drive also contains a laser emitter, but its power, used only to illuminate the disk, is low.
Removing the laser module from the drive will require care
The laser emitter, which is equipped with a recordable disk drive, is placed on a special carriage that can move in two directions. To remove the emitter from the carriage, it is necessary to free it from a large number of fasteners and detachable devices. They should be removed very carefully so as not to damage the laser element.
In addition to the usual tools, to remove the red laser diode (and this is what you need to equip a homemade laser cutter), you will need a soldering iron to carefully release the diode from the existing solder joints.
When removing the emitter from its seat, you should be careful and careful not to expose it to strong mechanical stress, which could cause its failure.
The cutter requires a red LED
The emitter, removed from the writing computer drive, must be installed instead of the LED that was originally equipped with the laser pointer. To perform this procedure, the laser pointer must be disassembled, dividing its body into two parts.
In the top of them there is an LED, which should be removed and replaced with a laser emitter from a computer disk drive.
When fixing such an emitter in the body of the pointer, you can use glue (it is only important to ensure that the eye of the emitter is located strictly in the center of the hole intended for the beam to exit).
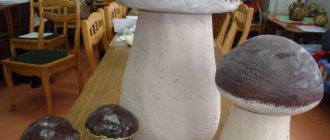
Various figures for decorating your home and garden
Fun plywood figures will add new colors to any space. They can be used not only as interior decoration, but also to decorate the yard. The corresponding sites are full of drawings of plywood crafts depicting people, animals, birds, and flowers. You can make a cat climbing a fence, a hedgehog hiding among the bushes, an owl perching on a vine.
If you allocate a separate corner for plywood crafts, you can create a real oasis for rest and relaxation in your yard, imitating, for example, a jungle or a forest clearing.
Flat figures are suitable for decorating outdoor furniture, garden utensils, organizers, and flower pots. Bright decor will prevent you from falling into melancholy and will delight your baby.
Cutting out a candy bowl with a jigsaw
There are many rules for cutting, but you need to rely on the most common ones. First you should cut out the internal elements and then start cutting out the outline. There is no need to rush when cutting. The main thing is to always keep the jigsaw straight at a 90-degree angle when cutting. Saw out the parts along precisely marked lines. The movements of the jigsaw should always be smooth up and down. Also, do not forget to monitor your posture. Try to avoid bevels and unevenness. If you go off the line while cutting, don't worry. Such bevels and irregularities can later be removed using a flat file or “coarse-grained” sandpaper.
Decorative shelves
Shelves of different shapes and sizes are another option for lightweight plywood crafts. They can be hung in any room. In the living room and bedroom they can serve as decor, in the nursery they can be used as places to store children’s books and toys. In the kitchen, jars of spices and cooking magazines are usually placed on them.
If desired, you can create entire racks from plywood. Different designs can be distinguished by:
- thickness of the material used;
- number of shelves;
- dimensions;
- presence of side walls;
- configuration;
- method of location (floor or wall);
- decorative technique.
PVC pipes for any purpose
Another way to use pipes is as an animal feeder. Moreover, it can be either poultry or cats and dogs in the apartment. This makes a very convenient feeder. You don't have to bend down to pour the food, and the animals don't scatter dry particles, as happens when feeding from a saucer.
You can make a decorative book rack from small diameter pipes. It will add a special style and charm to your room, and everyone you know will think that this is a design decision, and this is just your housekeeping.
Pipes can rightfully be called the most multifunctional, and continuing their theme, we will touch on copper (or other metal) thin products. Don't know where to use them? A very unexpected, but practical and beautiful option is a candlestick (candelabrum). You can put it on the table and have a romantic dinner.
Or invite friends and sit in an informal and cozy atmosphere. And the unusual appearance of the candlestick will add originality to your feast. It will also fit perfectly with the bookcase described in the last paragraph. You can use these candlesticks anywhere:
We hope that this article helped you take a different look at the garbage that has accumulated after renovation, and you will find a worthy use for it. But when arranging your apartment, do not forget that some building materials contain harmful substances that are best not placed in close proximity to food or in the bedroom. For the rest, don't limit yourself.
Expert opinion
Strebizh Viktor Fedorovich, leading construction foreman
Be sure to carry out work to disinfect the ceiling with antiseptics, even if, in your opinion, there are no prerequisites for the formation of mold or stains on the ceiling. If you want to clarify something, please contact me!
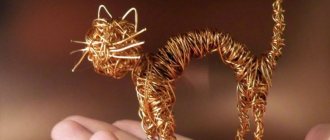
3D figures
The potential of plywood in decorating rooms is incredibly large. Proof of this is the mass of all kinds of sculptural compositions created using this material. 3D models are made up of many small elements.
Using this technology, you can make anything - a car, a ship, an airplane, and even furniture. Modern stores offer a wide range of kits with ready-made parts. Moreover, some sets are intended for children's use, others for adults.
Furniture
In the production of furniture, fiberboard plays almost a key role. This material is necessary for the back walls of wardrobes. The sheet size for these purposes is usually standard and the thinnest in thickness. In the laminated version, it is even intended to serve as doors in these cabinets. The bottoms of drawers in chests of drawers are also made from fiberboard.
In the furniture industry, not a single variant of cabinet products can do without fiberboard. The only drawback that can be noted is that an overly crowded cabinet with its contents can squeeze out the back wall of the fiberboard. However, it can easily be nailed down or replaced with a new one. The advantages include ease of installation, low cost and practicality of the material.
Fiberboard, which has been known to mankind for more than a century and a half, still has no analogues that can replace it. The ratio of valuable qualities to affordability makes fiberboard into the category of universal materials, which are convenient to use in construction and easy to use when creating furniture.
It is quite possible to build an arch with your own hands, the main thing is to carefully familiarize yourself with all the nuances of this process. An arch is an original and stylish piece of furniture that adds zest to any room. This element is often used when decorating door or window openings, gazebos, and sometimes even as garden decoration. In order to make an arched structure, you can call specialists, or you can try to create it yourself. It is not difficult. It is enough to have some construction skills and all the necessary tools.
Crafts for the kitchen
Photos of plywood crafts demonstrate that they have a place in the kitchen. Patterned organizers for spoons and forks, napkin holders, containers for spices, trays, fruit bowls - all this can be made from a plywood sheet.
Craftsmen create wooden clocks, lamps, panels, and sculptures as interior decoration. Furniture made from this material is quite in demand.
Features of working with fiberboard
So, you have to place the fiberboard on the ceiling, walls or floor.
There are the following options for attaching sheets to frames, joists or old floors:
- Fastening with screws.
Each sheet is screwed to the base with a distance between fastenings of at least 5-6 centimeters. - Gluing sheets.
Special glue or liquid nails are applied to the underside of the fiberboard sheet and to the base of the floor. The manufacturer does not indicate that the canvas should be left under the press. All we can say is that 20 minutes will be enough for the sheets to be considered firmly glued. This fastening method is only suitable for installing fiberboard on a wooden base.
Fiberboard sheets can be glued together or a special connecting profile can be used. And if such a floor is installed under linoleum, it is best to connect all its elements with construction tape or reinforcing mesh. If the installation was carried out carelessly, chips and other errors must be puttied. It is important to make a flat surface.
Gluing wallpaper to fiberboard ceilings and walls is no more difficult than gluing wallpaper to concrete. But the surface needs pre-treatment.
So, you need:
- Prime the fiberboard once, let the mixture dry;
- putty the surface, eliminate all irregularities;
- glue white wallpaper paper, let it dry;
- stick wallpaper.
This method will allow you to change the wallpaper over time without damaging the fiberboard texture. By the way, if you paint it correctly, then this procedure can be repeated several more times.
You need to paint fiberboard like this:
- Clean the surface.
- Apply a layer of alkyd primer. It is important that its temperature is at least 50°C and only one layer is applied. The primer is poorly absorbed, and it forms a film on the surface of the fiberboard.
- After the primer has dried, paint the fiberboard with a roller or spray gun. It is inconvenient to do this with a brush, since the texture of the fiberboard is uneven. You can paint the prepared fiberboard with any paint.
Cutting or sawing slabs with a hacksaw is quite difficult, since it is difficult to achieve a perfectly even cut. Therefore, you need to do this with an electric jigsaw. True, working with it requires certain skills, but by practicing on pieces of fiberboard and drawing sheets, you can achieve consistently good results.
The video will tell you about the technology for convenient cutting of large-format fiberboard sheets:
Thus, working with this building material, which is based on wood, is quite simple; the main thing is to follow the recommendations and then the final result of construction will please you for a long time.
Carved box
This casket is ideal for storing various trinkets: hairpins, keys, rings. It amazingly combines functionality and aesthetic appeal. You can choose the ornament yourself, so you won’t have any problems fitting the finished product into the interior.
Such boxes look good in rooms decorated in rustic, ethnic, and environmental styles. They will also find a place in rooms arranged according to the rules of classical and modern design.
Instructions for making a wooden arch yourself
The following materials are usually used to make a wooden arch: oak, mahogany, pine, larch, linden and beech. The most common is pine, which is distinguished by its resistance to decay and elasticity, but at the same time it is quite cheap.
Necessary tools and materials for manufacturing:
- Building level;
- Jigsaw or wood saw;
- Hammer;
- Pencil, compass and tape measure;
- Screwdriver;
- Self-tapping screws;
- Sheets of plywood or fiberboard for the template;
- Wooden planks;
- Varnish for processing the finished product.
Before you start making an arch, you should first prepare all the materials and tools for the job
It all starts with making a template. Since the arch has a curved shape, it is made up of individual elements.
It must be taken into account that the smaller the size of the assembled parts, the more smooth the arc will be and the more seams.
If the assembled template looks perfect, all the elements can be glued together and carefully fixed. To make the inner surface look like a circle, it is necessary to cut off all unnecessary and protruding parts. This is usually done using a router or other power tool.
In this way, as many wooden arches are made as necessary. The prepared template allows you to create them quickly and easily. Subsequently, all the parts are glued together.
The arch supports are made from boards of the required sizes, which are then connected to the arched arc using the tongue-and-groove method. The joints can be further strengthened with metal or wooden pins.
The inner surface of the arch must be thoroughly sanded, and all inconsistencies must be sanded out. This will make it appear as if the entire opening is made from one solid piece of wood.
The work ends with tinting and varnishing the finished product. If desired, you can add platbands, imitations of various stones, and add lighting.
Design of plywood products
There are several ways to decorate plywood crafts for a kindergarten or apartment. You can simply limit yourself to varnishing, or you can use:
- burning;
- painting;
- patination.
Whatever type of design you choose, first of all, you need to carefully go over all the details of the product with sandpaper. When choosing a paint or varnish coating, all existing unevenness and surface defects in the areas where the elements are fastened should be puttied and primed.
Making plywood crafts is not only a way to have a good time. With a minimum of effort, you can get a wonderful gift for a loved one. A handmade item will always be unique, because it contains a piece of the master’s soul. And therefore, crafts made from plywood, made with your own hands, will invariably be in demand.
DIY boxes
We continue to make things, but now not furniture with our own hands: a table, a chair, a bedside table, but boxes for the pantry. This irreplaceable little room is our salvation from wardrobes and chests of drawers. We really don't like bulky furniture in the room, so we make the most of shelving in the pantry and bathroom. This means that all kinds of boxes and crates are our great love.
When we returned from the maternity hospital, the question of storing Simina’s clothes arose, and Kostya built 4 beautiful simple boxes.
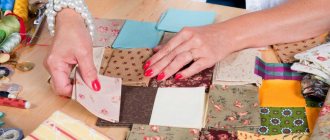
1. We measured the shelf on which the boxes will be placed; divided by 4, subtracted a little for the distance between the boxes. We calculated the size of all the parts.
2. Use a miter saw to cut the wood slats into small lengths (6 short and 2 long for each drawer). The walls and bottom will cling to them. Ksenia really liked this stage of the work.
3. Using a jigsaw, we cut the fiberboard sheet into parts for the walls and bottom. 1 bottom piece, 2 wide side pieces, 2 square pieces for each drawer.
4. To decorate the fronts of the boxes, we cut out scraps of fabric to the size of the front parts, taking into account a gap of a couple of centimeters for attaching the fabric. The fabric was ironed. Then they placed it on the fiberboard part, folded 1 edge, put a wooden strip on top and secured it with staples using a furniture stapler.
5. Then we stretched the fabric and secured it with staples on the other sides. Excess fabric can be trimmed.
6. We also assembled the remaining parts using a furniture stapler. These are the spacious DIY pantry boxes you get. Work for a couple of hours, and then it’s convenient and pleasing to the eye
Expert opinion
Strebizh Viktor Fedorovich, leading construction foreman
It will add a special style and charm to your room, and everyone you know will think that this is a design decision, and this is just your housekeeping. If you want to clarify something, please contact me!