Do-it-yourself plate painting is a creative activity that is accessible to both experienced and novice decorators.
After all, the technique is very easy to master, does not require the purchase of expensive materials, waste of time and effort, so you do not have to be afraid of losing interest in the process.
And hand-painting on glass and ceramics can become your permanent hobby, a method of relaxation, or even a hand-made business on Internet sites.
In this material we will look at the following methods and techniques for painting plates with your own hands, which are suitable for beginners:
- Spot painting of plates;
- Painting using stencils and templates;
- Artistic hand painted plate;
- Stained glass painting.
Master class No. 1: chiseled plate painting
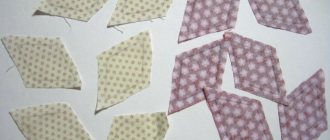
Dot painting of plates (pique or point to point) is a technique of drawing and creating contours with dots, thanks to which you can achieve the effect of chasing, inlay with stones, colored rhinestones or bead embroidery. In the photo below you can take note of successful combinations of colors and patterns (scroll the photo to the right).
Here are ideas for decorating bowls using the pique technique.
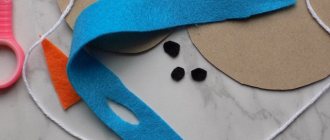
To work you will need:
- Cotton pads for degreasing and cotton swabs for correcting unsuccessful patterns;
- Ethyl alcohol, nail polish remover or special degreaser;
- Contour acrylic paints in the desired colors;
- Aerosol varnish to fix and protect the design;
- A needle and paper for cleaning tubes.
Adviсe:
- If you want to use plates for their intended purpose, then choose baked acrylic paints labeled dishwasher ability or dishwasher resistant. Durable contour paints can be found in the Hobby Line brands Kreul, Decola, Marabu and Pebeo Vitrail.
- The paints should not be too thick or too thin. You can check this in the following way: press on the tube - if the paint comes out easily, but in a puddle, then the consistency is too liquid; if it is difficult to squeeze out, then it is too thick. Before starting work, you need to test each tube, since different colors of paint of the same type may have different consistencies.
- You can make dots with a small thin brush, needle or toothpick, using acrylic ceramic paints in regular jars if you find painting from tubes difficult.
Drawing technique
The first thing you need to do is degrease the surface well with alcohol or a degreaser using a cotton pad and only then start getting creative. Experienced craftsmen can draw directly on the plate, without using any sketches or markings, inventing patterns right in the process of work. You too can trust the free flight of thoughts and improvise. But if you want to realize a certain artistic idea, then it is better to first draw a sketch, template, stencil or marking, thinking over the colors and patterns.
For painting on glass, it is convenient to use templates that can be glued to the back of the plate.
Tip for beginners: before painting a plate, practice placing small, medium and large dots on paper at the same distance from each other with the same pressure and pressure on the tube.
- The main rules: in one line there must be points of the same size, and the same distance must be maintained between the points, and it is very important that it (the distance) be minimal, that is, such that the points are “readable”, but do not merge into a continuous outline ;
- Remember that the larger the dots, the greater the distance between them can be. And vice versa, the smaller the points, the smaller the indentation from each other should be;
- You need to draw according to the principle from general to specific, that is, starting with large contours and ending with drawing small details.
After work, the paint should harden. There are three ways to dry them:
- Naturally for 1 day - if you want to use the plate rarely or even use it only as a decorative item.
- Dry with a hairdryer, and then leave the paint to harden naturally for 10-12 hours.
- Bake at a temperature of 150-170 degrees for half an hour, and then, without removing from the oven, let the dishes cool - in case you want to eat from painted plates. It is advisable not to wash painted dishes for 20 days after firing - this way the paint will last longer.
After the paint on the decorative plate has dried, you can seal it with varnish.
Historical reference
At least 6 thousand years ago, patterns and ornaments appeared on ceramic products. Most likely, the decoration of dishes originated earlier, but it was precisely this period of history that archaeologists were able to clearly record. Plates, mugs, and various utensils were decorated with magic circles, interesting lines, and mysterious patterns. Images of people, animals and plants can also be seen on objects found during excavations.
Neolithic pottery
The painting was thematic: if, for example, a ceramic dish was intended for fruit, the ancient craftsman would depict fruit on it. It must be said that in ancient times plates were used only for serving dishes; there were no personal plates - food was placed directly on a loaf of bread. But the dishes on which the main course was laid out had to be impressive.
It is believed that thanks to the painting of plates, fine art in general actively developed. The plots became more complex, the details were honed, the craftsmen looked for new color possibilities and thought out skillful patterns and ornamental decor.
Master class No. 2: painting plates using stencils and templates
Another method that anyone can master is painting dishes using stencils and templates.
To work you will need:
- Acrylic paints for glass and ceramics or felt-tip pens for painting dishes, which come in different colors and rod thicknesses. In Russia you can most often find markers from Marabu;
- Art synthetic brushes of suitable sizes (if necessary) or a sponge for tamping;
- Nail polish remover, alcohol or degreaser and cotton pads for degreasing;
- Everything you need to draw and cut out a stencil or template: paper, cutter, pencil.
Drawing technique
First, you need to draw or print a ready-made stencil/template yourself, and then use a utility knife to cut out the required holes. Perhaps, in this technique, only this stage can be called labor-intensive. Then everything is much simpler: degrease the surface and glue the template to the bottom with tape.
Also see our other materials:
Then we paint over/stamp the design using the stencil. Then you can place accents on your picture, draw details or contours.
If you painted with acrylic paints, then you can dry them naturally, with a hair dryer or in the oven according to the recommendations of the first master class on dot painting of plates.
Ideas for drawing with children
Creating a painted plate can serve as an excellent occasion for joint creativity with your child. The simplest, yet most effective and fun method is finger painting.
For example, you can depict a tree in this way. After degreasing the surface, you need to paint the trunk and branches of the tree with acrylic paint using a brush. Then coat the sponge with green (or any other) paint. Next, you need to touch the sponge with your fingertips and leave an imprint on the plate - each such imprint will represent a leaf.
A simple (child-friendly) and fairly quick way to decorate a plate is to apply a geometric pattern. To work, you will need masking tape, which must be glued to the surface, creating a simple geometric pattern (for example, a zigzag line).
Next, you just need to paint the entire surface of the plate with one color. Where the tape was glued, the surface will not be painted. After the paint has dried a little, the tape can be carefully removed.
Master class No. 3: Artistic painting by hand with brushes
Painting plates in the traditional way, that is, with brushes and paints, is the best way to paint a real masterpiece.
To work you will need:
Art synthetic brushes of different shapes and sizes;
Acrylic paints for glass and ceramics or water-based baked stained glass paints;
- Tip: stained glass paints are more transparent and, at the same time, brighter, but they are a little more difficult to work with due to their liquid consistency and ability to spread over the surface, so they are often used in combination with contour paints that contain them. Also, keep in mind that solvent-based stained glass paints are not suitable for painting plates that will be used for their intended purpose.
Any degreaser.
Drawing technique
First you need to write the underpainting, that is, draw large parts of the composition, which will be its basis. Next, add volume and depth to the design using dark and light colors. And then start drawing the details. At the end of the work, use the recommendations for fixing paint from the first master class.
Adviсe:
- Mix paints and play with undertones to create unusual colors and effects.
- Painting a ceramic plate with a matte glaze will be easier than painting on glossy ceramics or glass, since the paint will apply more densely and evenly.
Here are simple but interesting ideas for painting plates with brushes and acrylic paints with your own hands for beginning artists (scroll the photo to the right).
For those who have the skill and experience of drawing, we invite you to be inspired by the following selection of photos of painted plates.
Here's a great idea for painting saucers and plates from old tea sets.
A little history
Dot patterns look very beautiful. And that’s why people in several places in the world thought of drawing dots at once. However, historians believe that the Australian aborigines were the first to come up with dotted patterns - the oldest samples were found in Australia, and these samples are about 40,000 years old! However, dot painting is also known in other areas of the world - in China and India, Indonesia and Africa, Persia and Thailand.
Since the discovery of the Green Continent, Australian paintings have been of great interest to European art historians and artists. Therefore, dots have a place in serious painting. J.-P. painted his paintings with dots. Seurat, P. Signac, L. and C. Pizarro.
Naturally, dots were also used by European peoples in traditional crafts. But we won’t touch them - after all, it’s just an element there.
Master class No. 4: painting on ceramics and glass with markers
Drawing with markers and felt-tip pens is familiar to all of us from childhood. With the help of special markers for painting dishes with your own hands, you can quickly and easily decorate a ceramic plate with inscriptions, as well as depict a graphic and very detailed picture. We look at examples of such decor in the following selection of photos.
To work you will need:
- Any degreaser and cotton pads;
- Felt pens of different colors and thickness of the rod.
Painting technique
- Before you start painting on dishes, do not forget to degrease the surface.
- The main rule is to try to draw the lines and contours of the drawing with small, frequent strokes - this way you are less likely to make a mistake.
- Also try to draw from the general to the specific.
- Preliminarily outline the contours of the drawing; if necessary, use a template or stencil.
- Most markers dry in 24 hours, do not require burning, and are dishwasher safe.
Features of material selection
Using different types of paints in your work, you can decorate elements of dishes, kitchen appliances and any other interior items. To decorate dishes, it is advisable to select paints that are characterized by high photosensitivity and resistance to moisture.
When choosing paints for decoration, it is necessary to take into account the type of surface on which they are applied. Otherwise, the drawing made will not last on the product for a long time. Painting can be done using the following types of coloring compounds:
- Textile products - fabric acrylic. The contours with which the pattern is applied to clothing are less resistant to abrasion.
- Metal objects - picturesque enamel paint compositions. Jewelry made with enamel is characterized by rich colors, brightness and long service life.
- Ceramic products - special paints for glass. They are also called contour. They can be bought in small tubes with a long spout.
When purchasing paints, it is advisable to test the tubes, paying attention to the consistency of the coloring pigment. In order to find out the thickness, you need to press on the tube: the composition should not flow out easily, creating a puddle, but at the same time it should not be very difficult to squeeze out.
Painting compositions for painting can be:
- on an organic basis - can be removed from the surface only with a solvent like white spirit;
- on water - these paints can be easily removed with water.
Video tutorial: stained glass painting on glass
And finally, it was the turn of stained glass plate painting. This is a slightly more complex technique for painting on dishes due to the paint itself - as already noted, stained glass paints are liquid, and therefore they are often used to fill contours. They are also more transparent, glossy and less durable than acrylic. If you want to use “stained glass” plates, then choose only water-based paints, and upon completion of work, bake the dishes in the oven at a temperature of 170 degrees. If you want to hang a painted dish on the wall, then you can choose non-solvent-based paints and, in this case, do not forget to purchase varnish to fix the design.
For more information about the stained glass technique of painting glass plates with your own hands, see the following video:
Source
Drawing process
Simplicity is the main advantage of dot painting on plates. If you follow the basic rules, you can get high-quality painting on saucers and any other utensils. To get more information and practice, you can attend a special master class.
The sequence of actions when painting should be as follows:
Surface preparation - it is important that dust and other contaminants are removed from the product intended for applying a dot pattern. The surface must also be degreased with an alcohol-containing solution. Creating a background - using paints (acrylic, stained glass, gouache, etc.) you can give the surface the desired shade. Blanks - work out a pre-conceived sketch or prepare special stencils (ready-made diagrams) for drawing. Marking - draw the outline of the ornament. Creating a painting in compliance with the rules of order
First, large dots are drawn, then, after drying the large elements, they begin to apply them to the smaller components of the picture. To complete the pattern, draw the smallest details that are located close to each other. If baked paints were used in the process, the plate must be placed in the oven at 150-170 degrees and kept there for the amount of time specified in the instructions. After the paints have dried, the product is coated with acrylic varnish.
Another way of painting is to initially apply dots in the central part of the plate, and then gradually move towards its edges.
Preparing the plate Select the desired sketch Markings must be done starting from the middle Draw straight lines Then draw the remaining shapes from the sketch You need to start from the middle of the plate Continue working from the center to the edges (in circles) You can make beautiful strokes using a toothpick Done
Popular articles Crochet pony horse
Point-to-point technique
Artistic painting of dishes with dots is an entire art of compositional decoration of a specially organized space with paints. The pictorial surface differs in structure and shape. A special technique for creating a point-to-point pattern is to apply drops of paint along the contour of the plate. Thanks to the scattering of dots, an ornament is obtained that looks like a mosaic of beads or rhinestones.
To get started you will need: a plate, paints, a pointed stick or non-functioning felt-tip pen, degreasing liquid (for example, acetone), stencils, a well-lit work area.
The main stages of painting on plates are as follows:
- Treat the work surface with an alcohol-containing substance and dry.
- Draw a picture. On a glass plate, the sketch can be fixed on the reverse side, applied randomly to an opaque surface or using stencils.
- Sprinkle the sketch ornament with dots and frame it.
- Correct mistakes with cotton pads pre-moistened with alcohol.
Original painted plates can take a place not only in the kitchen, but also in a specially designated place as an exclusive handmade item. They can also serve as an original gift. The main thing is to approach the painting process with full responsibility and inspiration.
Degrease the plate Select a drawing Transfer the drawing with paint or a marker It is better to start painting from the middle Select suitable colors and continue working Done
Subject of drawings
It is very important to perfectly design the pattern for dot painting. Using different styles will give a plain saucer a distinct theme.
Oriental-style ornaments are very popular: dragons, mythical animals, birds, Turkish cucumber, world tree. They will create a special atmosphere in the interior of the house.
The motive of the drawing may vary in content. Geometric patterns are well suited for painting plates. The dots can be located at different intervals, differ in size, and color combination. Symmetry and proportionality are the main criteria when drawing a picture. Various abstract forms, fragments of architecture, weapons, floral arrangements, and elements that imitate animals also look stylish.
In a floral arrangement, even a simple design from a single plant pleases the eye with its natural beauty. More complex patterns contain more artistic elements. The correct combination of colors is the key to successful work. Yellow and orange, red and orange, blue and purple, gold and brown, white and pink, blue and green are harmoniously combined.