Flower pots made from clothespins
Such a pot can be made from scrap materials with a minimum of effort. The finished product will fit perfectly into the Scandinavian or eco-style, since the decor for it is made of natural wood.
Tools and materials
To make a flower pot you will need:
- Wooden clothespins.
- Tin can.
- Thick colored cardboard or paper.
- Plant.
Step-by-step instruction
- We distribute clothespins along the walls of the jar. For strength, they can be secured with hot or all-purpose glue.
- The result should be a pot like this:
- We plant the flower inside: some plants will need a jar, while others will need an additional pot.
- We decorate the craft with a heart cut out of cardboard. You can also decorate the pot with cord or ribbon.
In the photo, another option for using the craft is to use it as a candlestick.
Citrus peel
If you like to squeeze juice from citrus fruits (orange, grapefruit, lemon, pomelo, etc.) using a juicer, then you probably have a lot of halves of the peel of these fruits left over. Why not use them as seedling cups?
Make a small hole in half of the pulp-peeled fruit (in the bottom) for moisture to drain out, then fill the peel with soil for seedlings and sow 1-2 seeds per “pot”, depending on the “dimensions” of the future plant and the size of the citrus peel. Subsequently, the seedling can be planted in open ground directly from the “pot”.
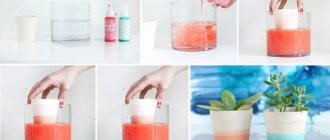
Concrete flower pots
Laying around yogurt cups, plastic buckets and bottles can make excellent molds for homemade concrete pots. Such products will be an original addition to an interior in a loft or minimalist style.
The photo shows flower arrangements made of concrete, made by yourself.
Tools and materials
To work you will need:
- Regular or low-dust concrete mix from a hardware store.
- Molds of different sizes (two for each pot).
- Bucket.
- Stirring stick.
- Thick tape and any weighting materials.
Step-by-step instruction
Let's start creating flower pots with our own hands:
- Mix the concrete mixture in a bucket according to the instructions until it reaches the consistency of sour cream.
- If there are holes at the bottom of the mold, we get rid of them using tape.
- Take a large form and fill it with concrete solution about halfway.
- We fix the small mold in the middle, after deepening it so that the solution fills the distance between the containers. We monitor the thickness of the bottom and walls. To prevent the internal form from becoming crooked, fill it with coins or sand and secure it with tape.
- When the concrete has hardened (after about 3 days), remove the finished pot from the mold.
- To get rid of defects, sand the surface with sandpaper. Homemade flower pot is ready!
- The product can be decorated by adding various objects - shells and pebbles, or painted with acrylic paints.
The photo shows an original example of decorating handmade flower pots.
How to paint a plastic plant pot
To ensure that the paint adheres well to the plastic, use a primer specifically for plastic. But in order for the primer to adhere well, sand the top of the container quite a bit with fine sandpaper. You can go over the primer once, and after drying a second time - for greater effect. There is no need to process the inside of the container - in any case, there will be a plant in it.
Then apply 2-3 light coats paint . You can buy textured spray paint, then the plant pot will look chic. For example, gray textured paint gives a “stone” effect.
In the same way, you can decorate small plastic containers and buckets for growing small indoor plants.
Flower pot made of tiles and bottles
If you have a few old tiles lying around your house, left over from renovations, you can use them to make an unusual flower pot for house plants.
The photo shows gorgeous flower pots made with your own hands from Moroccan tiles.
Tools and materials
To work you will need:
- Ceramic tiles with a pattern.
- Super glue.
- Empty plastic bottle.
- Scissors.
Step-by-step instruction
Making a flower pot will take no more than 15 minutes:
- We inspect the selected tiles: they must be free of chips. Lubricate one of the edges of the product with glue.
- Glue the second tile at a right angle. Press the elements tightly against each other and hold for at least a minute.
- We repeat the same with the remaining tiles.
- The result will be a smooth cube, open on both sides.
- We cut the bottom of the plastic bottle so that it is just below the tile.
- We place the workpiece inside the ceramic cube. The bottle should fit snugly against the walls of the pot. If desired, it can be glued.
- We plant house plants in a bottle. The flower pot is ready!
The photo shows a flowerpot made of square black and white tiles with ornaments.
A little about flowerpots
Flowerpot concept
A flower pot dressed in new beautiful clothes, that’s what a flower pot is.
Translated from French, pots are “hidden pots.” This name, as accurately as possible, reflects the essence of the subject. It often happens that housewives are afraid to replant plants or flowers so as not to damage the root system, and the pot has an unpresentable appearance. Then the position of the pot will be corrected, the plant will look new in the elegant “clothing” of the pot.
Types of flower pots
Flowers are grown in almost every home. This creates a beautiful, aesthetic interior, comfort, unity with nature. In addition, house plants enrich rooms with oxygen, which is of great importance, especially in a metropolis.
Flowerpots have different purposes according to the method of placement:
- floor planters are installed on special stands, sometimes multi-tiered;
- table pots decorate shelves, window sills, tables and cabinets;
- hanging flower pots, using ropes or wires, are attached to special hooks and suspended from ceilings and upper beams;
- wall planters are located in special holders attached to the wall.
Rope plant pots
To create the simplest design you will need 3 pieces of thick cord, each 2.5 m long. Do-it-yourself rope planters require some skill.
Note!
Weaving willow baskets: beautiful and unusual do-it-yourself baskets. DIY gazebo - the best design ideas. Taking a ring of small diameter (2-3 cm), we thread each cord into it so that the ring is in the middle of the cord. You need to tie all 6 segments into a knot near the ring itself.
To free your hands for work, you need to hang the ring somewhere. We tie the ropes in pairs into knots at a distance of 40 cm from the ring.
Next, we knit knots from adjacent pairs of ropes at a distance of 10 cm below the previous ones.
This type of weaving is suitable for oversized pots.
Rods (pots)
Using twigs you can create an interesting pot. To do this, you need to choose a suitable base, for example, cut it out of a plastic bottle, and then paste it over the entire area with twigs. This is easy to do if you first glue the twigs of the required height onto the paper. After drying, carefully wrap the base with this sheet and wrap it with twine for strength.
A more complex option is a wicker pot made of thin twigs. To make it you will need thin twigs (birch or willow) and wire for knitting. Weaving is done according to the principle of creating baskets. The rods are arranged in a circle, knitting them across with wire.
Hanging planter
If you have limited space at home, you can hang the pots. For manufacturing you will need metal triangular plates. Cement mortar without filler is spread on them with a layer of 3-5 mm. Having made three such plates, they need to be combined into a single structure, coating the joints with cement mortar. Even before complete hardening, a hole should be made in each plane. A rope will be threaded through them.
Flower pots
Indoor flowers in beautiful flowerpots are a unique opportunity to decorate and diversify the interior of your home. Flowers, in addition to being beautiful, also ozonize the air in the room. Many gardeners know how to make flower pots. After all, it is their prerogative to decorate their favorite flowers with beautiful flowerpots.
For such products, both special material and waste materials are suitable. You should not try to quickly throw away waste building materials left after repairs. They can always be put into action. Great idea: make flower pots.
Verandas and balconies become winter gardens if heating is installed on them. All year round, any flowers, even the most exotic ones, will delight you with their fragrance and bright colors.
Flower pots are created from leather, fabric, rope and yarn. Plastic dishes also come into play. And how unusual the cement planters look. They can be painted any color, or left grey. In combination with bright colors of flowers, they will also look great.
Mosaic planter
Give a second life to an accidentally broken vase or tile by using it as flower pot decor. In addition to fragments of any size, we will need glue for ceramics and special grout for seams.
Flower pot decorated with mosaic
- To obtain the fragments, use a tile cutter. If you don't have one on hand, wrap them in a thick rag and beat them with a hammer.
- We sort the fragments according to the size and color of the picture, setting aside those that suit them.
- Coat the prepared container with glue and glue the fragments.
- We fill the gaps between them with grouting compound. We remove the excess with a rag immediately before it dries.
- If desired, varnish the finished product.
Planters for the garden
The main difference between a flower pot and a flower pot is the lack of drainage. Therefore, you need to select options so that you can freely remove pots with plants from them without damaging them. When making flowerpots for the garden with your own hands, you can take into account all the nuances of watering and removing plants from flowerpots.
Decorating a garden with hanging flowerpots located on arches, or building a multi-tiered version in the form of a staircase exhibition, is quite possible even for those gardeners who are not particularly friendly with applied arts.
Tools and materials
To work you will need:
- Any plastic or glass jar that is suitable in size.
- T-shirts from which you need to weave a thread.
- Scissors.
- Hot glue gun.
Step-by-step instruction
The most difficult thing when making a flower pot with your own hands is learning how to make a patchwork thread, but once you understand the principle of weaving, you can easily cope with this task. A thread made from scraps is suitable not only for decoration, but also for creating a rug with your own hands. Let's get started:
- We cut unnecessary T-shirts into strips about 2 cm wide. We tie two shreds together.
- Place the strips in your left hand. We rotate the top strip away from ourselves, and then wind it onto the bottom strip, but twisting it towards ourselves.
- When the shreds are twisted, put a new strip inside the old one and wrap it in the same way.
- Over time, weaving from scraps will turn into a pleasant, meditative activity.
- Drill drainage holes in a plastic container. After that, we start decorating. Glue the end of the thread to the top edge and begin to wind it around the can.
- We secure the thread with glue at equal intervals. Continue until the entire container is covered.
- Now you can plant plants in the finished flower pot. Instead of thread, you can use any rope.
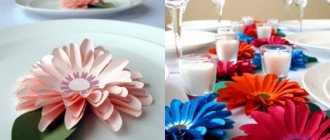
The photo shows flower pots in eco-style, decorated with jute rope and paints.
Interesting
Other unusual ideas
- If you are a fan of high-tech style and you still have unnecessary computer floppy disks, you can build original flower pots from them. By the way, they are perfect for growing violets and other small plants.
- By gluing together 5 square mirrors of the same size or 5 ceramic tiles, you will get an easy-to-make, but stylish and original flower pot.
- Pots can be made from old vinyl records. If a vinyl disc is heated, it becomes soft and pliable, easily taking on the most unimaginable shapes.
Photo of DIY flower pots
Sources
- https://podelki.expert/kashpo-svoimi-rukami/
- https://posuda-gid.ru/gorshki/94-dlya-tsvetov-svoimi-rukami
- https://proffstroygroup.ru/dekor/kashpo-iz-betona.html
- https://krrot.net/kashpo-svoimi-rykami/
- https://yellowhome.ru/2018/02/15/kak-sdelat-gorshok-dlya-cvetov-svoimi-rukami/
- https://design-homes.ru/sdelaj-sam/gorshki-dlya-tsvetov-svoimi-rukami
- https://sad-doma.net/polezno/svoimi-rukami/gorshok-dlya-svetov.html
Floral arrangement from a vintage suitcase
An item that has served its useful life easily becomes stylish and useful when it falls into the caring hands of a craftsman. We'll talk about how to turn a suitcase into a pot in the next master class.
The photo shows a transformed suitcase, which has become the highlight of the interior.
Tools and materials
To work you will need:
- Old suitcase.
- Primer, acrylic paints, brushes and varnish.
- Film.
- Scissors.
- Furniture stapler.
- Expanded clay, earth and plants.
The photo shows tools and materials for creating a composition. The film can be found at a hardware store. The number of plants depends on the size of the suitcase.
Step-by-step instruction
Let's get started:
- We wipe the suitcase with an alcohol solution. If necessary, remove the cover. We cover the surface with primer in two layers, and after drying, paint it in any color. To make the item last longer, it should be protected with parquet varnish.
- To prevent water from ruining the suitcase, we line its bottom with thick film. We fix it with a furniture stapler along the top edge.
- We fill the bottom of the suitcase with expanded clay and soil and plant the plants. To make the composition look harmonious, we place taller flowers in the background and lower ones in the foreground.
- Plants should be unpretentious and easily get along with each other.
- The garden in a suitcase is ready!
The photo shows a duet that always looks picturesque and harmonious.
How to make a rim for a large plant container
Next, you will need special polyethylene foam insulation. There is no shortage of this material - in the construction market you will find such insulation for pipes of different diameters. And it’s extremely cheap, which is very nice. This is a material designed to protect pipes so that they do not freeze at sub-zero temperatures. These pipe "skins" are conveniently cut and have sticky edges. They also attach very well to the top of a plastic bucket or container.
If you cannot buy such insulation, you can attach a piece of ordinary watering hose to the edge of the bucket. Of course, this will not be so convenient, but if you tinker, it can be done. When you try the insulation on the container, cut off the desired piece, and then, having installed it in place, connect the edges with adhesive tape or tape.
All this is done very quickly, it takes longer to tell. In about 10 minutes of not too difficult work you will get a large pot or container with a beautiful rounded rim.
Tetra Pak packages
Probably one of the most popular options among hand-made containers for seedlings is Tetra Pak bags. This multi-component material is distinguished from paper and cardboard bags by its increased strength and durability.
Tetra Pak is used for packaging juice and dairy products; in addition to cardboard, it contains foil and polyethylene. It is very simple to prepare such bags for sowing seedlings - cut them into 2 parts and the cups are ready! You can also make a tray for seedlings by cutting the bag lengthwise rather than crosswise.
Be sure to wash containers thoroughly before use.
Eggshell
Egg shells are an excellent option for a homemade container for small seedlings or for growing seedlings before transferring them to larger containers.
Take the shell and make a hole at the bottom. To do this, you can use a pushpin or a thick needle. Fill each shell halfway with soil and sow the seeds. Place the egg “pots” with seedlings in a plastic egg container. To create a greenhouse effect, close the lid of the container. When the time comes for transplanting or transshipment, plant the grown seedlings along with the shells.
Toilet paper rolls
Cardboard tubes left over from toilet paper rolls can be easily converted into biodegradable planting cups. You can also use paper towel rolls.
If you need a short glass, cut the sleeve crosswise into two parts. Next, do the following with each part: fold it lengthwise and use scissors to make cuts approximately 1/3 of the height of the tube so that you get 4 blades. Then straighten the workpiece and fold the blades one on top of the other, bending them, as they do with cardboard boxes, to form the bottom.
Seedlings can be planted in a permanent place without removing them from the cups, since paper and cardboard are biodegradable materials.
Tips from needlewomen
Paper is a fertile material for creativity. This is a safe, flexible, affordable way to occupy the leisure time of all family members. It’s also beneficial to get rid of unnecessary junk - old newspapers and magazines, containers.
Using the simplest models, you can practice your skills and instill a love of needlework in children
The woven product itself is a fascinating and interesting reward after a long, rather complex and not always pleasant process of making the required number of tubes, and to weave one flowerpot you need from 50 pieces. They must be done in advance.
After twisting, the tubes are ready for weaving. If you paint them before starting work, the product will look neater than when painting the finished product. Any paint will do. You can even take gouache, diluting it with a mixture of water and PVA glue. When finished, it is recommended to coat the craft with any wood varnish.
To make the paper vine pliable, it is advisable to slightly wet it before weaving. It is enough to spray the newspaper blanks from a spray bottle, or lower them into water for a couple of seconds.
It is especially important when weaving to ensure that your hands are slightly damp. When working, your fingertips must be periodically moistened with a sponge or rag soaked in water.