A mini tractor is exactly the same agricultural equipment for farmers as a tractor, but with less productivity, which is sacrificed for the sake of maneuverability and efficiency. In addition, some specimens are so light that they can be transported in a trailer. Small tractors perform all the same tasks as their higher-class counterparts - you can attach attachments to them for cultivating and fertilizing the soil, cleaning the area and transporting various loads. In addition, many tractors, even those made independently, have a rotation drive for auxiliary units and hydraulics.
They differ from walk-behind tractors, first of all, in that they are full-fledged agricultural machinery. Of course, a powerful walk-behind tractor also has considerable functionality, but when operating it you have to walk all the time. This is very tedious, especially when processing a large area. And when working with a self-propelled machine, even the smallest and homemade one, the operator gets much less tired - after all, the homemade vehicle is equipped with a steering control. Understanding all the advantages of mini-tractors, domestic inventors sometimes create first-class specimens with their own skillful hands. On the Internet you can now find many descriptions, diagrams and even ready-made drawings of such homemade products.
Mini tractor designs
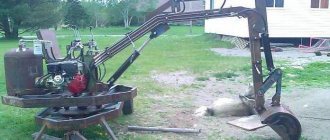
In most cases, when making a homemade tractor, some serial product is simply remade, with some components added and others eliminated. This is an easy way, but it is not always feasible, since a complete machine must be available. And the design of homemade tractors, created from scratch, is individual in each case - today the variety of solutions is simply off the charts. For example, the frame for a mini-tractor is made solid and breakable (popularly called “fracture”), the rotation is made with steerable wheels and onboard, the layout is classic or in the form of separate modules, allowing you to change the purpose of the device. Install the hydraulic system (hydraulic system) and power take-off shaft. The cabin is not the primary task when creating a homemade product, so it can be built on later.
A tractor from the manufacturer at the price of a homemade product - the entire model range is here. We buy a good hitch for a homemade agricultural machine using the link. Read in this article - the easiest way to assemble a mini-tractor from a walk-behind tractor.
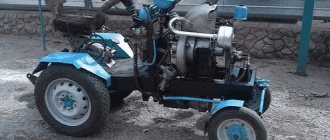
The homemade motor tractor proposed below is one of the easiest to manufacture and allows you to get by with affordable materials and parts. Assembling a homemade tractor is done on your own. Instructions and drawing are below in the picture.
But, of course, anyone who is planning to do something themselves, with their own hands, is recommended to have technical skills, the ability to work with tools and read drawings. And, most importantly, have a lot of time and a great desire to do it.
Do-it-yourself crawler all-terrain vehicle: manufacturing features, drawings:
It's no secret that in our vast country there are areas where it is completely impossible to move normally on the roads due to their poor quality. In this case, a special vehicle, which is characterized by high maneuverability, comes to the rescue.
We are talking about an all-terrain vehicle. But, unfortunately, it is almost impossible to purchase a vehicle that is light, economical and inexpensive.
Therefore, many craftsmen with engineering and technical skills decide to create a tracked all-terrain vehicle with their own hands, taking into account their needs and capabilities.
How can tracked all-terrain vehicles be used?
Such homemade tracked devices come in different sizes and are used for a variety of purposes. With their help, heavy loads are moved, which are placed either in the body or in a special trailer. If a crawler all-terrain vehicle, made by yourself, is used for a summer residence, then in this case various construction materials are most often transported.
In addition, such a vehicle has transport versatility, and if any unforeseen circumstances arise, you can quickly, without any difficulties, get to a certain destination over rough terrain.
What to pay attention to when creating a homemade all-terrain vehicle?
If you decide to make a crawler all-terrain vehicle with your own hands, you must clearly understand for what purpose it will be used. Be sure to consider the following points:
- Weather conditions during operation.
- Dimensions. The width affects the cross-country ability of a self-made crawler all-terrain vehicle, the length is calculated based on the number of seats or the presence of a luggage compartment, and the height should be optimal when creating the amphibious properties of the unit.
- Motor power. The more powerful the engine, the easier it is to overcome hard-to-reach sections of the road.
- Target. Depending on the purpose for which the mobile device is intended, its design may vary.
- Number of wheels. Most often, a homemade tracked all-terrain vehicle, made with your own hands, has wheels from two to eight pairs, which are necessary to support the caterpillar track.
Create a drawing
The most important stage is making a sketch of a tracked all-terrain vehicle. Do-it-yourself drawings with the location of the mechanisms of the unit and its components are drawn after this. They must be very accurate. When creating such a vehicle, they usually use both homemade parts and ready-made factory-produced elements. They are drawn separately, with the calculation of the compatibility and performance of parts and assemblies.
Design features
A crawler all-terrain vehicle, created with your own hands, must have an engine. Basically, this element is taken from cars, most often domestic ones. You can also borrow it from a motorcycle. The chassis consists of rubber tracks, a tension system, suspension, and rollers. Car tires are often used to make tracks. The chassis base consists of a bathtub, frame or any other metal frame. For the control system, various components are taken or ready-made control elements of motorcycles or cars, as well as tractors, are used. A homemade tracked all-terrain vehicle, made with your own hands, has a power system, which is represented by a fuel tank, gasoline or diesel. Gas equipment is used much less frequently.
Manufacturing technology
Lightweight tracked all-terrain vehicles are made by hand using a certain technology. Their creation begins with the construction of the body, which must have high strength and complete waterproofness.
The base of a homemade transport must be rigid, so steel pipes are used that can withstand any physical stress arising from movement. Then they begin to make the tracks. To do this, take ordinary sheet rubber and create ring rubber.
Small aluminum blades are placed on its outer side using rivets, and the necessary limiters are installed on the inner side, the step width of which is equal to the width of the tire tires.
The next stage is that the bridges are removed from the car through holes that were specially made in the body for this purpose. Rubber couplings are used as protection.
The rubber band is attached so that the wheels are located directly in the center of the stops. In addition, additional wheels are also attached. They are necessary to maintain the track tension.
To complete the work, heavy-duty glass is installed in the cabin of the all-terrain vehicle, which was made by hand.
Frame
It is made from rolled metal. Strength calculations are a thankless task, and in this case, unnecessary. Therefore, you just need to lay down multiple reserves in advance. Based on this, using a channel from No. 6 to 12 is the best solution for a homemade mini-tractor. It is not worth making any “cuts” and “bending around” the units, as this will greatly complicate and increase the cost of the project. An ordinary flat “ladder” is simple and accessible to many.
As practice shows, for a homemade tractor it is more useful to use a channel of a larger rolling size (up to 20) as a front and rear traverse (cross member), since subsequently it is to these traverses that various working parts and auxiliary equipment are attached. Moreover, it is better to place it with shelves inside. And the channels of the side members (longitudinal beams) can be placed both inward and outward. Fuel lines and lines are laid inside the side members, which are naturally protected.
In shape, the simplest design of a homemade frame is a rectangle with two or more traverses. But a frame in the form of a trapezoid will have much greater rigidity. The width in the front part should be smaller to accommodate the minimum dimensions of the steered wheels, as well as to allow monitoring of movement strictly along the arable row. The joints of the side members and cross members must be welded or reinforced by welding gussets. Please make sure that everything is in order with the body of the mini-tractor, because all other units are attached to it. To connect the trailer to the frame, you can weld a hitch.
Circular grinder
The easiest way to turn an angle grinder into a saw is to replace the standard blade with one designed for wood. Such a device has a limited action limit. It can cut slats or thin bars. A khaki casing is put on the grinder. The handle is made a continuation of the body.
Hand saw from a grinder
Cross-cutting lumber requires a cross-cutting pull. You can make it from a grinder by attaching the tool to a rotating bar. A circular saw is used to cut larger quantities of lumber. With its help, you can cut a board or bar of any size. Making a circular saw requires certain knowledge. The saw blade on a circular saw is fixed on a table mounted on the frame. For its manufacture, a 50*50 corner is used.
A circular saw
The sawing table is made of plywood or boards. The control button and switch are located on the side. You can figure out how to make a circular saw from an angle grinder with the help of a video.
Video - How to make a circular saw from an angle grinder
Layout
The relative location of the main parts of any tractor has developed historically. The classic layout of a self-propelled vehicle is as follows: the engine is located in front, longitudinally, above the front axle. A gearbox is connected to it through the clutch, followed by a transfer case and followed by a drive axle. The shafts of the units are connected to each other using cardans and (or) couplings.
Compliance with this scheme will be the best option when creating a mini-tractor, as it will allow you to use existing units without changing them. According to the experience of many creators of homemade tractors, it is better to assemble the units “in place”, without doing unnecessary drawings and calculations. The best option is to place all the main components and homemade mechanisms on the finished frame, install them on temporary supports (conveniently, on wooden blocks) and find the best relative position. After this, you can begin to manufacture brackets and fastenings for tractor components. But we must not forget that all components on self-assembled tractors must be mounted through supports that dampen vibrations (rubber cushions). It is best to borrow them from the same equipment from which the unit was taken. Another important factor that must be taken into account is weight distribution, that is, the distribution of the total weight of the mini-tractor along the front and rear axles. The most acceptable option is that 60% of the weight falls on the drive wheels, 40% on the steering wheels.
Engine for homemade
From the point of view of thrust-to-weight ratio, weight, availability and low cost of repair, it would be most logical when manufacturing a tractor at home to take an engine from classic VAZ car models, from 2101 to 2107, or install it from a motorcycle. They can be found in good condition for the price of scrap metal. If you're lucky, one car can become a donor for most of the parts for a mini-tractor. Or you can equip it with a new Chinese diesel engine.
The motor, clutch and gearbox are secured as a single unit, which simplifies the work on a homemade tractor and saves the creator from many difficulties. Be sure to install a fan impeller on the shaft of the water pump (“pump”), even if it was not there. After all, the speed of agricultural machinery is much lower than that of a car, so the operating mode of the mini-tractor motor is the same as when standing in a traffic jam. And this is considered heavy for any engine. Consequently, the radiator of the cooling system of a homemade tractor requires forced airflow.
Garden waste shredder
A garden shredder is a useful thing: when there is not enough organic fertilizer, but you don’t want to use mineral fertilizers, homemade compost comes to the rescue. It is not so easy to obtain it from large and hard material: it will take 3-4 years to mature. However, if thick branches and stems of weeds are pre-chopped, the compost will be ready in a few months.
Viktor50 made a garden waste shredder himself, using a block of 26 cheap circular saws with Pobedit surfacing (even if they break, it’s easy to replace) and a 2.2 kW electric motor. The only drawback was the cable behind the cultivator, but you couldn’t hear the engine running and the exhaust gases didn’t bother you. In three hours, the device turned a pile of half-rotten wood that remained after uprooting the site into excellent crumbs, which can be used as compost or sprinkled under strawberries while the berries are ripening. Viktor50 was pleased with himself: factory shredders cost five times more, and their 2-4 knives become dull after half an hour of operation.
Staratel2010 made a similar device from an old MTD lawn mower. He cut off the blades of the knife that directed the mulch into the collection box. The sink drain came in handy (for the “test” on the tank) - it was cut into a hole in the lawn mower body. The height of the drain is under the knife.
The forum member notes that the device requires improvement: it is necessary to replace the plastic funnel with a metal one, because the pipe is broken by thick raspberry rods, make a better fastening and install a square tank to make it more convenient.
The homemade chopper impressed the owner with its work: it easily crushed a couple of wheelbarrows of raspberries and less hard material. At the same time, Staratel2010 noted that when you simply let go of a branch and it is pulled in at high speed, you get long pieces, but if you hold it with your hand, then everything grinds into dust.
Transmission
As mentioned above, it is advisable to install the entire power plant on self-propelled vehicles. In this case, what will later become a mini-tractor will already have at least four forward gears and one reverse. All that remains is to coordinate the optimal tractor engine speed and the desired speed. For this, a transfer case from any all-wheel drive car will be quite sufficient. The most suitable option is an all-wheel drive UAZ. By the way, the previously discussed components can also be used from UAZ. But you need to understand that they are heavier, so the consumption of the resulting tractor will be higher, and all its power will be rarely used.
A good element for connecting shafts is an elastic coupling, which is installed on the output shaft of the VAZ gearbox. By making a flange for the transfer case, you can do without an intermediate cardan. But from the transfer case to the drive axle, a cardan is required, since the loads there are significantly higher, and the coupling will not withstand them. When building a tractor yourself, it is best to use the drive axle from a UAZ vehicle that has final drives. This will increase, firstly, traction, and secondly, ground clearance (which should preferably be increased to 450 mm). The required track size for a homemade mini-tractor can be obtained in two ways. The first way is to cut off the bridge stockings (narrowing the track). The second way is to make a spacer for mounting the wheels (by expanding). This has to be done because the nominal track of the UAZ is 1445 mm, which does not coincide with the accepted ranges for agricultural vehicles (1260-1285, 1350-1370, 1490-1515, 1790-1815).
Chassis and propulsion
This system in the homemade mini-tractor under consideration almost completely replicates that of serial tractors and differs from the automobile system in some important points. The main difference is the lack of rear suspension. That is, the drive axle is not attached to the frame on springs, but is rigidly fixed to it. This must be done if you plan to build not only the tractor itself, but also all the agricultural implements for it. Because attachments such as a plow, harrow, tiller, mower and other devices attached to the rear of a homemade tractor place a very heavy load on the rear axle and, if it has a rear suspension device on it, will quickly render it unusable. The front axle on a homemade tractor can also be installed without suspension - comfort will not be significantly reduced. It is convenient to use forks of cardan joints of trucks (ZIL, KAMAZ, KrAZ) as turning axles, spare parts for which can be found in motor vehicles and at metal receiving yards. Two forks are welded to the beam or directly to the frame, maintaining the alignment of the chassis, and two counter forks are welded to the steering knuckles of the donor car. The steering linkage along with the entire steering mechanism is also borrowed. The steering wheel is installed from a donor.
There is no point in using the braking system (disc brakes) in its “automotive form” on a tractor made by hand, since the speeds are not the same. Only the parking brake is enough. However, the mechanism must be driven not from a lever, but from a pedal with a fixed pressed position. Then the homemade product can be slowed down in motion and fixed in the parking lot. It is best to use wheels from agricultural machines, as they have the required tread. But tires from SUVs or light trucks are also quite suitable if you cut them with the desired tread pattern (preferably herringbone for self-cleaning). Tire pressure is determined empirically to find the optimal combination of comfort and performance.
Electrics on a homemade tractor
You can use any parts from anything, the main thing is that the voltage of the generator and consumers match. We must not forget that the battery is a container of acid. Therefore, it must be secured very firmly. The recommended solution is to place it under the seat of the mini-tractor in a special box or simply in a fence. A detailed description of the electrics is in the picture below.
Headlights and side lights, as well as brake signals, are desirable elements, but not required, since you won’t be able to drive on public roads as a result of your labors.
Driving on the roads
Not all home-made mini-equipment of designers goes on public roads. And this is correct, since our country lists a number of strict requirements that vehicles moving along them must meet. Even if everything turned out well and the product meets all the requirements, certification will be required to confirm this, which is very expensive.
Therefore, it is prohibited to drive on the roads on a homemade tractor. If it needs to be delivered to the work site, it is better to do this on a trailer. This, by the way, is one of the reasons why they are trying to make homemade work easier.
What can you use to make an irrigation system for your garden?
Watering plants in the garden can be considered labor-intensive work. It takes a lot of time and physical effort. You can make the task of caring for your garden easier by making an irrigation system from scrap materials. The design of the system depends on the water source. It could be:
- water supply network;
- well;
- containers;
- natural reservoirs.
Watering bottle from a plastic bottle
Water is taken from a well, natural reservoirs and containers using a pump. The optimal pump option for the garden is “Baby”. Him:
- body water intake;
- productivity - 432 l/hour;
- the period of work without a break is 2 hours.
Watering the garden
For drip watering of plants, hoses with holes are laid around the garden. The water from them should get under the root of the plant. When taking water for irrigation from the water supply, the hoses are connected to the tap. If a pump is used, the hoses are connected to its outlet nozzle.
Among the advantages of drip irrigation:
- saving water consumption;
- mechanization of manual labor.
You can read more about the manufacture of equipment for watering a garden in our article.