A snowmobile is a universal technical means of transportation in the winter season. Thanks to the peculiarities of the chassis, it is able to overcome kilometers of deep snow, while developing up to 50-70 km/h. Economical fuel consumption, maneuverability and extraordinary ease of control are all that make it indispensable where winter snowstorms and snowdrifts occur almost all year round. True, the cost of such machines ranges from several to tens of thousands of dollars, which complicates the purchasing process.
In a situation where purchasing a factory snowmobile is an unrealistic dream, and circumstances require its availability, homemade products come to the rescue, ready to solve it in a less expensive way. One of them is the conversion of a walk-behind tractor into a snowmobile, to which we will devote the article.
How to choose an engine
In order to create a snowmobile, it is necessary to take into account the most important and central part of the entire mechanism - the motor. The motor must have decent traction in order to move the entire mechanism in difficult snowy weather conditions. For everything to work out as it should, a powerful motor from the Neva walk-behind tractor will do.
If such an engine is available, one or two people will be able to move on a homemade snowmobile from a walk-behind tractor with their own hands. The engine power is 6-7 horsepower, which is quite enough to move on snow cover.
If you add a snowmobile stand to the walk-behind tractor, the lifting force will increase and you can easily load your walk-behind tractor for snow trips.
What is good about this engine, many ask. In fact, there are many more advantages than you might think:
- First of all, it is an affordable price.
- Also good quality is proven by Japanese production.
- The motor has an additional air cooling system.
Also note that gasoline can be used as fuel.
Case dimensions
The body or, as it is also called, the trough is a load-bearing element. The performance properties of the drag directly depend on its size.
The dimensions of the housing are the first thing you need to decide on at the design stage. Everything is simple here - the more things you plan to carry, the larger the trough should be. There should be enough space for the fisherman and his equipment.
But there is one more nuance. To prevent the failure of a motorized towing vehicle from turning into a disaster for you, it is necessary to provide for the possibility of transporting it in a housing.
Pulling a broken motorized towing vehicle is much easier than carrying it on your back. Depending on individual needs, the length of the trough can reach two or three meters, and the width - a meter.
Expert opinion Smirnov Alexander Stanislavovich Wilderness survival instructor. More than 15 years of teaching experience
The height of the sides does not play a significant role. Everything is similar here - the more things there are, the higher the sides.
You also need to take into account the height of the snow. The thicker the snow cover in your region, the higher the height of the sides you need to make.
But if you have a wide motorized towing vehicle and narrow skids, then this indicator can be ignored, since the structure will slide on already compacted snow. The height of the sides ranges from 30 to 50 centimeters.
Features of the design plan
The simplest version of a snowmobile consists of a part that drives and one that is driven first. The second part consists of a seat, shock absorbers, a steering part and runners, thanks to which this part moves. The second part is much more complicated, since it contains all the elements that set the snowmobile in motion.
First of all, in the second part it is necessary to correctly provide the power unit, that is, the motor itself. The frame on which everything will be arranged and the drive are also important.
Do-it-yourself diagrams and drawings of a snowmobile from a walk-behind tractor must be made in advance, and you can find the required option on the Internet or in various types of literature.
First, before drawing up the drawing, determine the purposes for which the snowmobile will be used. After the drawings, you will need to select the parts, and, if possible, make some with your own hands.
Put it together
There are many design assembly options. It all depends on the type of future device and its capacity. The chassis of an all-terrain vehicle must have independent suspension. It is better to supplement it with low-pressure pneumatic wheels. The frame can be either articulated or solid - it depends on the type of wheels used.
To provide the car with independent support, it is necessary to connect the side members with a strut, a stand and a special steering bushing. To attach the wheels, you need to install a bladder from the truck to the suspension (it's better to use a low pressure chamber). After installing the suspension, install the motor from the walk-behind tractor.
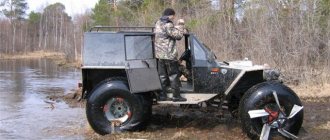
Homemade snowmobile from a walk-behind tractor
The simplest, homemade snowmobile can be made from an ordinary walk-behind tractor.
Winter is already upon us, and folk craftsmen are in full swing constructing their homemade means of transportation on snow and ice. Some people need a snowmobile to go winter fishing, and others need a snowmobile to go to the store to buy bread along the countryside off-road. Not everyone can afford to buy such equipment, but you can be smart and make a snowmobile, for example, from a walk-behind tractor.
And why not, but the walk-behind tractor itself needs a little modification, in principle it’s nothing complicated, let’s take a closer look at such a snowmobile built by a craftsman.
You need to install wheels with a larger diameter than the standard ones on the walk-behind tractor so that they do not get buried in the snow. As an option, replace it with car wheels, and to increase the contact area, we wrap a wide conveyor belt around each wheel. We will also make lugs from wooden blocks (you need to use hardwood). We fasten the bars with self-tapping screws directly to the conveyor belt. You can make more reliable lugs from a metal corner, and secure the corners to the tape with bolts and nuts.
This is how wide the wheels are, they will no longer dig into the snow, and the lugs will not allow the wheels to slip.
You also need to connect a drag sled to the walk-behind tractor for the driver and the cargo being transported.
Control left and right is carried out by turning the walk-behind tractor relative to the sled.
As a result of this modernization, we get a real snowmobile, albeit a homemade one, but still a vehicle on which you can move around a snow-covered village. If necessary, the structure can be disassembled and the walk-behind tractor used for its intended purpose. True, the cruising speed of such equipment is low, about 10 - 20 km/h.
Do-it-yourself snowmobile from a walk-behind tractor
A snowmobile is a universal technical means of transportation in the winter season. Thanks to the peculiarities of the chassis, it is able to overcome kilometers of deep snow, while developing up to 50-70 km/h. Economical fuel consumption, maneuverability and extraordinary ease of control are all that make it indispensable where winter snowstorms and snowdrifts occur almost all year round. True, the cost of such machines ranges from several to tens of thousands of dollars, which complicates the purchasing process.
In a situation where purchasing a factory snowmobile is an unrealistic dream, and circumstances require its availability, homemade products come to the rescue, ready to solve it in a less expensive way. One of them is the conversion of a walk-behind tractor into a snowmobile, to which we will devote the article.
What type of diesel or gasoline engine should I choose for my all-terrain vehicle?
It is impossible to answer this question specifically. Both motors have their advantages and disadvantages.
It is recommended to make the chassis with independent wheel suspension. To do this, you will need to make some effort, but the comfort of those inside will be ensured. An excellent result is achieved when the suspensions are paired with low-pressure pneumatic wheels.
If we are talking about a tracked all-terrain vehicle, the frame for it is a one-piece structure. In the case of wheeled vehicles, an articulated version is used. Although an articulated frame can be chosen for a tracked all-terrain vehicle.
Do-it-yourself snowmobile from a walk-behind tractor: reasons for choice and selection criteria
A walk-behind tractor is a worthy technique for transformation, which is in the arsenal of almost every resident of our country.
In the list of homemade devices that can be adapted from it, the snowmobile occupies one of the first places, competing with the caracat and the all-terrain vehicle. This is due to the fact that in winter, when a snowmobile is needed, the farm does not need the standard tasks of plowing, hilling or mowing the grass. Therefore, it makes sense to remove the engine in the winter and make a snowmobile based on it, and in the summer to return it to the walk-behind tractor and operate it in the standard way. Not every modification of a walk-behind tractor is suitable for a snowmobile. It is best to use for this purpose those that have:
- rear towing device;
- possibility of manual control;
- medium-power motor, cooled by air.
The Neva walk-behind tractors, which are available in eight models, are considered ideal for a homemade snowmobile from a walk-behind tractor. All of them represent a group of tillage machines with average traction potential (6-9 hp). Despite their low cost, the motor systems are assembled and tested in Japan, which makes them extremely durable.
Taking all these points into account, such walk-behind tractors make snowmobiles with good power. This means that it will be able to carry not only the driver, but also at least one passenger.
Opinions from forums
When covering the issue, it was impossible not to study what people who had already brought the idea to life or were just about to do so wrote on the forums.
A few points worth mentioning:
- the maximum speed of an all-terrain walk-behind tractor can be increased by replacing pulleys or making double pulleys;
- There is no problem with speed fluctuations;
- It is possible to use an all-terrain vehicle as a mini-tractor, but within the scope of work that is permissible for a walk-behind tractor that has not been converted into an all-terrain vehicle.
Snowmobile based on a walk-behind tractor: various design options
Among the varieties of walk-behind snowmobiles available today are:
The wheeled snowmobile has a primitive design. The only element that is replaced is the wheels - they are replaced with larger tires or even low-pressure wheels. They are made with all-wheel drive so that the equipment can easily turn to the sides. Among the disadvantages of wheeled snowmobiles made from a walk-behind tractor is their suitability only for shallow snowdrifts.
A homemade snowmobile on skis is also considered one of the simplest options for replacing branded motor sleighs. If you take a ready-made sled as a basis, the assembly process is simplified as much as possible. Another method is also possible, when skis are made independently from plastic.
A tracked snowmobile based on a walk-behind tractor engine is considered the most labor-intensive to recreate. Considering its versatility, excellent cross-country ability and maneuverability, we will dwell on it in more detail.
Necessary materials
As mentioned earlier, to transform the wheeled walk-behind tractors Sadko, Don, Huter, Profi, Plowman, Champion, Carver, Husqvarna into a tracked walk-behind tractor, you will need a fairly powerful engine with axial locking.
Power is important because such a walk-behind tractor will be used on a fairly complex surface, the maneuverability of which requires additional technical data.
Track materials
To summarize a little, we can highlight the main materials that we will need:
- The presence of the walk-behind tractor itself with a gearbox with a powerful 4-stroke engine with axle locking.
- A couple of extra wheels so you can pull the track on them.
- The homemade caterpillar itself, made from available materials.
- Depending on what material will be used in production, we may need two large car tires or transport tape.
Using these materials, you can make a fully functional crawler walk-behind tractor.
At the same time, you can make a full-fledged mini tractor on tracks if you add an additional cargo platform, or use it as an all-terrain vehicle in the snow by adding a platform on skids. In general, there is complete scope for imagination.
How to make a snowmobile from a walk-behind tractor yourself?
The process of manufacturing a future homemade snowmobile begins with competent design and execution of drawings - a strong point in any homemade product.
For convenience and better understanding, the design of the machine can be divided into two parts:
Leading members include:
- traction unit (motor from a walk-behind tractor);
- frame;
- drive elements.
- steering column;
- shock absorbers;
- caterpillar mechanisms.
Before making a snowmobile from a walk-behind tractor, the auxiliary devices and material resources are determined. Electric welding and a pipe bender are a must, without which the assembly would not be complete. It is advisable to purchase parts that are not on hand in advance.
Eventually
Thus, having straight arms and a head on your shoulders, you can make a fairly simple but passable all-terrain vehicle from a walk-behind tractor, which is nominally considered agricultural equipment.
There are positive experiences with alterations, a lot of them. Have experience in operation and maintenance.
An all-terrain vehicle made from a walk-behind tractor is an excellent solution for fishermen, hunters, and simply those people who live in rural areas far from big cities.
Read news about the new Niva
- VAZ 21213 | Engine won't start | Niva
- 12 best new crossovers under 2,000,000 based on price/quality combination on the Russian car market
- What kind of diesel engine can be installed on the Niva?
- Replacing a Chevrolet Niva heater radiator with air conditioning without removing the panel
- Technical characteristics (3-door, 5-door and Urban)
- Front bracket with platform for Lada4x4 winch, NP-00156, price 5870 rubles. Buy
- Toyota Highlander or Mazda CX-9: which is better, comparison, reviews, pros and cons
- Renault Duster vs Chevrolet Niva: comparison of characteristics, photos, videos
Crawler snowmobile from a walk-behind tractor: the manufacturing process at home
The snowmobile, the picture of which is presented below, is based on the motor of the Neva cultivator. Its production begins with the frame.
DIY snowmobile frame
The frame is made of metal pipes with a diameter that is used for motorcycle frames. Water pipes are also suitable. A pipe bender is used to give the desired shape.
To simplify the task and reduce design time, we suggest using ready-made drawings.
Designations according to the drawing:
- frame;
- intermediate type shaft sprocket;
- intermediate shaft;
- sprocket with teeth;
- gear parts;
- track drive elements;
- track shaft;
- ski support stands;
- tensioner rollers for tracks;
- axis for tensioning rollers;
- towbar;
- tensioner;
- drum flanges;
- steering column
After welding the frame elements to the established dimensions, a subframe is made in its front part - the motor is localized on it. To do this, a stand with holes for it is welded. The same holes should be in the traverse itself. Through these slots it will be convenient to tension the drive chain and adjust the position of the traction unit.
In order to ensure that the device can be started with a handle, the underframe frame is moved to the rear of the unit. Equipping the original walk-behind tractor with a forced cooling function will be an invaluable bonus. This will reduce wear on the carburetor and traction mechanism.
Intermediate shaft for a snowmobile made from a walk-behind tractor
The diagram shows a general view of the intermediate shaft.
The numbers in the figure indicate:
- support part for the operator's seat;
- cross member - made of stainless pipe 28 x 28;
- rack axle - made of pipes 18 x 18;
- traverse - from a metal corner with a side of at least 25 mm;
- jib - a steel billet 0.4 x 0.05 m is taken as it;
- bearings No. 204;
- shaft (pipe based);
- toothed sprocket (like element 10);
- spar;
- rubber casing.
All these details can be made with your own hands.
Making a steering column for a snowmobile: basic drawing with dimensions
A properly assembled and adjusted steering column is a prerequisite for a snowmobile made from a walk-behind tractor to be able to navigate through deep snow and to easily overcome uneven terrain.
Algorithm for completing parts
There are several proven ways to make a caterpillar with your own hands. They have proven themselves to be the most reliable.
Application of conveyor belt
It is considered one of the simplest methods . In addition to the transport belt, you will need a bushing roller chain. The simplicity in this case lies in the fact that manufacturing does not require a large number of auxiliary materials and tools. To extend the life of the transport belt in the device, you need to circle its edges with fishing line. It is important to ensure a step of 10 mm. To connect the ribbons, in this case you need a ring, you need to stitch it along the ends or use hinges.
Particular attention is paid to the thickness of the transport tape. The level of load on the unit directly depends on this. The optimal choice would be to select a tape with a minimum thickness of 7 mm. Among other things, you will have to take care of an additional wheel on each side. You can remove it from an old car, but it is important that its diameter matches the same parameter as the wheel on the walk-behind tractor.
Using a tire
For walk-behind tractors, tracks are often taken from tires. Craftsmen claim that the design is highly reliable when the specified element is included in it. In order for the resulting walk-behind tractor to be practical, you must take care of the quality of the car tires. They must have the correct tread pattern. In this regard, tires from large cars and tractors are preferable. The tread pattern is of key importance, as it acts as a lug.
The manufacturing process can be divided into several stages . Here they are:
- After finding suitable tires, a track for the tracks is cut out of them. This is labor-intensive work that will take a lot of time.
- Use a well-sharpened knife for cutting. It's better to take the one that shoemakers use. From time to time it must be moistened in a soap solution. This will make the rubber easier to cut.
- Both sidewalls are cut off the tires. To make the process easier, you can use a fine-tooth jigsaw for this. Remove excess fragments inside the tire if necessary. If the track turns out to be too hard inside, this manipulation can be repeated.
The advantage of this method is that there is no need for a ring connection. The tire already has a closed structure.
Thanks to this, it is possible to improve the reliability of the tracks, which is especially important under heavy load conditions. And yet such caterpillars are of rather limited length. It corresponds to a similar parameter for a car tire.
From chains and belts
All-terrain vehicles with tracks are often manufactured using conventional V-belts. They are connected to each other by means of lugs. The straps are attached with screws or rivets.
An additional method is to use chains of the same size. This material is often found in large quantities in gardeners' garages. The manufacturing process boils down to the following points:
- Take 2 chains of the same size. The last links are broken, after which they are combined into a closed ring. The links are clamped and welded.
- The lugs connect the chains to each other and provide reliable fastening. These devices can be made from simple steel plates of suitable thickness. They are connected using bolts.
If you don’t want to make tracks yourself, you can take such products from old equipment. For example, a walk-behind tractor on Buran tracks demonstrates good efficiency. It makes sense to use old parts, since new Buranovsky tracks are quite expensive.
Step-by-step instructions for assembling a snowmobile from a walk-behind tractor
- assemble the frame;
- install the engine, which should fit in the center of the machine for increased stability, and fix it;
- install an intermediate shaft to reduce angular speed and increase traction potential;
- adjust the steering column;
- aggregate caterpillars;
- choose a seat and equip it with an old car seat.
After successful testing to protect the external metal parts from corrosion, the snowmobile is cleaned and painted.
How to make a snowmobile from a walk-behind tractor with your own hands: instructions and diagrams
The walk-behind tractor is a seasonal equipment that is used mainly in spring, summer and autumn. To prevent it from being idle in the winter, you can construct a snowmobile from a walk-behind tractor with your own hands. Having minimal skills in using the tool, it is not at all difficult to do this. Reworking it back after winter doesn't take much time. Thus, the walk-behind tractor will be used all year round for household work.
A snowmobile is a useful unit that can overcome snowdrifts. The equipment allows you to transport small luggage. Many residents from the northern and central regions prefer to make such units from improvised materials. A snowmobile made from a walk-behind tractor is durable and quite powerful. It has good cross-country ability and maneuverability.
What is a walk-behind tractor
The walk-behind tractor is a universal unit that is used for agricultural work. This device helps make work easier in the garden. The design is based on a single-axle chassis. The person driving the walk-behind tractor walks behind the machine and holds it by the handles on which the controls are located.
Walk-behind tractors are mostly equipped with gasoline engines, but there are also diesel engines. The power units of walk-behind tractors have automatic speed controllers, which simplify the operator’s work. Engine power ranges from one to ten horsepower.
What can it be converted into?
To create alterations from a motor unit, you only need basic knowledge of mechanics and the availability of tools . The robust design of the block, very successfully developed by engineers, allows the unit to be modified.
The most common are the following typical designs:
- snowmobile;
- mini tractor;
- all-terrain vehicle or karakat;
- swamp walker;
- ATV;
- motorized dog;
- lawnmower;
- dump;
- potato digger;
- potato planter
A mini-tractor is perhaps the most popular homemade product. This design has a greater level of comfort compared to a motor unit. Here you need to take into account the factor of shifting the center of gravity. This problem is solved by installing a second driven axle and increasing the front one. A mini-tractor is often complemented by a trailer.
On the basis of a walk-behind tractor, you can design an ATV or a karakat.
Motorcycle dog
The unit can be converted into a motorized towing vehicle that is capable of pulling drags and transporting gear and working tools. To assemble a motorized dog yourself, you need to additionally purchase some spare parts. The frame is constructed from a square tube, and the control arms are made from a round tube. The finished unit has a low speed, but is very maneuverable.
boat motor
You just need to attach a walk-behind tractor to the boat hull, and instead of cutters, put aluminum blades, which should be located in the same plane with the shaft (perpendicular to the movement). The upper parts of the blades will move through the air, the lower parts will sink into the water. This makes it possible to develop a fairly high speed.
Wood splitter
Harvesting firewood seems easy only at first glance. However, for this you need to have endurance and considerable strength. A wood splitter from a motorized unit is a convenient and simple device that even a teenager can handle. An inexpensive device allows you to save time and get rid of monotonous and hard work.
Additional Tips
Before you start making a homemade caterpillar , you need to identify the appropriate parameters for it . The fact is that if a very high caterpillar is produced, the center of gravity of the walk-behind tractor will have to be changed, which will inevitably lead to some problems during turns, since the unit will roll over on its side.
To prevent this, the second driven axis must be increased by a few centimeters. You can also slightly expand the wheelbase of the walk-behind tractor, which is already available. To do this, just buy a bushing in a special store. Subsequently, it is installed on the drive shaft. In addition to the requirements regarding engine power, they also look at the cooling system.
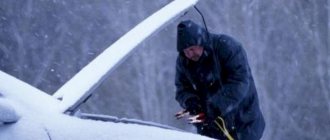
Air cooling is not very effective at high loads, which can lead to significant overheating of the motor. It turns out that it is better to give preference to water-cooled engines that show stable performance marks.
Attaching a caterpillar to a walk-behind tractor can significantly improve the cross-country ability of the device. Due to this, you can increase the range of potential jobs that a self-made device can handle. In other words, the resulting wheelbase in certain cases outperforms the usual wheelbase. But remaking a walk-behind tractor is not always suitable for the owners of these units.
We are talking about special requirements for the engine. It must have sufficient power. Speaking about the remodeling process, such work is quite possible to do at home. That's why it can be considered a strong alternative to the track attachments that are available in modern stores.
What tools will you need?
A homemade snowmobile is used for sports activities, tourist walks, and household work. After determining the purpose of the unit, the basic diagram can be slightly changed.
It is necessary to prepare the following tools and materials for work:
- manual welding machine;
- special mask and gloves;
- grinder;
- hacksaw for metal;
- set of files;
- pipe bender;
- frame pipes;
- brackets, clamps and other fasteners;
- small parts;
- drill;
- spanners;
- clamps;
- vice;
- wheels.
To save money, many parts and spare parts are made independently. To better imagine the design of a homemade product, you can use the advice of those familiar with experience, ready-made diagrams, special literature, drawings, photographs.
The dimensions of the parts must be calculated with particular accuracy. It is very important to study the drawings. With their help, the order of mounting the snowmobile elements is determined.
Watch the video showing a self-propelled machine created on the basis of a walk-behind tractor.
Making a snowmobile with your own hands
By following a certain algorithm for installing a homemade machine from a motor unit, you can avoid numerous mistakes. Snowmobile equipment from a walk-behind tractor must be assembled in a certain sequence. Let's look at the step-by-step process of making a snowmobile yourself from a Neva walk-behind tractor.
First, a sketch of the future design is drawn up:
- homemade frame (1);
- second intermediate shaft sprocket (2);
- intermediate shaft (3)
- first intermediate shaft sprocket (4);
- track shaft driven sprocket (5);
- track drive sprocket (6);
- track drive shaft (7);
- two supports of the support ski (8);
- two track tension rollers (9);
- tension roller axis (10);
- tow bar (11);
- tension device (12);
- four drum flanges (13);
- four drive sprocket flanges (14);
- steering column (15).
Blueprints
1-front driven wheels; 2-track lugs (birch slats 35×75-1260 mm); 3-threaded rods M8x170 mm with nuts; 4-upper part of the frame (steel pipe 30×2 mm); 5-front engine mount (steel strip 2.5 mm thick); 6-comb (steel strip 3 mm thick); 7-reinforcing element (steel sheet 2.5 mm thick); 8-post (steel pipe 30×2 mm); 9-plug (steel pipe dia. 22×2.5 mm); 10-fuel tank (2.5 l polyethylene canister); 11-control elements of the tracked unit (on the left: clutch handle and gearbox switch, on the right - pelvis handle); 12-steering wheel (from any brand of moped); 13- fuel tank support (steel strip 2 mm thick); 14-fuel tap with sump (from any moped); 15-fuel line; 16-drive shaft bushing; 17- hook; 18-sleeve (piece of rubber hose); 19-outer cheek of the wheel (duralumin sheet 3 mm thick); 20-washer; 21-fork washers; 22-pin; 23-drive shaft (steel pipe diameter 30×2.5 mm); 24-flange (steel sheet 3 mm thick); 25-pin (steel bar dia. 10 mm); 26-inner cheek of the wheel (duralumin sheet 3 mm thick); 27-rear drive wheel; 28 control system cables; 29-track drive chain; 30-rear engine mount (steel sheet 2.5 mm thick); 31-engine type B-50; 32-muffler (thin-walled steel cylindrical container 0130 mm with holes 20 mm in diameter); 33-lower part of the frame (steel pipe 30×2 mm); 34-front driven shaft bushing; 35-bolts M8x55 mm with nuts; 36,40 - bushings; 37-bearing; 38-adapter; 39-bushing; 41-bushing; 42-drive chain sprocket; 43- rubber-fabric tape
Other types of machines
You can also assemble an ATV from a walk-behind tractor, although this unit does not develop ultra-high speed, but in terms of maneuverability and cross-country ability it is not inferior to its own. The landing position in a homemade ATV remains traditional, not a motorcycle one. Wheels can be used from any passenger car.
It is worth mentioning an interesting homemade product called karakat. The power of the car lies in its large wheels, which are ordinary inner tubes, tightened with strong belts.
They put homemade wheels on carakat, modifying standard car ones. A very original disk is also installed on a lightweight walk-behind tractor. To do this, two aluminum basins are connected along the contour, having previously cut the bottom to fit the size of the hub, stiffeners and side stops are installed to fix the camera.
Despite its external clumsiness, the caracat has high cross-country ability and stability. Not only can it easily overcome swampy lowlands, but it is capable of transporting significant cargo (up to 100 kg).
Pros and cons of a homemade snowmobile
You can buy snowmobile equipment in a store, but many continue to create such machines with their own hands. This is due to the fact that homemade vehicles have some advantages over finished products.
- Low cost. It is precisely because of the price that many do not buy ready-made models, but create snowmobiles themselves from a motor unit. If we compare the cost of ready-made devices, their price can be 10 times more expensive than a home-made design.
- Ability to select parameters. Some homemade designs are more powerful than popular branded snowmobiles.
- Reliability. Snowmobiles, even from branded manufacturers, often break down during use. For their own all-terrain vehicle, people choose only high-quality materials.