How to assemble a fan yourself? This question is especially relevant in the warm season, when it is unbearably hot outside, and there is no possibility or point in purchasing an air conditioner or split system. It arises due to the fact that the instructions do not clearly describe the process of assembling the product or there are parts that at first glance are superfluous or are installed in an unknown location. Anyone, even someone far from technology, can solve this simple problem. The work will not take much time, and the result will be long-awaited coolness.
How to make a snail fan with your own hands?
A snail fan is what radial or centrifugal fans are commonly called.
They are widely used in industry or in large ventilation systems that require a sufficiently high energy airflow to overcome the resistance of the air ducts.
In most cases, industrial fan models are used, but if necessary, you can make a “snail” fan with your own hands.
Device and design
Radial fans move air flows using an impeller installed inside a housing of a specific shape.
The name “snail” arose due to some similarity in the appearance of the body with a spiral-shaped shell. The impeller has the form of a drum equipped with blades located parallel to the axis of rotation.
The operation of the device occurs in close interaction between the housing and the impeller, the functions of which are equally important.
Suction occurs in the direction of the axis of rotation, and discharge occurs tangentially to it, perpendicular to the suction . As the blades rotate, they capture air particles and forcefully throw them out in a centrifugal direction.
The fan housing does not allow the flow to dissipate, directing it to the outlet.
A vacuum is formed in the area of the central part of the impeller, which is immediately replenished by inflow from the inlet located in the central part of the flat side of the housing.
Peculiarities
The specificity of the operation of centrifugal fans is the ability to reverse the air stream when changing the direction of rotation of the impeller.
At the same time, there is practically no difference in pressure; there are only slight differences in parameters due to the use of the reverse sides of the blades.
This allows you to install the fan in different parts of the air duct system and provide certain operating modes of the system.
The design of the cochlea fan is quite simple. An impeller is mounted on the drive shaft, rotating inside the housing.
There are design options where the impeller does not have its own shaft and is mounted directly on the electric motor shaft. This is typical for small fans.
The value is determined by the fan number, which indicates the diameter of the impeller in dm. For example, radial fan No. 4 has an impeller with a diameter of 40 cm.
Impellers, blades
The impeller (impeller) consists of blades that act on certain areas of the air flow and a carousel-type support structure.
There are two types:
- drum type impeller . Outwardly it resembles a squirrel wheel. Used in fans that move a gas-air environment with normal requirements - temperatures up to 80°, no aggressive, flammable, sticky or fibrous inclusions. Fits most fans
- open impeller . It is used much less frequently, since a design of this type is less resistant to mechanical stress. Most manufacturers make such impellers only to order. Used for work as dust devices working with complex materials with fibrous inclusions
The air flow moves through contact with the impeller blades. When rotating, the planes of the blades act on a certain volume of air with which they are in direct contact, compact it and impart a corresponding impulse.
The operational parameters of centrifugal fans are determined by the dimensions of the impeller , its diameter and width, the size of the blade area, and their number. The larger the diameter, the higher the linear flow velocity and the greater its energy.
Accordingly, the pressure and performance of the fan increases. At the same time, the aerodynamic resistance of the installation increases significantly, which creates a strong load on the electric motor.
Increasing the diameter allows you to obtain high pressure, and increasing the width of the impeller (drum height) increases productivity.
https://www.youtube.com/watch?v=gHEHem-cY3I
The impeller blades have a slightly curved hollow shape. There are wheels with blades curved forward and backward .
If there is a tilt in the direction of rotation (forward), a more powerful impulse of air flow appears, but if there is insufficient power to the installation (for example, if the inlet pipe is not able to provide a sufficient supply), the fan begins to “choke.”
Blades curved back provide a slightly smaller impulse , but allow you to obtain a smooth and stable operating mode without failures or breakdowns.
Self-production
Let's consider how you can create a snail fan with your own hands, the drawings of which can be found on the Internet or made yourself.
Working wheel
First of all, you need to get an impeller. This is important because it is a fairly massive element and requires good balancing .
If the impeller beats even a little, the bearings of the electric motor (or its own drive shaft) will quickly fail.
Ready-made impellers from fans or air conditioners are often used, but if you can’t find them, you’ll have to make them yourself.
Landing sleeve
First of all, you need to make a landing coupling. It is made on a lathe . The coupling is then attached to the sheet metal by welding or screws, clamped in a lathe and carefully centered.
The result is a round disk with a seating sleeve in the center. Markings are made on it and the blades are attached.
Making a drum-type impeller with your own hands is impractical, since high-quality balancing of homemade elements is impossible.
Aspiration and ventilation of a woodworking workshop
Frame
For the body, sheet steel or, as in the example in the video, wood is used. A strip 0.5-1 cm wider than the thickness of the impeller is cut out of it. The strip is bent, giving it the shape of a snail. This is the side of the body. Then two identical parts are made, repeating the profile of the side element.
One of the parts will become the outer side of the housing; a suction hole is made and a flange is secured for mounting air ducts or grilles.
The second part is attached to the motor housing and has a hole for the passage of its shaft. It is secured to the engine with bolts , the side curved part is welded to it with a continuous seam without gaps.
Bolts are welded to the edge, which will press the outer part with the suction hole.
Assembly
Making a fan yourself is quite a difficult task, since it is necessary to make curved parts. Poor assembly, errors in the shape of elements, and imbalance of the impeller are common shortcomings of homemade fans.
In addition, all homemade products make a lot of noise during operation, and it is extremely rare to get rid of this. It is pointless to take on manufacturing without having plumbing skills, the ability to weld sheet steel with high quality and perform other work. The price of a finished fan is not so high that it wastes time, materials and equipment.
Review and comparison of production models
Ready-made fans have stable and stable performance characteristics and provide high-quality operation with low noise levels.
If you have an extensive system of air ducts that distribute sound throughout all rooms, the use of low-noise equipment is very important.
Let's consider the performance characteristics of several industrial designs in order to know what to start from when designing your own product:
Low pressure radial fans BP 80-75
They have a fairly high productivity (from 370 to 71000 m3/h depending on the fan number). The pressure is in the range of 0.37-1820 Pa. They are used in general ventilation systems or as part of process equipment.
Medium pressure radial fans VTs 14-46
The pressure indicator for this model range is increased, as is the productivity, reaching up to 127,000 m3/h for large numbers. Such installations are used in large branched ventilation systems with a long length of air ducts.
Dust fans VCP 7-40
They are used as part of the technological cycle to move fine bulk materials. They are used for transporting grain, cereals, and for removing sawdust or shavings. The peculiarity of this group is the design of the impeller, which has a small number of blades. This eliminates the risk of material getting stuck between the impeller elements.
Centrifugal fan 220 V
How to make a snail fan with your own hands - Metals, equipment, instructions
Creating high-density airflow is possible in several ways. One of the effective ones is a radial type fan or “snail”. It differs from others not only in shape, but also in its operating principle.
Fan device and design
Radial fan operation diagram
Sometimes an impeller and a power unit are not enough to move air. In conditions of limited space, a special type of exhaust equipment design should be used. It has a spiral-shaped body that acts as an air channel. You can make it yourself or purchase a ready-made model.
To form the flow, the design includes a radial impeller. It connects to the power unit. The wheel blades have a curved shape and create a discharged area when moving. Air (or gas) enters it from the inlet pipe. When moving along the spiral body, the speed at the outlet increases.
Depending on the application, the centrifugal fan volute can be general purpose, heat-resistant or corrosion-resistant. It is also necessary to take into account the amount of air flow created:
- low pressure. Area of application: production workshops, household appliances. The air temperature should not exceed +80°C. Mandatory absence of aggressive environments;
- average pressure value. It is part of exhaust equipment for removing or transporting small fraction materials, sawdust, grain;
- high pressure. Forms an air flow into the fuel combustion zone. Installed in many types of boilers.
The direction of movement of the blades is determined by the design, and, in particular, by the location of the outlet pipe. If it is located on the left side, the rotor should rotate clockwise. The number of blades and their curvature are also taken into account.
For powerful models, you need to make a reliable base with your own hands to secure the body. The industrial installation will vibrate strongly, which may lead to its gradual destruction.
Review and comparison of production ready models
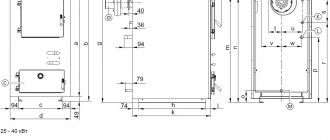
When considering a radial volute fan, you need to take into account the material of manufacture: cast aluminum housing, sheet or stainless steel. A model is selected based on specific needs; consider an example of serial models in a cast case.
| Series | Power consumption, kW | Productivity, m3/min | Pressure, Pa |
| ND (low pressure) | from 0.03 to 7.5 | from 3.2 to 95 | from 330 to 1900 |
| RD (average pressure) | from 0.04 to 22 | from 2.7 to 125 | from 650 to 9600 |
| HRD (high pressure) | from 0.55 to 22 | from 7.8 to 96 | from 2600 to 16400 |
| HRD-FU/FUK (frequency converter) | from 0.75 to 20 | from 7.7 to 97 | from 4900 to 20000 |
| FD RDF (conveyor) | from 0.25 to 11 | from 10.5 to 64 | from 1100 to 6800 |
| SVD (special) | from 0.6 to 4 | from 23 to 71 | from 1200 to 2600 |
ND Series RD Series HRD Series HRD-FU/FUK Series FD RDF Series SVD Series
How to make a snail fan with your own hands?
- Drawing
- Low pressure radial fans BP 80-75
Do-it-yourself centrifugal fan snail
A snail fan is one of the most popular devices that are used to create air flow with high densities. This hood has its own characteristics, design nuances and operating principle that distinguishes the snail from other systems.
Snail fan photo
Before you assemble a highly efficient snail fan with your own hands, you should learn about the features of this device and its design.
- To carry out forced air movement, sometimes you can get by with an impeller and a power unit that will rotate the working element;
- If space is limited, but an exhaust unit is absolutely necessary, specialized equipment comes to the rescue;
- The cochlea is a body made in the form of a spiral;
- The mission of the corps is to carry out the tasks of the air channel;
- Do-it-yourself snails are quite popular, but when there is no time to assemble or lack the appropriate skills, the objectively best solution would be to purchase ready-made equipment;
- To create an air flow, a radial component - a wheel - is located inside the fan structure;
- This radial piece of equipment connects to the power plant;
- The blades on the impeller are curved, which allows them to create a discharged area when they move;
- The inlet pipe of the structure serves to supply air or another medium;
- Due to the movement along the spiral casing, the speed of air exiting through the outlet opening increases noticeably;
- Coil fans come in heat-resistant, corrosion-resistant and general purpose;
- The movement of the volute fan blades depends on the design of the equipment. Particular attention should be paid to the location of the outlet pipe. If it is on the left, then the rotor should rotate clockwise, or vice versa;
- When choosing or assembling a snail with your own hands, you need to take into account how many blades are used and what their curvature is.
Created air flows
Photo of industrial fan snail
When planning to assemble a homemade unit with your own hands or buy a ready-made snail-type exhaust apparatus, you should definitely take into account the characteristics of the air flows created. Namely, you should be interested in the flow value, on which the scope of application of the snail largely depends.
- Low pressure. Low-pressure air flows are widely used in equipping production workshops and assembling household appliances. The air temperature here is not allowed to exceed 80 degrees Celsius. Also, low-pressure snails are not adapted to work in aggressive environments.
- Average pressure. Medium-pressure scroll fans are most often found in the design of an exhaust system used for transportation and removal of fine materials. A striking example is grain and sawdust removal.
- High pressure. High-pressure volute hoods form air flows that flow to the combustion zones of various types of fuel. Boiler equipment operating on different types of fuel is equipped with high-pressure volutes.
A volute, or centrifugal fan, requires a reliable base.
The housing must be properly fixed so as not to create vibration. Industrial units are characterized by increased vibration.
If this phenomenon is not prevented, the device will gradually fail.
Do it yourself
Building a scroll fan is not the most difficult thing if you decide to take on a homemade unit with your own hands.
There are several important recommendations that you should consider before building your own snail fan.
- Functional purpose. To equip a part of a room, a small area or equipment with a ventilation system, the housing can be assembled from scrap materials. If this is a centrifugal unit that will generate air flows to ensure the operation of boiler equipment, then the housing is made by hand using stainless steel or heat-resistant metal.
- Power. This parameter directly depends on the functions that the centrifugal unit will perform. Many home craftsmen use snails removed from old equipment, ventilation systems, hoods or vacuum cleaners. By using such a unit, you guarantee an exact balance between power and body characteristics.
If you want to make a snail for domestic use or for use inside a workshop, then you can assemble the device yourself. All other situations imply the need to use only factory-proven, proven snails.
To assemble an effective homemade snail fan with your own hands, you will need to complete the following tasks:
- Calculate the dimensions of future equipment. If this is a centrifugal unit for installation in a confined space, be sure to use damper pads. They will compensate for the vibrations generated during its operation and protect the volute from premature wear. If this is a large stationary unit, vibration protection occurs due to the weight of the equipment and its fixation;
- Make a fan casing. If you do not have a ready-made box that is ideal for the fan, use scrap materials. Plastic, plywood sheets, and steel are suitable for these purposes. If you decide to take sheets of plywood, make sure that during the process of assembling the structure there are absolutely no gaps and all seams are properly sealed;
- Think over the diagram of the snail's power unit. The job of the power plant is to rotate the fan blades. When choosing, consider how much power the snail has. If it is a high power centrifugal fan, use a belt drive. In small installations, it is important to use a shaft that connects the motor gearbox to the rotor;
- Use fasteners. When installing a scroll fan on the outer casing of the structure, U-shaped mounting plates are used. If the power of the units is impressive, then be sure to adopt a massive, durable base;
- Minimize noise. A high-power volute is characterized by the fact that such a centrifugal fan emits quite a lot of noise. Objectively, the best way to protect yourself from snail noise is to assemble the equipment with the highest quality possible. After assembling the cochlea, it is problematic to compensate for the noise. The noisiest models are those whose body is made of plastic and metal. Wooden cases reduce snail noise, but are significantly inferior to their metal and plastic counterparts in terms of service life.
According to the presented diagram, you can create centrifugal exhaust devices of various power purposes with your own hands. If necessary, you can make changes to the circuit, change components, add auxiliary elements.
The most significant point when assembling a fan with your own hands is the reliable sealing of all seams in the structure and the protection of the engine itself.
Over time and with use, an engine that does not have proper protection can become exposed to various debris, dust, dirt and moisture.
It is no secret that this leads to wear, gradual destruction and failure of equipment.
articles - material rating: 3.67 out of 5
Varieties of Snail Fans
Snail fans get their name from the shape of the body, which resembles the shell of this mollusk.
Today this type of equipment is used both in industry and in residential construction in ventilation systems. Manufacturers today offer several models of snails for ventilation.
But they all work on the same principle - the centrifugal force created by the rotation of the blades on the rotor captures air through a snail-shaped inlet and pushes it through a straight outlet located at 90° in a different plane to the inlet.
General information about centrifugal (radial) fans
Coil fans have a dual designation (marking): VR and VC, that is, radial and centrifugal.
The first indicates that the blades of the working part of the equipment are located radially relative to their rotor.
The second is the designation of the physical principle of operation of the device, that is, the process of intake and movement of air masses occurs due to centrifugal force.
It is centrifugal fans in ventilation systems that have shown themselves on the positive side due to the high efficiency of air removal.
Operating principle
As already mentioned, fans of this modification operate based on the action of centrifugal force.
- The blades attached to the rotor of the device rotate at high speed, creating turbulence inside the housing.
- The inlet pressure drops, which causes the suction of nearby air, which rushes inward.
- Under the action of the blades, it is thrown to the periphery of the space, where high pressure is created.
- Under its action, the air flow rushes to the outlet pipe.
This is how all centrifugal models work, which are installed not only in ventilation systems, but also in smoke removal systems.
About the latter, it must be said that their body is made of aluminum alloy or steel, coated with heat-resistant materials, and is equipped with an explosion-proof electric motor.
Design Features
As already mentioned, the main design feature is the snail. It is also necessary to indicate the shape of the blades. Fans of this brand use three types:
- with straight slope,
- with a backward tilt
- in the form of a wing.
Types of fans
There are different types of fans, which are divided according to the mounting method into:
- floor;
- desktop;
- ceiling
The last two types do not require assembly after they have been purchased. The last type (ceiling) is installed in a specially prepared installation location.
The types differ from each other in power, dimensions, number of speeds, various additional functions, and so on.
The first type of fan is one of the most popular methods to cool down. The main reasons for this prevalence are low cost, ease of use and installation, low energy consumption, mobility, and versatility. A floor fan does not take up much space in the room.
Based on their mode of operation, floor fans are also divided into:
- Axial. These are devices that are equipped with an electric motor and blades. These blades “force” the air flow to move during rotation.
Axial
- Radial. The mechanism is made in one case. With the help of a rotor and blades, air is drawn in and then pushed out.
Radial
- Bladeless. This variety is a round frame with a motor. The air flow is first sucked in and then expelled with acceleration.
Bladeless
Axial floor fans are the most common type. The entire room is not ventilated, but only a separate space.
DIY centrifugal fan
A low-power centrifugal fan will be of little use. Even quiet hoods are equipped with commutator motors that make a lot of noise. If the fact doesn’t frighten you, let’s proceed to choosing funds.
We'll show you how to make a centrifugal fan with your own hands from scrap items. If in a typical axial fan the motor and impeller are important, here, in addition to everything else, the housing is added.
Let's try to assemble a centrifugal fan ourselves.
What is a centrifugal fan
A centrifugal fan is used as a duct fan. To make things easier, the vacuum cleaner contains what looks like a duct fan. Now think:
- The dust is sucked up by a hose.
- Passes into the bag (tank, compartment).
- Passes filtration.
- The engine passes.
- It is ejected from the back of the case.
What it does is that there is a centrifugal fan inside, formed by a drum (squirrel cage) mounted on the motor shaft. This is not enough. The engine with the impeller is enclosed in a sealed housing, through the channels of which the air escapes to the outside.
Without a tight casing, the meaning of the centrifugal fan will be lost. Here's the main difference. Unlike axial fans, which often serve for personal needs, centrifugal fans are used in the economic sphere: room ventilation, cleaning, air purification.
To understand how to make a centrifugal fan, let's study the principle of operation of the device.
Operating principle of a centrifugal fan
A centrifugal fan operates due to the dynamic characteristics of the flow. Try tying a stone to a thread and twisting it around yourself in a horizontal plane.
The hand feels a noticeable tension; if the connection were broken, the projectile would immediately fly out tangentially to the circular path of rotation. Air molecules behave similarly: the wheels on the blades acquire significant speed and, unrestrained by anything, are carried away to the outer perimeter.
Then the channel system gives the flow the desired direction. Finally, air enters centrally, usually on the side opposite the engine.
Inside the vacuum cleaner we see a picture:
- Air from the bag (tank, container), cleaned of dust, approaches the engine from the front and enters the center of the drum.
- The molecules, accelerated by the blades to a significant speed, are thrown out. They pass through the channels of the sealed housing, simultaneously cooling the engine, and leave the belly of the vacuum cleaner from the back side.
Design feature: the blades of a centrifugal fan create pressure; if the housing is leaky, the air flow will be disrupted. Therefore, the difficulty for a self-taught master is to create the right conditions.
Good hoods use motors with tangential (centrifugal) type fans. In selected designs, the design surprises with a duet of squirrel cages. In the latter case, a pair of impellers is mounted on either side of the engine on a shaft. Then the air enters from two directions perpendicular to the plane of rotation of the wheels. Thus, the efficiency of the centrifugal fan increases.
How to make a centrifugal fan
From what has been said, the obvious way to achieve this is to remove the tangential fan from the hood, for example. Advantage: Silent operation is ensured. The manufacturer complies with the norms prescribed by the standards, so factory-made devices of the hood class are relatively quiet. We believe that for most readers this is not the best solution to the problem, let’s continue our consideration.
Vacuum cleaner
Inside the vacuum cleaner there is a ready-made centrifugal fan. A big plus is that there is already a ready-made housing that needs to be mounted in the channel on site. Additional benefits include:
- The vacuum cleaner engine is designed for long-term operation. Spins the blade for days on end. The windings are often protected from overheating; in addition, air passes through the channels, cooling the stator.
- The vacuum cleaner engine is designed to overcome significant pneumatic loads. When you disassemble this housewife's assistant yourself, you will see a safety valve inside. Try removing it and blowing it out with your lungs. Does not work? And the engine does this in jest! Pinch the inlet or bend the hose in half. A click coming from the inside of the case indicates activation. We believe that such a force will be more than enough to ventilate the facility.
- Plus - the suction power (in aerowatts) is indicated in the technical specifications, similar to the pressure created. Thus, it is easy to calculate in advance using formulas whether the engine power is sufficient for the selected task. Sometimes manufacturers are so kind that they indicate the flow rate, for example, 3 cubic meters per minute. Anyone can do the math: 180 cubic meters per hour. Thanks to the high power, the flow rate will be maintained despite the turns and bends of the air duct.
The disadvantage of the vacuum cleaner engine is noise. In addition, the commutator motor sparks, which creates interference along the power supply. You will need to make a surge protector so as not to burn out your imported home equipment. The noise level is high. Exceeds 63 dB allowed to be produced in an apartment by law.
Washing machine
What else can you use to assemble a centrifugal fan? The image of a front-loading washing machine came to mind. If you remove the door and make channels in the housing so that the flow cools the motor windings, you will get a centrifugal fan.
Plus - the working compartment of the washing machine is sealed. Simply remove the tank wall near the engine to create something like a centrifugal fan. The drum will have to be radically redesigned to capture air.
The housing will need to be disassembled.
The main dilemma arises: is it worth dismantling the tank? Most models are specially designed so that the operation cannot be performed without damaging the fasteners. This helps service centers track the sly ones doing the repairs.
In any case, the drum is cut in place to make blades in the walls. Bend the steel inward so that the structure does not touch the tank.
Option: from the walls of a steel cylinder, and bend the blades of the desired shape in the image and likeness of factory industrial models of centrifugal fans.
The main thing seems to be the correct selection of speed. 1000 spin rotations is quite enough. The drum diameter is large. The vacuum cleaner produces 6000-16000 rpm, but the radius of the blades is much smaller. Therefore, it is necessary to estimate the linear speed.
As you know, the circumference is directly proportional to the radius, therefore, if the diameter of the drum of a Samsung washing machine is 45 cm, it is at least three times larger than that of a vacuum cleaner - equivalent to a speed of 3000 revolutions per minute (minimum).
But! In this case, the wheel area is much larger, therefore, the flow is enormous.
From the above, we conclude that a speed of 1000 rpm, especially 1500 rpm, is enough to independently make a centrifugal fan from a washing machine. The performance is approximately the same, but the specific flow pressure will be reduced.
Much depends on the shape of the blades; we strongly recommend that you inquire on the forum of physicists and hydraulics. The simplest option is to borrow a blade from a floor fan.
The plastic is welded using a set of plastic bags and a soldering iron, which will strengthen the flywheel on the shaft.
The main thing is to maintain tightness. It is recommended to seal the extra holes that abound in the drum.
A homemade centrifugal fan from a washing machine is dangerous to operate (if there are safe tangential fans), it is recommended to close the hatch for loading laundry with a strong grille.
For example, make a number of holes on the front side of the case for installing the element. The centrifugal fan device is complemented by a durable fence. Make the grate from a steel rod and fasten it with bolts.
Adjusting the centrifugal fan motor
In 85% of cases, the motor in a washing machine is a commutator motor. These, by the way, also operate on direct current. The direction of rotation is determined by the polarity of the voltage.
About the speed control scheme. The operating principle of a centrifugal fan requires the use of spin modes. Find the thyristor circuit that regulates the cutoff angle and adjust it as needed. For maximum speed, connect the engine to a 220 V network. We consider the questions of what a centrifugal fan is and how to make one to be answered.
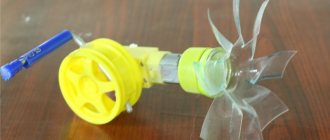
A simple homemade product from CDs
The simplest fan can be made from CD discs. It can be used, for example, for local impact on a user who spends a long time at the computer.
Let's prepare the raw materials to complete the work:
- CD discs – 2 pcs.;
- low-power motor;
- wine bottle cork;
- cable with USB plug;
- a tube or rectangle made of thick cardboard;
- soldering iron;
- candle or lighter, hot glue;
- pencil, ruler, squared paper.
For our purposes, you can use a motor from an old toy, for example, from a toy car. A toilet paper roll slightly decorated with decorative finishing paper can be used as a cardboard tube.
The main advantage of this model is that almost any do-it-yourselfer will have all the materials needed for its manufacture.
The assembly process of the mini fan is quite simple.
Let's take one of the CDs and use a marker to divide its surface into eight equal sections. The easiest way to do this is to use a sheet of checkered paper.
Draw a cross on it from a horizontal and vertical line. We divide each of the four resulting right angles in half. Using cells, this is not difficult to do.
Using a very simple method using a checkered piece of paper, we can achieve the ideal layout of the disk into eight equal sectors
We place a disk on our drawing so that the intersecting lines are in the very center of its hole. Alternately applying a ruler to the lines diverging from the center, we make markings on the disk. This way the sections will be the same.
To divide the disk into blades, follow the marking lines with a soldering iron from the transparent part to the edge.
You can also use scissors for cutting, but there is a danger that the workpiece will crack during the process. If you don’t have a soldering iron, you need to use a knife preheated on the stove. When working with a soldering iron, deposited plastic is formed along the edges of the cut, which can be easily removed with a knife.
Cutting a disk with a soldering iron is the most effective method in which the workpiece will not crack or deform, and the remnants of the deposited plastic can be easily removed with a knife
We heat the surface of the disk over the flame of a burning candle so that the blades can be slightly expanded. If you don't have a candle, a lighter or a soldering iron will do.
The central part of the disk should be heated, and all blades should be turned in the same direction. A wine cork is placed in the hole of the disc. To fix it better, you need to pre-treat the edges of the hole with hot glue.
The USB cable must be connected to the motor. If we don’t guess the direction of rotation of the propeller, we can swap the reins, that is, change the polarity.
The motor needs to be glued to a cardboard tube, and the tube itself to a second CD, which will act as the base of the stand.
When the plug is installed in the hole, the stand from the second CD and cardboard tube, as well as the connecting device are already assembled, it is very important to correctly fit the propeller onto the motor shaft
Now the propeller needs to be “planted” on the rod of the future fan. We will try to make sure that it is installed strictly in the center. You can secure it in this position using hot glue.
After all work is completed, the fan is ready for use.
Although the construction of this device will not take you much time, the result of the work performed will undoubtedly please you
How to make a similar, but slightly more complex design by including a regulator in the circuit, look at the video posted at the end of this article.
Do you find these homemade instructions complicated? Then you may be interested in information about the types of fans and the rules for choosing them in order to purchase a ready-made device offered by manufacturers of household appliances.