Idea 1. Tablet stand made from a cutting board
Watching your favorite TV series on your tablet or peeking at a recipe book while cooking will become easier if you make a special stand for this from... an ordinary cutting board. Making this kitchen craft with your own hands will take no more than two hours, and it will be used every day.
To make a holder for a recipe book or tablet you will need:
The angle of inclination of the holder will depend on the inclination of the hypotenuse of the triangular bar
Also, the craft can be further decorated - for example, by artificially aging it as in this master class, by drawing inscriptions, by burning a design, or by covering it with slate paint. In the following selection of photos you can get ideas for decorating original cutting boards.
Idea 2. Jute coasters
If your kitchen (or, for example, a country or summer kitchen) is decorated in a rustic, Mediterranean, rustic or nautical style, then you will probably love this kitchen craft idea. In just a couple of hours you can make coasters for plates for the whole family and guests with your own hands.
To make one substrate with a diameter of 33 cm you will need:
Just start rolling the rope in a circle, applying glue to small sections one by one and fixing them for a while. Once the mat is formed, cut the end of the rope and glue it down.
Placemat Ideas
The stand for different cutlery can be presented in any shape and color. The main thing is that it satisfies the wishes of the owner, is spacious, moisture-resistant and anti-corrosion. There are a lot of ideas for creating it on the Internet. Thus, a cutlery stand can be made in the form of a wooden barrel or basket, pre-treated with an anti-corrosion compound and varnish.
It can be made from plastic or metal cups joined together, ceramic and glass vases for different flowers. It can be created from a wicker cup, a plastic cereal jar, a hard plastic box with cut-out cells for knives, forks and spoons. It can also be made from a metal basket, reminiscent of the cells in a washing cabinet for storing plates.
A good option for creating a stand would be to use rubber containers, paint cans, and plastic yogurt cups. An original way to decorate the interior with a cutlery stand would be to use a plastic or ceramic flower pot for spoons, forks and knives.
An interesting, but not the most practical option for creating a stand would be to use cardboard boxes and paper. To make the resulting item more practical, you can only decorate the finished product with paper.
A great idea for creating a cutlery stand would be to use a pepper shaker or flour sifter for this purpose. The most interesting option, especially if the kitchen or dining room is decorated in a marine style, would be to decorate or create a glass from sea stones, shells or small sea pebbles.
Idea 3. Organizer for cutlery and kitchen utensils made from cans
Tin cans cost nothing, but they are durable, easy to clean, and their shape is just right for storing all kinds of spatulas, ladle, forks, spoons and other utensils. If you put in a little effort and creativity, you can make a convenient and cute organizer out of them, which, even if it doesn’t fit into the interior of a city kitchen, will definitely fit in at the dacha. You can also use an organizer made with your own hands from cans to store tools, brushes, felt-tip pens and other small items.
Stand for spoons and forks made from cans
To make such a stand for spoons and forks, you will need:
Tip: To make this process easier and not damage the paint layer, place a small block on the table using a clamp, then wrap the block in felt and only then put a jar on the block (see the picture in the lower left corner in the next photo collage)
Here are a few other deco ideas and modifications to the design of cutlery stands made from cans.
Holders
Knife holders are often used in the kitchen because they are:
- ensures the hygiene of cutting tools - the blades are constantly in an open space, which prevents the formation of rust on metal parts and the accumulation of bacteria;
- is universal - you can use them to store any other metal utensils.
Knife holder
Most often, holders are made using magnets; they look like thin boards that can be coated with varnish, paint or adhesive film.
Shelf
You can also store knives on a shelf; you just need to fix the board on the wall above the work table or with hooks on the railing. But such a device for storing kitchen cutting equipment is inconvenient and impractical:
- the blades come into contact with each other, which leads to a loss of their sharpness;
- a wet surface is a “breeding ground” for bacteria, which further increases the likelihood of rust forming on metal parts;
- knives may fall and damage the table surface and break dishes;
- It is very inconvenient to take the tool - you can accidentally grab the blade and injure your hand.
You can make a shelf with holes, in which case its practicality increases significantly. After all, the knives will be inserted with the blade into the hole - the chances of injury become minimal.
Shelf with holes for knives
Rack
A stand is a vertical stand that can be made of wood; the base can be combined with plexiglass, not thick metal. If the kitchen is small in size and you need to use space sparingly, then this option for storing knives will be ideal.
To solve the problem of using a small space, you can also use a tabletop - the necessary holes are made in it for knives, into which the tool is inserted with the blade down. You can designate a place for storing cutting utensils on top with a decorative plastic overlay or a wooden plank, decorating them to your taste and without violating the general trend of kitchen design.
This knife stand is safe and practical:
- contact with the blade occurs only when the tool is removed from the hole;
- knives do not fall and are not in a damp environment for a long time;
- the blades do not touch each other and do not become dull;
- does not require much space.
Vertical knife stand
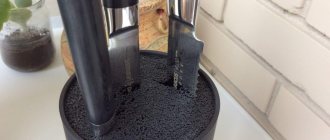
Universal glass
The simplest option for a knife stand is a glass, but it should be made of thick glass and tall. In such a device it is unlikely that you will be able to store a lot of tools at once, but it will be enough for 2-3.
What can you put in a glass:
- Cereals - rice, millet, pearl barley, buckwheat. They are dried well beforehand.
- Pasta – only spaghetti or long pasta will do.
- Legumes - beans, lentils, beans, peas. They can be placed in a glass in layers, alternating in color or size.
You need to pour a thin layer of glue onto the bottom of the glass and after that attach the selected filler:
- cereals - poured in a layer of 0.5 cm;
- pasta/spaghetti - inserted vertically and very tightly to each other;
- legumes - pour in so that the bottom is completely hidden.
After the layer has dried, you can continue filling the glass, but the pasta is attached all at once, and this must be done as quickly and carefully as possible, until the glue dries.
By the way, the glass needs to be chosen wisely: it should be transparent so as not to spoil the overall appearance.
You can even insert wet knives into the stand with food filling - cereals, legumes and pasta perfectly absorb moisture.
But consumers claim that such a device is not practical:
- the outside of the glass is covered with a coating of grease and water stains (after all, the glass is placed on the work table, next to the stove and sink, as a rule);
- the filler quickly becomes damp and has to be changed;
- Mold may appear inside the stand due to constant humidity.
Brush stand
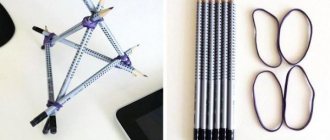
Brush stands are considered the most hygienic and practical for storing knives, because they are a container with rods inside. The rods can be removed and disinfected, for example, in the dishwasher. Any container is suitable as a stand: it can be narrow/wide wooden boxes, metal cup holders, cylindrical dense packaging. And as a filler you can use:
- Bamboo sticks . They are sold in oriental cuisine stores; the natural material has bactericidal and cleansing properties.
- Plastic bristles . It can be “obtained” from... a broom - these products are sold in hardware stores, their bristles are just thin, flexible, but durable plastic. You just need to cut everything to the size of the selected stand.
Knife stand made of bamboo sticks Knife stand made of plastic bristles
The selected filler is inserted into the container as tightly as possible - there should be no free space between the components. If you are working with plastic bristles, you can fix the filler with a glue gun to the bottom of the stand. It is most convenient to start the process in a circle/perimeter and end in the middle of the container.
Original stands: Deadpool, in the form of a man
If you have experience working with woodworking machines and various tools, then you can make the most original stands, for example, in the shape of a person.
The second option is very simple, but some skill will be required:
- Prepare drawings of the future product - a figure of a person (usually running) and a stand (oval/rectangle).
- Cut out the pattern and transfer the contours to plywood.
- Using a jigsaw, cut out blanks - 3 human figures, 2 stands.
- Next, identical parts are glued together. It is better to fix them in a vice after applying the glue until they dry completely (on average 24 hours).
- A hole is made in the stand (support for a person) - the leg of the “running” figurine is usually inserted into it and fixed with glue for another 24 hours.
The stand for knives in the shape of a person is almost ready, all that remains is to decide on the type of fastening of the kitchen tool: you can attach magnets to the figure (for a large product) or make holes the size of the knives. The final “touch” is grinding the finished stand, followed by polishing or varnishing.
Watch the video on how to make a “Warrior” knife stand with your own hands:
Deadpool is an anti-hero of American comics, and his head can also decorate the kitchen if it is made in an aggressive, urban style. You just need to make a stand in the shape of a head from a wooden blank and then cover everything with a film with the corresponding image - this is ordered in printing workshops. Holes for knives are made before the final decoration of the product, then cuts are simply made in the film.
The Deadpool knife stand is very original, but it has several disadvantages:
- the film is susceptible to the negative influence of moisture and high air temperatures;
- Water accumulates in the holes for the knives, and there is no question of any hygiene;
- The stand is quite bulky and is absolutely not suitable for small spaces.
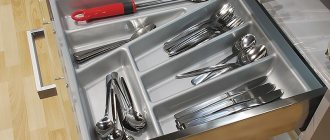
For kitchen
For kitchen knives, a stand in a table drawer will be convenient, which can be:
- with recesses for tools according to their size;
- with compartments for storing knives.
Such a stand is made literally from waste wood: you will need to prepare 1 wooden blank of a rectangular/square shape (bottom), 4 narrow blanks (walls) and as many strips as are supposed to be stored in the cutting tool product. Next, all the parts are glued together or fastened with metal “corners”.
If you plan to make a stand in a table drawer with personal recesses for each knife, then you will need to take a wooden die and use a cutter (a tool for artistic wood carving) to make the required number of storage spaces. If your home workshop has a milling machine in its arsenal, then the whole process can be completed with its help.
Such a stand must be sanded and coated with a waterproof material so that the product lasts as long as possible. Varnishes are used as decoration, so the stand becomes not only shiny and smooth, but the fibers of the original material beautifully appear on it.
For a collection of knives, souvenirs
Souvenir items and knife collections are the pride of the owner, so they try to show them to guests. For this type of instrument, you can also make a stand with your own hands:
- Take a rectangular wooden board - this will be the base.
- The second blank is also made of wood, made in the shape of a rectangle, and has a width equal to the length of the knife blade.
- In the base blank you need to make a slot into which the second wooden blank will be inserted (perpendicularly).
- Fix the product with glue - they coat the inside of the slot with it, then the entire structure is clamped in a vice in the places where the glue is applied.
- After drying (on average 1 day), the entire product is sanded.
- On a wooden rectangle located vertically, wooden hooks should be attached to hold knives - the distance between them is such that the knife “holds” on the blade and base of the handle. You need to make a notch on these holders; the blade will be inserted into it.
Souvenir stand for knives
The final stage is decorating the stand; experts recommend not “reinventing the wheel”, but using varnish and polishing.
For hunting, dagger
Hunting knives and daggers are often real works of art and storing them in some kind of box is a real crime. It’s better to make a stand for them with your own hands, especially since for this you only need:
- rectangular board - base;
- two “horns”;
- decorative images made of plywood - for example, a figure of a bear cub, a wild boar, a Caucasian man in a fur hat.
First, the base board is sanded with sandpaper, then you need to attach “horns” to it - the distance between them should correspond to the length of the product that will be on them. They are attached either with glue (an extremely unreliable method), or by making cutouts in the base.
Since the stands are made of wood, the finished product will need to be soaked in drying oil, varnished and polished. Decorative images can be placed anywhere on the base; they are simply glued and then varnished to match the entire base.
Idea 4. Topiary for kitchen or home decor
Topiary is a small decorative tree that is used to decorate a dining or coffee table, chest of drawers or mantelpiece. And topiary is an excellent addition to a gift, especially if you decorate its crown, say, with candies or flowers. Making such a craft with your own hands does not take much time, does not require the use of expensive materials, and even beginners can do it. Once you master the basic principle, you will be able to create topiary for any occasion, any shape and design. Take a look at our selection of DIY home decor photo ideas, you're sure to find something you'll like!
DIY jewelry stand
An organizer for feminine charms has many advantages, one of which is the visibility of the items in it. This is very convenient for women who constantly lose their things at the bottom of a bag or box.
The decorations will not get confused with each other, in addition, each one is in its place. A stand for bracelets, beads and rings looks great as an interior item that highlights the taste and character of a housewife.
To create a unique holder, it is not at all important to have special skills and a special list of tools. Choose the desired form and implement it.
Idea 5. Serving board-tray
But the idea of an unusual serving board-tray, which, although not a cutting board (intended for displaying food only in dishes), can nevertheless be very functional. For example, it can be used to beautifully serve snacks, drinks (olives, pistachios, nuts, chips, etc.), sauces, honey, sour cream, jam. Thanks to the slate part, while the board is not being used for its intended purpose, it can simply be hung on the wall and used for writing.
To make this DIY kitchen craft you will need:
You can replace furniture handles with leather straps, paint the board a bright color, burn a design onto it, or attach two “legs” to the back of it.
Idea 6. Stand for mugs and glasses
If you're the type of person who collects wine corks (either for fun or in the hopes of one day making something useful out of them), then you'll love this craft idea.
To make one mug stand you will need:
Step 1: Lay out your corks in pairs in a square format as shown in the photo below. Using hot glue, apply a bead of glue between the two corks and press them together for 30 seconds. Repeat the procedure with all other pairs.
Step 2. Cut a square from sheet cork (board, rug) corresponding to the size of the future stand. Next, apply thermal glue on it, wait 15-20 seconds. and glue your blanks.
Step 3: Fill the gaps between the corks with glue and let it dry. For better adhesion of the glue to the corks, you can put some kind of press on the workpiece.
Step 4. Wrap the craft with twine and tie a knot.
Handmade coasters for mugs, glasses and glasses can be beautifully packaged and given to a friend
If desired, the stands can be made round, triangular or hexagonal by cutting off the excess with a knife.
Using the described principle, you can make such a hot stand with your own hands. By the way, an old CD will work as a basis in this case.
How to make a sugar bowl at home?
How to make a sugar bowl with your own hands at home? What materials are needed for this? Has anyone made sugar bowls?
Another option is a sugar bowl made from a wooden box.
It’s very easy to decorate this box using a beautiful paper napkin, which we glue on a wooden base.
We must try to glue it without wrinkles.
you can make a very original sugar bowl like this.
Take any container you like, for example a glass jar.
degrease it and cover the outside with PVA glue.
While the glue is not high, pour sugar on it, you can even apply the glue in a pattern, then the sugar will follow the pattern and it will be more interesting.
Shake off excess sugar with a soft brush.
When the glue dries, coat the jar with varnish, you can use any hairspray.
and voila. your sugar bowl is ready.
You can use any container you wish to use as a sugar bowl that you have in your kitchen. The main thing is that it is not a container from household chemicals. The dishes should be dry, clean and odorless; it is advisable that they have a lid, because sugar absorbs moisture and odors.
Take any glass jar, not very large, half a liter will be enough. Pour sugar into it and voila. The sugar bowl is ready! (student version