Here you will learn:
- Structural features of furnaces
- Advantages and disadvantages
- Types of long-burning stoves
- Making your own oven
- Making a potbelly stove
- We make “bubafonya”
- Increasing efficiency
Wood stoves are actively used to heat premises for various purposes - these can be living rooms, outbuildings, garages and much more. Gas cannot be carried everywhere, which supports the demand for solid fuel units. After all, firewood is a fairly cheap source of heat, and in some cases even free. If we make a long-burning stove with our own hands and install it indoors, we will have at our disposal an easy-to-use unit.
In this review we will look at:
- Operating principle of long-burning furnaces;
- Their advantages and disadvantages;
- the most efficient wood stove designs;
- how to make a good stove with your own hands.
After reviewing the information presented and the homemade drawings, you can independently assemble a slow burning stove for a garage, cottage, outbuilding and any other buildings.
What is a long-burning stove, where is it used, its advantages and disadvantages
A long-burning furnace is a heating structure equipped with an additional chamber for combustion of the gas emitted by the fuel. In such a furnace, the combustion process of the combustion material slows down, as a result of which the room is heated in a period from several hours to a day and a half.
Under the influence of constant temperature, the fuel in the furnace breaks down into wood coke and pyrolysis gas. When interacting with oxygen, the gas begins to burn more intensely, releasing a large amount of thermal energy, sufficient not only for heating, but also for heating water.
Long-burning stoves are equipped with an additional chamber for combustion of gases
Long-burning furnaces differ from traditional designs in that they require a dosed supply of oxygen not from the bottom, but from the top.
Long-burning stoves are used for heating country houses, private households, garages, workshops, basements, chicken coops, barns and other outbuildings and residential buildings. Depending on the size and modernization of the design, these heating structures are also used in industrial premises.
In common parlance, these heating structures are also called long-burning stoves.
These efficient heat sources have gained great popularity due to their functional qualities. However, such furnaces have a number of both positive and negative criteria.
Water heating circuit - an option for heating a house
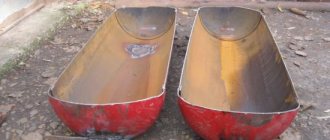
A potbelly stove can be easily converted into a slow-burning boiler for water heating. Instead of a screen, we install a U-shaped metal water heater, which will also reflect IR rays. We install it at the same distance as the screen. The installation cools the furnace too much, reducing its efficiency. A potbelly stove, as in the drawing, produces 15 kW, so it can heat 25 m2 of space. If there is no need for water heating, you can use a water heater for domestic needs.
The intention to make a potbelly stove with a long burning time to heat a larger area is futile. Increasing the size will lead to a deterioration in quality indicators. In a large firebox, there is sluggish circulation, insufficient gas emission, and the room does not warm up well. If you fill the firebox to the top with wood, there is simply no room left for a convection vortex to form. The conclusion is clear: the size of the potbelly stove determines the properties of the pyrolysis gas.
But still, a more powerful long-burning boiler for water heating has been developed. It is difficult to replicate industrial designs, but the design shown in the drawing can be assembled at home.
Unit B with a telescopic rod to regulate the flow of oxygen deserves special attention. The unit develops a power of 35 kW when operating on coal and pellets, combustion lasts 12 hours. Firewood is less efficient; it burns out in 8 hours.
Types of long-burning stoves and their choice for self-production
These stoves are usually made of bricks, metal or stone. They can be round, cylindrical, square or irregular in shape. Depending on their design and method of burning fuel, long-burning furnaces differ in types.
Classic long burning stove
The design in which the flame spreads from bottom to top, pushing burning gases through layers of combustion material, is classic. This type of furnace is equipped with a heat exchanger and an afterburning chamber into which an additional portion of air is supplied. Prominent representatives of this type are long-burning furnaces: Buleryan (Breneran), Butakov furnace, as well as modified designs with different heat exchangers.
In Buleryan furnaces, the role of a heat exchanger is played by curved pipes located inside the furnace body
Long burning shaft furnace
Another type of such structures is a shaft furnace. In this design, the combustion zone is shifted to the grate part. The products of fuel combustion are discharged through the adjacent compartment, in which they burn out, creating heat exchange. This type is best built from brick, which has been confirmed over many centuries.
In shaft-type furnaces, the combustion zone is located directly above the grate
Hearth oven
This is a top-burning design in which the upper part of the combustion material is ignited, and the direction of fire is in the opposite direction. Such a device requires oxygen supply under the burnt layer, so the furnace must contain special air delivery channels. Simplicity of design combined with efficiency and functionality has led to the creation of many DIY options. In this case, the material for its manufacture will be used cylindrical containers. A striking example of this type of heating units is a stove called “bubafonya”.
You can use an old gas cylinder as a body for a homemade stove.
Gas generating furnaces
Gas-generating furnaces or structures with additional combustion of pyrolysis gases. In this design, the combustion material burns under the influence of two factors: high temperature and a small amount of oxygen. This leads to the release of flammable gases, which burn out in the additional chamber. The designs of this type of furnace are the most complex to manufacture, but their efficiency and ease of use are superior to previous options.
Pyrolysis gases burn out in an additional chamber above the firebox
The Burelyan stove is considered a hybrid of a potbelly stove and a long-burning wood stove. In our next material you will find a description of the operating principle of this unit, as well as step-by-step installation instructions:.
Potbelly stove using waste oil products
A waste oil furnace is a device consisting of two chambers. In the first, oil is burned, and in the second, the resulting gases are burned along with air.
What does such a potbelly stove look like using waste oil and its main components
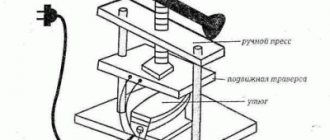
To weld such a stove, a master will need no more than 2-3 hours. It is made from the following materials:
- chimney pipe;
- fuel tank/finished metal box;
- sheet metal.
https://youtube.com/watch?v=9bm6rwog-EU
Video: review of a potbelly stove for the garage
Tools you will need:
- welding machine;
- Bulgarian;
- chisel;
- sledgehammer;
- tape measure, marker/chalk;
- hammer;
- perforator;
- rivets.
Drawing of a potbelly stove “under development”. The figure shows two sections: in the first, oil is supplied and burned, in the second, gases are burned together with air.
To make such a stove with your own hands, you should proceed in stages:
- First, they make a drawing of a potbelly stove for the garage. In the figure, all parts and workpieces with dimensions are schematically marked.
- A ready-made tank or a metal box with a cut hole for fuel supply is used as a fuel compartment. The legs are attached to the tank using a welding machine.
- The upper section is made in the shape of an elongated cylinder. It is connected to the lower chamber using a pipe. To do this, cut a small round opening in the box. All joints are checked for leaks. Holes (10 mm in diameter) are made in the pipe to allow secondary air to enter the channel.
- The chimney is made in the upper part of the structure at an angle at a height of several meters.
- The top surface of the potbelly stove can be used as a “cooking stove”. This is the hottest place in the oven.
- To light the stove, several liters of waste are poured into the chamber, a little heating oil is added, paper is placed and it is set on fire. If necessary, add oil in small portions.
Read the article about building a mini-stove and find answers to your questions.
A potbelly stove using waste oil is made from a metal box or tank. The upper chamber must be cylindrical.
This material will be perfectly complemented by the following publications:
- Review of Termofor heating stoves for home and bathhouses - the best from Siberia
- Using a rocket stove with a stove bench for heating a house or bathhouse
Furnace design, its features and operating principle
Before you start making your own stove, you need to carefully study all the characteristics of the device.
If you plan to make a unit for heating a large room, then the stove must have high heat output. For example, for a house or room with an area of 150 m², you should choose a stove designed to heat up to 200 m². This “reserve” of power is necessary to be completely sure that every corner of the house will be warm.
It is also necessary to take into account that not every room is adjacent to a heat source, so heating it will require more time and power from the heating device.
If it is intended to heat a room with an area of 30–50 m², then the stove can be made without the specified “reserve”. In such a small room, heat loss will be minimal, so a unit with low power is sufficient. Automatic fuel refueling will greatly simplify its maintenance. When making such a stove, it is possible to provide hobs for cooking on its body. If the stove is not only a source of heat, but also an interior item, then its body can have windows made of fireproof glass.
Design features of long-burning furnaces
Long-burning heating devices have design features that distinguish them from other stoves:
- the combustion chamber has a volume for loading a large amount of combustible material;
- the body of long-burning stoves is equipped with a large door;
- the combustion compartment in the furnace body is divided into two chambers; one chamber is intended for smoldering flammable material, the second for gas combustion;
- the design of such a stove provides for the presence of a special bumper that prevents flame from entering the chimney;
- This element of the furnace frame is made of a metal plate, which is welded into the upper part of the combustion compartment.
Differences between a conventional and pyrolysis oven
To understand the operating principle of a long-burning stove, you need to compare it with the operation of a conventional stove.
The work of a conventional stove is to heat its surface and transfer heat to the room. The combustion material is ignited from below, causing the flame to spread to the sides, heading upward. This occurs due to the access of a large amount of air into the combustion chamber. The fuel in such a stove burns quickly, which is why the air temperature in the room is unstable - it either drops or rises.
The operating principle of a long-burning furnace is different. The firewood is ignited from above, and the fire spreads downward, while air is supplied only to the burning site. As a result, the material smolders, releasing heat evenly over a long time. In addition to the combustion material, pyrolysis gas is released, which also serves as fuel, additionally creating heat.
In a conventional furnace, fuel burns quickly, in a pyrolysis furnace it smolders slowly
To make stoves, you can use almost any available means. In our next article you will learn how to make a long-burning potbelly stove from a barrel: .
About the temperature in the garage
In such a room it is not easy to equip a traditional heating system, and all this will be quite expensive. On the other hand, the optimal air temperature must be maintained in the garage, because it is not recommended to store the car at temperatures less than +5 degrees , while a minimum of +18 degrees .
Typically, compact, economical stoves with fairly high efficiency and good heating of the room are used to heat garages. It is also important that the stove warms up the garage quickly and is safe at the same time. It’s a big plus if the fuel can be various types of waste – wood, for example, or recycled motor oil. This will make heating your garage even cheaper.
Potbelly stove round
Note! Portable electric heaters for garages are almost never used because they are ineffective. They are also unsafe and should not be left unattended. And no one wants to spend the night in the garage to look after all this.
Operating principle of an electric convector
Garages are rarely well insulated using high-quality thermal insulation materials, and therefore heat loss in such rooms is usually high. In addition, to heat a small area, sometimes much more energy is needed than to heat a house. On average, a heating device with a power of 2.5 kW is enough to heat a garage with a standard area. To maintain a constant temperature of about +16 degrees, you will need a 2 kW oven. Quite often, owners, trying to save money, do not heat the entire garage, but only the area where they work.
The oven allows you to create optimal temperature conditions in the garage
On a note! If you properly insulate gates and walls, as well as seal all cracks, you can reduce heat loss and thus save money, since it will be easier to maintain the required temperature.
Required materials and tools
To make a long-burning stove, you will need the following materials:
- metal barrel for fuel and lubricants with a capacity of 200 liters; as an alternative material, you can use a steel pipe with a diameter corresponding to the drawing or an empty gas cylinder with a capacity of 50 to 100 liters; You can also use sheet steel with a thickness of 3 mm or more;
- to make an air supply channel you will need a pipe with a diameter of at least 50 mm;
- for the chimney a piece of pipe with a diameter of 100 mm is required;
- a steel channel or a section of an angle with a flange width of 55–65 mm;
- for the air distributor you will need a metal sheet of at least 3–5 mm, with a diameter slightly larger than the circumference of the housing;
- to make the lid you will need a steel sheet with a thickness of at least 3–5 mm;
- metal hinges for the door;
- if the furnace body is equipped with a water circuit, then sheet steel and two threaded pipes will be required.
The tools you cannot do without when making such a stove are:
- welding machine, electrodes;
- Bulgarian;
- file;
- electric drill;
- metal drills of various diameters (including core drills);
- hammer;
- an anvil or other stable hard surface;
- yardstick;
- building level;
- pencil.
Calculation of basic parameters
A long-burning solid fuel stove can be made from available materials, such as a used gas cylinder, a piece of large steel pipe or a metal barrel. You should select a material with a wall thickness of at least 5 mm. This is due to the fact that a thinner casing will burn out after some time.
Option of the “Bubafonya” stove with a water jacket
Furnace size
In the absence of any drawings and diagrams for the manufacture of the furnace, you can make all the necessary calculations yourself.
Calculation of parameters in the Bubafonya furnace
In this case, it would be more accurate to talk about its diameter - D and height - H. These values should be proportional to each other, where a ratio in the range from 1:3 to 1:5 is considered optimal. The height of the stove is usually made at least 100 cm, since this parameter is directly related to the duration of operation of the unit. However, it is not worth making a structure that is too high, as it will be inconvenient to load it with firewood. It can also negatively affect traction. It can drop so much that the maintained flame inside the combustion chamber goes out.
As numerous thermal engineering studies have shown, you should not make a stove with a small diameter. From this narrow unit, the air will simply be drawn into the chimney pipe, causing the stove’s power to significantly decrease.
If you make the stove frame too wide, then there will be no uniform burning of the fuel near the inner walls of the chamber and in the middle of the hearth. In this case, only the central part of the combustion material will burn out. The metal circle of the piston will sag and clog the fireplace, causing the flame to go out. The optimal diameter of this design is from 300 to 900 mm.
Thickness of material used
This criterion must be taken into account, since the thin walls of the housing will burn out after some time. In this regard, it is necessary to select a material with a thickness of at least 5 mm. This is especially important if you plan to equip the frame with a water jacket, turning it into a boiler. In the image, the wall thickness is indicated by the symbol Δ.
If you use material with a wall thickness of up to 4–5 mm, this risks causing the oven to lose its power. Due to the thin walls of the housing, the temperature above the piston plate will drop. As a result, the afterburning of pyrolysis gases will be reduced, and therefore the heat generated will be reduced.
However, for heating small spaces such as a garage, shed or small workshop, the thickness of such material is quite acceptable.
Parameters of a metal pancake
For efficient operation of the furnace, not only the diameter of the round plate on the piston is important, but also its thickness. After all, the metal pancake is a partition and at the same time a heating surface for igniting pyrolysis gases.
When making a metal pancake, you should adhere to the optimal size. The distance from its outer edge to the inner wall of the oven should be 5%. In the image, this gap is indicated by the formula C=5%D.
The diameter of the metal pancake should be slightly smaller than the internal diameter of the oven body
Outlet pipe parameters
In the image, the diameter of the chimney pipe is indicated by the letter S. It is recommended that its diameter be at least 80 mm.
Air supply pipe dimensions
In the diagram, its diameter is indicated by the letter d. To design such a furnace, you can use a 75 or 80 mm pipe. The pipe must be welded to a metal circle (into its hole in the middle). The result is a part called a piston.
Another option for a long-burning stove is Bubofonya. Description of the operating principle, calculation of materials, as well as step-by-step installation instructions in our article:.
Preparatory work and choice of location for installing the furnace
If the furnace is made of sheet steel, then it is necessary to cut it into blanks in accordance with the drawing:
- cut identical fragments from the corners that will serve as a grate;
- you can also use metal corners to make stands and handles for the case;
- It is also necessary to cut the pipes in advance.
The location for installing the long-burning stove is selected with the condition that when assembled it is not installed closer than 100 cm to the wall.
Since the furnace body will be completely heated, it is necessary to take care of the insulating material in advance. To do this, you can build a stand from brick, which should be 30 cm larger than the base of the case. Alternatively, you can weld steel rods or angles to the stove frame.
At the installation site, from the side of the door into the combustion chamber, it is necessary to lay insulating material. As such, a basalt or asbestos layer is used, on top of which a steel sheet with an area of 100 cm is placed.
The walls next to the stove must be lined with insulating material
Final stage
After the stove is assembled and installed in a permanent place, it can be given an aesthetic appearance using refractory bricks. As practice has shown, this does not affect the performance of the boiler in any way. There is an opinion that due to a decrease in heat loss, the fuel burnout period increases. However, this has not yet been proven.
Therefore, the owner of the stove can choose whether it is worth spending additional money on covering the stove with bricks, or doing without this step. Sometimes in this way they make a stove for a long-burning greenhouse with their own hands, which is very convenient and practical.
Do-it-yourself long-burning stove: diagram and step-by-step instructions
The most common materials for making long-burning stoves are metal and brick.
Making a “bubafonya” stove from a gas cylinder
For making your own “bubafonya” stove, a used gas cylinder with a volume of 50 liters is best suited. The order of work is as follows:
- Cut off the top part of the cylinder at the place where the body is rounded using a grinder. This fragment will serve as a cover in the future design.
The top part of the cylinder can be conveniently used as a stove lid
- Weld a metal strip to the upper edge (at the cut point of the future lid). This side will prevent the lid from sliding off.
- Next, it is necessary to make a pressure piston, thanks to which the combustion material will be pressed during combustion. Cut a circle from a thick steel sheet with a diameter slightly smaller than the body. The circle should fall freely inside the cylinder. The gap between the housing wall and the circle should be 8–10 mm wide.
- Drill a hole with a diameter of 100 mm in the middle of the circle. It is convenient to do this using a core drill.
- Take a pipe with the same diameter and weld one end to the middle of the circle. The result is a part with a common hole.
- Then weld four sections of channel in a cross pattern to the back side of the circle. They form unique channels through which air will flow into the combustion chamber.
Instead of channels on the piston, you can use angles
- Weld the handles and stands.
- Clean sharp and protruding welding fragments with a file or grinder.
Video: how to make a “bubafonya” stove from a gas cylinder
Making a long-burning stove from brick
Of course, in comparison with a homemade metal structure, a brick oven looks more advantageous. However, making it yourself is a labor-intensive process that requires certain skills and time.
There is a hob above the combustion chamber for cooking
Foundation preparation
Since the brickwork is quite massive, the stove definitely needs a solid foundation. The depth of the foundation must ensure the stability of the structure. The foundation is prepared as follows:
- First you need to dig a small pit 30 cm deep. Its width and length should be 10 cm larger than the expected dimensions of the stove.
- Level the bottom of the pit and cover it with roofing felt or other insulating material.
- Pour a 10 cm thick layer of sand on top, which must be compacted.
- Place a layer of fine gravel of similar thickness on top of the sand cushion.
- To ensure the reliability of the base, it can be reinforced with a metal grid. To do this, use reinforcing bars connected to each other with wire. The width of the grid cells should be no more than 10 cm. The thickness of the rods is selected in the range from 8 to 12 mm.
- Place the grate in the pit so that it does not touch the bottom. To do this, place broken bricks under the metal frame.
- Pour concrete mixture grade M-200 or M-250. The concrete must completely cover the metal frame.
For reliability, the foundation can be reinforced with a metal grid
Order of brickwork
After a few days, when the base has hardened, you can begin laying brickwork for a long-burning furnace. Before starting construction work, it is necessary to soak the brick in water for a day. This must be done so that the bricks laid in rows do not draw moisture from the mixture. Bricks should be laid as follows:
- The first and second rows must be laid out in continuous layers.
- An ash pan will be installed on the second row, so you need to provide space for the door.
- On the fifth row, a ceiling is installed above the door. Subsequently, a drying chamber box will be installed in it.
- The sixth and seventh rows are designed to accommodate the grate and install the door into the combustion chamber.
- From the eighth to the tenth row the firebox will be placed. When laying the combustion chamber, it is necessary to use fire-resistant material - fireclay bricks. Use clay-based mixtures as an adhesive for masonry. Ready-made mixtures intended for laying stoves are available for sale.
- The eleventh row serves as the ceiling of the combustion chamber and forms the area for the chimney. On top of this row it is necessary to lay steel reinforcement and fill it with cement mixture.
- On the twelfth row, a place for the hob is formed.
- Starting from the thirteenth - fourteenth row, rows for the chimney are laid. Its height is made according to individual projects, so the number of rows can be increased several times.
The procedure for laying bricks for a long-burning stove with a hob
Video: long-burning brick stove modeled on a children's construction set
Assembly
Having made the blanks, we proceed to welding and assembling the stove.
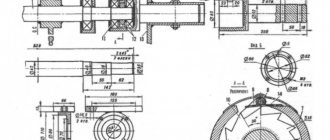
- We place the bottom element on a horizontal surface and place a side wall at its edge. We use a square to check the right angle between them, weld them onto spot clamps in increments of 10 cm. Make sure that we have a right angle, then weld the joint. We do the same with the second wall.
- We cut off two pieces of the corner: their length coincides with the size of the stove. We put marks from the inside on the walls where the grate will be located, and weld the corners along them (with the shelves down). We weld the joint between the corner and the wall on both sides.
- We give the structure rigidity and correspondence to the required geometry: we fix the back wall. Everything is simple here: we place it at the ends of the sidewalls and grab it from the inside without completely welding the joint; if suddenly something goes wrong, we will cut the tacks with a grinder and disconnect the part to adjust the design.
- We install a mirror and a partition that form the upper chamber. But before that, let’s weld the fastenings for them. We cut off 8 pieces of reinforcement 5 cm long and 8–10 cm in diameter. We make marks along the height of the channel (look at the drawing) and weld them as shown in the figure. Rigid fastening of the partitions is unacceptable: due to the high temperature in this part of the stove, they will eventually become unusable and require replacement.
- Let's start making the grate. We cut the fittings with a diameter of 8–10 cm into 25 strips (their length is 2 cm less than the width of the oven), this will ensure a power reserve, and the grate will fall into place freely. We cut out two strips of sheet steel (the width matches the width of the corner). We place them on the first and last pieces of reinforcement along the edges and secure them by welding. We perform similar actions with the remaining pieces of reinforcement. Turn the grill over and weld the joints on the reverse side.
- We make a hole in the cut-to-size lid and place a sleeve to connect the chimney. The easiest way to cut a hole is with a propane cutter, but if you don’t have one, you can burn along the contour using arc welding at high current. For the sleeve you need a piece of pipe with a diameter of 10 cm and a height of 20 cm. We weld it.
- Before attaching the cover, we weld the stuck joints on the back wall, since this will not be easy after installation. Now we can safely weld the lid to the sides and back wall.
- We put the finished grate in place.
- Installation of the front part. First, we cut out the top panel according to the dimensions from the drawing and drill 5 holes in a checkerboard pattern for the intake of secondary air (with a 5–6 mm drill). We attach the panel by welding at several points along the top and sides of the body; it should slightly cover the end of the mirror. Once we have checked the geometry and dimensions, we weld the joints.
- The next stage is the bottom panel covering the ash pan, with the blower door. First, we cut out the panel itself and the rectangular opening for the door. The height dimensions are indicated in the drawing; we measure the width according to the design of the future stove, since it may differ from those shown on paper. The best option is 1/2 of the oven width. The door is cut along the opening.
- In the door itself, we drill a hole for the bolted connection of the locking strap (this is a steel strip 2–3 cm wide and 10–12 cm long, with a curved end of 2–3 cm). The curtain is made from a piece of pipe and a steel plate. The door is placed with a tube on a rod welded to the body to the left of the opening. To lock on the right side of the body, a piece of corner or a curved strip is welded.
- The firebox door (the central part of the stove) and the curtains are made similarly to the bottom one, the only exception is that you don’t have to cut an opening for it in a single sheet: we will make it from strips 4–5 cm wide. They are attached by welding to the ends of the side walls, to the top and lower front panels.
- The oven is ready, we need to put it on its feet. A pipe with a diameter of 15–20 mm is suitable for the legs. We cut it into 4 pieces 20 cm long. To prevent the stove from pushing through the floor covering with its weight, we weld 5x5 cm sheet steel nickels to the tubes. You don’t have to do this if the potbelly stove will be in a garage or utility room, but with nickels it will become more stable. All that remains is to weld the legs to the bottom in the corners, retreating 3–5 cm from the edges (depending on the dimensions of the oven).
- To improve the appearance, the unit is coated with heat-resistant paint. The chimney should be made collapsible: with clamp connections for easy cleaning. The design of the chimney depends on the location of the stove in order to bring it outside.
When installing a stove in a garage, it is important to think in advance about additional safety measures for placing the stove next to the car and ways to retain heat while the stove is operating.
How to upgrade a long-burning stove yourself
To make a homemade stove less of a hassle, it can be improved.
Modernization of the Bubafonya stove
The weight of the Bubafonya stove structure usually reaches 150–170 kg. This creates inconvenience, since it must be turned over to clean it from ash and other combustion residues. To avoid this, you can improve the design by making holes in it with doors. However, it should be taken into account that the peculiarity of such a stove is precisely the absence of extra cracks through which air can penetrate. Therefore, when manufacturing doors, they will need to be carefully sealed in the closed position. This can be achieved by welding metal sides and seals to the body.
Air draft in the combustion chamber will be improved if the number and shape of the ribs on the round piston plate of the structure are changed. To do this, instead of channel sections, you need to weld steel plates. At the same time, they should have a slight bend along the entire length of the part. This shape will allow the incoming air to swirl, which will be evenly distributed in the combustion chamber. To obtain the desired effect, 6 to 8 plates are enough.
Curved ribs on the piston help improve traction
Modernization of a brick kiln
A long-burning stove made of brick will take up much less space if its design resembles the shape of a triangle and is placed in the corner of the room. The construction of such a structure will require less building material and, accordingly, less financial investment.
The brick version of the long-burning stove can be upgraded with a separate damper to switch between winter and summer heating modes. In the autumn-spring period, when there is no frost, but the air is saturated with dampness, this damper will help prevent the heating from being too hot.
An additional damper will make heating more comfortable