DIY hub for the rear wheel of an all-terrain vehicle with inner tubes. From the correct design, which the wheel can be easily and quickly removed and interchangeable. The material and design must withstand heavy loads when the all-terrain vehicle moves. With all this, the weight of the hub should be minimal. This has a good effect on the cross-country ability of a homemade all-terrain vehicle.
Hub material
We will need sheet iron of two sizes: 8mm and 2mm. Metal rod with a diameter of 8mm. Tools - angle grinder, welding, drill, vise and measuring tool. We cut out the blanks for the hub parts with our own hands.
First hub part
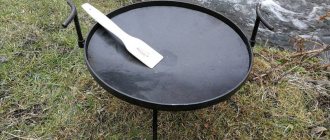
First, we cut out two identical blanks in the shape of a strip from a thin sheet. The strips are 35 millimeters wide and long (any size) slightly larger than the outer circumference of the hub. The blanks must be bent into rings on a special device and welded together. In the photo under number 1 are blank parts. Under number 2 are finished parts.
Second hub part
Next we cut out the base of the hub from a thick sheet. We take the finished first part, place it on a sheet and roughly outline it in a circle. You can add two millimeters. Cut with an angle grinder. We get a rough blank of the second part. Everything is like in the photo, number 1. Then we go to a turner we know, place an order and the part is ready, number 2. But you can do it with your own hands no worse than on a lathe.
How to make a differential for a walk-behind tractor with your own hands?
Despite the fact that the differential for the walk-behind tractor has a rather simple design, before making it yourself you will need to prepare and study the drawings. They should indicate the dimensions of the mechanism spare parts and methods of fixing them in the device.
Practice shows that every homemade differential has a small rotation angle of the wheels in the free position. As a rule, this parameter does not exceed 250 °. This disadvantage is due to the fact that the design of the mechanism includes a transverse groove, which significantly reduces the power and efficiency of the design. Another significant disadvantage is the rapid wear of the parts of a homemade differential, especially if a large amount of dirt accumulates between them. In this regard, self-made differentials should be used for exceptionally light models of walk-behind tractors.
In order for a homemade differential to be more durable and effective, you should adhere to a number of rules:
- there is no need to leave too small a groove in the space between the bushing and the extension axle. If corrosion occurs, these parts will quickly stick to each other;
- in order to timely lubricate the differential without regularly disassembling it, you need to place a pressing oiler on the mechanism bushing;
- For the manufacture of extension cords, it is best to use carbon steel. As a result, the mechanism will be more reliable and, at the same time, not expensive. The video will tell you more about making the differential.
Making a differential for a walk-behind tractor is not a complicated procedure. By following all the recommendations listed, you will be able to assemble a durable mechanism that will quickly pay for itself with further use.
MY MOTORCYCLE
Only the driver who operates his motorcycle on smooth asphalt roads, without loading it too much, can say that the wheels of domestic motorcycles are strong and reliable. The championship in wheel unreliability traditionally belongs to the heavy Dnepr and Urals. Here, I think everyone understands, not only are their engines powerful, but they are not always used correctly, which is why spokes and rims fly. The owners of the motorcycles have no sense of the load capacity, and the manufacturers themselves did not try very hard.
Therefore, it happens that you can find motorcycles on the roads with rear wheels, where instead of wire spokes, either metal strips or rods, or pieces of water pipes are welded on. Lately, “homemade” manufacturers have begun to make more neat designs and the wheels are taking on a cooler look.
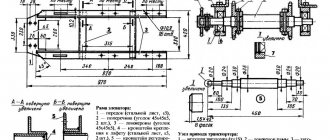
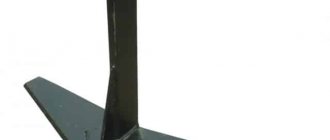
How to make welded steel wheels at home yourself? So let's talk about this topic: Welded steel wheels (WSW) have high rigidity due to the absence of movement of the rim and hub, thanks to the high elasticity of the parts that make them up. Strength is ensured by high-quality welding of all parts and a sufficient cross-section of the spokes. Welding on the jig eliminates axial runout of the rim, and the same length of the spokes eliminates radial runout. The rim for the manufacture of SSC must be new and undamaged. The conductor for piece production of SSK is very simple. This is an axle with M10 - M12 threads. fixed on a perfectly flat plate, which can be a piece of a large channel, beam, etc. (Fig. 1).
Conductor: a - with a stove; b - with a channel.
A steel hub (without bearings) is put on the axle with the same lateral clearance and pulled to the plate with a nut through a washer. If necessary, a pad is placed under the hub to ensure its axial displacement relative to the rim. Here it is necessary to achieve perpendicularity of the hub axis to the plane of the slab. Then the rim is placed on the slab so that its center coincides with the center of the hub (measured with a ruler); if necessary, shims are installed under the rim. After this, it is tacked at points in 5-10 places either to the plate or to the pads welded to the plate. Once again I want to note that the rim must initially be perfectly accurate! The spokes are made from rectangular pipe. Their number and cross-section depend on the load, the purpose of the wheel and aesthetic considerations. Practice has shown that five spokes with a cross-section of 25x25 mm (wall thickness - at least 2 mm) are quite sufficient for the rear wheel of a motorcycle weighing 150-200 kg. For the front wheel of such a motorcycle, four such spokes are enough. For the Minsk and Voskhod motorcycles, 25x28 mm spokes are recommended (parts from school and office furniture) - 4 for the front wheel and 5 for the rear. The spokes must have strictly the same length, fit tightly to the rim and hub at the welding points, and snap into place with a slight tension (from hand pressure). When assembling the wheel, the nut securing the hub is slightly loosened, which allows the hub to be accurately centered with the spokes inside the rim. After assembly, the nut is tightened again. Electric welding (manual, arc or gas-shielded) is performed crosswise using tack welding tools. At one time, it is allowed to weld one edge of the pipe to the hub or to the rim. All seams that can be reached without removing the wheel from the jig are welded. If necessary, the jig with the wheel can be turned to ensure ease of operation and the absence of vertical seams. So it is necessary to boil at least 75% of the welded surfaces. After this, the wheel is removed from the jig and the remaining seams are welded. To avoid warping of the rim, it is advisable to weld the holes for the spoke nipples on the jig after 75% of the welding, but it is also possible after finishing the work - it’s more convenient. Gas welding is allowed here, which makes it easier to heat the protrusions near the holes for straightening them. Before removing the wheel from the jig, it is advisable to weld two circumferential seams along the rim, near the curved side (Fig. 2). This will increase the rigidity of the rim.
Welding the circumferential seams on the rim After welding, cleaning, priming, painting and mounting the tire follow, which is self-explanatory. It is much more difficult to make a steel hub, especially when a chain guard is required for the rear wheel.
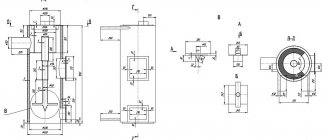
In Fig. 3a shows the front wheel hub with a flange for the brake disc. Rice. 3b offers a simple hub with a drum brake and a speedometer drive gearbox. The rear wheel hub has a similar design, where the driven sprocket is mounted on the brake drum (Fig. 3.c). The sprocket can also be mounted on a separate flange on the other side of the brake (Fig. 3.d). Anchors with blocks and speedometer gearboxes are used from serial motorcycles. For IZH (except IZH-PS), you should use a bearing housing with a flange to which the brake drum and a second flange for attaching the spokes are welded. Spokes should only be welded to flanges. Seams on a cylindrical hub can cause warping of the hub, which leads to misalignment of the bearing housings and their thermal deformation.
The spokes can be welded to the rim either symmetrically or offset (Fig. 4, a), or at an angle (Fig. 4, b). In both cases, the strength is quite sufficient. The most difficult thing is to make a hub for Minsk.” "Voskhod" and "Java". You can try the variation shown in Fig. 5. In this case, the stars remain unchanged.
There are several ways to make a brake drum: grind the entire hub from a blank; make a prefabricated hub using a brake drum cut from an aluminum hub; select a suitable pipe for making a drum; bend a drum from a steel strip. In any case (except the first), after welding it is necessary to bore the drum to ensure its alignment with the wheel axle. The Ural steel hub is ideal for the manufacture of SSK. It can also be used for other motorcycles by pressing an adapter sleeve for the axle into the bearings (the diameter of the Ural axle is 20 mm). In addition to the finished product, you will receive fairly strong brakes. Compliance with the recommendations listed above will allow you to produce strong, beautiful and durable wheels, avoiding mistakes.
Of course, the manufacturing option is more suitable for workhorses, but if you approach everything more carefully, then you can make it “more beautiful”! I hope you find this article useful. Good luck with your engineering robots.
Types and characteristics of hubs for walk-behind tractors
The hub for a walk-behind tractor is an important element of the design of an agricultural machine. Its presence, paired with an installed special attachment, significantly improves the quality of plowing the soil, hilling beds, planting potatoes, harvesting and other activities in the garden.
There are two types of hubs on sale.
Among them stands out:
- differential hub - this part is considered universal and can be mounted on all walk-behind tractors, regardless of their class and design features. Differential hubs are required for use on those walk-behind tractors whose factory equipment does not include a wheel unlocking mechanism, as well as for those models of equipment that cannot be freely deployed at the end of the cultivated bed. This walk-behind tractor wheel hub is equipped with bearings, which significantly increases the maneuverability of the unit:
- ordinary hub - a part of this type has a simpler design, but is less efficient in use. It only slightly improves the maneuverability of the walk-behind tractor, so every year it is in less and less demand among farmers.
Differential hubs, or semi differentials as they are also called, consist of one or a pair of bearings, as well as retainers. When using such a part, in order to turn the walk-behind tractor, it is necessary to disconnect the lock from the corresponding latch.
Depending on their diameter and shape, differential hubs for walk-behind tractors can be of the following types:
- round hub;
- sliding part;
- hexagonal hub - can have a diameter of 24 or 32 mm.
This kind of classification of semi-differentials allows the farmer to select the part that is optimally suited for installation on his walk-behind tractor and will bring maximum benefit when used.
Why does a walk-behind tractor need this element?
The walk-behind tractor wheel, which follows an outer arc when turning, must travel a longer distance. And here the need arises for a differential or other mechanism for distributing power, which will avoid slipping. If the wheel device does not have this element, this will cause straightening of the movement. Moreover, the greater the distance between the wheels, the more difficult it will be to turn.
The main part of the work that is carried out on the ground, for example, cultivation or fertilization, is carried out in a straight line. But this does not mean that the device will never turn. Of course, the standard version of a walk-behind tractor with a rigid 2-wheel drive makes it quite convenient to use in most agricultural work. But if frequent turns are necessary, the problem with slippage and control will have to be additionally solved. If special mechanisms are not used, the vehicle will be braked by lugs. Such work will be difficult even for a person with great physical strength.
Most often, experts choose to use overrunning clutches as a solution to this issue.
These are simple and universal installations that allow you to correctly distribute the load between the wheels if you need to turn the walk-behind tractor. The versatility of this method lies in the fact that overrunning clutches can be used not only on a rigid axle, but also on a connected one. In this case, when turning, the wheel will tend to rotate faster than the front shaft. This makes it possible to conveniently operate the machine and work even in small areas, as the device becomes more maneuverable.
Tips for choosing a hub for a walk-behind tractor
On the open market you can always find a large selection of hubs designed for installation on various models of walk-behind tractors.
In order not to make a mistake when choosing a part, farmers should adhere to a number of certain rules:
- when ordering a hub for a walk-behind tractor, you should indicate the class and model of the agricultural implement;
- in most cases, when selling a walk-behind tractor, one set of hubs is included in its kit. In this case, when using attachments, there is no need to rearrange the hubs. This, in particular, applies to the lugs used on the walk-behind tractor. This feature will save a lot of time when working in the garden;
- If the walk-behind tractor is equipped with pneumatic wheels, then its delivery set will necessarily include hubs.
By adhering to these simple rules, every novice farmer will be able to choose a walk-behind tractor equipped with hubs or choose the right parts, separately from the agricultural machine.
Advantages and disadvantages
The main advantage of this method of solving the problem of turning wheels is the simplicity of the design. In addition, such a differential is universal, as it is suitable for almost all types of walk-behind tractors.
But the semi-differential also has its disadvantages. Here, first of all, you need to note the small angle of rotation that will be available after installing such a structure. This type of mechanism does not allow rotation of more than 240º. Many farmers note that the presence of a transverse groove makes the structure not very strong. If the load is significant, the axle may break. Therefore, those who decide to use their own made differentials for a walk-behind tractor should be prepared for the fact that the structure will periodically have to be repaired and remodeled.
Considering all the pros and cons, we can say that for those who are not too demanding of their walk-behind tractor and lightly load it with straight and rotary work, a semi-differential is perfect. For serious loads, it is worth looking for more durable structures.
Do you use a differential for a walk-behind tractor?
Making a hub - step-by-step algorithm
As in the case of a differential, to manufacture a hub for a walk-behind tractor, you will need to prepare drawings. A detailed diagram will make it possible to complete the work faster and avoid common mistakes.
The correct sequence of actions when making a hub is as follows:
- First you need to grind the workpiece. To do this, any metal part is taken and processed on a lathe;
- A fairly popular option is to make a flange and then weld it to a metal pipe or rod. When processing a part, you should be extremely careful and observe the dimensions indicated in the selected drawings;
- It should be remembered that during operation the hub will be subject to constant loads, which is why it is better to choose a reliable material for making it yourself - for example, hardened steel.
After manufacturing the hub, it can be installed on the walk-behind tractor and tested in operation.
You should not place high loads on the part immediately after installing it on the unit - otherwise it may become deformed. It is best to walk with the walk-behind tractor several times on a flat surface in the yard, turning the car around several times. After this, the hub will finally fall into place, and the unit with it can be used for work in the garden. A self-made differential or hub can be successfully used to equip Neva brand walk-behind tractors. The design of the units of this brand allows you to easily install the part, and, if necessary, remove it easily and quickly.
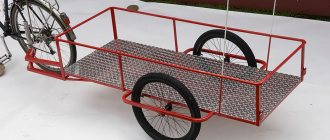
The process of assembling an axle for a passenger car trailer
At this point, if you want to assemble a trailer axle, you should already have the frame and wheels ready. The sequence of actions is as follows:
- Choose a beam (with a round or square cross-section, whichever you like best);
- Next, connect the hub axle with fasteners using bolts or welding to the already selected beam. The hub should fit into the main pipe by about a couple of millimeters;
- If your trailer is single axle, then install the axle at a distance that is 40% of the length of your trailer from the tailgate. At this stage, measurements must be made with maximum accuracy;
- Then turn the trailer over so that the bottom is on top and make sure that the spindles are not in the way;
- The axle installation site must be thoroughly cleaned. Next, measure and divide the distance between the bushings by two, then make marks;
- Connect the axle to the frame by spot welding along the entire contacting surface;
The assembly process is complete. All that remains is to mount the sides with wheels.
It should also be clarified that in addition to spring and torsion bar suspensions, you, like many craftsmen, can install a spring-shock-absorbing suspension on your just-made trailer, which provides a much softer ride.
Source twimg.com
The homemade axle for the trailer is ready.
I recommend the following video, where the author explains in detail how he made his own trailer axle:
Options for power distribution mechanisms
Structurally, the simplest way to solve the problem arising from the rigid connection of the wheels is to use overrunning clutches, which allow the wheel to rotate faster than the axle driving it.
Overrunning clutches
This mechanism is well known in all its variations: both with a ratcheting mechanism (bicycle wheel hub) and with wedging rollers (electric starter bendix).
Overrunning clutches are also used in the power drive of a number of cars with plug-in axles. However, this solution has a characteristic feature: when cornering, the overrunning clutch is disconnected on the wheel running along the outer radius, as it tends to rotate faster than the drive shaft.
To make it easier to enter a turn, on the contrary, most of the torque should be transmitted to it.
This problem is solved in the classic gear differential , which distributes power in inverse proportion to the rotational resistance of the wheels.
But it is also noticeably more difficult to produce, and also requires forced full or partial blocking on off-road conditions, since otherwise it redistributes all the power to the slipping wheel.
Homemade devices for walk-behind tractors
The list of additional units is not limited to a mower, plow or harrow.
This list is quite large, and not a single walk-behind tractor has such a strong package. After calculating the amount it will cost to purchase all the necessary equipment, many abandon this idea. It should also be remembered that not every model can be considered universal. Simply put, when purchasing units for one walk-behind tractor, it is very difficult to guarantee their operation on another. However, if you have the desire and a certain amount of knowledge, many additional devices can be made independently.
Their drawings are often found on the Internet, but it is important to ensure compatibility. When developing attachments from scratch, you need to focus on the available walk-behind tractor model.
DIY trailer adapter
With the help of this unit, the walk-behind tractor can easily be converted into a mini-tractor, which allows you to automate a large number of works on cultivating a personal plot. The design of the trailer adapter consists of the following elements:
- Metal supporting frame.
- Hitch.
- Cross rod.
- Braces.
- Chassis.
- Controls.
- Seat.
To make a supporting frame, you should use a pipe of any cross-section, the length of which is in the range from 1.5 to 1.7 meters.
On one side, a device for attaching to the walk-behind tractor is welded, and on the other, a transverse beam. The width of the second element is selected in accordance with the dimensions of the wheelbase of the walk-behind tractor. Then braces and wheel stands are attached to the rod to increase the rigidity of the structure. Most often, additional units are attached to the walk-behind tractor adapter using a single hitch. You also need to think about the control of the equipment, and the best option in this situation would be a lever, switching which will change the position of the auxiliary devices.
The last step in creating a trailer adapter is to install the seat, and to do this, a post is attached in the middle of the crossbar.
Homemade disc hiller
The optimal type of hiller for a personal plot is a disk one. When working with it, you do not need to exert much effort, and when the speed decreases, the power increases. Do not forget that the disc hiller is a universal tool, because it can be used not only after planting crops, but also during their growth.
The design of this type of attachment is not very complex and includes:
Thanks to the presence of talpers, it becomes possible to adjust the angle of inclination of the working disks. It is this factor that affects the depth of their immersion in the soil and the force applied during operation.
The discs can be taken from agricultural equipment that has become unusable, for example, an old seeder, or made from high-quality steel, the thickness of which is 1.5-2 mm. The outer edges are bent, and a hole is drilled in the center for attachment to the frame.
Need for differential
Many works performed with a walk-behind tractor (for example, cultivation) require its linear movement . In this case, a rigid drive on both wheels works great, significantly reducing the cost and simplifying the walk-behind tractor.
If frequent sharp turns are necessary, a walk-behind tractor of this type will require significant physical effort - one of the wheels will be braked by lugs, and the walk-behind tractor will have to tilt, hanging the outer wheel in the air.
This is especially difficult if the walk-behind tractor has a wide track and is quite heavy.