The installation of this function in my car continued for several months. Slowly, little by little, and finally finished)).
I would like to note right away: This function is used at street temperatures down to -10, -15 degrees. In cold weather this function is not needed. It is needed in slushy weather. That's why the glass won't burst)))
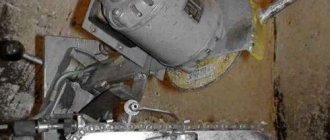
Heating elements (HE) were purchased to heat the wiper area. At the first opportunity they were installed on glass. It stuck perfectly, but not as I would have liked. It turned out that they were visible from the street. The length of each NE is 55cm, when ordering I somehow didn’t think that it was worth taking one NE 55cm and the second 35cm, then I think everything would have stuck perfectly. In principle, they are not even noticeable and if you don’t look closely, they are not noticeable, so I don’t worry about it.
Then the connection issue arose. There were several options: 1. Connect together with the heated rear window. 2. Connect separately from everything else and display a separate button. 3. The most interesting. Connect it separately from everything else, make a small electronic control unit and use the same button as turning on the heated rear window. And to turn it on, for example: a short press turns on the heating of the vehicle, a long press turns on the heating of the vehicle, turn it off in the same way. Plus, make sure that after a certain time the heating turns off automatically.
In the end, I settled between the second and third options, since I myself am not good at programming and besides Stepan Palych
I have already designed a similar device. So all that remained was to assemble it.
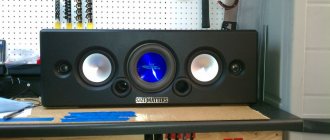
The result is this device:
To turn on the heating, I bought a used PWR HEAT button, it is intended for an additional interior heater that is found on diesel cars. It is clear that I do not need it for these purposes, but this is the best option since there is a picture of heating and there is free space in my car for the housing of this button. I found the chip I needed to connect the button in my car in the area of the stove, since this chip was not used, I happily removed it))
This button has undergone a slight modernization to suit my wishes. The board was redesigned and the button fixation was removed.
Circuit board in the button.
And this is how the indicator lights up
When the engine was running, the current consumption was 4A (two heating elements), the fuse was set to 5A. I touched the heating of the glass with my hand, after about 1-1.5 minutes the heating was 40-45 degrees, but since I’m not a thermometer, I can’t say for sure))). In general, it doesn’t heat much, but at -10 degrees outside, I think it will stay about 5 degrees, and this should be enough to thaw the brushes. Accurate tests can only be carried out after 3 months.
Car enthusiasts who operate their cars year-round are very familiar with the problem of windshield wipers freezing and icing up. To restore elasticity and performance to rubber elements, they must be constantly cleared of ice along with the frozen glass area. If you often find yourself in a similar situation, the issue needs to be resolved radically - organize electric heating of the windshield wiper blades. Additional equipment is inexpensive and can be installed on the vehicle yourself.
Methods for defrosting windshield wipers
Traditionally, the lower part of the glass is heated by blowing hot air supplied by the cabin heater fan. The problem is that defrosting takes too long: first you have to warm up the engine and coolant to get warm air, then it takes another 15-20 minutes to melt the ice.
There are several alternative solutions to the issue:
- organize heating of the resting zone of the brushes using an overhead heating element;
- purchase ready-made windshield wipers with a built-in heating system and connect them to the car’s on-board network;
- make your own heating element and install it on standard wipers with connection to the electrical network through the cigarette lighter or a separate button.
The first method will give excellent results when installing a heater on the rear window of a car . The fact is that at the factory it undergoes heat treatment and is not afraid of temperature changes in different zones. The same cannot be said about the windshield, whose heating in frosts of minus 15 °C and below will cause cracks to appear. This is a consequence of a sharp increase in temperature in one area, which the three-layer “triplex” structure is not designed for.
Warming up the lower zone of the glass is quite simple: buy a film thermoelement and glue it to the surface (the product has an adhesive layer on one side). Then connect the wires connected to the cigarette lighter or a separate button to the contacts.
Note! When using a heater on the front window, do not turn it on in frosty temperatures of –15 °C or below. First, warm up the car in the traditional way.
Where to connect the heaters
The easiest way is to place the power button on the cigarette lighter, and hide the remaining elements (wires, etc.) in the engine compartment, securing it to a stud.
Our article will tell you what to do with a chip on your car windshield.
This scheme for the amateur production of heated wipers is quite simple and inexpensive. But to implement it, you need to have a good understanding of electrical work and be able to solder. The execution must be of high quality. If this cannot be achieved, you can buy ready-made heated brushes. Their connection is even simpler. There, skills in working with an electrical circuit may be needed only at a primitive level.
The problem of car wipers freezing to the surface of the windshield in winter is considered one of the main problems for drivers. Even if you can tear them off, the effectiveness of the brushes can be questioned, since the rubber deteriorates. How can heated brushes save you from such problems and what should you pay attention to when installing them?
Additional car accessories make it much easier to drive and maintain your car at different times of the year. Winter accessories include heated blades, thanks to which you don’t have to scrape the windshield wipers off the windshield in the morning and replace them after they quickly fail due to frost. Why are warm wipers so in demand and how to connect them? Is it possible to make warm brushes with your own hands?
Installation of heated wipers
Frameless blades equipped with factory thermocouples are equipped with adapter modules for attaching to windshield wipers of cars of different brands (quantity - from 5 to 9 pcs.). There are several brands on sale whose products have been tested by drivers in practice: BREMAX, Burner and CHAMPION.
To heat the windshield using ready-made wipers, read the product’s operating instructions and install them in this order:
- Remove the standard brushes from the brackets, and remove the plastic covers of the adaptive modules from the new parts.
- Select a suitable mount from the kit and fix it on the adapter, carefully leading the wiring through a special hole.
- Install the wiper blades by running the wires inside the brackets. To prevent them from dangling, secure the current-carrying wires with thin plastic clamps.
- Using any technological hole in the partition, route the wiring to the button or cigarette lighter socket.
Attention! Where the windshield wipers are attached to the drive shafts, the wires must not be pulled, otherwise the wires will quickly break.
To protect the vehicle's electrical network, connect an additional 5 A fuse to the heater power supply circuit. If you need to activate the button, it is recommended to assemble a circuit with a relay that allows you to protect the button from high currents.
The practice of car enthusiasts who use factory brushes shows that heating and thawing of the glass under the rubber bands occurs in literally 2–4 minutes. The unheated area remains covered with ice, which must be melted with hot air from the stove.
Do-it-yourself heating
They differ in the type of brushes. Their first type is practically no different from ordinary ones, but this is only externally. In order for such a wiper to be more effective, the metal materials of its structure were replaced with plastic ones. It is known that plastic is less susceptible to freezing than metal. They also use special rubber that repels water. It does not freeze to the windshield or rear window and is softer at low temperatures than its regular counterpart. In the case of the first type of brushes, there is no need to change them to regular ones even with the onset of the warm season, and all thanks to their excellent characteristics.
Otherwise, heated wipers can compete with a frame brush, the frame of which is enclosed in a rubber cover. This is the second type of brush. Their unique structure protects the internal metal structure and the rubber itself from freezing at key links. Heated wipers are good, but this type retains its mobility and is completely protected from corrosion. Unfortunately, they are difficult to clean from moisture, since due to sudden changes in temperature, water simply condenses directly from the air on the metal elements. They also lose their effectiveness at high speeds.
And finally, the last winter type of this mechanism is heated wipers. They look like a brush without a frame, but with a built-in special heating element. In addition, they are able to maintain their elasticity for a long time and such brushes are well protected from freezing. However, heated wipers need to be connected to the car's electrical system.
You can install Burner heated brushes yourself. Each brush comes with a set of adapters in the box, as well as detailed installation instructions. There are, in general, several connection methods. One of them is connecting to the network through the cigarette lighter. To carry out this manipulation, you will need wires added to the kit, which are designed specifically for such a connection. Don't forget to connect the Burner wipers to the button that controls the heated rear window. To do this, you will need to purchase a special kit consisting of connectors, special relays, wiring and fuses.
The connection is also made via a radio button. This is the simplest and most convenient option. With the help of a special kit, the driver will ensure driving comfort. The connection is very simple - first we connect the device directly to the battery, and then we take the radio key fob with us. When you press the button, the brushes will turn on. This device has a shutdown timer that will protect the battery from premature discharge.
Many brave car enthusiasts not only undertake to connect purchased heated wipers, but also create them with their own hands. To do this, use a set of ordinary wipers, nichrome thread, a soldering iron, a piece of wire, acid and flux. You will also need heat shrink, a heat gun and some other tool.
Consider the example of frameless winter wipers. Their design is very simple. We place nichrome elastic bands on both sides. The rubber bands can be pushed inward to prevent them from falling out. But this must be done carefully, otherwise they will tear. A good tip is to use a heat gun to connect the rubber band to the metal plate, otherwise the structure may fall apart when putting on the protective casing. I advise you to immediately measure the resistance level. If it is within 8-9 ohms, this is very good. Well, if the number is lower, there is a risk of heating and even breaking the glass. Then we put protective covers on the wipers to protect the structure from destruction when we connect the wiring to the mount.
We place the mount on the wipers, drill small holes into which we insert our wires. We drill 2 more holes in the top cover for the wires. Although you don't have to do this. Wires are sometimes routed through a slot when the lid is opened. To eliminate the risk that the threads may become short-circuited, it is also worth preparing a couple of heat shrinks.
We assemble all the parts, measuring the resistance again. If the indicators are normal, you can solder the wires
It is important to check for weight on the fasteners. If yes, then you need to connect it to the mount too, passing 12V under the hood
Both wipers are connected at the same time, the fuse should be set to 5A, then we take on the relay and install wiper switches in the interior. And, in fact, everything is ready. Every review about this method carries positive information. This is how you can make heated wipers with your own hands, which in 10 minutes will free your car window from ice and snow in winter.
Assembling homemade heating
To make heated wipers, you need to understand how factory-made products are designed. The design is as follows: a film heating element is glued to the metal strip that serves as the base of the brush, whose contacts are brought out approximately in the middle (where the mount with a lock is located). The heater is covered on top with a rubber windshield wiper. Hence the conclusion: it is necessary to make the same flat elements and integrate them into standard brushes.
For work you will need the following materials:
- MGTF brand wire - 0.03 mm 2 in an amount of about 10 m for the heater;
- the same, brand MGShV or PV-3 (0.12 mm 2) for connection;
- heat shrink tube for sealing soldering;
- aluminum foil.
Note. The resistance of the heating wire for one wiper must be at least 5 ohms. This will give a thermal power of about 35 W at a circuit current of 2.5 A.
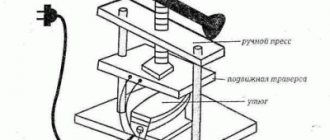
To make a heating element with your own hands, the first thing you need to do is remove and disassemble the wipers. The goal is to accurately measure the length and width of the future film heater, guided by the dimensions of the metal base. Then proceed like this:
- Drive 2 nails into the board at a distance equal to the length of the brush base.
- Cut a piece of resistance wire (indicated above) and wind it between the nails so that the ends are centered.
- Secure the resulting train with tape, remove it from the nails and wrap it in foil.
- Solder the ends of the MGTF heating wire to the PV-3 connecting cable. Place an insulating heat-shrink tube over the joint and heat it with a lighter.
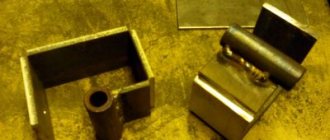
Installing the mechanism on the car
The button that turns on the heating is mounted on the dashboard on the right, which provides convenience.
After which a wire is installed connecting the button and the relay. It is better to install the relay under the hood, which means the wire must be long enough. To avoid short circuits, the wires should be insulated.
We install the relay on the diagnostic connector bracket. The wiring harness from the button is moved through the “rubber band” there. Next, we connect all the elements in the diagram, ending with “”. A fuse must be used in the circuit. 10
.
It is better to buy a thicker than standard cable, type ShVVP 1.5
. We connect the “plus” to the relay, connect its other end to the battery, then connect it to the fuse. Device installation completed successfully!
Of course, if you have never installed heated wipers or other additional devices, for example, installed parking sensors, much of this article will not be clear to you.
Therefore, find an experienced assistant you trust for such work.
Thank you.
Refinement of silicone brushes
Many car owners install silicone windshield wipers from the Horse brand instead of regular wipers with rubber pads. The products have 3 features:
- Increased elasticity that does not lose over time.
- There is a longitudinal hole inside the cover.
- Silicone can withstand heat up to 250 °C.
In this case, the heating of the brushes is done using a nichrome thread with a resistance of at least 8 ohms. If it is twisted into a spiral, then straighten the wire by heating it with a small gas burner. Then thread the thread through the hole and bring the ends out in the middle, making an inclined channel with an awl. To solder a copper wire to nichrome, treat it with a brush dipped in hydrochloric acid. Then work according to the previous scheme - assemble the windshield wipers and connect them to the power supply.
If, for various reasons, you cannot make a heating element yourself, then take the advice of experienced drivers: before leaving the car in the parking lot, lift the wipers so that they do not ice up and freeze to the glass.
Almost every car owner, especially those living in the northern latitudes of Russia and without a warm garage, has more than once encountered the freezing of wiper blades in their parking area and the windshield becoming icy. As a result, “driving on the highway” was delayed until the functionality of the windshield wipers was restored and the driver’s view was cleared.
Today, unfortunately, very little attention is paid to this problem by automakers. Although many technologies have been developed to equip windshield wipers with thermoelements, spot heating of windshields, supply of heated non-freezing liquid to the windshield wiper parking area with further removal of ice from the windshield, and others. However, they are not used or are included in a set of expensive options, which, in both cases, is inaccessible to the vast majority of motorists.
Therefore, many car owners are forced to use “folk remedies”, and there are currently three of them:
- heating the parking area of the wipers using improvised means;
- heating the wiper parking area using a standard stove;
- heating the wiper parking area using an electric heating tape.
Let's look at each of them.
Manufacturing instructions
Well, let’s move on to production, I’ll list it point by point, it’s easier to digest.
We are disassembling our frameless wipers, do it carefully so as not to break anything! Otherwise you won’t be able to collect it later.
We will thread the thread into the elastic on both sides.
It is IMPORTANT that it does not fall out, that is, we hide it inside. Also, do not damage the elastic band, because if it is torn, it will not clean
What else I would like to note is that we encountered such a difficulty - the design has two separate metal plates that hold the elastic. To insert it there, and even push the thread, you need to use all your dexterity. Therefore, without thinking twice, we simply glued the elastic band to the plates with a glue gun, so it did not fall out and sat in place. This is exactly how we managed to insert the nichrome thread.
- It's almost ready. However, we immediately measure the resistance. It should be 8 - 9 Ohms remember! So the thread will heat up evenly, if the resistance is 5 - 6 Ohms then this is bad, the thread will heat up quickly, which is not very good in the cold, the glass may burst. The large wiper was fine, about 8 - 9 ohms, but the small one was about “6”, so they added a little more wire, somewhere they made it like a herringbone under the rubber band. In general, after 15 minutes - 8.5 Ohms - you can assemble normally.
- Two holes were made in the mount for the outlet of heating wires. Our black speaker cable will go to it.
- After being assembled, we tried heating. In about 7 - 8 minutes the heating was about 49-51 degrees. Which is more than enough, given the cold weather, there will be no such heating, it will warm up to about 20 degrees outside, during the same time - that’s what you need.
- We put the wipers in their regular places. We take the mass from the body, plus we connect it with another cleaner in parallel! And to the salon. It should be noted that we connect it through a fuse, about 5A will be enough, and also, if desired, install a relay (so that it cuts off automatically when the resistance changes - after heating)! You can do it without it, but just press the button, then you need to monitor it yourself - which you don’t want to forget.
The result is great heat, even at minus 25 degrees, the wipers go off almost instantly. With a slight minus, especially when it snows, the ice does not linger on the brushes at all. Here are the instructions. The asking price is approximately 200 rubles per wire.
However, I repeat once again - if you cannot work with the car’s electrics yourself, DO NOT CLIMB, it’s dangerous!
I’ll finish this, I think my instructions helped you.
Similar news
- What are spark plugs?
- How to check the oil level in a machine?
- I bought a used (used) car – what should I change first?
Heating the parking area for wipers using improvised means
Judging by the numerous videos from the famous YouTube portal, there are a great many folk remedies for dealing with frozen windshield wipers. However, the most effective and simplest methods among them, which are used by most car enthusiasts, are only two. This is heating the windshield wiper parking area and the entire area of the windshield (or only the driver’s side) with a warm air flow from a hair dryer or an “anti-freeze” heated to room temperature.
- Advantages: accessibility, low cost, speed.
- Disadvantages: the mandatory presence of a power source for a hair dryer or heating the liquid, freezing of wipers and icing of the windshield while driving or when parked for a short time at sub-zero temperatures, some labor intensity and discomfort.
Connecting warm brushes
You can install heated brushes either in a car repair shop or yourself. If the second option is more preferable for you, focus on the following sequence of work.
Thoroughly clean the surface of the windshield from dust and dirt. Remove the protective film from the purchased brushes. Decide where to install the wipers on the glass. Mark the area where the brush will stop and glue the ESC to this place on the inside of the glass
At this stage, it is important to consider that the wiper stop zone should be in the center of the heating material. Connect one cable to the vehicle ground, and the second to the wire labeled +12 volts through the switch. At this point, you can start the wipers.
You can find more detailed information on how to change wipers in our expert’s content material.
Installation of the power button
While driving, you need quick and convenient access to the power button, therefore, it should be located based on this requirement. You must have basic electrical knowledge and follow these guidelines.
- Connect the relay to the power button. The best place for the relay is under the hood of the car. Watch the length of the wires.
- To make it convenient to pull wires into hard-to-reach places, use wire.
- Ensure that all wires are properly insulated, otherwise you will have to do everything all over again due to a short circuit.
- Start connecting the relay with a minus and end with a plus.
- Install a fuse between the positive wire.
As a result, turning on the machine and pressing the button should activate the start of the devices and the heating. This function should be disabled when the button is pressed again.
Heating the wiper parking area using a car heater
It is possible to eliminate freezing of windshield wipers and ice on the windshield using a standard heater only if there are two car options. These are: blowing warm air onto the windshield and the function of moving the wipers 5-7 cm up from the permanent parking zone. Then, as practice shows, even in severe frosts, the glass thaws and cleans itself while the engine warms up.
- Advantages: high-quality visibility even in severe frosts; wipers do not freeze to the glass when driving or in short-term stops at sub-zero air temperatures.
- Disadvantages: the mandatory presence of the two above-mentioned options and ensuring that the wipers are always 5-7 cm higher than the standard position.
What is better to buy rating of winter blades 2018-2019 for the standard windshield wiper of any car
The best solution for winter is to buy wipers with a rubber cover. If you want cheaper ones, look towards the “frameworks”. The advantages of “frameless” and “hybrids” in snow conditions do not justify significant investments.
Testing aspects
The best life test is real operation in conditions of contact with road reagents on the windshield. The main criterion is how long the brush can clean without streaking. Creating a film on the window is not recommended - at night it acts as a significant obstacle to the view.
The quality of workmanship directly affects the service life and performance characteristics of the product. Price is not a determining factor in the duration of work - not only reviews know about this. Tests from reputable publications also confirm this fact. A positive point of an indirect nature is the absence of squeaking.
Wipers that have been used for at least two winter seasons are considered good. Moreover, without significant dissonance of characteristics during the entire period of operation! The lion's share of models lose their ability to clean perfectly after the first winter.
A lot of positive and negative reviews allow us to make a rating of car winter windshield wiper blades for the 2018-2019 season:
- Alca Winter (540 rubles).
- Maruenu Gyraless Snow (3,500 rubles).
- Lynx Winter Wiper Blade (550 rubles).
- Goodyear Winter (380 rubles).
- Trico Winter (570 rubles).
- Masuma Snow Blade (700 rubles).
- Avantech Snowguard Polar (340 rubles).
- Champion Winter WX41 (475 rubles).
The availability of Alca Winter brushes does not come at the expense of quality - the products function properly during the first two years. No deterioration in the quality of cleaning or squeaks was noticed after a year of operation. The best qualities are revealed in the temperature range °C. Various adapter designs allow you to install wipers on any car. The only negative is the windage after 100 km/h.
Maruenu Gyraless Snow are silent in operation and work without problems for at least three to four seasons. There are no complaints about cleaning throughout the entire service life. Demand is constrained by the high price dictated by the use of tourmaline, which increases the service life of the model.
Lynx and Goodyear cope with eliminating the consequences of precipitation for no more than two winter seasons. Afterwards, unacceptable gaps appear. The packaging of the product is already squeaking. At near-zero temperatures, they tend to rub dirt on the glass.
Trico Winter and Matsuma Snow Blade do not make squeaks, but do not last more than one winter. Avantech have an acceptable level of cleaning during the first two months. Further, acoustic discomfort and significant stripes are observed.
Champion copes with functional responsibilities throughout the entire season without significant complaints. There are some comments regarding the fastening part - it is suitable only for cars with “hook” type leashes. The case is also not ideal - it is made of too thin material.
Heating the wiper parking area using an electric heated strip
The use of electric heating tape to prevent wipers from freezing to the glass is recognized as the most effective among the available, low-cost and uncomplicated methods. It works most effectively in cars with the option of warm windshield blowing at almost any sub-zero temperatures outside and regardless of the state of rest or movement of the car. For cars where there are no windshield heating systems, no better method has been invented either. True, you have to put up with increased wear on the windshield wiper blades when they move over the frosty windshield for some time before it disappears.
- Advantages: with proper installation, it not only prevents the wipers from freezing to the glass, but also provides an automatic mode for turning on and off the heating of the windshield wiper parking area.
- Disadvantages: there are none, except for some physical and financial costs, but they are more than worth it.
Advantages and disadvantages
Like any other product, these windshield wipers have their pros and cons. understand which winter windshield wiper blades are best. The positive qualities of such wipers include:
- the brushes do not freeze or freeze even in heavy snowfall, and, therefore, cope with their task in any problematic conditions;
- the heating surface can easily and quickly melt snow on glass;
- the liquid remaining on the glass and wipers does not freeze in the cold season, that is, at low temperatures an ice crust does not form and does not create unnecessary problems for motorists;
- longer service life compared to standard wipers;
- easy accessibility. Today, winter wipers are in great demand and can be found in almost any automobile store;
- ease of operation and installation. Installation of such windshield wipers takes very little time and does not require outside help.
Driver reviews
Such a device as a heating device for windshield wipers cannot leave any motorist indifferent, given the harsh realities of the Russian winter. Reviews about heating elements are mixed. It is likely that both the quality of workmanship and the climatic conditions in which they were tested play a role here.
I took brushes from Burner for my Chevrolet Aveo. I bought it on the Internet. I don’t have enough knowledge to connect the wipers; my husband did this.
I chose the ones that came with a device that connects to a battery. They operate only at a certain temperature and the machine’s engine is turned on. They turn off as soon as the motor stops or the temperature rises to a certain level. They have enough power from my Chevrolet's generator.
The idea itself is good, but the quality of the brushes is disgusting. Washer streaks formed on the glass and did not wash off. In general, I used them for a season and took them off. We tried to find rubber bands for the brushes to replace the original ones, but nothing worked out.
I decided that store-bought brushes were too expensive. And he did the heating for them himself. As a heating element, I used nichrome in factory insulation, which I took from old seat heating. I disassembled the brushes and installed the elements.
Our winter conditions are quite mild, with a maximum of minus 10 degrees Celsius. Tests have shown that the element heats up in 5-7 minutes. At low temperatures and light snow, such brushes cope quite well.
I was afraid that the glass might burst due to temperature changes on the surface. But this happens due to a sharp change in temperature. I have a smooth heating process. Therefore, no problem.
I installed frameless wipers on my Mazda. I think this is a very useful and effective thing. There is absolutely nothing to break there; the rubber bands can be changed. But our climate has changed dramatically and now there is nothing to freeze. If there is two weeks of frost, then it is not at all necessary to spend money on them.
The windshield wipers were connected not to the cigarette lighter, but to a relay that turns on the heated rear window. It is located under the hood. That is, when the heating in the cabin was turned on, the heating of the wipers immediately turned on. When the glass and the cleaner were heated at the same time, everything that had frozen up immediately “flew off.”
Heating elements
To organize heating for the area of car wipers in the windshield area with your own hands, you will first need to decide on the heating element. That is, with the device that will perform the functions of a heater.
Among car enthusiasts, 3 options are most widespread.
- Nichrome thread. This is a wire that is often used as a heating element in a large number of electrical appliances. They can be used with frame-type glass cleaners with hollow rubber bands. That is, there should be a hole along their entire length. It is also possible to install the thread in frameless models. But only on the condition that the wiper design allows the thread to be installed in the groove and the sections of the thread do not short-circuit with each other.
- MGTF wire. Here we are talking about a heat-resistant installation wire, which has fluoroplastic insulation. For our purposes, we will need a wire with a cross section of 0.03 mm2. Fluoroplastic is frost-resistant, it is refractory and is not afraid of contact with alkalis and acids. Rather suitable only for installation in a stationary state. Therefore, a heater based on this wire is usually mounted under the casing of frameless wipers.
- Ready-made heating plates. They are designed for windshield wipers. Kits of different sizes are available for sale. Be sure to consider the rated voltage parameters when selecting a kit.
Ready-made kits come with detailed installation and connection instructions, so there is no point in focusing on them. The option with MGTF does not involve installing wipers in the moving components, since the insulation may wear off, and this will lead to serious consequences. Therefore, the optimal solution is to use nichrome thread
Therefore, the optimal solution remains the use of nichrome thread.
Factory heated glass
When it comes to installing a fully heated surface, the situation is different. Installing this heated windshield yourself is much more difficult. At the same time, the wind turbine itself is more expensive than the standard one. First, you should remove the standard one from the car and clean the seat from any remaining glue. Then on the heated glass you need to find the ends of the taps for connection. They are usually located at the end of the glass. Next, you need to connect electrical wires to these terminals by soldering. The connecting areas must be insulated using liquid insulating materials. After the work has been done, the glass is mounted on the car, like a standard one, and they begin to connect it to the on-board electrical network.
Famous manufacturers
The main companies producing heated windshield wipers for cars:
- Consul Winter.
- Burner.
There is practically no difference between them and the differences are observed only in 2 details. Consul Winter has a “hook” fastening, and Burner is equipped with special adapters that make fastening easier. Also, the upper part of the first one is made in the form of a spoiler, which is why the brushes come off the windshield while driving.
The plates of both options heat up to approximately 100 degrees. Current consumption is 5.6 A (Consul Winter) and 6.0 A (Burner). Cost - from 1100 to 2000 rubles.
Their performance is quite high; indoors, the heating elements of these wipers warmed up to 100° in 3 minutes. But you don't have to worry about your windshield getting damaged. The rubber cross-section has a rather small area and low thermal conductivity. During outdoor tests, it was found that the brushes melt the snow quickly enough, but do not always cope with ice.
You can handle the installation yourself or contact a car repair shop. This is done using 2 main methods.
- To a common on-board network with a separate button.
- To the network through the cigarette lighter.
The first one is more convenient and looks much better (no extra wires sticking out), but most likely you will need to contact an auto electrician. You will have to think about how the connection will be made. You need to select the location of the wires, the location of the relay and the control button. Don't forget about safety! Each connection must be carefully insulated.
If you have the skills and tools, the first step is to clear the dirt from the glass and choose where the wipers will attach to the windshield. Next you need to mark the area where the brush will stop.
Next, connect all the parts to each other, use insulation. The next step is to place a relay and an additional 10 - 15 A fuse under the hood. Then connect the ends. A “positive” cable to the relay, and the other to the battery and fuse, respectively. At first glance, this is not difficult to do, but from a safety point of view, in the absence of the necessary skills, it is better to seek help from professionals.
The connection process using the second method will take no more than 20 minutes. You just need to follow the instructions. But in this case, the interior will be loaded with a large number of unnecessary wires. In addition, such a connection is not very suitable for the heating element of the brushes.