A lot of useful devices are constantly at the disposal of the home craftsman. All the tools and materials that are constantly at hand help in a variety of household chores. So a gasoline burner is considered an extremely important and necessary part for some work.
In cases where it is necessary to solder any metal parts, a careful approach and special tools are required. A gasoline burner melts metal perfectly, which makes it possible to use it when soldering parts.
For efficient operation, a combustible mixture of gasoline and air is used, which is formed in the burner.
Modern retail outlets offer a fairly wide range of similar products and everyone can choose a unit for themselves.
However, what could be better than a homemade gasoline burner, photos of which can be found anywhere.
We will tell you everything a home DIYer needs to know to easily make a gasoline burner for home use.
Advantages and disadvantages of a gasoline burner
Among the main advantages of BG are the following:
- Proper functioning of the burner at an altitude of 3-4 thousand above sea level.
- The burner can operate normally even at minus 40 degrees Celsius.
- Fuel such as gasoline costs much less, especially when compared with gas.
- Light weight burner and ease of use.
- You can take the burner anywhere, for example, fishing, hunting or just on a hike.
- This device is convenient to use during installation work.
- The high temperature at the outlet allows you to work with various types of metals and alloys.
- You can use other fuel: kerosene, alcohol or diesel fuel.
But a gasoline burner also has disadvantages:
- High fire hazard, especially during fuel filling.
- Most often, the fuel torch is uneven.
- Soot may appear during operation.
- It is important to use pure high-octane gasoline, otherwise the throttle hole will quickly become clogged.
INDUSTRY JEWELERY FORUM
help a self-taught person.
: a turbine like a piezo or like a powerful candle. (WITH)
Forum members, share your knowledge. Please comment on the video Or simply: Type of combustion product: gas + air? gas + oxygen? gasoline + air? And if possible?! about the design of the nozzle so that the flame needle can be adjusted for soldering thin elements(!)
PS Choose the optimal fuel for this burner to solder small parts (really?)
PPS The video is not mine (for reference) Thank you, we are waiting for your master class.
There are calibers) Need advice on fuel and equipment (gearboxes? cylinders?) What “caliber” (melting soldering)??
by burners
Thanks for the answer! But there are considerations that gasoline is also suitable (!) We just use one hose and one regulator) or gasoline + air pairs!?
So gas + air! Is it possible that this is gas + oxygen? Interested in the correct selection (to solder small parts)
Oleg236 Thank you for supporting the topic+++
The question is being clarified) are gas + oxygen but reducers on cylinders desirable? For a smooth feed (to adjust finely with taps)
Or are just cylinders with taps sufficient?
I want to get confused!) I would like to buy a pair like this and assemble it correctly!?
PS I'll watch your video! but now I don’t have time with the firewood settings (Thank you.
Oleg236 Thank you for supporting the topic+++
The question is being clarified) are gas + oxygen but reducers on cylinders desirable? For a smooth feed (to adjust finely with taps)
Or are just cylinders with taps sufficient?
by burners
I strongly recommend that you stop even thinking about experiments with burners, cans, reducers, etc. It is very dangerous! Otherwise you will think of mixing gasoline with oxygen. I repeat: gasoline and gas burners are fundamentally different things in design. Have you ever seen a burner turn into a flamethrower? Buy a textbook, everything is written there! What is there to experiment with? All this has long been chewed, digested and shitted! Have pity on your relatives!
Do-it-yourself gasoline torch for soldering
First of all, it is important to say that gasoline burners made independently are no worse than factory ones. BG made by hand is just as productive and safe.
It is important to note that the temperature at the flame can exceed 1000 °C. Therefore, such a burner will easily melt refractory solders, perform heat treatment of small tools, melt various metals and even glass.
You will need:
- Frame.
- Fittings.
- Cotton wool (cotton and basalt).
- 2 valves for regulating the supply of the air-fuel mixture.
- Silicone pipes.
- Flexible plastic ties.
- Copper tube.
- Emphasis.
- Sealed metal can.
- O-rings.
- Pen.
- Rubber bulb.
- Filler.
The process of creating a gasoline burner with a compressor with your own hands:
- The body is created on a lathe; the workpiece can be a steel alloy of any grade. One end of the tube should be closed with a stopper, and the other will be open. It is necessary to drill a hole in the plug 0.2 mm larger than the supply tube. Then the housing will move successfully along the tube, while the tightness will be maintained.
- Several pieces of steel mesh and basalt wool should be inserted into the housing. This is done so that if the flame breaks out, the fire does not reach the fuel container.
- After this, it is important to make a sleeve with a hook and a resting element. It can be made from a sheet of steel 2-3 millimeters thick.
- The handle can be cut from ash or oak.
- Two through holes are drilled carefully. In this case, the projections of the drilled channels must be equidistant. Then the handle is sanded with sandpaper, then you need to apply 2-3 layers of colorless varnish.
- After this, the copper tubes are passed through the handle, after which they are sealed with refractory solder. Next, holes are drilled into them using a 0.3 mm drill.
- At the outlet of the tubes from the handles, 2 valves are installed, then there is a transition to silicone hoses. They are connected through fittings to a metal can, it is important to embed one fitting in the upper part of the can, and the second in the lower part, this is done so that concentrated gasoline vapors flow through one tube, and less saturated ones through the second. Don't forget to install O-rings on the fittings to prevent the mixture from leaking. The bottom of the jar is tightly packed with cotton wool. A bulb for pumping air is also connected to it.
- This completes the assembly, now you can fill the cotton wool with gasoline, seal the jar hermetically and test the device. To do this, air is pumped into the system with a blower, and then the combustible mixture supply screws are opened and set on fire.
Even such homemade gasoline burners will function properly, especially if you made the device according to our instructions.
Remember! If you do not have knowledge of the operation of burners and experience in using burners of this type, then it is better to buy a production version of the device.
Below you can see a photo of a DIY gasoline burner.
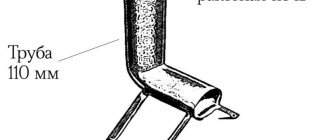
Making a gas burner from scrap materials: step by step
List of materials and tools:
• drill; • Bulgarian; • hammer; • sandpaper; • brass blanks for the divider nozzle; • thin brass tube with a diameter of 15 mm; • wooden blocks; • vice; • silicone seal or FUM tape; • hoses for connection; • valve for adjustment.
How to make a nozzle and handle
First of all, we take a brass tube and attach a handle to it - for example, from an old burner, or from a wooden block, having processed it beforehand. We drill a hole in the block for a brass tube with the appropriate diameter. Having inserted the tube into the timber, we secure it with silicone or epoxy resin.
Next, we proceed to a more labor-intensive and time-consuming stage of work - manufacturing the nozzle. The hole size should preferably be 0.1 mm.
You can use a drill to make a slightly larger hole, and then adjust the edges to 0.1 mm. The hole must have the correct shape so that the flame is even.
Preventing clogging
During use, the channels or nozzles for supplying the combustible mixture may become clogged.
To prevent this from happening, it is important to follow these recommendations:
- Use gasoline with the lowest octane number.
- Each use of the burner must be completed by thoroughly cleaning the device.
- Once a month, add high-quality injector additives to gasoline.
- Systematically clean the system with carburetor cleaner. Such products fight very well against various deposits in fuel channels and jets.
High pressure kerosene lamp. My experience, advice
There is a neck with a lid on the tank, into which a pressure gauge and a pressure release screw are mounted. By the way, a lot depends on the performance of the pressure gauge.
On the other side is the pump.
Nearby is the “Rapid” valve of the burner for warming up the steam generator, for a quick start. More details below.
Handle for cleaning and adjusting the supply of kerosene. To the left - clean the nozzle, to the right - to open.
Inside you can see a special container. This is a container for alcohol, which is used to heat the steam generator. For a soft start.
There is a special hole on the side of the casing for filling it. It can be seen from behind, behind the container.
There is a carburetor under the hood.
Note. The photo clearly shows the nozzle cleaning needle.
I think it is unlikely that they will be able to get any wrong mixture, but an untuned carburetor is the reason for the excessive noise of the lamp during operation.
The valve is disassembled, washed, lubricated and screwed back on.
It is not necessary that you will have to deal with all these problems. But it’s not a fact that you won’t have to face something more serious. So one forum member had to go through the entire fuel system.
Now, taking into account the above, without delay, let’s move on to the question of whether it’s worth buying.
So, it seems like all the issues have been sorted out. The pump pumps, the pressure gauge reads.
The question is extremely important. One genius wrote up a whole article in RuNet on the topic of how stupid the Chinese are, you see, they installed plastic o-rings, which leaked during the first start and dirtied the entire lamp. It was not enough for the genius to open the instructions and read it. And it says something like this: “Before first use, be sure to remove the plastic transport rings!” That is, it is already clear that they are needed so that the glass does not move during transportation, but apparently not for everyone. Okay, basically take off the rings.
The note. Store kerosene in a dark, warm place to avoid “waxing.”
Why do I say non-illusory? Because they told me, I didn’t listen. Broken glass. And finding something new is not so easy. Nevertheless, let's consider both.
They also produce special caps for the lamp to replace the stationary one, with which the lamp can be used to heat food.
Buy or make a burner yourself
Buying a gasoline burner in a store is the easiest option. Understanding which model is best for you is quite a difficult task, because everything depends on the design features.
Sometimes burners are heavy, so you won’t be able to take them with you, especially if you don’t have a vehicle.
Factory-made burners are extremely expensive, and for their stable operation you need to buy only high-quality fuel.
- Creating a BG yourself has certain advantages.
- Firstly, you can refuel such burners with the most affordable fuel, and secondly, you can create a drawing of a gasoline burner and make exactly the device you wanted.
- And thirdly, you can install accessible consumables that you can quickly change while using the burners.
We are confident that this article will help you create a homemade gasoline burner. We wish you good luck!
Recommendations
To make a burner with your own hands, you can refer to videos, of which there are many on the Internet. The masters tell in detail, show, give useful tips and recommendations.
In every case you may encounter various surprises, so you should carefully review them and pay attention, for example:
- To make a burner, use refractory metals, because during combustion a flame of more than 1000o C can form.
- use a reliable tap that shuts off the gas supply.
- Pay special attention to the location of the cylinder connection.
- for the burner, improvised and unexpected materials can be nozzles from: gas burners, a household stove or stove, a car pump, a construction foam gun, and even medical needles. They are made of durable steel and coated with chrome, which gives them sufficient rigidity.
- The faucet is an ordinary plumbing faucet, and ordinary plumbing pipes with threads are suitable for connection to the entire structure. There are no high temperatures in this place.