What is a pump for?
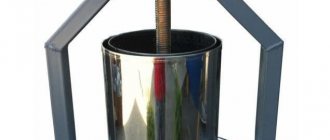
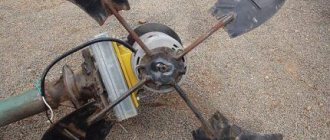
The pump will be used as the same generator that will generate electricity. The pump consists of a movable rotor with permanent magnets and a movable stator with a U-shaped magnetic core, as well as a coil that is attached to this structure. The rotor can be easily pulled out. Thanks to the mentioned permanent magnets, such a pump makes an excellent generator, capable of producing a voltage of up to 250 V.
Rotor of the electric generator I. Belitsky
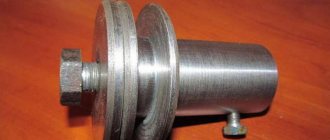
Rotor
is an iron axle. There are 2 iron disks with neodymium magnets located on them. An iron bushing is pressed between the discs on the axle. Its length depends on the thickness of the stator. Its purpose is to ensure a minimum gap between the rotating magnets and the stator coils. Each disk contains 12 neodymium magnets with a diameter of 15 and a thickness of 5 mm. Seats are made for them on the disk.
They need to be glued with epoxy resin or other glue. In this case, it is necessary to strictly observe polarity. When assembled, the magnets should be positioned so that opposite each one there is another from the opposite disk. In this case, the poles must be different towards each other. As the author of the development himself (Igor Beletsky) writes: “It would be correct to have different poles, so that the lines of force would come out of one and enter the other, definitely S = N.” You can purchase neodymium magnets in a Chinese online store.
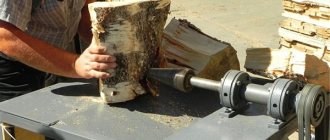
The manufacturing process of blades and their fastening
Blades for a wind generator can be made from PVC pipe. To do this, cut it into three equal parts lengthwise. From such blanks you can then make more “elegant” elements. In the places where the blades are attached, do not forget to make suitable holes for subsequent fastening. It is also necessary to make a tail blade from a similar material, which will guide the generator.
We will fix the blades on two disks from the HDD. The whole difficulty of this stage of work is to make holes in the disks in suitable places, and then screw the blades to them using prepared bolts and washers.
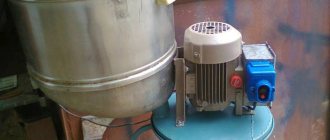
Crafts from non-working HDDs - mini pump
I somehow needed a water pump for future homemade projects.
Yes, not simple - with restrictions on dimensions - thickness up to 25mm, width up to 50mm (length can already be varied). The desired characteristics include a head of 1 m and a flow rate of 100 l/h. Having not found what I wanted in sales (mainly in terms of dimensions), due to my stubborn, stubborn nature, I began to implement my solution to this issue! Attention - a lot of photos!
“Brains” and a little background:
Strictly speaking, the idea of using HDD motors for pumps is not new. Since 2009, there has been a whole thread on one well-known forum. So I was initially aimed at making a pump from a “laptop” hard drive and finding a suitable driver with integrated power switches and touchless control.
But I wasn’t able to learn from the experience “out of the box.” A series of tests with different drivers (MTD6501C, DRV11873 and a number of other Chinese handicrafts) gave a disappointing result: larger motors from 3.5 disks work perfectly. But with small motors, at best, only a few can be started, and they work extremely unstable. With such a disappointing result, the long-standing idea was abandoned and on the verge of oblivion.
But relatively recently I came across a rather interesting driver from TI - DRV10987. Despite its modest dimensions, it has quite impressive potential:
- Operating voltage from 6v to 28v
- Integrated 5v step-down converter (you can power the MK for control)
- Constant operating current up to 2A (peak - 3A)
- A huge number of software-defined parameters (setting the values of configuration registers via the I2C bus) to control the operation of the motor
- Automatic restart of the motor after an emergency stop/failure (if the failure conditions have passed)
- Overcurrent protection
- Surge protection
- Rotor stall/lock detection
- Shutdown when controller overheats
Armed with an Arduino
(Local electronics engineers will forgive me for this dirty word) to set the parameters of a board made by LUT for this driver, I delved into experiments on starting motors. Well, this controller did not disappoint me! Despite the “scientific poking” method used when selecting parameters, we managed to find an approach to any HDD motor!
online settings configurator helped me with this
. Enjoy it for your health!)
Then more presentable scarves were ordered from the Middle Kingdom:
After registration (well, that’s what they require), you can download the project files for free. Or immediately order boards here
.
About "heart transplant"
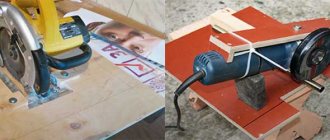
All that remains is to get the motor out of the HDD case, which, by the way, in 2.5 disks (and in most 3.5 ones) is its integral part. The process can be briefly described by the famous phrase “ Saw, Shura, saw!”
«:
An external guide for a metal crown is made from plywood and is attached to the disk body. For safety, the motor cable is glued to its base so that it is not cut off by a crown
After drilling, we get round pieces with a motor. After processing with a file, we obtain a base diameter of about 25mm.
Preparing the recipient for transplantation:
The brains and heart of the future pump get along well with each other and are ready to find a new habitat. So it's time to think about the housing and impeller.
Since it is necessary to obtain high pressure with a small working volume, I designed the impeller with 7 beams:
Printing on a 3D printer with polycarbonate
3D model
Polycarbonate is an excellent thing for a case. But it’s expensive for them to print an entire body. Pieces of thick sheets are very difficult to find and milling is not free (for me). But you can ask advertisers for thanks for scraps from sheets 4mm and 2mm thick. So the body was designed for subsequent laser cutting of parts and gluing them into a single whole without the need for milling. All that will be required is drilling holes for fittings and nuts.
View of the 3D model
3D model
A set of parts for gluing the “top” of the pump. At the junction of the inflow and outflow channels, the edges are cut off
Progress of the operation:
Here I would like to make a lyrical digression and remind those who want to repeat and not only that the dichloroethane used for gluing contains few vitamins and you need to inhale more of a rather toxic and volatile substance. Work with it must be carried out either outdoors or in a well-ventilated area.
Stack of “top” parts drying after gluing - top-inflow-separator-impeller-rotor. The base for the motor is glued in the same way (or make it entirely from a 6mm piece of polycarbonate)
After gluing, holes are drilled for the fitting - an 8mm brass tube along the notches on the “separator” part
The good old composition BF-4, as for me, gives reliable gluing of brass and polycarbonate
The base of the motor at the bottom of the pump is glued with the same glue.
In the upper part, holes are drilled ( not through!) for inserting M3 rivet nuts. And the photo shows a thin silicone gasket
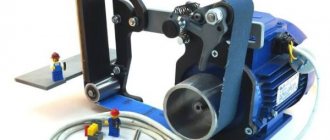
Testing:
Now it's time to test the homemade product in action. For this purpose, a test bench was quickly assembled. Since Habr is read by the children of serious developers, for whom the appearance and composition of the stand can cause attacks of panic, horror and disorientation, I wanted to hide it under a spoiler... but I hope everything will work out, and then don’t say that I, dear readers, didn’t warn you !
The Arduino supplies a PWM control signal, the duty cycle of which is set manually by a variable resistor, reads the value of the configuration registers, and also determines the rotation speed both through the internal driver registers (RPMrg) and the FG signal (RPMfg).
Motor power supply - 12v Starting the motor without load. Adjusting speed and measuring energy consumption
The motor starts successfully from 6% PWM control signal. And at the end of the video you can see how at high speeds the speed values in the internal register “freeze” in the range from 10k to 13k revolutions, although through the FG output the frequency is fixed without changes.
With idle speed everything is clear - we got 13k revolutions at a voltage of 12v and a consumption of 0.16A. But the water pump was being assembled, and I’m moving air here. So the next stage is to escort the household members outside so as not to interfere, and occupy the bathroom!
General assembly
Now all that remains is to assemble the wind generator, attach the wires to our pole, install the rotating element on it, and also lift and place the “mill” in a suitable place. After completion of the work, it is good to carry out small tests. Of course, the wind generator will not provide a maximum of 250 V, but the result of the work will still be pleasant! The detailed assembly process can be seen in the video below.
Do you want even more interesting and useful tips for your summer cottage for the next season? How about we find out a few more good reasons why you don’t need to throw away your old bathtub, but rather take it to the countryside
and turn it into something useful for the household.
Did you like the article? Then support us, click
:
Stator device
A sheet of textolite 12 m thick was used as a base. Holes were made in the sheet for the coils and rotor bushings. The outer diameter of the iron coils that are installed in these holes is 25 mm. The inner diameter is equal to the diameter of the magnets (15 mm). The coils perform 2 tasks: the function of a magnetically conductive core and the task of reducing sticking when moving from one coil to another.
The coils are made of insulated wire 0.5 mm thick. 130 turns are wound on each coil. The winding direction is the same for all.
When creating a powerful generator from, you need to know that the higher the speed that can be provided, the higher the output voltage and current of the device will be for free energy.
You will definitely like this material, as in it we will look at a way to obtain a simple generator from an old computer CD/DVD drive.
First of all, we suggest you familiarize yourself with the author’s video
Let's look at what we need: - an old CD/DVD drive; - wire cutters; - soldering iron; - any plastic case; - wires; - hexagon; - washer.
According to the author of the homemade generator, the idea is quite effective, since the ratio of the gear ratio to the motor that drives the gear that extends the disc tray is quite large. Thus, it is possible that at low revolutions of the same gear, good revolutions will be obtained on the electric motor, and we will be able to obtain a generator. We will find out at the end of the review whether our plans will work out or not, but now let’s get to work.
First you need to unsolder the board on which the motor is mounted.
Next, we cut off the part of the plastic drive housing that holds the motor, as well as the gear we need. Later we will derive a handle from this gear so that we can turn it and generate electricity. We take the first wire and solder it to one of the motor contacts. Solder the second wire to the second contact. To test the generator, the author of the idea uses UBS inputs, which are installed in a plastic case. Therefore, he glues a piece of the drive with a motor and gear into this body using a glue gun. To make a handle you will need a hexagon and a washer. These parts need to be attached to each other. The author does this by soldering. Solder the wires to the pins of the USB connectors. On the second half of the plastic case you need to make a hole for the gear protrusion. Finally, we glue the homemade handle to the gear lug. Our generator is ready.
There is a way to get electricity absolutely free. It is enough to make and install a wind generator on your site. Today, this cannot replace traditional sources of electricity, but it will add a few pleasant percentages of proud independence to the household. The most important thing is that you can “concoct” a full-fledged generator from literally any old trash and garbage.
Do-it-yourself wind generator from a washing machine: instructions for assembling a windmill
Electricity is an expensive resource, and its environmental safety is questionable, because... Hydrocarbons are used to generate electricity. This depletes the mineral resources and poisons the environment. It turns out that you can power your home with wind energy. Agree, it would be nice to have a backup source of electricity, especially in areas where there are frequent power outages.
Conversion units are too expensive, but with some effort they can be assembled yourself. Let's try to figure out how to assemble a wind generator with your own hands from a washing machine.
Next, we will tell you what materials and tools you will need for the job. In the article you will find diagrams of a wind generator from a washing machine, expert advice on assembly and operation, as well as videos that clearly demonstrate the assembly of the device.
Enchanting arrangement of points over HDD motors. Part 1
Hi all! In this article I will try to explain the basic methods of controlling the HDD motor and similar electrical machines.
Introduction
1 ohm.
Control algorithms
Looking far ahead, I will say that the ideal case for our machine is to supply its phases with 3 sinusoids shifted by 120 degrees (as in conventional electrical networks). However, in some cases such “ideality” is simply not needed.
1 way.
Simple phase selection. You need 3 power switches that connect the phases to the source in the order AB-BC-CA. This method is most often found on the Internet among DIYers. Advantages:
— simplicity;
— small number of power switches (3 pcs); — simplicity of organization of counter-EMF control; — less weight/dimensions, which is important in rc modeling. Disadvantages:
- high current through the keys; — the electromagnetic moment pulsates and is far from ideal (saturated with higher harmonics). As a result, the stability of operation without O\C is low. At maximum speed it also loses to other control methods. In Fig. below are phase voltages.
Method 2.
Enumeration of phases with the formation of 6 basic vectors. I came across it in the ST microelectronics update [1]. It is an improvement of the 1st method (or a deterioration of the 3rd). The advantages and disadvantages are mixed. We will not consider it, because... I don’t understand why, having 6 keys, not use the method given below O_o
3 way.
Formation of 6 basic vectors. 6 keys required. At any given time, 3 of them are working. In total, there are 8 positions of these keys, 6 vectors (form sinusoids) + 2 zero vectors (all keys of the upper or lower arm are open). Zero vectors are needed for more advanced PWM systems.
Advantages:
— simplicity;
— the shape of the supply voltage is closer to a sinusoid; - as a consequence of the previous conclusion - less heating; — more stable in operation without o\c; Disadvantages:
— the field of the car is still not circular, as it should be; — the machine current is slightly higher than in the ideal case.
Phase voltages are lower.
4 way.
Industry standard - we add PWM modulation between the base vectors to the previous method No. 3 in order to obtain any circle vector instead of 6.
Advantages:
- everything here is almost perfect.
The current is minimal, the magnetic field is circular. The torque does not pulsate. Disadvantages:
- To organize a full-fledged drive with PWM of 6 vectors and position control, a DS processor is required.
This is what PWM modulation of a certain TRIOL AT drive looks like [2].
5 way.
Vector control. Due to its complexity, we will not consider it.
In this case, Field Oriented Control, popular in the West, is field control, which was later competed by DTC - Direct torque control. I have not seen other methods of vector control (based on the flux linkage vector of the stator, rotor.) in industry.
Position feedback.
It must be said that a drive with sensor control is always preferable to a drive with control without sensors. This also applies to vector control of asynchronous machines and DC motor control systems. However, all industrial manufacturers strive to eliminate sensors as an extra mechanical element.
The principle of the back-EMF connection used: we need to catch the moment when the magnet pole passes through the phase. To put it simply, this means that the rotor of the machine has gone exactly halfway and we need to adjust (delay) turning on the keys for the appropriate time. For example: in method No. 1, this time is equal to half the time it takes to turn on the keys. In the 3rd, it is equal to the operating time of one base vector.
What energy costs can the installation cover?
Installing a wind generator is cost-effective if the wind speed reaches 4 m/s.
In this case, almost all needs can be met:
- A device with a power of 0.15-0.2 kW will allow you to switch room lighting to eco-energy. You can also connect a computer or TV.
- A wind turbine with a power of 1-5 kW is enough to power basic household appliances, including a refrigerator and a washing machine.
- For autonomous operation of all devices and systems, including the heating system, you need a 20 kW wind generator.
When designing and assembling a windmill from a washing machine engine, the instability of wind speed must be taken into account. Electricity can disappear at any second, so equipment should not be connected directly to the generator.
Requires batteries and a charge controller, because... electrical appliances require a voltage of 220V.
no_copyright_Connected_Car
It soon became obvious that hard disk drives (HDDs) were a more elegant solution. Information on them was updated much easier using a conventional wired connection. However, the task was somewhat more complicated than simply installing a standard HDD from a laptop into a car. The hard drive in a car has to work in conditions of changing heat, cold, humidity, and atmospheric air pressure. This also includes constant vibrations and shocks that the hard drive of an office computer or laptop usually does not encounter. Drives must be able to handle a wider operating temperature range - typically -30 to +85 °C - compared to the +5 to +55 °C standard for consumer devices. There was also a design problem: developers of hard drives for use in cars had to build in higher strength and durability, and automakers had to be confident in the long-term commercial availability of these devices on the market.
Working prototypes of car navigation systems appeared in the late 60s of the last century. Thus, on the Holden Hurricane RD 001 concept, along with a rear view camera, an automated route finding device was presented. Predating the era of GPS satellites, this navigator used a system of magnets placed at intersections on the road network to guide the driver along a route. Information about when and where to turn was displayed by illuminated signs on a separate display and was accompanied by a sound signal.
Types of wind generators and their operating principles
Both industrial and homemade wind generators are different.
They are classified according to several criteria:
- Features of rotation of the rotor with blades attached to it - vertical or horizontal. The former react less to negative environmental factors, while the latter are characterized by higher efficiency.
- Number of blades. Three-blade installations are considered the most practical, but there may be more or fewer blades.
- Material . For the manufacture of blades, various materials are used - hard or sailing. The former are usually more durable, while the latter are cheaper.
- Blade pitch . It can be fixed or changeable.
When making a wind generator with your own hands, you have to decide on the design yourself. In this case, it is necessary to calculate the required power and take into account the operating conditions of the installation. We discussed the detailed calculation of a wind generator using formulas in this article.
Horizontal windmills are convenient because their creation does not require high-precision calculations; the design itself is easier to manufacture and starts at the slightest wind. Cons: loud noise during operation and bulkiness.
A vertical wind generator is suitable for people who are willing to spend time and effort on assembling and maintaining a complex but compact design. We recommend watching the step-by-step instructions for making a vertical wind generator with your own hands.
A wind generator operates by rotating blades attached to a rotor. The rotor itself is fixed on the generator shaft, which generates electric current. The energy is transferred to batteries. Here it accumulates and powers household electrical appliances.
The wind turbine is equipped with a controller that converts three-phase alternating current into direct current and controls battery charging. The installation diagram must take into account that an inverter must be connected after the battery.
Comparing the pros and cons of installation
Wind generators have been used for many years, their designs are constantly being improved, and wind is an easily accessible source of energy.
Devices powered by it are absolutely safe for the environment and convenient, because... are located on masts and do not occupy useful space. They are easy to maintain and repair.
Windmills make noise when operating. The sound may be louder or quieter, but it is always there. Sometimes this bothers home owners and even neighbors.
There are other inconveniences that can be noted. Wind is an unpredictable element, so the operation of generators is unstable and it is necessary to accumulate energy so as not to be left without electricity during periods of calm.
Instructions for assembling a windmill from a washing machine
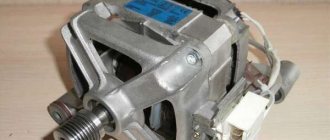
Let's look at how to assemble a simple installation with your own hands, using an electric motor from a washing machine as a basis.
Stage #1 – preparing the necessary materials
To create a homemade windmill from a washing machine engine, you need to purchase several parts.
Some of them will probably be found in old household appliances, and some will have to be purchased:
- rotor with blades - you can make the blades yourself;
- a gearbox that will regulate the speed of rotation of the windmill rotor;
- a casing designed to protect windmill elements from moisture and other negative environmental factors;
- a battery, the function of which is to store energy and power electrical appliances when the blades are not rotating;
- inverter for current transformation;
- the tail section, with the help of which the installation turns in the wind;
- the mast on which the structure will be attached.
Where to begin?
Based on the magnitude of the required loads to simultaneously turn on the devices, all the main elements are selected.
Optimal performance indicators are achieved by correctly selecting the power of gasoline and electric engines.
To obtain a single-phase current of 220 V, a two-stroke gasoline engine is suitable, and if you plan to obtain higher powers, then the choice should be made on a four-stroke. Fuel consumption will depend on the selected engine. In addition to the main task - generating energy, a system for noise reduction, lubrication, ventilation, and installation of an exhaust pipe for removing gases should be provided. You will have to buy wheels to ensure the mobility of the device. The casing can be made of metal or plywood.
A gas generator based on a two-stroke gasoline engine will help out if you need a short-term connection. When work is required for a long time and with a heavy load, it is better to make a generator with a four-stroke gasoline engine.
The control panel must have a voltmeter, a circuit breaker button, grounding terminals, and sockets for using the generated energy.
Making your own gas generator makes sense when you have unused engines from old appliances. You can, of course, buy all the components specifically for these purposes, but you won’t be able to get much savings - the cost of the components may even exceed the price of the finished factory model.
In practice, motorcycle or car engines, engines from mowers, chainsaws and other devices are often used.
Generator with engine from Volga 21
Conclusions and useful video on the topic
Self-assembly of any technical devices is a complex task that requires attention to detail. When it comes to power systems, the work must be done especially carefully. We offer video instructions that will help you avoid mistakes.
You can see how a homemade wind generator looks and works in the video:
Description of the process of assembling a wind generator from a washing machine:
Unnecessary household appliances can help out in the most unexpected situations. A hopelessly outdated washing machine can become a new source of “green energy”.
The wind generator will last for many years and will help you save a lot of money. The best part is that such a transformation will cost a reasonable amount. The main thing is to search, learn from other people’s experiences and not be afraid to experiment .
Have you assembled a wind generator yourself using an electric motor from a washing machine? Share a photo of your homemade product and your assembly experience - leave a comment under this article.
Or maybe you are just starting to assemble the installation and you have questions that we have not touched upon in this material - ask them, and we will try to help you with practical advice.
Application of HDD Regenerator
HDD Regenerator is a very easy to learn and use application designed to recover bad sectors of hard drives and regenerate the surface. The developers are especially proud of the special surface magnetization reversal algorithm, on the basis of which the program operates. The application is notable for its simple interface and control method - there are no complex settings, multi-level menus or switches, the launch commands are simple and understandable even for a novice user.
In fact, the list of features and benefits of HDD Regenerator is quite wide. We will not delve into listing all the advantages of the application, but move on to the main methods of application that are used by a wide range of users.
DIY wind generator from a washing machine engine: materials, assembly, installation
Publication date: June 12, 2019
An old washing machine is a real Klondike of spare parts for the home handyman. And it is quite understandable to want to give them a second life - for example, to construct a wind generator. A simple and useful device will partially solve the problem of power supply to a small facility: a country house, an outbuilding for tools or a workshop. Moreover:
- The cost of the cheapest Asian-made wind generator model from Aliexpress is several tens of thousands of rubles. And no one can guarantee that they will send you a working and powerful device.
- A DIY wind generator from a washing machine will cost no more than 5,000 rubles. The price includes all the necessary consumables, provided that you already have a faulty machine that you want to put to good use.
Do-it-yourself wind generator from a washing machine engine: step-by-step assembly instructions
We select materials
The basis of the future design is an electric motor of a washing machine with a power of at least 1.5 kW. We are talking about a serviceable design, and not about a burnt out motor. You will also need:
- A rotor with blades that will rotate due to the force of the wind. The design of the blades is easy to make with your own hands from available materials: plywood, sheet metal, etc.
- Set of neodymium magnets – 32 pcs. 0.5, 1 or 2 cm.
- A gearbox “responsible” for the rotation speed of the generator.
- A protective casing that excludes any climatic influence on external structural elements.
- A battery that carefully collects and stores energy to operate household appliances during windless periods.
- Inverter for transforming direct current into alternating current.
- Mast for installing the structure in open space.
If you have decided to surprise your loved ones with a wind generator made by yourself from a washing machine motor, do not rush to run to the nearest market for shopping. Most of the listed devices and materials can be easily found in old household appliances that are out of use and collecting dust in the basement or on the balcony. This saves your time and further reduces the cost of the future generator. The exception is neodymium magnets, which are best ordered on Aliexpress or in regular stores selling electrical equipment and radio products. Tools that should be at hand during work: a screwdriver, scissors and pliers, as well as a drill or screwdriver, which will act as wind during testing of the device.
Assembling the frame
The cores are removed from the engine rotor, on which grooves are cut 5 mm deep. Then the cores are covered with a tin covering and the placement of neodymium magnets begins. First, they need to be marked and then sequentially laid out on a strip of tin, taking into account the mutual attraction of neighboring magnets. Fastening is carried out using a suitable superglue, which guarantees a reliable connection of the metal elements.
Please note: when constructing a windmill from a washing machine engine, it is important to maintain the distance between adjacent magnetic elements. The attractive force of neodymium magnets is so strong that even superglue cannot hold them in place. And the sticking of elements will negatively affect the operating power of the new generator.
You will have to work hard to create an impeller with a shank and blades. The main thing is to make the blades correctly so that they rotate easily under the influence of the wind. An excellent solution would be fiberglass - a dense and lightweight material that is durable and resistant to the climatic difficulties of the Russian weather.
After laying and gluing, the tin sheet with magnets is laid on the rotor, filling the gaps with cold welding or epoxy resin. Final grinding of the surface with sandpaper - and the generator frame is completely ready.
Modeling the gearbox
For a wind generator made from a pump from a washing machine, a vertical gearbox is recommended. Its main advantage is the ability to rotate freely on the mast along with the blade structure. Of course, the weight of the additional device will slow down the rotation speed somewhat. But the gearbox, which limits the number of revolutions of the blades, will “make sure” that the propeller does not fail during hurricane winds.
According to the given diagram:
- the main gear 5 is put on the mast 7;
- reinforcing sections C are welded in a circle;
- bearings with gears B are mounted on the reinforcement;
- small gear A is in contact with gears B;
- gears B are in contact with the teeth of the gearbox housing 11.
Checking the functionality of the device
The two wires leading to the motor winding are connected to a rectifier, and the rectifier is connected to the controller to which the battery is connected. Using a drill or screwdriver, the device is put into operation at a speed of about 1000 rpm. The voltmeter probes are connected to the battery and the resulting voltage is measured. An indicator of 200-300 V indicates excellent performance of the device.
Please note: if the voltage level is low, there was probably an error when installing the magnets. If you are determined to achieve your goal and assemble a working generator, the device will have to be remade or made in a new way.
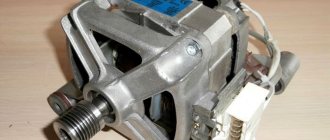
Connect the motor from the hard
Where should 220 volts be supplied, and where should the output voltage be removed? The most difficult and expensive repair is replacing the motor. The motor that rotates the spindle of the hard drive or is it a regular synchronous three-phase DC motor. Connecting an asynchronous motor from a washing machine. Connecting a motor from a hard drive without a driver. If the revolutions must be significant for this, then one of the simplest ways is to use a motor from hard drives. ✅Connecting the motor from the washing machine. In today's video we will look at the simplest connection of a motor from an automatic washing machine. What kind of motors are on hard drives and how to work with them.
many have motors from hard drives and https://docs.google.com/document/d/1euOdrWTEjm1aUvc9ky0wumcmpVgCJpCeaHRtvWLaCeE/mobilebasic everyone was wondering how to connect it. I connected them with a wire, the engine works, but after a minute it stalls. The purposes for use have changed; I want it as a cooler. It is very difficult to start any motor from a battery. In the case of a motor from an optical drive, everything is simple: there are windings, there are position sensors. #hard drive # In this video I will tell you how to connect a motor from a computer hard drive to. This must be taken into account when choosing a current shunt resistor. Motors in hard drives and optical drives are different from each other. Knock the spindle motor out of the housing, put a cooler with transparent blades and lighting there, cut a window in the lid, lead the hose through the air valve, you will get a good compressor for an aquarium. Yes, this is a stepper motor and can only be started using special circuits.
Thank you all for reading, as soon as the motor from the hard drive appears, I’ll try to start it. Starting the engine using a simple controller Video Connecting the engine from a channel hard drive. When using older drives for application purposes, a problem sometimes arises that the spindle motor stops some time after starting. No driver boards, controllers or transistors are required. In motors for radio models, the windings are connected with a triangle and 3 pins; for hard drives, they are often star-connected and have 4 pins; 3 windings and a common one. According to the domestic theory of electrical machines, a hard drive motor is classified as a synchronous machine with excitation from permanent magnets. Ready-made three-phase motor driver from a hard drive. The shown method of turning on the motor by powering only one winding is not very effective, but it works.
We start the brushless motor from the hard drive using.
Hard drives typically use three-phase brushless motors. We connect the motor from an old washing machine. Here is almost the same circuit for controlling the motor from a hard drive. In this circuit it is not indicated, but it is better to connect the LED through. The motor from the hard drive spins, but the output transducers get very hot, well, this is understandable, each winding of the motor is about 2.2. With the connection of hall sensors and adjustment. Not the easiest way to get a motor out of a hard drive, but the result is worth it. We connect the wires to the motor from the controller, insulate it and fix it with a metal jumper; you can cut it out of a tin can. The simplest connection of a motor from a washing machine. If the revolutions must be significant for this, then one of the simplest ways is to use a motor from hard drives. A motor coil is connected to the drains of the three transistors, and the fourth output of the motor goes.
Now look, motors in hard drives can have either three or four pins. There is also a jumper on the board to change the direction of rotation of the motor. The drain of each transistor is sinusoidal. Just for fun, I decided to try to find a circuit for starting motors from a hard drive. A simple brushless motor controller from the site. And I remind the technicians and owners of service centers that you can order mass diagnostics of hard drives from me. MasterOK workshop - repairing hard drives and restoring data at home using improvised means with a minimum of equipment. Today we will conduct an interesting experiment and find out what a motor from a hard drive can do as a generator. The capacitor connected to pin 27 of the microcircuit determines the final generation frequency, and therefore the motor rotation speed.
There is a ribbon connected to the drive, do not pull it because there are very thin wires inside that are connected to the motor coils. The connection diagram demonstrates that the motor operates without a starting winding; there is also no starting capacitor in the connection diagram - it is not required for starting. This is a very simple way to start motors from SidiRooms and Hard Drives. IMHO, manually turn on this motor and put the distributor with a breaker and bobbin on the Mercedes 12 engine through the gears from the alarm clock instead of the original block. You won’t be able to control these motors by closing two contacts. Generator from engine from hard drive connection diagram. I disassembled the old hard drive, and now I want to use the motor for something. Simple and primitive starting of the motor from the hard drive with three transistors. Starting the hard drive motor with a three-phase multivibrator. Unfortunately, all three existing microcircuits burned out within the first second at launch.
Connecting the motor from the hard drive, diagram, video.
But it is necessary to connect the wires to the network strictly in accordance with the diagram. In a hard drive, for spinning up an aluminum disk drive. How to start a hard drive motor directly from the MK. Start the motor from a hard drive directly from the Atmega128 microcontroller, without using complex or special firmware. They have such a feature if signals are not received from the head block to the microcircuit controller. After more than 40 days, they finally sent me the driver. If you cannot hear the motor noise after plugging it into the outlet, most likely the starting capacitor is connected incorrectly. Connecting the motor from https://wap.google.com/xhtml/search?q=Negri+sar%C4%B1%C5%9F%C4%B1n+site:qeves.buzz&num=100&filter=0&gbv=1&sei=0 old washing machine cars, diagram. Strictly speaking, the idea of using motors for pumps is not new. In hard drives, a different method is used to determine the moment of switching; at each moment of time, two windings are connected to the power supply, and on the third.