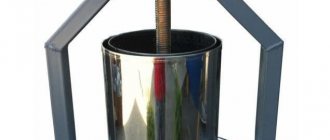
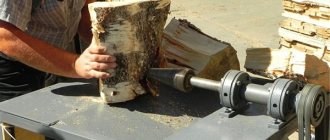
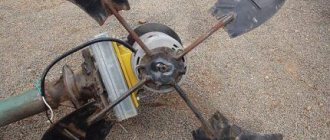
Grinder is a grinding machine used in the final finishing of crafts - for grinding elements. You can do it yourself, especially if you have an old washing machine and it has a working electric motor. Moreover, one that will allow you to grind the ends of parts, which is difficult to do with factory products.
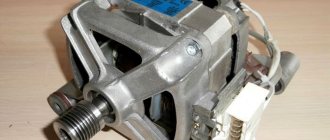
The engine used in the craft has a power of 180 W and a speed of 1350 per minute. A small machine made on its basis will grind wooden and plastic parts and products without any problems. If metal ones are a priority, then the motor needs to be more powerful - 300 W and at high speeds.
Assembling the grinder is not difficult, but you will have to contact a turner who will help turn the pulleys. True, they can be replaced with plywood ones made independently.
During work, they use materials: steel angle, plates; sheet metal; bolts, nuts and washers; washing machine motor; sanding belt; furniture gas support (for tensioner); working steel or aluminum wheels (made on a lathe or ordered by a turner).
Tools you will need: welding machine; drilling machine; Bulgarian; spanners.
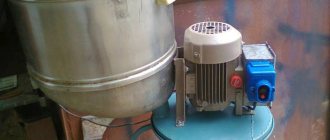
First they work on the electric motor. A U-shaped bracket is welded under it from sheet steel. They are secured to it with bolts or studs that tighten the engine housing. The bracket is then welded with the bottom or screwed with the sides to the base - a rectangular plate made of thick sheet metal.
The machine frame is made. Sheet metal is used with a thickness that eliminates deflection and springiness of parts. Cut out the base - the plate. Holes are drilled in its corners and the legs are screwed through them. To reduce vibration of the future machine, they must be made of rubber.
A stand is cut out of a sheet of steel and welded to the base. To increase its stability, add corners and a scarf.
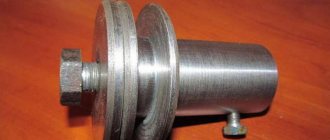
Pulleys made of steel, aluminum of different diameters. The larger one is placed on the output shaft of the motor and secured with a screw. To do this, make an additional hole and cut a thread corresponding to the screw. The upper pulley consists of two bearings and a spacer sleeve. The position of the upper pulley is fixed with a nut.
Assemble the top assembly. The larger pulley mounted on the motor shaft is the drive pulley. They provide the ability to change its horizontal angle, which is necessary for centering the belt. The assembly is made from parts cut from a sheet of metal, which are fastened with bolts.
Install the belt tensioner. They use gas pressure, which is found in different types of furniture. It can be purchased at a store that sells furniture components. Instead of support, you can use a spring or an old pump (you will have to redo it a little).
A thrust pad is screwed to the base, on which the workpiece or part is fixed. A sandpaper belt is placed on the pulleys. Arrange the connection of the machine to the outlet via a switch.
Due to the low power of the motor, the machine stops if you press hard on the pulley. But for sharpening tools and polishing small elements, his strength is enough.
How to make a grinder with your own hands at home for almost free?
- Grinder specification
- What does a homemade grinder consist of?
- Assembling the frame of the grinder
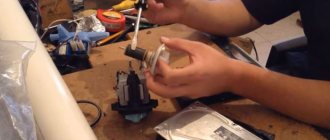
- Preparing the washing machine motor shaft
- Collecting videos
- Tensioner and driven rollers
- Tensioner pulley lever
- Tool rest and stop
- Console left
- A selection of videos of homemade belt sanders
Having a belt sanding machine in your household is not a cheap pleasure, but it is extremely useful. Because its presence solves many problems with sharpening, straightening, fitting and grinding.
Therefore, today we will make a grinder with our own hands at home from parts that can be found in a landfill. And you can buy some of them at any hardware store. So, let's start with the specification.
Rotary table for grinder
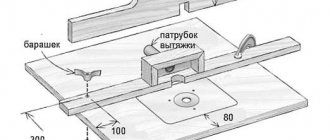
For accurate and uniform grinding, the part must be rigidly fixed in relation to the moving abrasive belt. Therefore, any grinder includes a rotating support table (or, as turners call it, a “handle”).
Usually this is a flat metal plate 15÷30 cm long, 5÷10 cm wide and 5÷10 mm thick. The table should have a recess at the end to fit the width of the belt, an adjustable tilt towards the grinding plane, and also move back and forth and up and down.
Some support tables have the ability to rotate 90 degrees to the right and left, but the master must decide how necessary this option is. Moreover, its implementation on home workshop equipment can be quite complicated.
In foreign videos, craftsmen widely use rectangular pipes and various shaped profiles to make homemade grinders. This simplifies both the design and manufacture of the machine. Our craftsmen use such materials much less often: they mainly use channel, strip and corner.
Of course, you can refer to the difference in price, but the grinder requires very little metal, so this explanation is questionable.
Grinder specification
Any belt sanding machine consists of a reliable frame and auxiliary parts. The main task when manufacturing a machine is to place the rollers in the same plane, otherwise the tape will constantly move to the side.
DIY grinder
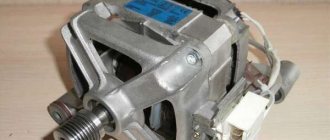
You also need to pay attention to the speed of the drive. For this, a washing machine motor is perfect.
Before we begin production, we need to prepare:
- Square pipe 30x30x2 - 250 mm.
- Square pipe 25x25x1.5 - 1250 mm. Taking into account the cut.
- Channel No. 21 – 350 mm.
- Steel strip 50x8 – 700 mm. (With reserve). Or the eyes from the Gazelle spring earrings.
- Old door hinge.
- Sheet 170x190x4 for making a stop.
- Plywood sheet 500x200x8 mm.
- Bearings 201 – 9 pcs.
- Polypropylene couplings for 32 – 6 pcs.
- Polypropylene pipe PN20 – 250 mm.
- M8 hairpin – 1 pc.
- M12 hairpin – 1 pc.
- M8 nuts.
- Spring for tension arm.
- Angle No. 5.0 for mounting the engine to the frame.
- Motor from a washing machine.
“Responsibilities” and features of the grinder
This machine is universal. A grinder is used to remove rust, remove burrs or paint, clean welding seams, and get rid of sharp edges. The variable sharpening angle makes this tool indispensable when a part that has an extremely “tricky” shape requires grinding. The grinder works with any material: wood, metal, plastic, glass.
Before deciding on the feasibility of self-assembly, it will not be amiss to become closely acquainted with the machine: you need to look at the drawings of the grinder and understand the principle of its operation. The belt grinding structure consists of a motor (3), a straight (drive) and tension rollers (7,8), on which there is a belt (10) of the required grain size. Other elements:
- a bed having a stable base (1);
- stand (2);
- pulley (4);
- swivel unit (5);
- spring (6);
- turntable-table (9).
The usual design has a table with clamps for fastening to a stationary frame or workbench. Some models provide for its rotation along one axis by 90°, in others it is perpendicular. The frame is equipped with a drive motor or foot drive.
Tricks for assembling a grinder
The design must be reliable, so there are rules regarding the elements of the grinder.
Turntable
It is extremely important for precise machining of complex parts. Duralumin sheet is the material most suitable for this element. A bracket is attached to it, allowing the table to rotate in a horizontal plane. The minimum thickness is 15 mm, thicker is better, if you choose a smaller value, the platform will not withstand the load.
Rollers, pulley
They can't be very heavy. This is the main condition for the effective operation of the tool, since a large weight will provoke jerks that threaten the tape with stretching or damage. Therefore, heavy steel is not the best option. On the other hand, a steel roller can be made hollow, but the cost of such a part ordered from a turner will be much higher.
The optimal solution is to choose duralumin. To ensure that the tape holds well, an end groove is made. Excessive smoothness of the roller will lead to permanent rotation of the belt, so you need to ensure a surface roughness of 1.25 to 2.5 RA. A higher value is synonymous with faster wear of the sandpaper. The rollers are secured to the grinder with cotter pins.
The belt sander pulley is made from various materials - wood, plywood of varying thicknesses, a motorcycle wheel, thick-walled steel pipe, or any other material that is at hand. A good choice is to make the part from D16 duralumin or higher.
Bonding tape
This element requires cloth-based sandpaper. When evaluating grinder drawings, you need to pay attention to the width of the sanding belt and its length. It is better to choose those schemes that provide standard values: 100, 50 mm and 610, 915, 1230 mm, respectively. The last value is the limit, since the longest tape automatically means the need to search for an engine with increased power.
Other requirements for an ideal element:
- elasticity of the base fabric;
- good abrasive resistance;
- no fear of extreme angular speeds (minimum - 1500 rpm);
- minimal heating even during long-term work;
- Possibility of elongation without large loss of quality (relative tension - at least 15%).
It is better to use store-bought products, but if you decide to make it yourself, then 1 joint is the maximum allowance. Glue the material like this:
- cut the tape to the required size, make future joints obliquely;
- they are connected and glued on the abrasive side with masking tape;
- fix the cut with superglue, glue a piece of silk fabric to it;
- Wrap the gluing area in paper, place a weight on it, and leave to rest for 24 hours.
Before installation, the tape is hung on a cylinder, its optimal diameter is 60 mm. The procedure will allow the abrasive material to stretch naturally.
What is a grinder made from?
If you have supplies at home, now is the time to give them a second life. This applies to those devices or tools where the engine is still alive. The most beloved by home craftsmen are drills, grinders, and washing machines that have served their purpose, but have retained the desired motor in working condition.
What does a homemade grinder consist of?
Let's look at the main components from which our homemade belt sanding machine is assembled.
Assembly drawing of the grinder
- Leading video
- Tension roller
- Driven roller
- Second driven roller
- Tensioner pulley lever
- Podruchnik
- Console
- Emphasis
- Frame
All components of the machine are easy to manufacture, and anyone can assemble it if desired. If you don’t have a welding machine, you can always negotiate with your neighbor for a small fee. Or allow you to use a homemade grinder if necessary. The grinder will be compact and not heavy.
Collecting videos
The drive roller for the engine is made of plywood. Cut out 10 circles with a diameter of 85 mm. Mark the center and drill a hole with an 8 mm drill. We coat each disc with PVA glue. We collect it in a bag on an M8 stud and compress it from both ends through washers with nuts.
We compress the drive roller on both sides with clamps.
Let it dry overnight for further finishing. Next, drill a hole 24 mm deep. If you don't have a finger cutter, you can use any drill. In our case, the cone from the drill is not a hindrance.
Driving Roller Hole Dimensions
Your motor shaft may be different from the drawing, but this is not a problem. The principle of fastening remains the same, only the dimensions will change, which can be measured with a special tool. Read how to use a caliper here.
Another option for a washing machine motor
After preparing the roller and shaft, you can begin finishing the drive pulley. Attach the motor to the platform, put on the drive pulley, turn on the motor and carefully sand the roller with a flap abrasive wheel.
Finishing drive pulley
After cleaning, the edges need to be beveled a little to get a barrel look.
Materials used
It didn't take much to make:
- motor from a typewriter;
- its original starting capacitor;
- part of the sheet metal covering of the machine;
- 4 rubber feet from the washing machine;
- plywood sheet;
- a 5 cm piece of thick-walled tube with an internal diameter of 14 mm;
- 2 identical bearings;
- glass sealant;
- sheet metal with a cross section of 8 mm;
- corner 63x63 mm;
- profile pipe 40x40 mm;
- profile pipe 30x30 mm;
- extended nut;
- steel strip with a cross section of 10 mm;
- furniture gas shock absorber;
- power button;
- plastic plugs 30x30 and 40x40 mm;
- bolts and nuts M12, M10, M6 and M5.
The main detail of the entire structure:
Tensioner and driven rollers
Made from propylene couplings, they are sold at any hardware store. Assembly drawing and step by step guide below.
Assembly drawing of the coupling
We assemble a package of couplings and D20 tubes onto the M12 stud; they serve as spacers between the bearings and install the bearings themselves. The photo below shows the entire assembly.
Step 1. Assembling the roller
Step 2. Tighten the nuts with a wrench
We pull together the assembled package into one whole. We process it with a grinder and a petal wheel on all sides, achieving a barrel-shaped shape.
In the same way we assemble the next two driven rollers. But we give the barrel shape only to the tension roller.
Console left
The console is easy to assemble. The parts are welded according to the drawing. First, one pipe must be bent using a manual pipe bender or simply clamped securely in a vice.
After welding, clean the seams and blacken them to prevent corrosion. Or you can paint it with enamel.
This is what you should end up with.
Homemade grinder assembled without tape
If you need to change the maximum grinding speeds, then, as an option, you can change the diameters of the rollers.
The diameter of the drive pulley is calculated using this formula: D=V x 1000 x 60 / π x N
Or use a frequency regulator to change the speed. There are many options for implementation, the main thing is the desire to do everything with your own hands and not be afraid of difficulties.
Preparatory work
You will need to make a moving element with your own hands along which the tape will move. If you buy it separately to assemble the structure, it will cost about the same amount as a new machine.
What parts are needed for the job:
- corners: one 40 cm long and two 15 and 25 cm long;
- 2 long bolts and several regular ones, nuts, washers, spring;
- hairpin;
- a piece of metal measuring 30x100 mm.
What tools will you need:
- lathe;
- drill;
- welding machine;
- pliers;
- open-end wrenches;
- Bulgarian.
You also need parts that can only be made on a machine or ordered in a workshop. This:
- roller;
- bearing;
- sleeve;
- screw;
Top 3 ways to make a belt grinder
Review of possible options for making a grinder with your own hands. How to make a belt grinder at home from an angle grinder, a drill, or a washing machine motor. How to make a rotary table for a machine.
Among folk craftsmen, one of the most common homemade products is a belt grinder, which is commonly called a grinder, sander. Making the necessary parts and assembling a grinder with your own hands is generally not difficult, especially for those who have certain design skills and have the necessary tools and equipment. Depending on the goals of the home craftsman, as well as the volume and duration of grinding work, the sizes, design and materials from which a homemade grinder is made can be very diverse.
Some create machines that are practically no different from factory ones, using milled parts or a complex metal profile. Others use wood and plywood to make the frame and rollers. In addition, on the Internet you can find many video clips in which the authors demonstrate their grinder made from scrap metal and the remains of various materials stored in the yard or workshop. In fact, what the grinder frame is made of does not matter very much. The main thing is that it is strong enough, and the rollers are located in the same plane, have free rotation and are securely fixed. The maximum number of revolutions of the grinder drive is also very important, since its main technological parameter—the linear speed of the grinding belt—depends on this. The parts and components necessary for this device can be made with your own hands or purchased ready-made.
Ready-made machines from the store
Grinder "Lefty"
Characteristics: motor – 1.5 kW, belt length – 1250 mm (up to 1600 mm); The model is interesting for its additional equipment (wheel, contour), which is included in the kit.
Appearance of the “Lefty” grinder
Grinder-sharpener “Kraton” BG 14-05
Characteristics: the device is used for sharpening metal tools and wooden parts; power consumption – 2 kW, movement of the sanding cloth – 14 m/s; disc diameter – 150 mm; tape width – 50 mm. Features: rigid cast base, adjustable stops and protective screen.
Model cost from 6,000 rubles Grinder-sharpener “Kraton” BG 14-05
Grinding machine BISON ZShS-330
Characteristics: machine type - disc-and-belt; circle – 125 mm; speed – 2950 rpm; tape size 762 mm × 25 mm; power - 330 W; belt speed – 810 m/min. Cost – 5490 rubles.
Grinding machine BISON ZShS-330Grinding machine BISON ZShS-330
Sharpener METABO DS 125
Characteristics: sharpener type - with sanding belt; circle - 125 mm × 20 mm × 20 mm; circle diameter - 125 mm; circle thickness - 20 mm; landing diameter – 20 mm; speed – 2980 rpm; power - 200 W. The cost of the model is 7679 rubles.
Sharpener METABO DS 125Sharpener METABO DS 125
Sources
- https://lesoteka.com/instrument-i-oborudovanie/shlifovalnyj-stanok-svoimi-rukami
- https://m-strana.ru/articles/chto-takoe-grinder-i-dlya-chego-on-nuzhen/
- https://homius.ru/grinder-svoimi-rukami-chertezhi.html
- https://tehno-gid.net/sad/shlifovalnyj-stanok-po-derevu-svoimi-rukami.html
- https://svoimirykami.guru/grinder-svoimi-rukami/
- https://HouseChief.ru/kak-sdelat-grinder-svoimi-rukami-chertezhi-s-razmerami.html
- https://vopros-remont.ru/elektrika/grinder/
- https://WikiMetall.ru/oborudovanie/grinder-svoimi-rukami.html
- https://SdelaySam-SvoimiRukami.ru/5627-samyj-prostoj-grinder-bez-svarki-i-tokarki-iz-dvigatelja-stiralki.html
Schematic diagram of the grinder design
The Internet contains many images of 3D models, drawings, sketches and even assembly drawings of grinders of various designs. Each of them has its own characteristics, but in principle they all consist of several main components (see figure below):
- Drive with electric motor.
- The bed is on a stable base.
- Drive pulley.
- Tension roller with tension adjustment mechanism.
- Guide rollers (usually one or two).
- Device for moving and tilting guide rollers.
- Support table.
Before you start designing your grinder, you need to decide on the range of lengths of sanding belts that you plan to use. Both the overall size and layout of the future machine, as well as the characteristics of the tension mechanism and the device for moving the guide rollers, depend on this parameter. The length of the tape used is equal to the sum of the center distances, adjusted for the dimensions of the pulley and rollers, and must take into account the strokes of the adjustment and tension mechanisms.
One of the key points when designing a grinder is calculating the linear speed of the grinding belt, which directly depends on the engine speed and the diameter of the drive pulley.
When grinding various materials, it is necessary to take into account that each of them has its own physical characteristics and therefore must be processed at a certain speed. The maximum grinding speeds for the most common materials are approximately equal (or close), but the lower limits vary significantly (indicators in m/s):
- hardwood and plywood - 15÷30;
- varnish coatings - 5÷15;
- soft and coniferous wood - 12÷20;
- carbon steel products - 25÷30;
- plastics - 10÷20.
When making a grinder with your own hands, as a rule, old electric motors from household appliances are used (most often from sewing and washing machines), or hand-held power tools (drills and grinders) are used as a drive. That is, the home master is limited in advance in choosing the engine rotation speed, so for him the main design parameter in the design of his machine is the diameter of the drive pulley, on which the linear speed of the sanding belt directly depends.
The drive pulley diameter (in mm) is calculated using the following formula:
Here V is the required speed of the abrasive belt in m/s, and N is the rotation speed of the drive pulley in rpm. Below is a table of the dependence of linear speed on this diameter.
Types of grinding machines
When working closely with wooden parts and objects, the craftsman needs to know what types of wood sanding machines there are in order to select the most optimal device for himself.
Based on the design principle, types of wood sanding machines are divided into 3 types: belt (grinder), disk, drum.
- The band press is considered the most common. The abrasive coated belt is mounted on two shafts, which are driven by an asynchronous motor. In this case, the grinding element can be located in a horizontal or vertical position. During operation, the tape does not sag, but processes the wood without generating a large friction force. This design can be used when processing long parts.
- The disk unit, or as it is also called a disc grinding machine, is equipped with an axis to which an abrasive wheel is attached. During operation, the disk begins to rotate around its axis. During operation, you can adjust the speed of the wheel with an abrasive coating without reducing the speed of the axis itself.
- The disk unit, or as it is also called a disc grinding machine, is equipped with an axis to which an abrasive wheel is attached. During operation, the disk begins to rotate around its axis. During operation, you can adjust the speed of the wheel with an abrasive coating without reducing the speed of the axis itself.
- The drum machine is designed in such a way that abrasive belts in the form of a spiral are wound onto adjacent rollers. In turn, these elements are spaced a certain distance from a flat surface (table top). By adjusting this distance, you can calibrate the wooden parts.
There are other types of portable sanders. Drills and screwdrivers are often equipped with special attachments with abrasive coating.
The device and principle of operation in each version is different from each other. At the same time, the wood will be processed differently.
The easiest way to create a disc sander. But a homemade sharpening and grinding machine, based on a belt design, will be much more functional and in demand in the home workshop than any other.
Homemade grinder with a washing machine engine
When using commutator motors from next-generation washing machines, you cannot do without a separate speed controller, since their rotation speed usually lies in the range from 11 to 18 thousand revolutions per minute. These compact and powerful devices have their drawback: with constant use under load, their brushes quickly wear out.
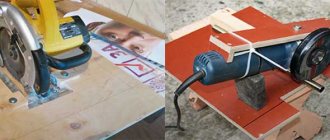
How to make a grinder from a drill
This grinder is easy to make with your own hands, even at home. Moreover, when grinding small products made of wood or plastic, such a device is in no way inferior in its characteristics to a stationary grinder. There should also be no problems with selecting the grinding speed, since most modern drills have a built-in regulator (in extreme cases, you can use an external dimmer). In addition, such a grinder is very simple in its design, so it can be assembled and disassembled as needed.
Do-it-yourself grinder from an angle grinder
The main design difference between an angle grinder and other types of power tools is that its output shaft is turned at an angle of 90º to the axis of the electric motor and, accordingly, to the housing. For this reason, it is called an angle grinder. This feature is perfect for longitudinal fastening of the drive roller and the “electric file” blade. The result is a tool that is elongated in a line and very comfortable to use. The same attachment for a drill is located at a right angle to the body, which is quite inconvenient for work.
Making a grinder from Chapai
From a technological point of view, the “Ot Chapaya” grinders are an example of a mechanism thought out in every detail. These devices have a rotating frame, the ability to tilt the belt, adjust the working height, and are also equipped with various devices: a pressure table, contouring rollers, a grinding wheel, etc. It is impossible to make such a machine with your own hands without the use of special equipment. As a rule, craftsmen who make grinders of this class borrow design solutions from Chapai, and also copy the general layout and individual elements. But they have to order most of the parts from factories with equipment for cutting thick metal, milling and turning.