The question of whether a juicer can be made with one’s own hands is primarily of interest to owners of summer cottages and garden plots who annually harvest fruits and berries, which need to be quickly processed and preserved. Adding even more relevance to this issue is the fact that juices obtained independently are much tastier and healthier than those sold in stores.
Any garden owner can make this or a similar screw press.
Today, purchasing a juicer of any capacity does not present any particular problems, but such equipment is not cheap. That is why it is advisable to make a juice press with your own hands, especially since the design of such devices is not very complex.
Homemade centrifugal juicer
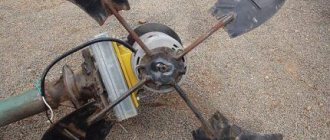
A large harvest can not only please, but also greatly puzzle the summer resident. If you have parts from an old automatic car lying around in your garage and have basic skills in working with metal, then making a juice press at home will not be difficult.
To work you will need:
- rivets;
- bolts;
- centrifuge with tank;
- pulley with belt;
- 1.1 kW motor;
- stainless steel pipe 100 mm;
- pipe 20 cm;
- stainless steel mesh with 1 mm cells;
- 2 mm metal sheet and pieces of tin;
- thin rubber;
- steel corners.
Much depends on the existing tank, its size, and available means. The main purpose of remodeling is to use unnecessary parts. The desire to improve and refine the design can be realized using purchased parts.
Step-by-step instruction:
- Remove the tank from the housing, remove the heating element and all related elements. Descale with vinegar or lemon essence.
- In a tank separated from the centrifuge, rivet all the slots with pieces of sheet metal of a suitable size. Leave a single hole with a diameter equal to the pipe for draining juice.
- Prepare a grater for chopping fruit. Take a sheet of metal and cut out a perfectly even circle with a diameter 20 cm smaller than the bottom of the centrifuge. Cut a gasket from thin rubber, place it between the bottom and the grater, paying special attention to the symmetry of the ring. Strengthen the structure with another circle of metal placed under the future grater.
- Drill 5 mm holes in the steel sheet in 15 mm increments. Use a punch to give the holes the shape of teeth, as on a regular food grater.
- Bolt the grater, metal reinforcement and gasket to the bottom of the centrifuge. The nuts should be on the outside; it is good to reinforce them with washers so that the bolts do not unscrew during rotation.
- Screw the pulley with the belt. Install and connect the motor. You can use the original motor if it produces at least 1500 rpm. At lower speeds, you should take any more powerful engine.
- The centrifuge already has holes for filtering the pulp, but they are too large and the juice will be cloudy. To fix this, there are two ways: riveting a stainless fine mesh to the inside of the drum or using a clean filter cloth each time. If you lay out the mesh, then attach it as best as possible to the centrifuge, absolutely motionless, without protruding edges and corners. With fabric everything is simpler; each time before processing fruit you need to soak it in warm water, distribute it over the drum, turn on the device, and the centrifugal force will fix it to the walls.
- Secure a 100 mm pipe above the grater at a distance of 4 cm using bolts and metal corners. It’s better to move the pipe from the center closer to the sides to make it more convenient to get the pulp out without having to disassemble the entire structure.
- To keep the unit stationary during operation, it should be installed on a frame welded from metal corners. If this is not possible, a rubber tire will dampen vibrations and provide relative stability.
- Attach the pipe to the tank to drain the drink.
Video on how to do everything yourself:
Most often, this juicer is used for apples, pears, and carrots. It is better than a simple apple chopper in that it produces absolutely pure juice in a short period of time, without requiring an additional press. When working with grapes, you cannot do without a press and chopping due to the peculiar structure of the berries.
Own juicer project: folk methods for extracting natural juices
Juicers are necessary for every summer resident and gardener. These devices are especially useful when it comes to pressing fruits at the end of the summer season. The design of such a device is quite simple, so it is not at all necessary to purchase it in a store.
A homemade juicer will help you process a large volume of fruits and berries quickly and easily.
To make such a device, we will need materials and tools, as well as a couple of hours of our precious time. Let's learn more about how to make a juicer with your own hands.
Let's look at the main types of homemade units.
Types of juicers
When you go to a hardware store, you will notice how varied the juicers are. Each is designed to perform specific tasks. But according to the principle of operation, they are divided into two types: centrifugal and screw. They are also manual and electric (the grater rotates due to the incoming voltage).
In turn, electrical appliances are divided into household (for home use), professional (cafes, restaurants, canteens) and industrial (for factories, etc.).
Press
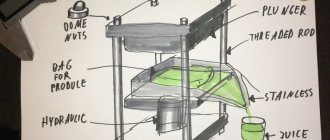
If possible, a screw press was used, consisting of:
- support frame made of wood or metal;
- screw with handle for tightening;
- round support board with a diameter corresponding to the internal dimensions of the container.
The possibility of using a welding machine will allow you to assemble a press from metal. Alternatively you can use:
- two pipes;
- a U-shaped profile is welded on top;
- a hole is made in the profile and a threaded head is welded to install the screw;
- a push-up stop must be provided on the bottom of the screw;
- top rotation handle;
- A pair of clamps are welded to the pipes from below for fastening to the support board;
- Instead of clamps, a support structure made of a metal profile can be used.
This option will not be too costly in terms of time and resources. The performance of the device depends on the volume of the tub.
In operation, the pressing method is more labor-intensive due to the fact that a significant part of the work is performed manually.
Functions of juicers
Recently, juicer manufacturers have been adding many additional functions to their machines that seem necessary and convenient.
But before you decide to purchase such an upgraded device, think about the main purpose for which you are purchasing it.
As a rule, many functions turn out to be completely unclaimed and almost never tested in practice. But at the same time, additional characteristics of the device increase its cost.
But there are also useful functions that an automatic tomato juicer can be equipped with. For example, many people find it convenient that the grids or grates of the device are capable of peeling or cooling themselves during the process to avoid overheating. Such additions are really useful if you have to process large volumes.
How to make a loading hopper and pusher
For dosed loading of fruits, you will need to make a bunker. It can be made from a piece of plastic pipe with a diameter of 100 mm. It is fixed obliquely so that the fruits roll onto the edge of the grater. The hopper is attached to the device body with aluminum or steel angles with bolts
Pipe for making a bunker
The pusher can be made from a birch cutting for a shovel. A circle of plywood with a diameter 5 mm smaller than the diameter of the pipe is attached to the lower edge. A transverse stop is installed on the top one.
Which juicer is suitable for obtaining tomato juice?
As a rule, centrifugal machines are not suitable for processing tomatoes. The resulting juice remains of poor quality and watery. In this case, the tomato pulp heavily clogs the sieve, and it can take a lot of time to clean it.
Many people are convinced that a tomato juicer should be of the auger type. Outwardly, it resembles a standard meat grinder. Such devices are capable of finely grinding tomatoes and squeezing them through a sieve.
At the same time, the pulp and seeds are well ground, and the output is high-quality, rich juice. It is much more convenient to use an electric juicer. It is easy to use and gets the job done faster.
But you can get delicious juice even if you purchased a mechanical one or for tomatoes.
Manual, mechanical and electric tomato juicers
There are devices that operate on a manual, mechanical or electrical principle. A manual juicer is considered the easiest to use, because it does not require electricity to obtain juice, which is especially important in dachas, where there is often no light or constant power outages.
The most popular in this category are pressing devices, for example, models “SVR-01” and “SVR-02”. The devices are containers with a screw press located inside the housing. The handle that operates the device is located at the top of the device.
The design is based on a stainless steel body, so the juicer is lightweight, but at the same time it is suitable for processing large quantities of tomatoes. However, you need to be prepared that you will have to spend quite a lot of time and effort during the work process.
A mechanical manual tomato juicer is also a simple design, the main components of which are:
- screw shaft;
- handle;
- suction cups for installation;
- a chute for loading vegetables or fruits;
- juice outlet tube.
This principle is used by the Motor Sich SBCH-1 model, as well as the Healthy Juicer and Tomato Juicer juicers, which are among the most common mechanical auger devices. The devices are activated by a handle that triggers a shaft, which acts as a kind of press that grinds and chops the fruit.
Tomato juicers are divided into devices that operate on a manual, mechanical or electrical principle.
The resulting mass is pushed to the sieve under high pressure, after which the juice supply begins. The operating principle of a mechanical tomato juicer is based on the cold pressing method, which allows you to obtain a rich product in which all the important elements are preserved.
Electric juicers are mainly represented by auger devices, the shaft of which is driven by a built-in electric motor.
A distinctive feature of electric tomato juicers is their high productivity, which allows you to process a large number of vegetables at a time and spend a relatively short period of time on it.
Thus, most models have a screw that can spin up to a speed of 200 rpm. In this case, the power can be small, for example, 250 W.
On a note! Even the lowest-power electric auger juicer is designed to process 40-50 kg of tomatoes per hour. This device is the easiest to use, but it is important to pay attention to the presence of an automatic pulp removal system.
If you are wondering which tomato juicer is better - electric or mechanical, then it is worth considering that each option has its own advantages and disadvantages. If you choose a quality product and do the right work, you will be able to get healthy and rich juice using either one or the other version of the device.
Mechanical manual tomato juicers are very popular.
The principle of auger devices
A manual auger for juice is very similar to a meat grinder, but its difference is that the juicer has a cone-shaped auger.
That is why many craftsmen manage to make a unit such as a tomato juicer from a meat grinder with their own hands. The main thing is to choose a suitable nozzle, which is easy to buy. To obtain juice, cut tomatoes are placed in a bowl.
As the auger moves, the juice and pulp are separated. The liquid passes through the grate. The remainder passes further and falls into the container.
The mechanical version of the juicer has a slightly different design, and the juice is obtained by pressing vegetables. When you press the lever, pressure is created and the tomato releases juice.
In electric models, the motor rotates the grater, which grinds the fruit. The juice flows into a glass, which is included in the kit.
Other ideas for squeezing fruits and vegetables
A medium-capacity manual auger juicer can be made from a meat grinder. You will have to extract the juice by rotating the handle yourself. This device is the best option for small volumes.
The main advantages of this type:
- affordable price;
- reliability;
- long-term operation.
To improve the design, you can use plastic bottles. We take a container and cut off its bottom at a distance of 10-15 cm from the bottom edge. Then we insert a small bottle into the resulting hole, having previously made small holes in it. Unscrew the plug and you can get to work. This option is only suitable for irregular juicing for one person.
.
Don't be afraid to experiment and learn something new. A homemade juicer will delight you with its performance while saving significantly on its purchase. Keep the taste of summer and saturate your body with vitamins regularly.
From this video you will learn how to make a juicer with your own hands:
See inaccuracies, incomplete or incorrect information? Do you know how to make an article better?
Operating principle of juice extraction devices
To create a good juicer, it is important to understand how it works. Obtaining fruit, vegetable or berry juice can occur simultaneously or sequentially. Screw models remove it immediately at the time of processing, but their assembly will require time and money. Centrifugal devices first grind the raw materials in a centrifuge, and then pass them through a press.
Based on the principle of operation, juicer designs are divided into the following types:
- hydraulic;
- mechanical;
- pneumatic;
- electrohydraulic.
The simplest structure is a mechanical type device. This is what is most often created independently at home. The principle of operation of such a juicer is to apply pressure to the raw material with a piston, which begins to work under the influence of a simple screw mechanism. First, berries and fruits are sent to a perforated container. Next, under strong pressure, juice is squeezed out of the products, which drips into the tray through special holes in the walls of the basket.
It doesn't matter what design of the device was chosen. To make a homemade apple juicer, you will need a basket for raw materials, a mechanism for chopping and squeezing, and a container for the squeezed juice.
HydraulicMechanicalPneumaticElectric juicer
What is an apple press?
With a large fruit harvest, many gardeners are interested in how to make an apple juicer at home. The most convenient way to process these fruits is to use a press. You can choose one of 3 types of such devices, they differ in the method of application:
- Mechanical is the easiest design to manufacture and does not require extensive resources. You will need a frame and a screw press, which is twisted by hand. Instead of a container, a mesh wall is made, a circle of wood, food and another circle are placed inside. A suitable container is installed under the mechanism into which fresh juice will flow.
- A hydraulic press is a jack model that does not require much effort to use. This is a more expensive and complex design option, since it requires skills to install the press itself and money to purchase a jack.
- A combined model is a product in the manufacture of which previous methods are combined. When using this mechanism, the products are first processed with a screw press, at the same time fixing the position of the pressing surface, and then a jack is used to squeeze out the remaining juice.
The cake remaining after processing can be used to prepare dried fruits or used as pet food.
Among the positive properties of any of the listed models of homemade juicer:
- no noise;
- the ability to store large volumes of juice for the winter;
- ease of manufacture;
- durability;
- low cost.
Among the disadvantages is the large amount of effort and time spent on manufacturing. In addition, a homemade design will not provide maximum efficiency when compared with industrial analogues. Household machinery takes up a lot of space and requires constant maintenance. After each use, it must be thoroughly washed and dried, and all metal parts should be lubricated with oil so that they do not corrode.
Hydraulic
Mechanical
Preparing tools and materials to create a juicer
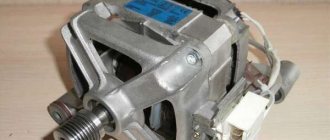
To build such a device, you will first need an old washing machine, perhaps even one that is out of order. The main thing is that the motor is working and the drive mechanism is in working order.
In addition, you will need: wooden blocks for installing the device, metal mesh, a set of bolts with nuts, rubber plugs, a piece of clean hose for draining the juice and a large container for the finished product.
Tools you will need: a set of screwdrivers, wrenches, welding, an angle grinder with a metal disc, a drill and a hammer. Metal scissors will also come in handy.
Typical faults
Common breakdowns:
- Wear of plastic gears.
- Heavy pollution.
- Blown fuse (if any).
- Failure of control circuit elements.
- Corrosion or shorted contacts.
- Wear of engine parts.
If the juicer is many years old and its warranty has long expired, then perhaps it has simply served its lifespan, as calculated by its manufacturer (not out of nowhere). However, if the juicer is “overseas”, then its manufacturer may not have even imagined that someone would disassemble his creation on their own and try to repair it after so many years of service!
But if the juicer was not physically damaged immediately before the breakdown, but simply suddenly stopped working, then this may mean that over time it could have become very dirty, some contacts have oxidized due to humidity, maybe the wires have burned out somewhere or something has shorted out. Anything could happen, but the main thing is that nothing serious happened to it, which means you can count on a successful repair. After all, the very fact of long, uninterrupted operation speaks of the reliability of the juicer. If it weren't reliable, it would have broken during the warranty period.
Advantages of a homemade juicer
A juicer constructed from an old automatic washing machine or activator-type machine is easy to use. A grater is installed at the bottom of the tank. Raw materials are poured through a wide hole capable of passing a whole apple or other large fruit. It is crushed and the juice is squeezed out.
The advantage of a homemade device is that it allows you to make juice in large volumes. The drum of such a juicer is much more spacious than store-bought equipment . If you add a powerful motor to it, then within an hour you can get up to 20 liters of juice.
Specifications:
| Modification | Optimus |
| Dry grain up to, (kg/hour) | 155 |
| Root vegetables up to, (kg/hour) | 280 |
| Grass up to, (kg/hour) | 54 |
| Hay/straw up to, (kg/hour) | 30 |
| Voltage, (V) | 220 |
| Net power of the electric motor, (W) | 750 |
| Power consumption, (W) | 1200 |
| Overall dimensions, mm) | 780x330x330 |
| Net weight no more, (kg) | 10 |
| Hopper volume (dm3) | 7,7 |
| Electrical safety class | I |
| Warranty period, (months) | 6 |
You can read the instructions for Farmer "Optimus" DKU-05 here:
Design advantages
If you have an old, unwanted washing machine with a working spinner, consider yourself putting it to good use.
The essence of a standard juicer is that fruits and vegetables are thrown into a special hole. It should be wide enough for a whole apple, pear and other fruits. The fruit then goes into a centrifuge, at the bottom of which there is a grater. After grinding, the juice is squeezed out.
The advantages of a washer as a juicer are that the volume of its drum exceeds the capacity of conventional appliances. And if you use an engine that produces 1500 rpm, then you can quickly and efficiently chop the fruits and get 10-20 liters of juice per hour.
Apple juice in a juicer
Preparing apple juice in this device is not difficult. It is necessary to wash the apples, cut them, put them in the container for raw materials, which is located at the top. Pour water into the lower container. Assemble the entire structure as described above. Put on fire. Place a tap clamp on the hose. It must be closed. As the water heats up, the apples will begin to release juice. After an hour and a half, you can open the clamp tap and direct the hose into the jar. The first portion of apple juice poured into a jar should be poured back into the juice collector , since it is not yet sufficiently sterilized and will not be stored. The next portions of juice can already be collected in sterilized jars and rolled up in the usual way. You can add sugar to the juice directly into the juice collector, or you can do without it. Then the drink will not only be tasty, but also as healthy as possible.
This is interesting! Which auger juicer is best for home use, rating of the best
The apple slices remaining in the container for raw materials can also be placed in sterilized jars, and you will get an excellent apple filling for pies. Or you can rub them through a sieve so that the skin remains in the sieve, and the most delicate applesauce will come out.
As you can see, preparing juice in a juicer is practically waste-free , which cannot be said about using a juicer, which leaves a lot of waste.
Automatic washing machine and rotary juicer
What you need from a washing machine
Typical domestically produced rotary juicers operate at a maximum of 3000 rpm. The speed is enough to compress the pulp by centrifugal force on the mesh walls of the centrifuge. Fruits and vegetables are thrown inside through a special spout to serve the fruit. It is designed to be large enough to allow whole apples, carrots, and beets to pass through. At the bottom of the horizontal centrifuge there is a grater in the form of a circle. Engaged in grinding fruits to pulp, which is subsequently squeezed out.
The faster the rotation and the larger the radius of the centrifuge, the more intense the process. Typical juicers will not exceed the diameter of a washing machine drum; a motor or gearbox will need 1500 revolutions (see below). This is normal operation during spinning; the mechanical part will not be damaged.
We choose a narrow model of a belt-driven washing machine. Modern direct drive will not suit you. The dimensions of the drum directly depend on the depth of the washing machine. The diameter remains almost unchanged, the height of the walls will be smaller. When we place the mechanism vertically, the low setting will ensure a modest lateral load from possible distortions on the bearings and seals. Consequently, the longer the homemade juicer from the washing machine will last. An apple juicer made with your own hands will require the following sacrifices from the machine:
- Drum.
- Tank (casing).
- Belt pulley.
- Belt.
We remove the mechanical part from the washing machine along with bearings and seals.
The question is, why not use the original motor. Let's answer - if you can set it to 1800 rpm, the option is ideal. The pulley will have to be removed from the original engine.
Assembly of other elements
A high-quality apple crusher should have devices for adjusting the start. Despite the “high-tech” name, there is nothing complicated about it - we just mean a switch button. The electric motor is placed on the side of the main structure of the crusher.
With high-quality design and careful operation, homemade crushers are often superior to branded products. You need to think through everything so that washing even the farthest corners of the shredder is not difficult.
How to make an apple juicer with your own hands: components and assembly
The question of whether a juicer can be made with one’s own hands is primarily of interest to owners of summer cottages and garden plots who annually harvest fruits and berries, which need to be quickly processed and preserved. Adding even more relevance to this issue is the fact that juices obtained independently are much tastier and healthier than those sold in stores.
Any garden owner can make this or a similar screw press.
Today, purchasing a juicer of any capacity does not present any particular problems, but such equipment is not cheap. That is why it is advisable to make a juice press with your own hands, especially since the design of such devices is not very complex.
Juice cooker - recipes
It has long been no secret that packaged juices of almost all brands today are more like juice drinks than a natural and high-quality product. A lot can be said about the benefits of juices, especially for young children. Of course, real 100% juice is much healthier and tastier for a child than those drinks that are sold in stores. If you want juice right here and now, you can use a juicer, but in winter and spring you won’t be able to do this trick. You can prepare juice using a juicer.
Juicer from an activator type machine
To construct a juicer, you need an Oka washing machine or a Sibir washing machine. Other brands with a spin cycle and an activator installed at the bottom of the tank are also suitable.
Procedure:
- remove the activator and shaft;
- install a new threaded shaft;
- fasten three knives on the shaft with nuts, rotated 60° (all materials must be made of stainless steel);
- install a plug on the drain hole;
- Place a wire mesh up to 0.25 mm thick with a 1.5 mm cell in the centrifuge so that it overlaps the sides of the drum by 4-5 cm;
- close the hole in the rubber cap that comes with the kit with a plug and place it on the bottom of the centrifuge;
- Wash the internal parts of the machine, hoses, and pump with a baking soda solution.
The resulting juicer will work longer than the washing machine programs allow, so the time relay should be turned off or the switch should be blocked after starting.
How to get juice:
Wash fruits or vegetables and place small quantities into the washing tub, in which the knives rotate. Grinding lasts from 20 to 30 minutes, depending on the variety and ripeness of the fruit. The resulting liquid puree is placed in small portions (up to 3 liters) in a centrifuge. If you put more, it will be thrown out during operation. Turn on the juicer and squeeze the juice out of the resulting mass. After a few minutes, remove the mesh with the cake and shake it out.
Advantages of the device:
- up to 12 liters of juice per hour;
- no need to peel and cut berries and fruits;
- constant presence is not required.
Depending on the type of raw material and the duration of grinding, the juice will contain some amount of pulp. To get rid of it, just pass the liquid through a filter or let it settle.
How to convert it into a moonshine still?
But having set a goal, the juice cooker can be easily converted into a moonshine still.
Option 1. With a separate refrigerator. Actually, this design uses only the bottom saucepan and lid. Instructions:
In this case, the moonshine will be partially purified during distillation.
Option 2. Without drilling the cover. In this case, use not the lid, but the inverted middle part of the juice cooker (the one with the fitting with the tube).
The distillate will flow through this tube to the steamer or directly to the refrigerator. At the same time, seal the existing structural hole in the bottom of the middle part of the pressure cooker (insert a plug, cover with thick dough).
Option 3. Without a special refrigerator. Assemble the pressure cooker as you would for juicing. Only place a container without handles with cold water in the very top, perforated part. This will be the refrigerator.
Read interesting and funny articles on our blog! * New relative. Story.
The mash, heating up, rises through the fitting of the juice collector and falls on the cold surface. Cooling, the vapor turns into moonshine and escapes through the tube.
Therefore, before the distillate begins to flow through the tube, clamp it with a special clamp (included with the juicer) so that alcohol vapor does not escape randomly. This is fraught not only with loss of product, but also with explosion.
And a few words about tightness. The containers of the juicer already fit tightly into one another, but they still need to be helped with fumigation tape. In addition, all containers have their own aluminum handles. They can be secured with wire for reliability.
Instructions on how to make a juicer at home
You can make your own juicer from any automatic washing machine - with front or vertical loading. The main thing is that there is a belt drive, since a direct drive model will not work.
If you have a front-loading washer, you will have to place it on its back, with the hatch facing up.
Preparing for work
First, remove from the machine body all the parts that are no longer needed: pump, pressure switch, intake valve, drain filter and control panel.
Pre-prepared drawings and drawings will help make the work easier. This way you can perform all the steps sequentially, referring to the diagram.
Prepare the necessary details:
- two metal meshes measuring 30x6 cm;
- bolts with nuts 3 mm;
- utensils for collecting juice;
- drain pipe;
- rubber plugs.
You will also need tools:
- screwdrivers and wrenches;
- Bulgarian;
- welding machine;
- drill;
- pliers;
- hammer;
- metal scissors.
Before putting the car down, prepare the support bars on which it will be secured.
Prepare the body for refurbishment
How to do it:
To create a juicer at home, it is advisable to take a stainless steel drum. However, a plastic drum will also work.
- All holes in the drum need to be sealed by welding because they are too large.
- Drill many small holes around the perimeter of the drum.
- Now put the tank back together by screwing in the screws. If the tank was non-separable, you need to prepare holes for self-tapping screws in advance.
Place the tank back into the body, return the sealing rubber and shock absorber springs to their place.
Modify the drum
Since to make the juicer yourself you will need most of the parts from the washing machine, it will cost you almost free. But in order for the drum to become a full-fledged chopper for apples and other fruits, it needs to be modified.
Make a grater. The fact is that the holes located on the surface of the drum are too large. They will turn the fruit into puree rather than juice. Therefore, take the prepared mesh strips and install them in a circle between the ribs of the drum. Secure the mesh in place with small screws. If necessary, you can remove the mesh and clean it.
A rib punch, which needs to be further sharpened, will help you chop fruits and vegetables. Don't forget to attach a pipe to the drain hole. The design is ready, all that remains is to connect the motor.
Since the control panel is removed when not needed, you will have to connect an additional switch.
To connect the motor correctly, you need to follow the electrical diagram. We have already described this in other articles, so watch the video on the topic:
Hand press
The easiest way to acquire a device for squeezing juice is to use your grandfather’s experience. In ancient times, an ordinary wooden trough and a chopper (a special knife for chopping hard fruits and vegetables) were used to chop pre-peeled apples.
The pulp prepared in this way, packed in canvas (gauze), was loaded into a wooden tub under a press. To drain the juice into a specially prepared container, a hole was made in the lower part of the tub. Any heavy objects, for example, a couple of boulders, could be used as a press.
Tomato juice
The steps for preparing tomato juice are the same as for preparing apple juice. It is necessary to wash and cut ripe tomatoes. Place them in a container for raw materials. Pour water into the lower bowl. Assemble the entire structure and place it on the stove to heat. After about 40 minutes, when there is some waste left in the upper bowl, open the clamp tap, and through a sieve, which will collect all the pulp that has fallen into the juice, strain directly into jars. Roll up as usual. As you can see, using a juicer is very convenient. And most importantly, you can stock up on vitamins for the whole winter!
Source
Other types of units
You can make other types of juicers yourself.
Press juicers are good friends of winemakers. A screw press is best suited for pressing grapes. Depending on the grape variety, different principles of berry processing are applied. White grapes are pressed only after crushing. The red is pressed only after the fermentation process has begun.
The press operates according to the following algorithm. First, the grapes are placed in a basket, then a screw mechanism presses juice out of it, which can be used to make wine, a variety of drinks, and jelly. You can prepare a grape press with your own hands from wood, plastic or stainless steel. The easiest way to implement it is from wood. Made from stainless steel, the device will be of higher quality and more durable.
The production of a press juicer is shown in the video.
From a meat grinder you can make an auger-type juicer with a medium capacity. Rotate the handle and get juice. This mechanism is optimal for processing small volumes. The main advantages are affordability, reliable design and the possibility of long-term operation.
Washing machine drum press
The design does not require a motor, electricity or complex parts. The bottom line is that a centrifuge is a sieve made of stainless steel - an inert metal ideal for working with tartaric acids.
- Remove the centrifuge from the tank, clean and descale it. Cut off the inner edge.
- Weld a frame and a stand for the press from a metal corner. Drill a hole in the frame for the screw. Weld the nut to turn the screw.
- Make a tray for draining juice from a sheet of metal or find a ready-made option.
- Cut a circle out of metal along the diameter of the tank and weld it to the screw.
By turning the screw, the press lowers and presses on the berries; the liquid comes out through the holes in the tank, collects in a tray and is poured into a suitable container. This allows you to squeeze the juice yourself without effort and in large volumes.
How to care for your home crusher
If you managed to make a shredder, then the hardest part is over. Don’t worry about caring for and cleaning the crusher yourself – it’s as easy as shelling pears.
The main rule for operating devices that come into contact with food is the cleanliness of the units. After each grinding, thoroughly rinse the surface of the device, clean and dry even in hard-to-reach places - these are the main areas of accumulation of bacteria and mold, which not only lead to rapid spoilage of the juice, but are also dangerous to human health.
Important! Before you start cleaning, turn off the power to the crusher!
To be able to enjoy delicious juice both in summer and in winter, it is enough to design a home apple crusher and learn how to squeeze the juice. Assembling such a unit is quite simple. You will receive undoubted advantages and significantly save money.
Making a grater
The standard centrifuge cannot be used as a grater and requires modification. Standard holes, which are used to drain water during spinning, will not cope with grinding. There are several options to solve the problem. Among them:
- make a steel lining from stainless steel, drill holes and fill teeth, secure it inside the centrifuge;
- install a mesh on the walls of the centrifuge, which will serve as a grinder;
- Drill out the standard holes of the drum and fill the notches with the sharp part inward in the direction opposite to its movement.
Housing installation
The drum with the grater is mounted in the tank. For this purpose, fasteners and ball bearings from the washing unit are used. Fastening is performed depending on the characteristics of the donor car. The assembled structure is placed in a vertical housing, which is closed with a removable lid with latches or a thumb-type fastening. A hopper is inserted into the hole in the lid on top, where vegetables and fruits are placed for chopping.
To prevent the apple bin from sinking down to the grater, a limiter should be provided. The body itself is mounted on a rigid or shock-absorbing base. The main thing is that the device does not lose stability from vibrations during operation.
Improving the device
For ease of operation, tighten the belt, which is secured using a special bolt for clamping and by means of the main block along the guides.
Rollers and a handle are screwed to the frame, which makes it easy to transport the chopper.
The apple crusher body can be avoided from bending by attaching it to the upper corners of the frame using bolts.
Note!
To avoid splashing when processing apples, make sure that the container in which you collect the puree at the end is wide. When designing, make sure the frame is low, otherwise processed food will flop into the basin and splash around.