The most pressing problem in the warm season is overheating of electric motors. Depending on the operating conditions, the cooling of the electric motor may be insufficient, and the overheating temperature of the electric motor may rise to a critical level. Based on my experience, I can say that if you spit on an electric motor and it hisses, it means that the cooling impeller of the electric motor is not doing its job.
I would like to note that hot weather may not always be the cause of overheating; in any case, it is necessary to measure the load with a current clamp, and only then draw conclusions. Heat and current overload of an electric motor is a killer cocktail that will ruin any electric machine. Well, that's probably enough chatter, let's move on to ways that can improve the cooling of an electric motor.
So, you spat on the engine and it hissed, in my opinion, disconnecting the electric motor from the network is not the best cooling option. When an overheated engine rotates, the cooling impeller produces air flows that, although poorly, still cool the electric motor. By turning off the power, the motor heats up even more from the residual temperature and this can become a critical factor that will lead to a short circuit in the windings.
Remember , if the engine is overheated, then try to reduce the load on it ; the load can be reduced based on the specifics of the application. For example, you need to stop the supply of raw materials at the press, close the damper on the electric motor of the smoke exhauster, in general, try to get the electric machine to idle. There are cases when it is technically impossible to reduce the load; there is a direct drive and nothing is regulated; in this situation, I stop the electric motor and quickly disconnect it from the mechanism being executed. After we execute the mechanism, it is disconnected and can be connected to the network. At idle, the electric motor cooling impeller will reduce the temperature of the iron faster and safer than if the electric motor was turned off.
In cases where it is not possible to reduce the load or mechanically disconnect the drive, I want to advise you the old fashioned way. Take a bucket of cold water and a large rag (just use this method only when turning off the power to the electric motor), after wetting the rag, squeeze it out so that it doesn’t drip. Feel free to cover the engine with this rag, then periodically check its temperature. If necessary, wet it in a bucket, and this procedure will cool the engine in a very short time. This cooling technique may seem strange to you, but I can assure you that it works.
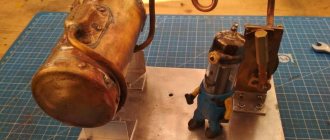
The factory electric motor cooling impeller does not always fully cope with its task. The air flows go to the cooling fins, but they are not too large; their strength is not enough for normal cooling. If we consider that the electric motor operates at 80% of its power and the street is +35C, then the electric motor cooling fan will not cope with its task. In such situations, I make a homemade impeller, which I make from strips of iron. The trick is that after installing it, its blades can be bent for better air capture (the principle of a propeller) when you bend the impeller blades, take into account the rotation of the electric motor, otherwise the air flow will go in the other direction. Such a homemade cooling impeller will not work when using electric motors in reverse, since the rotation changes and the curved impeller will blow in the wrong direction.
Basically, the cooling fan is made of duralumin which cannot be bent, unlike a homemade metal impeller. Be sure to take note of this method of cooling an electric motor using a homemade impeller with curved blades.
And one more piece of advice: if the electric motor is very overheated, do not be too lazy to disassemble it and lubricate the bearings, since under the influence of high temperature the lubricant may leak out and the bearings may jam.
Source: elektro-blog.ru
Where can I get impellers for motors?
Where can I get impellers for motors?
Post by atamkosta » Aug 16, 2011, 05:56 pm
Re: Where can I get impellers for motors?
Post by atamkosta » Dec 29, 2011, 11:15 am
Re: Where can I get impellers for motors?
Post by pentagrid88 » Feb 27, 2012 7:58 pm
Re: Where can I get impellers for motors?
Post by green_3mii » Mar 06, 2012, 12:34 pm
Re: Where can I get impellers for motors?
Post by atamkosta » 06 Mar 2012, 14:17
Source: asutpforum.ru
Pump impeller: the importance of the part for centrifugal devices
Pump impeller
- this is its key working organ. It is designed to convert rotational energy received from the engine into fluid flow energy.
Even in ancient times, people invented the simplest pumping devices. Over the centuries, the mechanisms have been constantly improved, and today this equipment is in demand in all areas of industry. There are many varieties of these units on the market, each of which is designed to solve specific problems. At the same time, centrifugal pumps are very popular. For example, they are indispensable for pumping water, for example, supplying it from a well over long distances.
The main working element of a centrifugal unit is the impeller (impeller). The technical parameters of the equipment depend on its specific shape, size, diameter and other indicators.
How to make a fan impeller with your own hands
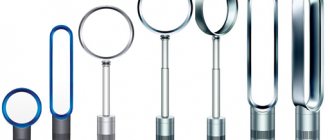
Fans without blades blow air through a ring placed on a stand. Dyson is the company that created the fan without blades and without noise. However, the very term “bladeless” misleads everyone; in fact, they still have blades. A small fan is installed in a stand and pushes air through a thin ring - this is the principle of operation of a bladeless fan.
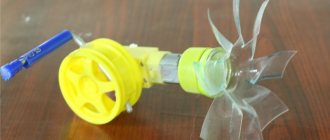
I'm going to build a simplified version of the original with my own hands. Of course, it will not work as efficiently, but the price is several times lower. You can also take a small fan with you anywhere.
The parts are printed on a Monoprice Maker Ultimate printer from PLA plastic, nozzle diameter 0.4 mm, on a heated platform.
Belt drive pulley between bearings
The impeller is connected to the engine via a belt drive with a pulley fixed between the bearings. The engine is located horizontally, the spiral housing is located vertically. The disadvantage of this design is the difficulty in replacing the belt. When using flat belts, they have to be embroidered. For V-belt transmission, remove the bearing located on the edge. Therefore, fans of this design are rare.
Read also: DIY jigsaw table with drawings
Device and design
Radial fans move air flows using an impeller installed inside a housing of a specific shape. The name “snail” arose due to some similarity in the appearance of the body with a spiral-shaped shell. The impeller has the form of a drum equipped with blades located parallel to the axis of rotation. The operation of the device occurs in close interaction between the housing and the impeller, the functions of which are equally important.
Suction occurs in the direction of the axis of rotation, and discharge occurs tangentially to it, perpendicular to the suction . As the blades rotate, they capture air particles and forcefully throw them out in a centrifugal direction. The fan housing does not allow the flow to dissipate, directing it to the outlet. A vacuum is formed in the area of the central part of the impeller, which is immediately replenished by inflow from the inlet located in the central part of the flat side of the housing.
Peculiarities
The specificity of the operation of centrifugal fans is the ability to reverse the air stream when changing the direction of rotation of the impeller. At the same time, there is practically no difference in pressure; there are only slight differences in parameters due to the use of the reverse sides of the blades. This allows you to install the fan in different parts of the air duct system and provide certain operating modes of the system.
The design of the cochlea fan is quite simple. An impeller is mounted on the drive shaft, rotating inside the housing. There are design options where the impeller does not have its own shaft and is mounted directly on the electric motor shaft. This is typical for small fans. The value is determined by the fan number, which indicates the diameter of the impeller in dm. For example, radial fan No. 4 has an impeller with a diameter of 40 cm.
Impellers, blades
The impeller (impeller) consists of blades that act on certain areas of the air flow and a carousel-type support structure.
There are two types:
- drum type impeller . Outwardly it resembles a squirrel wheel. Used in fans that move a gas-air environment with normal requirements - temperatures up to 80°, no aggressive, flammable, sticky or fibrous inclusions. Fits most fans
- open impeller . It is used much less frequently, since a design of this type is less resistant to mechanical stress. Most manufacturers make such impellers only to order. Used for work as dust devices working with complex materials with fibrous inclusions
The air flow moves through contact with the impeller blades. When rotating, the planes of the blades act on a certain volume of air with which they are in direct contact, compact it and impart a corresponding impulse.
The impeller blades have a slightly curved hollow shape. There are wheels with blades curved forward and backward . If there is a tilt in the direction of rotation (forward), a more powerful impulse of air flow appears, but if there is insufficient power to the installation (for example, if the inlet pipe is not able to provide a sufficient supply), the fan begins to “choke.” Blades curved back provide a slightly smaller impulse , but allow you to obtain a smooth and stable operating mode without failures or breakdowns.
Water pump impeller: purpose, types, causes of breakdowns, repair nuances
The pump impeller is the main working element of the centrifugal unit; its shape and dimensions determine the main technical characteristics of the equipment.
Today, pumping equipment is relevant for many areas, especially for owners of private housing construction. Such installations provide a stable supply of water from wells over long distances. There are many types of pumping equipment on the market, each unit is designed to solve specific problems.
The content of the article
For all types of installations, including heating units and pumping stations, the pump impeller is a key structural element.
Self-production
Let's consider how you can create a snail fan with your own hands, the drawings of which can be found on the Internet or made yourself.
Video review
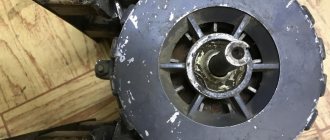
Working wheel
First of all, you need to get an impeller. This is important because it is a fairly massive element and requires good balancing . If the impeller beats even a little, the bearings of the electric motor (or its own drive shaft) will quickly fail. Ready-made impellers from fans or air conditioners are often used, but if you can’t find them, you’ll have to make them yourself.
Landing sleeve
First of all, you need to make a landing coupling. It is made on a lathe . The coupling is then attached to the sheet metal by welding or screws, clamped in a lathe and carefully centered. The result is a round disk with a seating sleeve in the center. Markings are made on it and the blades are attached. Making a drum-type impeller with your own hands is impractical, since high-quality balancing of homemade elements is impossible.
For the body, sheet steel or, as in the example in the video, wood is used. A strip 0.5-1 cm wider than the thickness of the impeller is cut out of it. The strip is bent, giving it the shape of a snail. This is the side of the body. Then two identical parts are made, repeating the profile of the side element.
One of the parts will become the outer side of the housing; a suction hole is made and a flange is secured for mounting air ducts or grilles. The second part is attached to the motor housing and has a hole for the passage of its shaft. It is secured to the engine with bolts , the side curved part is welded to it with a continuous seam without gaps. Bolts are welded to the edge, which will press the outer part with the suction hole.
A car drove past you with a fan cooling the engine. You went into a store - there in winter a warm stream of air greeted you at the door, and in summer a cool breeze blew from the ceiling. This is all the work of the fan. It is found in refrigeration units and in air conditioners. It cools various radio and electronic equipment and helps us at home.
All the fans that you may have seen probably seemed very simple to you. It’s not difficult to make two or three curved blades. And yet, if done incorrectly, the fan will immediately acquire a bad character: it will drive less air and work noisily.
Several years ago, engineers from the Central Aerohydrodynamic Institute (TsAGI) developed a blade shape that would make the fan quiet. The impeller - impeller is very simple to manufacture. It is performed using sheet material. Metal sheets are convenient for both manual production of parts and industrial production. It can be easily hammered out and stamped.
You can make such a fan for room air conditioners, for window and table fans, for cooling or heating various equipment.
Here is a general view of the TsAGI low-noise fan (see Fig. 1). It consists of an electric motor, a housing and an impeller (impeller). The fan can be made without a housing. But then it will not produce such a powerful air flow. The fan diameter can be up to 400 mm.
If you have an electric motor and you know its maximum speed, then from the graph (Fig. 2) it is not difficult for you to determine what maximum diameter you can make a fan.
So, you have decided to make a fan. Keep in mind that the noise of the entire installation is due to the noise of the electric motor and impeller. So if you want a low-noise fan, then choose a low-noise electric motor.
The fan impeller is made of metal, duralumin or steel sheet. The thickness of the sheet is selected depending on the diameter of the impeller within 0.5-2 mm. The larger the diameter of the impeller, the thicker the sheet should be taken.
First, cut out the impeller. The dimensions of this scan are shown in Figure 3. Here the numbers do not indicate millimeters, but rather the radius of the impeller blades. To obtain dimensions in millimeters, multiply the indicated numbers by the selected radius of the fan impeller. Then give the impeller blades the desired profile - knock them out on a blank. Make a blank from hardwood according to the dimensions indicated on diagram 4. Here the dimensions are also given in fractions of the impeller radius.
How to get such a blank? It is processed using three curved patterns. These templates are made from flat templates (Fig. 5). You will find the radii of bent templates and the dimensions of flat templates in the table. Bent templates are used to check the correct manufacturing of blanks along three sections I—I, II—II, III—III. Align the ends of the template arc with the corresponding vertical marks on the sides of the blanks. Make sure that the axial marks on the templates on the blank are located in the same plane. Templates are easiest to make using rigid steel. But any metal or plastic sheet will do, only the working edge of the templates should be made no thicker than 0.5 mm.
The working surface of the blanks must be smooth and firm. To do this, it must be thoroughly cycled and sanded. Only after this can the blades of the fan impeller be knocked out on it. To prevent the impeller blank from moving when hammering, nail it in the center to the blank. And in order to increase the rigidity of the shoulder blades, after knocking them out, make small decreases along the base of the shoulder blades - ridges.
The bushing for fitting the impeller and the axis of the electric motor is turned on a lathe or made manually as shown in Figure 6. The impeller and bushing are connected with rivets or inside.
Once the fan impeller is assembled, be sure to balance it statically.
We have already said above that the fan can be made with or without a housing. Figure 1 shows one of the possible* design options with housings. Other designs are also possible.
Source: zhurnalko.net
Power supply
Anyone who wants to make a fan with their own hands sees 3 problems: getting a motor, power supply, and making a propeller. The parts must fit together. Three problems solved, you can start making a fan with your own hands. Today there are an abundance of switching power supplies at home. Think about it, it started in the 90s. Game consoles, mobile phones, other equipment. Equipment breaks down, switching power supplies remain. The voltage is sometimes non-standard; most motors operate on any voltage. The revolutions will simply change according to the voltage. If you have broken household appliances lying around at home, immediately make a fan yourself.
Homemade fan power supplies
People are constantly trying to make a special fan with their own hands. One issue is often beyond the scope of discussion: the power source. The design of the fan itself is so obvious that there is no point in going into more detail. So, it’s clear that there are an unimaginable number of batteries today. Will they be able to work for a long time? The answer is no. As a last resort, take the “crown”; in Soviet times it was considered a reliable source of energy. The power supply is bad, the power will gradually drop, the speed will decrease, and it will irritate people. Stability without additional effort is important. There is no small 12 volt battery - get ready: let's start looking for how to make a power source for a homemade fan.
The first thing that comes to mind is to screw up the computer. It is known that miniature devices are powered by a USB port. Gadgets are being recharged. The USB port is a source of inexhaustible energy. The voltage is low, you will need a low voltage DC motor. We believe you can find it at home or buy it at a hardware store. How much port power will be: according to old standards, 2–3 W. Another thing is to find a host device with an updated version of the interface (2014 was considered a rarity). The developers promised to deliver 50 W (it’s hard to believe even more). True, there will be more wires, the rated voltages will increase. We remind you that according to tradition, power is supplied to the red (+), black (-) wires. White, green - signal.
It’s clear that it’s difficult to expect much power - even if the port supports it, the motor won’t pull it. It is recommended to look for a higher voltage. The motor must be supplied with higher voltage. For example, it is recommended to use a processor cooler. The supply voltage is less than the required 12 volts, the rotation speed will simply decrease. Beware of exceeding it - the motor may burn out.
We are looking for energy, the question is easier to solve than for 3 volts:
- You will find 12 volts in a personal computer; voltage is used to power the cooler. Pay attention to the direction of the wires. At each standard connector, 12 volts are detected. The outermost yellow wire (I've seen exactly the opposite circuits), two black ones in the middle - ground. Check with a tester, the layout is typical.
- 12 volts DC is provided by adapters for charging portable walkie-talkies. Devices that consume 9 volts are common. Suitable for CPU cooler. Today, Peltier elements are popular; they are equipped with a large radiator; the fan often becomes useless. Smart people brought the processor to a temperature of minus 10 degrees Celsius - enough for reliable operation. Adapt the cooler to a homemade fan. Any is good with 4 holes. It is rarely possible to screw it to the processor socket, but you can thread a wire frame that acts as a stand. 4 holes in four corners - figure out how best to make a stand.
- Anyone can make a power supply on their own... Let's get started right now, hold off on messing with the system unit. Microcircuits and radioelements are widely sold in retail outlets and markets.
Causes of part failures
Since the impeller is the key element of a centrifugal pump, it is the one that most often causes pump failure. Problems may arise due to difficult operating conditions: exposure to the pumped liquid itself (high density, abrasive content), temperature changes, vibration. The wheel also wears out due to dry operation: the impeller is deformed and even completely destroyed.
The cause of part failure is sometimes cavitation, when “cold boiling” of liquid occurs on the surface of the part. Air bubbles collapse in this area, and pressure surges damage the impeller. It is possible that the wheel was initially installed incorrectly or that it shifted during operation.
Source of the article: https://www.arkronix.ru/blog/krylchatka_nasosa_znachenie_detali_dlya_tsentrobezhnykh_apparatov/