Craftsmen assemble fashionable ATVs from various motor vehicles of the last century. This will allow you to breathe new life into old motorcycles and mopeds, making them more functional and efficient. So, for example, you can assemble an ATV from the Dnepr. This legendary road motorcycle with sidecar will be a good donor for new motorcycles.
To assemble an ATV from the Dnepr with your own hands, the drawings of the future design should be worked out in detail. This is a heavy motorcycle that had a four-stroke two-cylinder engine. Depending on the modification, it had power from 22 to 36 hp. With. This allows you to create an all-terrain vehicle that can conquer tough off-road conditions, transport significant loads, and also cultivate the soil. This is multifunctional heavy equipment, the characteristics of which are not inferior to popular factory models.
The ATV can be made all-wheel drive or rear-wheel drive. The second option is preferable, as it is easier to assemble. To improve the all-wheel drive system of the model, it will be necessary to seriously alter the existing design, so in this case it is impossible to do without the help of professionals.
To assemble an ATV from a working Dnepr motorcycle you will need:
- Cross steering rod.
- Levers for the front suspension.
- A pair of front hubs from a rear wheel drive car.
- Pipe with a wall thickness of 3 mm.
- Axle shaft or driveshaft.
- Rear axle.
The master must have a welding machine and be able to handle it. During the work, electric and manual tools are used.
ATV from MT motorcycle
ATV built on the basis of the Dnepr MT motorcycle: photo, description, test video.
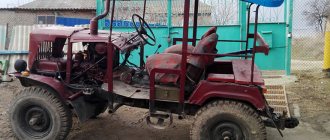
Craftsman Alexander Gilyanov assembled a homemade ATV with his own hands; the donor for the homemade product was a heavy-duty motorcycle Dnepr MT.
The Dnepr motorcycle is ideal for building an ATV; it is equipped with a 2-cylinder, 4-stroke, boxer engine with a power of 32 hp and a gearbox with reverse gear.
The photo shows the main stages of assembling an ATV.
The motorcycle was completely disassembled and the front end had to be lengthened.
The suspension arms are welded from a square pipe.
Shock absorbers from a motorcycle are installed.
Hubs and wheels from VAZ.
The rear axle is also from a VAZ classic.
During testing, the homemade ATV performed very well.
Also attached is a video of the author, which shows his homemade ATV from MT.
Making a snowmobile from a motorcycle with your own hands
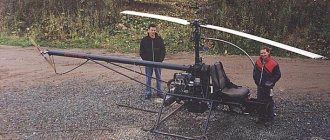
What brands of motorcycles are preferable for conversion? As a rule, these are “Izh”, “Ural” and “Dnepr”. What is important? You can take the original steering wheel, but during assembly try to install it at the same original angle, because It is advisable to place all control elements on it (clutch lever, gas handle). As a rule, sheet steel and angle are used to make skis. The geometry of the rubber band is about 300×2200 mm. For the frame, you can select steel pipes or angles with dimensions for the final reference point of the frame 430x1500 mm. If by chance there is an engine from the Voskhod-3M motorcycle on the farm, that’s wonderful. Craftsmen have long ago developed on its basis such a stable scheme with one driving track located at the rear and two steering front skis, see photo:
Home » We can do it ourselves » How to make a snowmobile with your own hands from a motorcycle and a walk-behind tractor with video and photos Snowmobiles made with your own hands from a walk-behind tractor and a motorcycle We found out how to make a similar unit from a chainsaw here. Now let's try to figure out how to build a snowmobile with our own hands from a motorcycle and a walk-behind tractor. There are several fundamental principles based on the laws of physics that must be strictly adhered to. This will save nerves and money. We will explain these points further in photos and videos. A snowmobile overcomes snow obstacles only because it has a large support area, which prevents it from falling through. Hence the conclusion: for a comfortable ride, you should try to make this very area as large as possible. Further. What else can reduce the specific load on the snow cover? That's right, less weight. Hence the second conclusion: it is advisable to minimize the weight by removing all that is unnecessary. Next point. Let's watch this video with a homemade snowmobile made from a motorcycle: What caught your attention and hurts your eyes? That's right, the unstable position of the device, which is why the driver is forced to constantly desperately balance on the brink of a foul. This happened because the design of the device itself was not thought out: one ski and one caterpillar are on the same horizontal axis. Meanwhile, it is known from physics that at least three points of support are required for stability. Therefore, the entire design must include either two tracks and one ski, or one track and two skis. The second option is certainly preferable, because it is structurally simpler, easier to assemble and cheaper. Do-it-yourself snowmobile from a motorcycle Of course, it’s not that simple. Only people who are, as they say, “in the know” can make a snowmobile out of a motorcycle with their own hands. Those. fluently operate a chisel, grinder, and welding machine. But the game, as they say, is worth the candle. What brands of motorcycles are preferable for conversion? As a rule, these are “Izh”, “Ural” and “Dnepr”. From the Izh motorcycle you can get a design like in this photo: What is important? You can take the original steering wheel, but during assembly try to install it at the same original angle, because It is advisable to place all control elements on it (clutch lever, gas handle). As a rule, sheet steel and angle are used to make skis. The geometry of the rubber band is about 300×2200 mm. For the frame, you can select steel pipes or angles with dimensions for the final reference point of the frame 430x1500 mm. If by chance there is an engine from the Voskhod-3M motorcycle on the farm, that’s wonderful. Craftsmen have long developed on its basis such a stable scheme with one driving track located at the rear and two steering front skis, look at the photo: What you need to focus on: the steering wheel, instrument panel, headlight and seat from “Voskhod-ZM”. Pro skis are made from boards (15 mm, aspen), width – 180 mm. The socks are simply steamed in boiling water, folded according to a template, waited for complete drying, and then lined with sheet aluminum from the bottom. With a Ural engine you could end up with a monster like this:
Let's look at another transformation of mechanisms with our own hands from a walk-behind tractor A DIY snowmobile made from a walk-behind tractor is also an interesting option. In the sense that minimal alterations are required. After all, a walk-behind tractor is essentially a multifunctional unit. By its very design it is intended to change functions. In this case, it and the snowmobile have one common unit - the engine. It should be used. The set of tools is not so large. In addition to the standard plumbing kit, you will need a welding machine and, possibly, a pipe bender. The brand of the walk-behind tractor does not matter much; you need to focus on manual control and the middle class of the model. How to make a propeller for a snowmobile from a walk-behind tractor? There are two options to choose from.
Wheel version: Crawler (with transport tape as a caterpillar plus snow hooks)
An intermediate version of a snowmobile made from a walk-behind tractor, made by yourself:
The brand of the walk-behind tractor does not matter much; you need to focus on manual control and the middle class of the model. The most common models of walk-behind tractors are equipped with single-cylinder, four-stroke, air-cooled gasoline engines. Based on them, you can assemble a snowmobile from a walk-behind tractor with your own hands. However, with some skill, a two-stroke engine with its relatively simple design can also be used. You can generally use a four-wheel scheme, then you will get a snowmobile from a walk-behind tractor, as in this video:
source https://avtotuningg.ru/kak-sdelat-snegoxod-svoimi-rukami-iz-motocikla-i-motobloka-s-video-i-foto/
Do-it-yourself homemade ATV: how to make a decent device
An ATV is a vehicle equipped with four wheels. The main manufacturers of mini cars are: Yamaha, Polaris, BRP, CF Moto. Utilitarian quadrics are used as all-terrain vehicles, and stunt models are used for fast driving. The categories differ from each other in technical characteristics, which is taken into account when you need to assemble an ATV with your own hands.
ATV from "Dnepr": wheels
They also take ATV wheels from an old car, which are quite wide, unlike motorcycle wheels. Such tires provide vehicle stability and good cross-country ability, which is especially important in off-road conditions. The diameter of the wheels can be large, up to cargo size. The Dnepr engine has good power and endurance, so such modifications that increase the load will not affect its operation. At the same time, the speed will remain quite high.
Description of the vehicle
A modern ATV is equipped with four or six small wheels, but with increased maneuverability. The main technical characteristics include: light weight, all-wheel drive and low gear. Due to the unique configuration, the vehicle can easily travel on country roads. It can be used in summer and winter.
To make a homemade ATV, it is recommended to decide on its type:
- Utilitarian. The model has a lot of weight and good maneuverability. The vehicle easily carries several people and accelerates to 90 km/h.
- Stunt. Equipped with a narrow platform and radiator. The car weighs little and can accelerate to 137 km/h.
Vehicle assembly is carried out taking into account technical characteristics, equipment, and operating conditions. To perform independent work, you will need to have skills in working with a welding machine and a lathe. To build a car, you will need a spacious garage. Taking into account suitable parameters, a do-it-yourself drawing of an ATV is prepared.
Frame assembly
The frame is assembled almost from scratch from pre-prepared pipes, which should be light, but at the same time durable. Some structural elements are taken from the Dnepr, but the structure is partially supplemented with appropriate material. Pipes from an old motorcycle are ideal if they are well preserved. Such structural elements have sufficient strength and flexibility.
Additional pipes should not be too thick, as their weight will make the ATV clumsy and heavy, lacking maneuverability and good dynamics.
Preparatory stage
When assembling the structure yourself, the power of the motor, the type of suspension, and the need to install a trunk are taken into account. To perform the upcoming work you will need: a welding machine, drill, grinder, keys, hammer, pliers, jack. As a basis you can take:
- Motorcycle Ural.
- Motorcycle Izh.
- Scooter.
- Oka or Niva car.
If necessary, transport is assembled from motorcycle and car parts. If the frame is made independently, special equipment will be required to deform the pipes. In this case, it is recommended to separately make drawings of the frame for the ATV with your own hands. This will simplify the process of assembling components:
Selection of systems
The brake system uses new parts or with minimal mileage. It is dangerous to install old brakes. The muffler is removed from the old car or made independently from a pipe. If a frame from another machine is used, it must be securely bolted to the bottom of the motor. The power unit is installed at the rear or front. Experts advise securely attaching the drive and transmission to the frame.
If the frame requires reconstruction, the component elements are dismantled. The front part needs to be extended onto the frame. At the next stage, the components of the frame are welded. When reconstructing the frame of a motorcycle, the seatposts are moved back by 40-45 cm. Racks are cut out of metal and welded, which are then fixed to the frame. The resulting homemade quad part can be painted with any paint.
To make your own frame, use a regular pipe with a wall thickness of up to 3 mm. It is better to make the spars from a pipe with a diameter of 25 mm, and the struts from a 20 mm pipe. The elements are fixed by spot and then solid welding. In a similar way, the ears from the levers and shock absorbers are welded to the frame. It is recommended to fix the brackets when installing other components and assemblies.
Electrics and body kit
When the frame is ready, all components and assemblies of the system are installed on it using metal brackets. Each of them must be firmly fixed in its seat. Otherwise, due to vibration, parts and mechanisms can quickly fail. It is also important to distribute the load correctly to keep the ATV stable.
To make the appearance of a homemade vehicle spectacular, the body kit can be made independently from polymer materials. To do this, a mold is created from foam plastic, onto which fiberglass is applied in several layers. A metal mesh is installed between them, which will serve as reinforcement. After installing the plastic parts, the driver's seat, headlights, and lanterns are installed, which are also removed from the old motorcycle. The electrical system is carried out, after which it is necessary to check its functionality. If everything is functioning correctly, you need to test the new equipment, gradually increasing the load.
A homemade ATV is assembled not only from the Dnepr: read how an ATV is made from the Ural, Ant, walk-behind tractor, scooter and Oka.
Power unit
The motor is removed from a sports or regular motorcycle, scooter, or car. Auto mechanics advise using a four-stroke engine with a power of more than 15 hp. With. The power units of scooters differ from other analogues in their low fuel consumption. An ATV based on a scooter weighs little, so it can be pulled out quickly if it gets stuck in sand or mud.
To transport cargo or drive off-road, a stronger motor is installed:
- from Izh-1, Izh-2 or Izh Jupiter with a power of 24 hp. With.;
- from the Urals 32 or 36 l. With.;
- from Oka two-cylinder engine 35 liters. With.
Homemade all-terrain vehicle from the Izh Planet-3 motorcycle
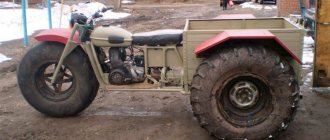
A homemade all-terrain vehicle made from an old motorcycle, it goes through any snow and mud.
.
Greetings! Old motorcycles often undergo various types of modernization. All-terrain vehicles, ATVs, and snowmobiles are made from them. Many even put this business on stream, that is, they equip their garages and build this equipment to order. Probably in almost every village you can find a garage Kulibin who can build anything out of a motorcycle. It is for the villages that this technique will always be relevant, because in winter the roads are so swept up that tractors often do not have time to clean them.
Many people make such all-terrain vehicles for fun, for example, to go fishing or hunting. But I made such a device in order to get to work on it.
Once upon a time I lived in a village, the roads were very snowy, we went to work on skis, but this was in the winter, when spring came, everything that had accumulated over the winter began to melt and it became even more difficult to get to work.
My grandfather’s old Izh Planet 3 motorcycle was gathering dust in the garage; after looking on the Internet, we found quite a few options on how to make an all-terrain vehicle out of it. The most important thing that was needed for this was the bridge and front suspension of the VAZ classic
The bridge was cut, and a sprocket from the combine was installed on the differential instead of the standard gear. An asterisk is also installed on the drum.
The most labor-intensive and expensive part was making the wheels.
The cameras were taken from the combine. There were 8 of them in total, that is, they made fur coats from the same chambers. The wheels were taken from a Niva car, the cameras on them were perfect. The fasteners were modified to fit the classic hubs.
For snow, these wheels are probably the ideal option. The all-terrain vehicle does not sink much on them. But during the first test ride, it became clear that there were not enough lugs. Therefore, we installed drive belts from the combine on the drive wheels and bolted them to the disks.
They didn’t weld the differential, but it happens that it makes it difficult to overcome a large snowdrift, and one wheel begins to slip.
The all-terrain vehicle overcomes any dirt without problems. In the spring, you can drive it across a plowed field, even when the plowing becomes very soggy.
But there is one big drawback to these wheels, and that is that they are not durable. Cameras begin to crack over time due to exposure to sunlight. And of course, there is a big risk of piercing them, or even worse, tearing them. But these wheels lasted me for 4 seasons, in principle this is not bad.
Share this idea on social media. networks
Popular articles on our website:
- Homemade ATV based on Izh Planet: photo, description
- Homemade all-terrain vehicle based on the T-16 tractor with a body…
- DIY amphibious all-terrain vehicle
- A craftsman assembled a homemade all-terrain vehicle: showing the design
- DIY mini tractor
- DIY ATV based on Izh Jupiter
- All-terrain vehicle made from a walk-behind tractor
- Homemade GO cards
- Made a homemade scooter with a chainsaw motor
- Homemade tracked all-terrain vehicle with a residential module and…
- Homemade tarabike “Pitbull” (37 photos)
- Homemade children's car with an engine from...
Front and rear suspension
Homemade ATVs are equipped with front or rear suspension. It is easier to mount a ready-made front suspension from an old motorcycle. You can use other options:
- Rear axle from the car. It must be shortened to fit the parameters of the quadric. The advantage of this method is the presence of a differential. The disadvantage of the bridge is its large mass.
- Cardan + gearbox on the rear axle. An independent suspension with high ground clearance is suitable for an all-terrain vehicle. In this case, the suspension arms are fixed to the frame using bolts.
To prevent the ATV from turning over while driving, it is recommended to tilt the front suspension strut. The shock absorbers are from Izha. If you have the financial opportunity, it is better to install gas-oil shock absorbers with pumping. They provide suspension adjustment based on the road surface.
The steering system of an ATV is similar to that of a car. A steering wheel or motorcycle handlebar is installed . Some experts advise combining 2 types:
- motorcycle handlebars, shaft and lever at the top;
- parts of the steering system from the car are below.
You can make the steering shaft with your own hands. For this, a pipe with a diameter of 20 mm and a wall thickness of 3 mm is used. You will need to install a travel stop at the bottom of the part.
Rear suspension assembly
How to make an ATV from Dnepr? It is worth considering that it is recommended to take the front hubs and rear axle from the same car. Thanks to this, there will be no need to adjust to the mounting discs. Parts from VAZ are best suited for these purposes.
The old motorcycle is disassembled, placing its parts neatly on racks. The steering wheel and shock absorbers are removed from the frame, and then assembly begins. The suspension can be on leaf springs, springs or a rigid type. Driving comfort depends on the choice of this part, so it is best to make a suspension with a spring-type shock absorber.
It is best to purchase the missing parts separately so that they cope with their task in full. The suspension is fixed to the frame, for which you will need to calculate the weight of the ATV. It will be quite heavy, so the structural elements are chosen accordingly. In this case, shock absorbers will be able to provide a smooth ride when driving off-road.
Gearbox and brakes
If the quad is assembled on the basis of a car, the chain drive is replaced. This greatly simplifies vehicle maintenance. A manual transmission is installed, as it improves maneuverability. The input shafts are directed to the front and rear axles. Wheels can be removed from small cars: Oka, Niva.
The brake system is selected taking into account the mounted wheels. The steering knuckles are removed from the Niva or Oka. To assemble an all-wheel drive model, you will need: car steering, transmission drive and differentials. In this case, the frame is not used. It is better to weld the structure to suit the engine size.
The suspension is also removed from the car. A gearbox is installed on the front-wheel drive model. The next stage is the manufacture of the body. For this you will need fiberglass, fiberglass. Experts advise using the first material, as it is easier to work with.
A drawing is pre-prepared and body elements are cut out from polystyrene foam. To fix them together, glue or foam is used. Fiberglass is glued to the foam. The resulting structure is attached to the frame. The body is well dried, primed, sanded and painted.
Tires of the required size are selected. If the vehicle will be used off-road, it is necessary to create the appropriate ground clearance (distance from the bottom to the surface of the earth). For this, R17 wheels are installed.
The resulting ATV is equipped with turn signals, headlights, a dashboard, and a battery. Electrical equipment is connected according to a pre-designed diagram. For this, wiring and a multimeter are used to check the voltage in the network. The next step is to install the seats. The vehicle is checked for serviceability, and the data displayed on the drawings is compared. A quadric, correctly assembled, is not inferior in technical and operational characteristics to finished vehicles.
Homemade ATV ICE Dnepr
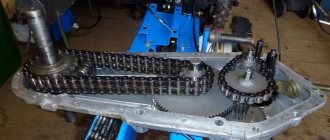
Dear visitors to the “ Samodelkin Friend ” website, today we will look at another homemade ATV with an engine from a heavy-class motorcycle “Dnepr” with a 4x2 wheel arrangement. More than 100 step-by-step photos of assembling the ATV and video tests.. This all-terrain vehicle was designed and assembled by Oleg from the village of Vyselki, Krasnodar Territory, registered on the DRIVE2 website under the nickname “Krik Dushy.” If you are interested, you can find the author and check directly with him for the nuances and subtleties of building an ATV.
First of all, the master and his friends bought an old homemade ATV in a neighboring village, which had been standing in the garage for a long time without wheels and would not start. The purchase cost only 5 thousand rubles, then the author began a large-scale redesign and modification of the old quad design, namely, the frame and suspension were completely redone, the oil filter was replaced with an air filter, VAZ wheels with a deeper cut tread (herringbone) were installed.
The levers, balls, hubs and brake calipers with discs are all borrowed from the VAZ classic, the shock absorbers were initially installed from IZH Jupiter-5, but were later replaced with original ones from the Dnepr. The author turned the steering bipods over so that the ground clearance was higher and the calipers also had to be swapped. The brakes are classic, disc brakes in front, drum brakes in the rear. The axle shafts are shortened by 32 cm, 16 cm on each side, respectively.
And so, let's take a more specific look at the step-by-step process of assembling an ATV with a Dnepr 650 cc 0.6 l, 36 l/s engine.
Materials
- ICE Dnepr MT-10
- rear axle VAZ
- professional square pipe
- charging relay (classic)
- air filter for 150 cc from a moped
- VAZ wheels
- disc and drum brakes
- bolts, nuts and other small items
Tools
- welding inverter
- Angle grinder (grinder)
- drill
- set of wrenches
- plumbing and measuring tools
- skillful hands and a bright head)
Preparation for work, tools and equipment
First of all, you need to carefully consider when, where and for what purposes the future ATV will be used - hunting and fishing, motorcycling in nature, transporting goods, etc. It is on this basis that you need to make a choice of a “donor” vehicle, deciding how powerful the engine is needed, what kind of suspension is suitable, what kind of trunk, etc.
You can take ready-made drawings from the Internet, create them from scratch yourself, or combine both options and ready to remake them at your own discretion.
List of required tools:
- welding machine;
- Bulgarian;
- drill;
- a set of keys;
- various small tools - calipers, hammer, knife, screwdrivers, pliers, etc.
To make your own frame, you will also need equipment for bending pipes. If you don’t have one, you can rent it or outsource the necessary work to another craftsman. Only with remarkable skill can you bend the pipes manually by heating the bend with a gas cutter or torch.
- engine;
- frame;
- rear and front suspension;
- steering;
- brake system;
- cooling system;
- muffler;
- electrical equipment - battery, headlights;
- body, body kit
It is quite possible to make a muffler yourself. Everything else is to purchase used parts on the shadow market.
Parts selection
ATV frame
Depending on the “donor” and the design of the quad, you either have to make the frame yourself, or you can reconstruct a finished, used one.
The most important thing is that the engine is securely bolted to the bottom along the frame, which can be located either front or rear. The transmission and drive should also be firmly attached to the frame to avoid play.
Homemade frame
The material used is ordinary water and gas pipes with a wall thickness of no more than 3 mm:
- for spars - 25 mm;
- for crossbars and struts - 20 mm.
The pipes are connected using spot welding, followed by solid welding. Ears for attaching shock absorbers and levers are welded to the frame immediately. Brackets - during installation of units and components.
Reconstruction of an existing frame
To reconstruct a finished frame, you should remove everything, leaving the frame, dismantle the back part and build up the front. Then weld elements for fastening a complete set of components and assemblies of the ATV. When reconstructing a motorcycle frame, the seatposts should be moved back by 40 - 45 cm.
The front and rear luggage racks are cut out of a metal sheet and welded to the frame. Finally, the finished frame is painted; there is no need to varnish it.
Additionally, we recommend reading our expert’s article on how to choose a roof rack for your car.
Stages of assembling an ATV
To create a homemade ATV with your own hands, you need to go through 9 stages of work step by step:
- Acquisition and preparation of everything necessary;
- Welding (alteration) of the frame;
- Installation of suspensions, brakes, chassis, shock absorbers, wheels;
- Installation of engine, gearbox, drive assembly;
- Installation of the fuel system;
- Installation of electrical equipment - turn signals, headlights, dashboard, battery;
- Case manufacturing;
- Priming, sanding and painting the body, (if desired) sophisticated custom tuning;
- Installation of the body and seat.
After the final stage, the finished miracle of home-made equipment will need to be thoroughly tested, gradually making road (and off-road) conditions more difficult.
ATV from Dnepr: engine and gearbox
The engine from an old motorcycle is suitable for creating a powerful ATV, as it has high performance and endurance. Thanks to this motor, the equipment will be functional and productive. If desired, it will be possible to attach a plow and other attachments to it, since the motor power is enough to withstand such loads.
The transmission needs to be the same one that was used with this engine, since otherwise the system will not work smoothly. The gearbox has reverse gear and 4 speed shift stages.