Chain gear: device and principle of operation
The chain gearbox is one of the most popular types for use in walk-behind tractors.
How to make it yourself, and what criteria are used to calculate it. The gearbox is an integral part of walk-behind tractors, cultivators and other garden equipment. This is a complex mechanism that is a transmission link that is located between the rotation devices of an electric motor or internal combustion engine to the final operating unit. Among the main indicators that a chain gearbox has are:
- Transmitted power;
- Efficiency;
- Number of driving and driven rotation shafts.
Gear drives are attached to the rotating devices, which transmit, lower and regulate the movement of the chain conveyor drive.
#betterathome. Grocery shopping in comfort: an electric bicycle made from an old screwdriver
What could be more enjoyable than a bike ride in the fresh air on a nice day?
Right. Cycling without having to pedal. But an electric bike is an expensive purchase. Therefore, it’s worth thinking about how to make it yourself using improvised materials. And the author of the YouTube channel Sergey will help with this. Let's make a reservation right away that only the base will be described. Home craftsmen can finish the rest of the little things on their own, to suit themselves. But making such a bicycle with an electric drive will be extremely simple. Read in the article
Peculiarities
Chain gearboxes can be different, but mostly they are dismountable, that is, they have a bolted connection. This makes it possible to carry out easy visual diagnostics, identify any deviations in gears and chains in a timely manner, and the lubricant will be conveniently applied to the mechanism.
The main advantages of chain gearboxes include:
- Availability of reverse function;
- Simple operation;
- High level of conveyor reliability.
The most common failures of chain gearboxes are associated with chain rupture or stretching. These faults are very easy to fix even by people who do not have special technical skills. This is a big plus, since repairing a chain gearbox does not require contacting a specialist.
The gearbox has a fairly simple structure. Among its components, we can note a chain and two sprockets, upper and lower. The lower sprocket is located on the working shaft, due to which the mechanism operates, in which lubricant is used to reduce its wear. A manual chain reducer works on the same principle. The existing gear ratio on the stars allows you to increase the force on the cutters. This version has a thin body, as this ensures maximum penetration of the cutters. The housing is equipped with holes with bearings, and the shafts are located on them. Below we will describe the process of how to assemble a chain gear yourself and carry out calculations.
Preparatory work
To make a homemade gear-chain reducer, the following tools and materials are required, and in particular the presence of:
- Sprockets, with a thoughtful number of teeth, in order to provide the desired gear ratio;
- driven shaft;
- Bearings of the required size to install the drive and driven shafts;
- Chains of the right size;
- Metal corners to secure the crankcase;
- Carter.
Before starting the manufacturing process, you need to make a certain calculation, which will indicate the assessment:
- Gear ratio;
- Gearbox type;
- The magnitude of the load on the shafts;
- Overall dimensions of transmission mechanisms, which will depend on the selected type of gearbox.
When the calculation is completed, you can begin assembly.
If you burn a pot or pan
Anyone who has ever forgotten a pan on the stove knows: the smell of burnt dishes can be unbearable. Food particles burn to its surface. Most often it is impossible to scrub the dishes.
If the housewife burned a saucepan, how to remove the burning smell from the apartment? First, you need to fill the container with water and assess the damage caused. In most cases, it is easier to throw away the dishes than to wash them, since the persistent burning smell will spoil the aroma and taste of the prepared dish. To get rid of the smell, ventilate the room and treat surfaces using any of the methods described above. You can use lemon water or vinegar, and wash the floor with water and essential oil. Bedspreads, curtains, curtains need to be washed and thoroughly rinsed in water with a drop of vinegar. Fill a spray bottle with clean water and spray it around the apartment from time to time.
Build process
It will be better to start making a homemade gearbox by installing the drive sprocket of the first stage of the gearbox on the output shaft. The star can be attached in different ways, in each design individually. Can be fixed with a key, flange, or spot welding. The driven shaft is assembled using 2 axle shafts. Their ends require counter flanges. Between the flanges, you need to install the 2nd stage driven sprocket in its place, after which you can assemble the axle shafts into a whole structure using a bolt connection.
To organize the protection of the chain transmission, the 2nd stage gear unit is protected with a protective housing. In addition to its protective function, it serves as a reservoir in which the liquid is located. It is capable of ensuring smooth operation and helping to reduce wear of parts due to friction.
The housing must have coaxial mounting slots where bearings are installed, which serve as shaft support. To install the driven shaft, conventional ball bearings having a cylindrical housing are required.
Due to the design feature, the eccentric is able to change its location by an angle in the socket, up to 15°. Along with it, the location of the drive gear shaft also changes, which allows you to adjust the amount of chain tension.
When the mechanism operates, the calculation is that the teeth of the 2nd stage driven sprocket are immersed in the oil in the container to form a lubricant. Due to rotation, the lubricant is evenly distributed over all chain transmission units.
You can create a seal around the casing. To do this, it is necessary to install standard sealing gaskets and seals on the bearing seats and on the housing split line. They can be selected without much difficulty, because all sizes in the design have standards.
In order for a self-made gearbox to have a sealed housing, you will have to put in more effort. When non-standard products or outdated types of shells are used, it will be more difficult to find seals on them. For these purposes, you can use special oil-resistant sealants.
Budget electric bike (from a screwdriver)
Hello to DIY lovers, this time we will look at how to make a very simple electric bicycle using a screwdriver with your own hands. The drive is carried out on the largest drive sprocket of the bicycle using a separate chain. Visually the engine used is similar to the 775 engine. If the battery runs out, you can always pedal to your destination. The drive sprocket on the engine comes from the rear wheel of the bicycle; it has a ratcheting mechanism, so you don’t need to turn the engine when working with your feet.
The author uses two batteries from a screwdriver as a power source. Of course, everything is not assembled reliably, but, nevertheless, the homemade product has the right to life.
Materials and tools used by the author:
List of materials:
- motor with gearbox from a screwdriver; — two batteries for a screwdriver; — switch from a screwdriver; — bicycle (with gears); - boards; - bottle; - wire; - screws, self-tapping screws; - epoxy glue, cold welding or the like; - chain; — a sprocket with a ratchet from the rear wheel of the bicycle; - wires.
List of tools:
- glue gun; - drill; - soldering iron; - hacksaw; - scissors.
Homemade manufacturing process:
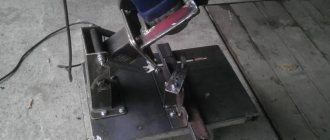
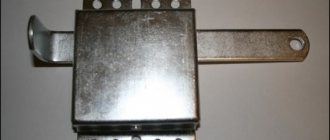
Step one. Gearbox installation
First you need to disassemble the screwdriver and remove the gearbox from it. We have to install it on the bicycle frame. We take a piece of board as a base; first, the author glues the gearbox with a glue gun.
000_moto_1011_084
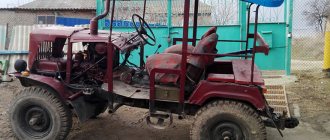
Like many, I started my journey with the legendary “deshnik”, which I put on a teenage bike “Tisa”. The device turned out to be funny, but it came with a petrol stench in the apartment, dirty hands and a shaman's tambourine for driving out evil spirits from the carburetor and ignition. The device did not perform any utilitarian functions.
But one day I was lucky enough to ride a mountain bike with a motor from a trimmer (gasoline mower) and a belt drive. Even though it was winter and I didn’t ride for long, I experienced a culture shock! In cold weather, the engine started perfectly, both cold and warm, pulled great, was perfectly clean and did not stink at all. And the “maximum speed” of 55 km/h with such traction was never even dreamed of by the “dealer”!
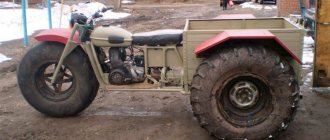
In general, a belt kit with a two-stroke motor from a trimmer with a power of 1.5 hp was soon purchased. plus a stronger mountain bike. There was no limit to happiness, but only until the first rain... It turned out that the drive belt loses strength when wet and breaks, changing it on the road is not very convenient, and besides, the cost of a new one is high. And rain in Moscow is not a rare phenomenon. But I was already used to riding such a comfortable motorbike and didn’t want to give up the idea, I decided - a chain and only a chain will save the “father of Russian democracy”!
The required gear ratio forced the use of a driven sprocket almost the size of a bicycle wheel, but fortunately, a gearbox from a Chinese minibike was found that fit perfectly onto the trimmer motor and allowed the use of sprockets of the usual sizes. The drive components are generally available bicycle ones: a single-speed wide chain, a 51-tooth sprocket from an HVZ bicycle and a “freewheel” (overrunning clutch with a sprocket) from a BMX, as well as a bicycle brake handle as a throttle trigger.
In addition to purchased parts, the design also contains many original components. These are steel racks that are attached to the bicycle frame, a motor mount (holds the gearbox with a motor), a chain tensioner with caprolon rollers, fastening the driven star to the wheel, an adapter from the gearbox shaft to the freewheel. He designed the parts himself and manufactured them at a nearby defense plant.
Of course, it was not possible to assemble the ideal structure the first time; I treated childhood illnesses for another year. I selected the optimal materials and design solutions, tried different layouts, and rode, rode, rode...
What happened in the end? Ultra-light (curb weight - 25 kg) motorized transport with a maximum speed of 55 km/h, dynamics at the level of simple Chinese scooters, fuel consumption of 2 liters per 100 km (power reserve on one tank 50 km), which does not stain with oil at all and does not smell of gasoline . The absence of smell and dirt helps me save on a garage or parking lot; the motorbike is in the apartment and does not bring any discomfort to the family. What’s especially pleasing is that all the “pedal” functions have been fully preserved. All that remains is gear shifting and easy pedaling (thanks to the “freewheel”); if there is a lack of traction, the engine can always be helped by the pedals and go up any hill. The chassis of a modern mountain bike is very durable and reliable, disc brakes provide very confident braking, and large wheels help to overcome our “directions” more easily.
After completing modifications to the design, I have already driven more than 4,000 km and during this time I only changed the drive chain once, twice the spark plug, and once cleaned the fuel system - a good indicator of reliability and unpretentiousness.
For its lightness and daring agility, I called my motorbike “Hare”. Now I drive the “Hare” every day to work, and in traffic jams it has no equal. It's so narrow and maneuverable that during rush hour I get home faster than I used to on a motorcycle, and the travel costs are ridiculous. There were also small trips, trips outside the city, even from Moscow to Yaroslavl. But a motorbike, of course, is not for the highway - it’s not comfortable to “beat” on it, but in the city and country trips I can’t imagine a better transport for myself!
Source
Large drive driven by a screwdriver
Hello to all those who like to make things with their own hands. Today we will look at how you can quite easily turn a regular bicycle into an electric bicycle. The author used a screwdriver as a power unit. Of course, the battery will not last long, but no one is stopping you from installing a more powerful battery on your homemade product. The design considered is just an example of how you can power a bicycle using a screwdriver. Your child will be happy with this homemade product, just don’t forget to come up with running boards and install a reliable braking system. If you are interested in the project, I suggest you study it in more detail!
Materials and tools used by the author:
List of materials:
- screwdriver; — an old experimental bicycle; — a cable with a handbrake handle from a bicycle; - corner; - bolts and nuts; - round timber; — plastic ties; - spring.
Homemade manufacturing process:
Step one. Experiment
To begin, turn the bike over with its wheels up and remove the left connecting rod with the pedal. We reduce the diameter of the axle using a grinder and grab the axle with a screwdriver chuck. That's all, now we try to spin the wheel. Based on the speed of unwinding and revolutions, you can roughly estimate whether the screwdriver will pull a bicycle, but this is only if you have experience.
What can be done with an angle grinder without a gearbox
A grinder without a gearbox is a fairly powerful electric drive with a value rarely less than 0.5 kW. Such a device can be used in home-made machines for performing various types of mechanical processing (cleaning, cutting, grinding and others).
Important: do not throw away the emergency gearbox, but modify it by removing all unnecessary parts, for example, on a lathe, leaving only part of the housing with the bearing assembly. This design of the drive shaft will maintain its rigidity when transmitting load. Next, instead of the drive gear of the angle grinder, a drive pulley of a suitable diameter is fixed and, using a belt drive, torque is transmitted to another driven pulley sitting on the working shaft. The working tool is installed according to the nature of the work performed.
The option of using high speed electric drives for an angle grinder is effective when performing engraving work . Here, no intermediate mechanisms are required to set the working speed, but you only need to solve the problem of how to connect the flexible shaft used in engraving technology with the electric drive shaft. Preserving part of the gearbox housing with the bearing installed in it (the replacement process for which is presented in a separate article) is an important condition for the operability of the design.
Homemade products, what you can do with your own hands, where to adapt the gearbox
A significant number of mechanisms operate at shaft speeds after the grinder gearbox. there are more options for using an angle grinder gearbox for the operation of other devices . Together with non-standard ways of using an entire grinder for homemade projects, masters of technical creativity create interesting compositions . Some are presented by the authors in specially filmed videos.
To the trimmer
Owners of summer cottages and garden plots will be interested in the following video. Many of them use trimmers to maintain the area in proper order. The possibility of failure of the electric motor installed on such a device cannot be ruled out. The author suggests using a grinder instead. Why is a bracket made from waste materials, which is mounted in place of the burnt out engine. In addition to the bracket, you should make an adapter from the angle grinder spindle to the flexible trimmer shafts. A grinder is attached to the installed structure and the trimmer is ready to mow overgrown grass.
The number of revolutions of such a modernized design is about 10,000 rpm . At such speeds, grass mowing is carried out quite efficiently. It is possible that the use of grinders of the minimum power range to reduce the weight and overall characteristics of the trimmer will lead to overheating of the grinders during operation. You should monitor the temperature of the grinder gearbox and take breaks if necessary.
Cultivator drive: Mole and more
Land owners will benefit from the experience of the author of the following video. of the cultivator failed . In its place, the author came up with a mount for the grinder and connected the spindle of the grinder gearbox to the cultivator gearbox . The speed of the grinder is certainly higher than that of a gasoline engine. However, the performance improvement advertised by the author is unlikely to occur. The problem of overheating of the commutator motor will remain and frequent stops, as a protection against it, will remain. Although for owners of relatively small plots the use of such a cultivator will be effective.
Machine
One of the structural elements of the drilling machine is a gearbox from an angle grinder (!you will learn how to disassemble the gearbox here). Working in tandem with an electric motor from a washing machine makes it possible to obtain drill speeds in accordance with the required technological conditions for processing materials. The rotor of the angle grinder is cut to the length necessary to securely fasten the rubber bushing, which acts as an elastic coupling. The other end of the bushing is attached to the motor shaft. Fastening is done using clamps.
The machine has several degrees of freedom . In addition to lifting up/down using a handle and spring-loaded suspension, the lever system allows you to change the location of the cutting tool in the horizontal plane. It is advisable to use it as a tabletop device for making holes in metal and wood parts.
Required materials and tools
The first thing you need is a screwdriver. You can take any power tool, but it is best to give preference to a device with characteristics of 18 Volts and 900 rpm or more. Moreover, you can take either a single-speed or a two-speed screwdriver. In the second case, the electric bike will be able to change speeds.
In addition to the screwdriver, you need to prepare the following materials and tools:
- screwdrivers;
- hacksaw;
- Bulgarian;
- drill;
- sprocket from a bicycle or velomoped;
- key;
- nuts, screws, bolts;
- plastic washer;
- bicycle crank with sprocket;
- washer with welded bolts (car cushion);
- metal plates.
You will also need a battery, a small board, wires and wires. Additional materials and tools may be required if necessary.