It is not difficult to explain this optical effect theoretically. You can even create an illusory endless tunnel with the help of an ordinary candle: this magic was used by many girls of almost all generations, conducting Christmas rituals of fortune-telling. Due to the multiple reflection of the light source from the real and imaginary surfaces of the mirror, it seemed as if the candle was falling into a tunnel without end or edge. All this can be easily explained in terms of quantum physics.
Infinity mirrors are a wonderful decorative item that can become the main accent in the interior. Most often they are used when decorating commercial premises: nightclubs and bars, cafes, exhibition halls, offices. However, you can decorate your apartment with such an art object. It will look appropriate in a bathroom or hallway made in a Gothic or industrial style, with elements of minimalism, pop art or techno.
A mirror with infinite depth can be used not only for its intended purpose, as a wall structure with lighting, but also as an element of other furniture. It will become an original tabletop for a coffee table, the face of a cubic structure, a decoration for the floor and more. This can be a full-fledged ceiling chandelier or an additional light source.
Theoretical basis of an infinity mirror (light well)
Our grandmothers also used the effect of creating an illusory endless tunnel, placing a candle between two mirrors during Christmas fortune-telling. It arose due to repeated reflection of the light source from a real and imaginary mirror surface. A schematic diagram of this effect is shown in the figure below.
Theoretical basis of the infinity mirror
If you want to know more about why a reflected mirror surface has the same optical properties as a real one, open a quantum physics textbook. Well, we will continue the story about how to use this effect (with modern light sources), but for those who are ready to accept this postulate a priori.
Infinity Mirror or mirror tunnel using Arduino.
Infinity Mirror literally translates as an infinite mirror; this effect is also called a mirror tunnel. This is a very effective technique that is used to decorate various interior items or as an independent decoration device. Today we will transform an old table and turn it into a real work of modern art. After its transformation, a standard piece of cabinet furniture can not only fit into any interior, but also become its decoration.
DIY infinity mirror. Formulation of the problem
So, we are faced with the task of creating a plane, when looking at which the optical effect of an endless well will appear. To do this you need:
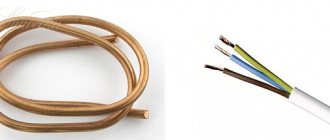
- Light source.
- Two mirrors.
Of course, you can use your grandmother's recipe and create an open mirror system. In it, the observer's gaze is parallel to the plane of the mirrors. But this is too inconvenient due to the fact that the height of the lamp is equal to the width of the mirror. But we need a plane that does not reduce the height of the room.
Therefore, we use a closed optical system in which the viewing direction is perpendicular to the plane of the mirrors. Only one of them should transmit part of the photon flux from the light source. Otherwise we won't see anything.
To get the desired optical effect we need:
- Classic mirror with one-way reflection.
- Glass with a partial mirror effect.
- Design that holds mirrors at a distance of no more than 2 cm from each other.
- Light source.
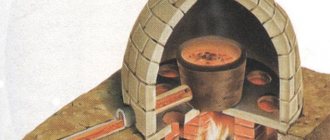
Basement insolation
So that sunlight can penetrate into the basement rooms, windows are made in the basement area (as a rule, these are wide, but very low structures that appear almost under the basement ceiling). It happens that the size of the plinth is not sufficient for such windows, and then they have to be partially lowered below the surface of the ground, and pits must be created in the area of the openings - fences made of reinforced concrete, covered with gratings on top. The bottom of the pit is made at a distance of 20 cm from the bottom edge of the window and gives it a slope to allow water to flow into the drainage network.
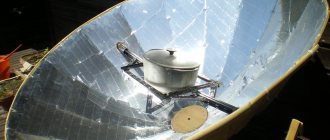
You can also provide insolation to the basement using daylight tunnels. Having installed a pipe (flexible hose) in the wall, gravel is poured into a concrete pit (necessarily with drainage) and covered with a monolithic or steel slab with a light-receiving dome brought to the surface.
Additional functions
The Russian market offers solar lighting systems from the following brands: Solargy, ALLUX, VELUX, FAKRO, Solatube®, Sunway, etc. Manufacturers adapt their products to the peculiarities of our climate and expand their functionality, making them as comfortable to use as possible.
Thus, VELUX offers a device for additional ventilation of rooms through a light guide and LED lighting in the diffuser for organizing lighting in the dark. Sunway, in addition to LED lamps, can equip tunnels with a dimmer that creates shading up to blocking the light flux, and protection against penetration (for channels Ø 560 and 780 mm). Solatube® development is a hybrid lighting system based on a light-sensitive sensor and a motion sensor, allowing you to save up to 94% of energy. And the Solargy company has a unique Peresvet technology using a heliostat. It is a stationary panel that “collects” the rays of the rising and setting sun falling at a small angle (up to 15°) and directs them into the light guide.
Implementation of the design
This design can be implemented in different ways. It all depends on the materials available to the home craftsman. Below is one possible solution.
Mirrors
With a classic mirror, everything is clear; you need to buy the right size or cut the existing one. What to make translucent from? The best option is 4 mm thick glass covered with automotive tint film. Choose one that transmits at least 50 percent of light radiation.
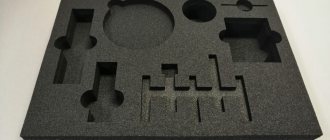
Frame
For the frame holding the mirror system, it is better to use wooden blocks with a side of 2 cm. No tricky tenons are required for articulation. To securely stick them to the surface of the absolute mirror, use silicone sealant. Transparent is better.
In the rack frame you must first drill a hole parallel to the plane of the mirrors. The wires supplying the light source are routed through it. The slats are glued one at a time. At the same time, they are aligned along the outer edges of the mirror.
Preparation of tools and materials
For work you may need:
- drill or screwdriver with a set of bits and drills;
- jigsaw or hand saw;
- electric milling machine, folding cutter or zenzubel - types of planes for cutting quarters under the top glass;
- a plane if the boards are not planed or sandpaper with a holder;
- screwdrivers;
- miter box and file, square;
- ruler, pencil;
- brushes, paint trays.
A garland is used as lighting.
Additionally prepare:
- bars with a section of 40x60 mm;
- boards 24x60 mm;
- boards for decorative frames;
- self-tapping screws 4x50 mm;
- Chipboard or laminated chipboard according to the size of the table;
- silicone glue or double-sided foam tape;
- mirror film;
- wood glue;
- mirror and glass according to the size of the table;
- wood stain, paint or varnish.
The missing tools can be rented from construction stores or you can find such a service in advertisements of private companies.
Light source
After assembly, the cavity of the optical system becomes sealed and non-ventilated. Therefore, the light source can only be one that does not emit heat. The best option is LED strip. It is better to choose RGB, which will allow you to create additional optical effects. If possible, use those whose operating voltage rating is 24 volts. They are brighter and easier to penetrate through the mirror film.
LED Strip Light
How to add light to dark rooms and basements without paying for electricity?
In any country house there are rooms that “do not get” sunlight - attics, bathrooms, storage rooms, basements, etc. But natural lighting is not only a factor of comfort for humans, but also a significant energy saving. We’ll tell you what technical solution will help organize insolation of rooms without windows or with insufficient daylight
We will talk about light tunnels (otherwise known as solar wells or tunnel-type lanterns). Structurally, these are simple devices consisting of external and internal elements and a light-conducting channel connecting them.
External element
is a square module that is installed in a flat or pitched roof, in the enclosing walls, and in the case of an underground floor - in the slab covering the pit. The module has a round light receiving hole with a diameter of 190 to 740 mm or more and is equipped with a polyurethane or aluminum frame for hermetically sealed installation. Please note: Light receiving units with a metal base can be cut and bent to fit specific installation conditions. The opening can be protected by a removable 4mm tempered glass cover (clear or frosted, with a stain-resistant coating) or a dome made of impact-resistant acrylic or polycarbonate.
External blocks with a cover are designed exclusively for roofs with a slope of 15 to 60º and are built in the same plane as the roof. The flashings of such modules are specially adapted for profiled or non-profiled roofing materials, equipped with a drainage gutter, special brush seals that prevent condensate from freezing, as well as vapor and waterproofing contours for connection with the layers in the roof “pie”.
Dome-type blocks with a head rising above the base plane allow installation in both inclined, vertical and horizontal enclosing structures. The spherical shape of the light catcher increases the efficiency of the device in cloudy weather, during snow and rain (precipitation does not accumulate on the dome), and especially
in the morning and evening hours, when the sun is low above the horizon.
In addition, polycarbonate hemispheres serve as filters that cut off UV radiation, which prevents its impact on other components of the system, as well as fading of interior items. Double walls improve the thermal insulation properties of the dome without reducing its light transmittance.
Light level measurements show that roof tunnels with a diameter of 350 mm, even on a gloomy winter day, illuminate the room in the same way as a 60-watt incandescent light bulb would.
Standards for artificial lighting in residential premises according to SanPiN 2.2.1/2.1.1.1278-03
Illumination standard,
Lx
Library, billiard room, office
Kitchen, living room, bedroom and other living rooms
Hall, corridor, bathroom
Stairs, basement, attic
Internal element of the system
- this is a diffuser lamp installed in a room - usually round or square, but the product can be made to order in other shapes. The lampshade evenly distributes soft light (scattering angle 150-170º), which does not dazzle the eyes and does not distort the color of objects. The diffusers are equipped with decorative frames and are made of two layers of polycarbonate or frosted double glass with an argon layer (as in a double-glazed window), which prevents heat loss and the formation of condensation on the light diffuser.
the light tunnel itself
- a channel that transmits light over a distance with minimal losses due to the reflective properties of its walls.
This can be either a rigid aluminum pipe (tube) or a corrugated fiberglass sleeve, the inner surface of which is coated with a mirror coating containing silver. Pipes provide a reflection coefficient of 98% or more; for hoses it is slightly lower.
Flexible pipes are available in lengths up to 2 m and cannot be extended; they are usually used if it is necessary to bypass any obstacle in the tunnel path. The basic length of metal pipes ranges from 0.8 to 1.7 m. If necessary, the channels can be extended with additional segments that have a simple snap-on fixation system. To connect the elements, adapters are used - elbows with tilt adjustment from 0 to 45º. For the needs of a private home, as a rule, light guides Ø 250–350 mm with a maximum length of up to 6 or 9 m are sufficient, capable of serving rooms of up to 10 and 20 m², respectively (bathrooms, kitchens, stairs, hallways, corridors, dressing rooms). To fully illuminate spacious living rooms, rooms with high ceilings, etc., you will need channels Ø 400–550 mm with a possible length of up to 15 m, designed for an area of up to 35 m². It is important to take into account that each additional linear meter of pipe, as well as bending of the tunnel, results in a loss of 10% or more of the light transmission volume, significantly reducing the efficiency of the system.
Special calculators will help you choose the right light tunnel for a specific room.
Solar wells are the best option for lighting those rooms where the use of electrical appliances can be potentially dangerous, for example, fuel storage facilities, gas boiler rooms, showers, etc.
Assembly
The assembly process is simple. If all of the above elements are at hand, then you only need to be careful.
- Glue the frame slats with silicone sealant to the mirror on the side of the reflective surface.
- Attach the RGB LED strip to the inner surface of the frame, and lead the power cord through a hole pre-drilled in the frame rail.
- Cut the mirror film to the width of the frame.
- Apply silicone sealant to the frame and place glass with a mirror film on top (mirror surface inward).
Now all that remains is to decide what to do with the ends to cover the wooden frame.
- If everything is done carefully and the frame slats are planed, then the ends are painted.
- Using an aluminum U-shaped profile is an excellent solution for a Hi-Tech design.
- Use a plastic cable duct without a cover.
The same silicone sealant is suitable for securing the profiles.
What it is?
An infinite mirror, or mirror tunnel, is a reflective surface in which multiple reflections of objects are visually observed. In fact, there is only one object, and the resulting visual effect is just an illusion. It is achieved using bright light from third-party sources that are reflected in the mirror.
Mirror tunnel effect
Important! In practice, a 3D mirror tunnel can be created by parallel arrangement of mirror surfaces and the use of LED strips.
On one side of the structure there is a real mirror, on the other there is glass with a reflective film. When a person looks at such an object, he does not see the bottom of the tunnel, and the repeated reflection of light creates an unusual effect of a multi-level well.
The thickness of the mirror is only a few centimeters, but the illusion of its depth is very realistic. You can further enhance the experience by using flashing lights or color-changing lamps.
Belt design options
If you place an RGB LED strip along the perimeter of the holding frame, the visual effect will consist of repeating luminous rows. It's interesting, but too simple.
Show your imagination and glue two or three geometric shapes made from the same slats onto the mirror along with the frame. Glue the LED strip around the perimeter of the inserts. Just make sure that its length is a multiple of the integer value of the distance between the mounting points along which the tape can be cut. The power wire will have to be routed through the mirror. To do this, it is drilled with a diamond-coated drill.
System Setup
I didn't intend this section to be a comprehensive guide to setting up smart mirrors.
Here I will tell you only about the most important things. Namely, I installed Raspbian Stretch Lite and then followed this tutorial. I first experimented with a variety of MagicMirror modules created by enthusiasts. And only then I selected the most important things. If you follow my path, I advise you to at least try MMM-EyeCandy.
As a result, I installed the following modules, which I still use today:
- MMM-MyCalendar
- MMM-cryptocurrency
- MMM-Wunderlist-Enhanced
- MMM-RemoteControl
By default, everything is configured so that the smart mirror will look into the repositories of all installed modules and check if there is anything new in them. I thought this was good, but I ended up writing the following script, located in /home/pi/myscripts/mm_update.sh, which automatically updates the modules at midnight. #!/bin/bash # Update modules for d in /home/pi/MagicMirror/modules/* ; do (cd "$d" && git pull && npm install); done # Update MM cd “/home/pi/MagicMirror/”; git pull && npm install # Restart MM sudo /sbin/shutdown -r now To make this script executable, use the chmod command: chmod +x /home/pi/myscripts/mmm_update.sh Then you need to configure crontab: sudo crontab -e You need to add the following command to the list of tasks, which will run the script every midnight: @midnight /home/pi/myscripts/mmm_update.sh
Connecting LED strip
If the RGB strip is connected directly to the power supply, it glows white. Color effects are possible when connected via a controller. This control device works in tandem with a remote control. But if you want to see color music, you need to choose models that are compatible with a computer.
It is better to choose a power supply whose power is two (at least) times greater than the power consumption of the tape. This will allow you to enjoy the lighting effects indefinitely without fear of overheating.
“Smart” home lighting or How to “give” sunlight from the roof to any room
The basement, dressing room, bathroom, hallway - all these are classic “dark” rooms without windows, problematic from the point of view of lighting the house. There are such “unlucky” rooms in every cottage or apartment. They are usually lit using lamps, putting up with all the disadvantages of artificial light: color distortion, flickering, unevenness and electricity bills. But this is not the only option. You can “bring” natural light into any such room; just install a light tunnel in it.
Light tunnel Velux or Fakro: tips for choosing
Daylight tunnels are made by dozens of companies, and 7-8 brands are represented in Russia. In this case, as in the case of roof windows, one usually chooses between two leaders: Velux and Fakro. And this, without exaggeration, is a difficult choice. The products of both companies are practically the same in quality, so it comes down to details and price. Let's talk about them.
Velux light tunnel
Velux is one of the oldest manufacturers of roof windows not only in Europe, but also in the world. The company has existed for more than 75 years and its main focus is on time-tested designs and unconditional reliability. Therefore, the Velux light tunnel, if installed correctly, will last for decades.
The Velux company produces light tunnels for flat and pitched roofs:
All series with the letter “F” at the end are equipped with a flexible light guide up to two meters long. Series with the letter “R” at the end are equipped with a 1.7 m long rigid tunnel and the ability to extend the light shaft up to 6 m using additional sections. Tunnel diameter - 25 mm and 35 mm.
An important feature of Velux light tunnels is the variety of accessories. This is not only the already mentioned Lovegrove designer diffuser, but also a whole range of shades of different shapes and colors. In addition, Velux diffusers can be fitted with light-proof curtains if you need to periodically darken the room.
Light tunnel Fakro
Compared to Velux, Fakro is a young manufacturer. It was founded in 1991 and has been committed to diversity and innovation throughout its 30-year history. Its light tunnels for the roof are cheaper, but at the same time they are practically not inferior to Velux light guides in reliability.
Fakro produces two series of daylight tunnels for pitched roofs: the SRT line with rigid light guide and the SLT line with flexible light guide. Fakro does not have separate series for flat roofs, like Velux; for such installation you need to order a special flashing instead of a complete one. In addition, the Velux external unit is installed almost flush with the roofing, and the light tunnel in the Fakro roof will protrude greatly above the surface due to the glass dome and, accordingly, retain snow on the roof, increasing the load on it. If there are a lot of daylight tunnels, this can even lead to the formation of large snow caps on the roof.
Fakro salaries also differ. Where Velux has two types of salaries, Fakro has three:
The last type of flashing is intended for tunnels that are installed on industrial and commercial buildings with a ceiling made of load-bearing profiled sheeting. Velux does not offer solutions for such problems at all - its flat roof series are designed for roofs with roofing felt or similar coverings. Therefore, Fakro is preferable in such cases.
Finally, the maximum length of Fakro fibers is longer: up to 12 m for rigid ones and up to 4 m for flexible ones. In this case, you can put a light bulb inside the tunnel so that it can be used as a lamp not only during the day, but also at night.
Now let's summarize. The Velux light tunnel is suitable for those who prefer trouble-free and thoughtful solutions from the world's leading brand. Fakro daylight tunnels are an option for those who value flexibility more and want to save money without much loss of quality.