The sheath is the “clothing” for a knife, which should be of high quality and comfortable. You can make them yourself using a standard set of tools and the material you like - leather, wood or plastic.
It is important to complete the first stage and make patterns/patterns exactly according to the size of the knife; then everything depends on practical skills: you will need to sew the blanks, clean them and cover them with stain or varnish or paint.
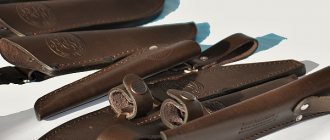
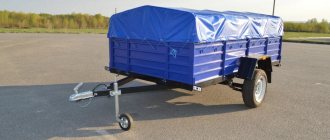
The most popular are leather sheaths - lightweight, practical, durable and easy to make with your own hands.
General information about the scabbard
A sheath is a product designed for carrying and storing edged weapons. They protect the owner and surrounding people from accidental injury from a sharp blade and prevent the appearance of rust on the metal. If you need to organize the storage of collectible, expensive, exclusive models of knives, then the sheath can be made with decor from precious stones, gold, and silver.
For the manufacture of sheaths, various materials are used, which will be characterized by increased strength - genuine leather, hardwood, metal, thick fabric, plastic.
We recommend reading the article about the unusual pchak knife. From it you will learn about what a pchak is, types of Uzbek knife, handmade pchaks from Bakhrom Yusupov, how to make an Uzbek pchak knife with your own hands. And here is more information about the best hunting knives.
Materials you can make with your own hands
You can make a sheath with your own hands from the following materials:
- a natural skin;
- wood - hardwood only;
- plastic.
| Material name | Advantages | Flaws |
| Genuine Leather | The material is dense, will last a long time as a finished product, affordable | Working with leather is difficult (requires some skills), requires specific care, remains soft |
| Wood – beech, oak, walnut | Reliability of the finished product, it is possible to decorate the sheath with decor or paints | Working with hard wood is very difficult; for fastening you will need to make hinges from leather |
| Plastic | Waterproof, has a long service life, can be washed even with aggressive agents, inexpensive | To carry out the work you will need a professional construction hair dryer |
Types of fastenings
Depending on what the knife is intended for, the types of sheath mounts differ:
- traditional (worn on the belt);
- combat (shoulder, hip);
- special (suitable only for those who want to hide the presence of bladed weapons);
- image (applies only to folk traditions and the conditions for observing attire at ceremonial parades).
On the thigh
Combat knives are worn below the waist on the hip - this is typical for the military, but is also suitable for professional hunters or wilderness survivalists. In this case, the sheath is fixed to the thigh with a belt or cord at the lower end; the upper part can be additionally secured to the belt - this is especially true for large cutting tools.
Carrying a knife this way is quite specific: it is inconvenient for an untrained person to remove it, and there is a high probability that a leg injury will occur.
On the belt
A knife is attached to a belt by both amateurs and professionals - this method can be called a belt method and is considered universal. In this case, the weapon can be worn on the left or right side, for which the scabbard is structurally provided with left-handed/right-handed hangers; there is also an option for a double-handed hanger - you can place the knife on any convenient side. The latter type of fastening allows you to carry the cutting tool on a belt both at the back and at the front.
The disadvantage of this type of carrying is the difficulty of removing the knife from the sheath while sitting or lying down.
Shoulder
The shoulder sheath mount is most often used for combat knives. It is a wide cord that is threaded through a loop in the sheath and fixed on the shoulder or forearm. The knife is worn with this mount only with the handle down.
Only specially trained people can safely carry knives with a shoulder mount; amateurs are better off not taking risks - and taking out a weapon without specific skills is extremely inconvenient, and the risk of damage to the skin, soft tissues and even the periosteum is very high.
To the fisherman's vest
On the fisherman’s vest, the place for attaching the knife is pre-thought out, because this tool can save a person’s life - for example, if a fisherman fell into the water and became entangled in his own or someone else’s nets, then a quickly removed knife in his hands will solve the problem.
The weapon must be attached to the fisherman's vest with the hilt downward - this way it will be convenient to take it out. If the vest does not have a special pocket-compartment for weapons, then you will need to attach it to the sheath on special loops.
Watch the video on how to attach a knife to a fisherman’s vest:
Which ones are suitable for a dagger, hunting knife
For a hunting knife and dagger, you should choose a belt mount and here's why:
- the easiest and most affordable way;
- the knife/dagger is located on the right or left side (where the “working” hand is located);
- the weapon is positioned with the blade down.
If the dagger is an element of traditional clothing (for example, Cossacks or Caucasian warriors), then it is worn according to the rules, for example, in a sheath on a hanging belt hanging down on the hip.
Sheath for a hunting knife Sheath for a dagger
Sewing a holster
I sew the holster with waxed thread 1 mm thick. First I apply glue and sew on the reinforcing triangle and the top of the belt loop. If you want to make a holster not with a belt loop, but with a metal clip, then you will need to make a piece of leather under your clip and sew it all at once.
After I sew on the top of the belt loop, I wet it with water so that it becomes soft so I can mold it to the belt. If you sew the entire belt loop at once, there will be no space left for the belt.
Then I sew on the bottom of the belt loop and insert the same piece of plastic to fit the belt. In my case it will be a 38mm wide belt. If you are sewing a holster for a belt of a different width, then you will need to rework the seam areas to fit your belt. For leather with a thickness of 4mm and for a belt with a thickness of 38mm, I take the distance between the horizontal seams 9mm wider.
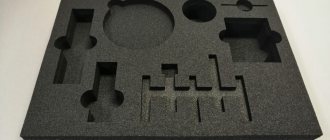
Tools and auxiliary materials to make a knife sheath with your own hands
The most popular are knife sheaths made of leather, and to make them yourself, you will need the following tools:
- PVA glue;
- pencil, ruler - regular stationery/school ones;
- kitchen fork;
- nylon threads of maximum strength - can be replaced with a thin cord;
- Scotch tape - replaced with cling film;
- paraffin;
- thick paper, cardboard - several sheets of A4 format;
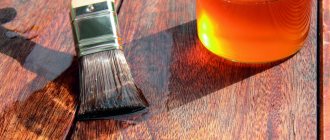
- stain;
- special glue for gluing leather, can be replaced with “Moment”;
- drill and drill bit 1mm (diameter);
- a fragment of cotton fabric, which is already impregnated with epoxy resin;
- sandpaper with a fine abrasive coating;
- office clips;
- sewing awl with hook;
- shoe polish or special wax for polishing leather products;
- scissors, a stationery knife with a supply of blades;
- vodka.
A set of tools for working with leather
If you plan to make a sheath from wood, then you should additionally prepare a jigsaw, a cutter for cutting out decor, impregnation (linseed oil), varnish, and sandpaper with a coarse abrasive surface.
Edge processing
This is how I process the edges of my products. I cut with an edge cutter. Then I smooth it out with sandpaper so that the edge becomes semicircular. I moisten it with water and rub it in with a wooden slicker. If you want to leave the edge a natural color, you can also wipe the top with tokonole. This is Japanese chemistry, you can buy it on ebay. If I paint a holster, as a rule, black or brown, then I apply kenda orly matte edge paint to the edge. This is polyurethane paint, very durable. My review of this paint can be seen in this video
DIY leather sheath: step-by-step instructions
You need to make a leather sheath with your own hands in strict accordance with the step-by-step instructions:
- Make a liner from waterproof fabric (cotton, impregnated with epoxy resin), attach a knife to it, wrap it and cut it exactly to the size of the weapon.
- Cut the leather according to preliminary drawings, which can be made on thick paper or directly on the material - the knife blade is outlined with a pencil, 0.5 cm overlaps are made.
- Using PVA glue, fix the liner made of waterproof fabric on the leather blank (from the inside), wait until it dries completely - on average about 24 hours.
- Wrap the finished workpiece around the knife blade and secure the edges with paper clips.
- Use a sewing awl to make holes and stitch the workpiece so that “at the exit” it becomes a cover.
- Use a utility knife to cut off the excess edge.
This is an algorithm for the simplest sheath, which allows you to carry a cutting tool in a backpack, in a pants pocket, or in a belt.
Watch the video on how to make a leather sheath with your own hands:
Where to get leather
You can take leather to make a sheath from any no longer needed product, for example, jackets, boot tops, bags, even a purse or man purse will do. It is important to use really high-quality material - natural, without visible damage or scuffs. You just need to choose the size of the leather fragment, because it should be enough for the product - it is not customary to sew a sheath from pieces, and this is not practical; later it will interfere with the active use of the knife.
Optimal skin thickness
The thickness of the leather should be large - a saddle cloth, floor or collar would be an excellent choice. It should be of the saddlery type and vegetable tanned. If leather is not bought in specialized stores, but is taken from already unnecessary products, then you need to control its thickness, which should be no less than 2.5 mm and no more than 4 mm.
Skin structure and topography
How to make a pattern
The pattern is first made on cardboard or a sheet of thick paper. You need to put a knife blade on it, outline it with a pencil, then add 5-10 mm to the initial outline and draw a new line - this is exactly the place of the cutout. The length of the pattern is made 2.5-3 times longer than the real one, and the full parameter of the knife (including the handle) is taken into account.
The second part of the sheath is made according to the same principle, but without taking into account the handle.
The finished cardboard pattern is applied to the prepared piece of leather (from the wrong side). To prevent it from slipping, you need to pin it with pins. Next, a contour is drawn on the skin clearly according to the pattern, and the blank is cut out with scissors.
Sketch on a piece of paper Leather blank
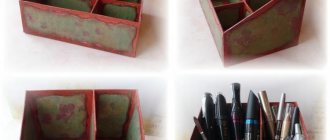
How to sew it yourself
You can sew a leather sheath with your own hands using one seam. In this case, you will need to draw a line for the future seam from the edge of the leather blank, retreating 0.5-1 cm. Holes and seams are made with an awl, at the end of which there is a hook - it will be convenient to pull the nylon thread. The thickness of the awl is selected according to the thickness of the thread/cord - the holes from it should not be too noticeable on the material. All knots are made hidden, that is, they remain inside the sheath.
If the sheath is sewn with a double seam, then you will need to use a drill with a drill with a diameter of 1 mm to make holes along the line of the future seams - they run parallel to each other, repeating the contour of the sheath. Next, the steps are repeated: you need to connect two pieces of the product using an awl and a nylon cord.
Using an awl and a nylon cord, connect two pieces of the product
Leather sheath
Submersible leather sheaths can be made for small knives that are used for fishing or while picking mushrooms. They are made according to the same algorithm as standard ones, but the patterns are made the same - the knife must be completely hidden, including the handle. These cases are perfect for carrying and storing cutting tools while fishing, picking mushrooms, or hiking in the forest.
To make it easier to carry a knife in a submersible sheath, you need to make a loop, which is made of leather. The material must be cut into strips no more than 2 cm wide.
Finished scabbard
The loop is fixed on the inside of the sheath by making holes with an awl with a hook or a drill with a drill bit with a diameter of 1 mm. You can hide the seams on the outside of the sheath by gluing a piece of leather overlay.
How to make a twist
A twist is a case for carrying and storing a set of professional knives, often used by chefs who work “on the road.” For manufacturing, in addition to the standard set of materials and tools, you will need magnets - they are sewn into the skin and securely hold the tools.
The twist is done as follows:
- A leather pattern is prepared along the length of the longest knife and the width of the entire set. It is necessary to place the tools at a distance of 3-5 cm from each other, and this parameter should be measured not by the handle, but by the blade. The pattern should be 5 cm larger on each side than the measurements taken. There should be two ready-made patterns.
- One pattern is laid out on the table, and the contours of the future location of the knives are applied to it with a pencil or the tip of an awl. A magnet is placed in the middle of each “drawing” (presumably where the middle of the blade will be) and fixed with glue.
- The second pattern is placed on top and with the help of an awl and nylon thread they are sewn together. It is better to do this with a double seam.
- According to the magnets located, you need to lay a strip of leather into which the handles of the knives will be inserted. It is sewn on in the usual way; dividing stitches must be made to mark the place for each tool. At least 1/3 of the knife should be placed in such pockets.
- Leather strips are sewn on the outside of the twist, which will tie and secure the twist with the tools in the closed position.
Twist - a case for carrying and storing a set of professional knives
The easiest ones for beginners
For beginners, the simplest leather sheath is suitable, which can be made in accordance with the instructions:
- Make a pattern out of paper for a sheath that will only hide the blade of the knife.
- Place the finished pattern on a piece of leather and trace it with a sharp object (this will leave a clearly visible mark). Turn the pattern over and make another “drawing” in a mirror image. The “output” will be two blanks.
- Coat the edges of the blanks with “Moment” glue or special glue for leather products, connect and secure with office clips until completely dry.
- Trim the edges with a utility knife and, if necessary, clean off the glue “sags” with fine-abrasive sandpaper.
- Mark future holes along the edge of the sheath using a kitchen fork. Then drill each hole with a drill with a diameter of 1 mm.
- Sew with nylon threads or cord along the resulting holes. Leave all the knots inside, and “solder” the edges of the threads with a lighter or matches.
- Apply stain to the sheath and leave to dry without forced heating. This step can be repeated several times if you want to achieve a specific color.
- Sand the leather lightly with fine sandpaper, soak it in leather cream or wax and dry.
Purpose of the bag
Twisting ensures convenient, safe use of the working tool. Thanks to this, all the knives will be in one place. If a chef works on-site, he should definitely purchase such an accessory. Professionals working on site should also always have tools on hand.
The pencil case will allow you to store your knives in an orderly manner.
Rolling allows you to store knives in an orderly manner.
DIY knife case made of leather and wood
You can also make a knife case out of wood with your own hands, just follow the instructions:
- Cut the board in half or take two at once.
- Place a knife blade between the blanks and mark the diameters of the mouth with a pencil at the end. Measure the depth of the blade.
- Using a chisel or a special milling machine, make a recess for the handle of the knife. Then again place the knife on the board and use a pencil to draw/transfer its contours onto the tree. Carry out all the steps on another workpiece.
- The boards are given the shape of the future case, but taking into account the fact that the knife should not dangle freely in it. Sawing is carried out with a jigsaw, file or small file.
- Both halves must correspond exactly to each other; if necessary, the recesses are finished with a chisel.
- Lubricate the halves with epoxy glue, connect exactly along the contours and press with a vice, leave for 24 hours until completely dry.
- Sand the product, apply drying oil to it and leave it to dry for a day.
- Cut a piece of leather to the shape of a sheath, grease it with glue and stretch it over the wooden case, making sure there are no folds. Secure everything with a vice, but not as much as possible, and leave until completely dry.
- Loops are made from leather to attach the sheath to the belt. They are attached to the case using metal rivets.
Watch the video about a combined wood and leather sheath:
Sheridan style embossing
Now it's time to apply the embossing. I wrote this article for an American magazine and to show how much you can decorate a holster, I made a template for embossing in the Sheridan style. In the USA they love this style and decorate everything. There, no one is puzzled by a holster with flowers. In Russia, this embossing option is not particularly popular, especially on holsters. It's mostly men who carry weapons, and they are too stern to enjoy flowers. I made only two holsters with Sheridan style embossing - the one in the photo for the magazine article, and the second one to order. I also made several hundred PM holsters, but with different embossing options.
But let's get back to embossing. In the files that you download after paying for the pattern, you will find all the necessary templates. The embossed template is also there.
I lightly wet the skin with water and give it time to absorb into the skin. I repeat several times until the leather reaches the desired state for embossing. You can read more about preparing leather for embossing in the article that I translated and use the method described in it every time I do complex artistic embossing.
Preparing vegetable tanned leather for Bob Park embossing.
Once the leather is ready, I transfer the design template onto it, cut it out with a rotary knife and tap with stamps. I won’t describe the details here.
DIY wooden knife sheath
A wooden knife sheath is made by hand according to the algorithm described above. The only difference is that leather is not used for finishing. But it will be possible to decorate the case with burning, wood carving, paints and varnish.
You need to know that before using wooden sheaths and before decorating them, you need to impregnate the material with special solutions that make the material more resistant to external factors - they stop absorbing moisture and are not susceptible to scratches and cracking.
Sewing a holster
At this point, I wet the inside of the holster with water, apply glue to the edges to be glued, and join them together. Needles can be used to precisely position the holes. I press the edges with glue with clamps through pieces of thin leather so that they do not leave marks on the holster. I use American don deal adhesive and sealant. It dries quickly and is not afraid of water. Can easily stick to wet skin. I wait 15-20 minutes and sew the holster.
Making sheaths for different types of knives with your own hands
Making sheaths for different types of weapons with your own hands has identical algorithms, only for some types of knives there are features, and they need to be taken into account at the beginning of work.
How to make a holster
A holster implies the presence of fasteners on the handle of a knife, and this is not a separately made loop, but a T-shaped piece of leather.
Therefore, some changes concern the beginning of the manufacturing process of such sheaths:
- When cutting one pattern, you will need to measure the entire length of the knife and increase it by 5 cm.
- This pattern should be made on a wider piece of material, because you need to make two “branches” of leather to the sides at ½ the length of the handle. They will be narrow strips and long enough to connect at the handle.
- After completing the main work, you need to attach it to a T-shaped fragment - it’s convenient when it is fastened with a button.
The result is a sheath that opens like a holster and with just a flick of your fingers the knife is accessible.
How to make an American type sheath for Uzbek knives, swords and tactical
Regardless of what kind of weapon will be “hidden” in the sheath, they can be made according to the same instructions, you just need to take into account some nuances:
- tactically, the scabbard is made like a standard leather one, but for fastening it uses not a loop, but a wide ribbon, which allows you to wear it on the hip, shoulder and forearm;
- sheaths for Uzbek knives are distinguished by beautiful embossing - this is a mandatory “program”, and the decor should be rich, with rivets and fringe;
- American knives are carried in sheaths with pads, which can be made of thin and light metal - for example, aluminum.
As for the sword, the scabbard for it is made according to individual patterns and sizes, the base is wood, and the top can be covered with thin leather. The scabbard for a sword hides only its blade; the handle (hilt) is not fixed anywhere. The sword is worn on the belt, so the fastening is only on the scabbard - leather loops at both ends (on the end side), through which the cord is threaded, and it is already attached to the belt.
Beginning of work
To begin, print and cut out the holster pattern. You can buy and download a holster pattern for a Makarov pistol using the link “Leather holster for a Makarov pistol”
In this master class I will not paint the leather. You can use paint of any color and manufacturer, just not KARAT.
Paint the reinforcing triangle only after embossing.
If you plan to make several holsters, I recommend sticking the printed sheet onto a piece of thick cardboard and then cutting it out. This pattern-template will last a very long time.
To trace the outline of the holster pattern and two other parts, I use a regular ballpoint pen. Subsequently, traces of ink will either be cut off when cutting out the parts of the holster, or they will be cut off with an edge cutter and they will not be visible.
A semicircular chisel will only be needed at this stage. With its help you can easily make a semicircular cutout. We cut out all the details: the main part of the holster, the belt loop, the reinforcing triangle. I do not cut out the last part completely to make it easier to emboss on it.
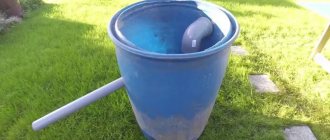
Do-it-yourself plastic knife sheath: what you need and how to do it
To make a plastic knife sheath with your own hands, you need to prepare the following:
- rivet gun;
- small diameter plastic pipe;
- drill;
- rivets;
- fitting blade;
- spray paint;
- professional construction hair dryer;
- flexible press.
Such sheaths are made without inserts, the operating algorithm will be as follows:
- Insert a knife blade into the plastic pipe and cut off a piece of material 2-3 cm longer. The diameter of the pipe should not be much larger than the width of the blade.
- Using a heat gun and a flexible press, they begin to deform the pipe. The material needs to be heated and bent until it turns into an almost even “sheet” of plastic, but only double and with space (thin) inside.
- Next, insert the knife (blade) inside the plastic and continue heating, using a flexible press to form the shape of the sheath along the contour of the weapon.
- You need to insert rivets into the remaining plastic on the sides as close to the blade as possible.
- “Extra” material is cut off with a sharp construction or stationery knife. The edges are cleaned with sandpaper with a fine abrasive surface.
1. Take a PVC pipe of medium diameter 2. Cut it into parts of the required sizes 3. Heat the plastic and give it shape 4. When melting, take into account the handle that the sheath grips 5. Connect with rivets 6. Done The finished
plastic sheath can be painted from a spray can by selecting the desired shade will create an exclusive item.
Oiling the holster
Now that the holster has completely dried and taken the shape you want, you need to coat it with oil. I use oil on unpainted holsters. If you painted your holster with paint, you don’t need to coat it with oil. Keep in mind that oil will darken the color of the holster.
And I leave the holster to dry. As a rule, I leave it on the battery overnight. After this, the holster becomes solid, holds its shape well, and the gun fits smoothly.
What scabbards can be made from scrap materials?
You can make a “temporary” sheath from scrap materials, and for this you can use, for example, even an old vinyl record.
How to work:
- Take a plate (regular black) and put it in the oven at maximum heat. After 10 minutes it will become soft and pliable.
- Place the warm plate on a hard surface, place a knife blade on one half of it and cover with the other half.
- Press everything down with a wooden board, lean on it with your own weight.
- Next, you need to adjust the contour of the “sheath”, periodically heating the plate structure over the fire and cutting off all excess with scissors.
- The corner where the tip of the blade is located also needs to be “soldered” by heating.
All that remains is to wrap the product with tape and at the same time attach a piece of belt to the “sheath” for attaching the weapon to the belt. Of course, such sheaths can hardly be called a full-fledged product, but in force majeure situations, when you need to go out into the forest or fishing, they will come in handy.
Watch the video on how to make a plastic sheath:
You can also use ordinary plastic from bottles for temporary sheaths - just heat it over the fire and form a “case”. Holes are made in it into which a rope is inserted - the knife can now be attached to the belt and will not interfere with movement.
Punching holes for seams
Mark the seam and punch holes. The photo shows that I punch holes with a round punch with a diameter of 1 mm. You can also use any line punches. In my case, I needed a marking wheel. It is not needed for line punches.
In those places where the main part of the holster will be sewn, I punch 16 holes. If you use a line punch, the number of holes will depend on the pitch of the punch.
What is Kydex
A material with unique characteristics was developed in the second half of the 20th century. It has high rigidity, strength and resistance to external irritants. He is not afraid of chemical and mechanical influences. The material is similar to plastic.
It is called - kydex, in Russian this word sounds like - kydex. Looking at the material, it is difficult to imagine that this is raw material with unique properties. In Russia it is difficult to find it in the original. It can be found on many interior items.
Kydex gained its wide popularity thanks to the following characteristics:
- fire resistance;
- impact resistance;
- resistance to chemical attack;
- volume stability;
- good elasticity when heated;
- resistance to abrasive influences;
- moisture resistance;
- the structure is not porous.
Kydex in sheets.
Double edge processing.
Once the holster is completely dry, I begin finishing the double edges. I level it with a Dremel and an emery drum, then cut it with an edge cutter. I sand it to a semi-circular shape, moisten it with water and polish it with a wooden slicker.
OK it's all over Now. The leather holster for the Makarov pistol is ready.
Author of the master class Roman Konin