Useful tips
Not long ago we talked about how to make bouquets of sweets with your own hands. amazing compositions can be made from sweets and other materials
, which will be wonderful sweet gifts for your loved ones and will please the eye.
Candy compositions are suitable for any festive occasion
and will appeal to everyone: women, children, and men.
We offer you several master classes on making the most popular compositions from sweets with your own hands. Once you know the basics, you can get a little creative and come up with your own compositions
.
Christmas sock
Such a gift is usually given in Europe or America, but why not please your sweet tooth with an unusual surprise.
The sock itself can be made from any fabric, and completely different candies can be placed inside. And the festive mood is guaranteed.
How to fill a gift box
Below we have listed many options for different holidays. Just choose a gift, complement it with goodies and fill your surprise box, which we will tell you how to make a little below.
On February 14
A heart-shaped gift box with a Valentine's card will be very useful. You can bake cookies or a heart-shaped cake for your loved one with your own hands.
For a friend or relative,
on the occasion of
a birthday
or
New Year,
the packaging can be made from dark shades of cardboard, or a wooden box or suitcase can be prepared. The content depends on age, hobbies and profession.
Here are some ideas:
- for grandfather - a scarf, belt or luxury tea.
- employee - a leather diary, a pen in a case, a business card holder.
- The driver will receive a gadget charger, driving glasses, and a steering wheel cover.
- for an athlete - a fitness bottle, an expander.
Universal gifts include coffee, chocolate, cookies, a mug, and maybe even a can of beer with nuts or chips. A practical man will be happy with a flashlight, a navigator, and if he is interested in fishing, then give him a folding knife, a flask, and an underwater camera. A man with a sense of humor will enjoy a weight covered with candy. Small realistic chocolates in the form of bolts or a set of tools look stylish.
For a girl
In honor of
March 8,
the box is suitable in a bright or delicate shade, round shape, cardboard or heart-shaped handbag. You can hide your favorite cosmetics, a set of oils, a brooch, a book, candles, or bath salts in sweets.
Relative
will enjoy a beautiful decorative piece made of porcelain. The main gift will be complemented by unusual chocolate, handmade sweets, marmalade, marshmallows, and macaroons.
For a colleague
feel free to make your own cupcakes, gingerbread cookies or chocolate covered prunes. The eternal classic is tea or coffee, which can be purchased by weight. The drink will be complemented with acacia honey, buckwheat, cream honey with berries or jam made from figs, pine cones, pear with lavender.
For a child
you need a bright chest or an unusual box in the shape of a house.
For a girl,
a box made of soft fabric and a button closure with hairpins, elastic bands, a doll and even a candy necklace (strung on a thread) is suitable.
The boy
will be happy with cars, a robot, and a small Lego set.
the teenager’s
box: headphones, a flash drive, a mouse, and hide it in candy.
For
a friend’s
birthday , you can prepare packaging based on your hobby, for example, cut out a camera from polystyrene foam and cover it with candies. Fill with chocolate bars, halva, nuts, and your own baked goods. The box will fit luxury cosmetics, smart watches, and a certificate.
Filling for New Year's
presentation: painted gingerbread cookies, Christmas cookies, chocolate figures, dried fruits, Ritter Sport mini chocolates, a bottle of cognac, a kit for making a gingerbread house.
Cardboard cake
You can make small voluminous triangles from ordinary cardboard. Sweets are poured inside. All triangles are made in the form of a cake, the top is decorated with a large bow or a bouquet of artificial flowers.
There are a lot of options for creating a sweet surprise, so you can choose exactly the way to improve your mood and make an unusual gift that you like best and is not difficult to make.
Original packaging for chocolate
I also suggest giving chocolates to good people! But not simple ones, but decorated in the form of snowmen. Not corny and very uplifting!
Master class No. 6. Packaging "Snowman"
Let's take:
- chocolate weighing 90-100 g,
- album sheet,
- sock,
- markers,
- glue.
We will need a chocolate bar that has a neatly folded edge, like the Russian one.
Wrap the chocolate in a sheet. Gently press the folds with your fingers to create a shape. We glue the cuts from the inside.
If it turns out that there is a lot of album left, then we cut off the excess. Fix the edges.
Draw a carrot, eyes and mouth. You can glue felt or beads to this place.
Now we make a hat and scarf from a sock. Cut off the part of the new sock where there is an elastic band and a heel.
We turn it inside out and sew it up.
Select the edge where there is a seam and assemble it so that you get a pompom. To do this, we tighten it with threads.
We put a hat on the chocolate bar. Cut out a scarf from the remains of the sock.
That's all! Add more cones and spruce branches to make it smell like the holiday itself.
It is also better to choose expensive types. For example, “Babaevsky” is an expensive chocolate and you want to package it accordingly. For this purpose, I advise you to use an envelope. More details are described here.
Christmas tree made from candies
Well, what a New Year - even without a Christmas tree! You can make a sweet New Year's beauty from candies and tinsel with your children. The technology is quite simple, so this universal gift will not take much of your time and effort.
For creativity we will need:
- candies,
- New Year's tinsel,
- shiny corrugated paper,
- thick cardboard,
- stapler,
- glue gun,
- newspaper.
We start work from the base of our future Christmas tree. To do this, take a thick sheet of cardboard and roll it into a cone. We secure the ends at the bottom with staples using a stapler, and apply glue along the joint. We align the bottom of the craft so that the cone stands firmly and does not wobble - this will determine how stable our Christmas tree will be.
Before sealing the bottom of the cone, stuff newspaper inside very tightly. This is required to give the craft stability. The process will be greatly facilitated by using a ready-made foam cone, which can be purchased at craft stores. We insert a small piece of wire into the top of the cone. It will be needed at the very end of the process to secure the tinsel.
We cut the corrugated paper into strips (5*60 centimeters) and begin to gradually glue the cone in a spiral. This must be done so that if a gap appears between the tinsel, the Christmas tree will still look elegant.
Using a glue gun, we carefully begin to glue the tinsel (7-10 centimeters each), slowly. Tinsel and candies need to be selected in such a way that they match the color scheme. After the first tier of tinsel is glued, we begin to glue the candies. Typically, no more than 4 pieces are required on the lower tier. It is very important that they are located opposite each other to maintain stability. And then we alternate a row of tinsel (glue it tightly) and a row of sweets, which we place in a checkerboard pattern relative to the previous sweets.
As you approach the top of the cone, you need to gradually reduce the number of candies in the rows. At the very end of the wire we fix the tinsel either by wrapping it around the wire or by placing it on glue. The top can be decorated with a Christmas ball or a bow. With such an original gift you can take a great photo to remember the holiday!
As you can see, nothing special is required to create gifts from candy. The main materials needed for creativity are wrapped confectionery products, beautiful paper, glue, decorative ornaments, as well as imagination, taste and originality of execution.
The idea of giving candy gifts is very exclusive and at the same time easy to implement. Such a gift makes it clear how dear you are to the person to whom you are presenting the result of your own creative master class. After all, the gifts that are dearest to the heart are those made with your own hands!
Materials for work
It is better to carry out the work in a well-organized place where there is a source of high-quality lighting. You also need to prepare:
- Metal wire.
- Wooden skewers.
- Corrugated paper of various colors for decorative purposes.
- Adhesive tape.
- Wrapping paper.
- Cardboard or felt for making a flower pillow.
Candies, chocolates, lollipops - this component is chosen directly by the master, depending on the wishes of the hero of the occasion.
Edible flowers
We have already described in detail how to make edible roses and lollipop tulips with corrugated petals on our website.
We also learned step by step how to create entire bouquets of chocolate kinder surprises. We will continue to highlight new ideas in our publications. Read, dear sweet tooth, ask questions. What else would you like to know? Have wonderful holidays and the sweetest gifts.
How to make a box with your own hands
Step-by-step production of a box that folds out
An opening box of sweets will definitely surprise and lift the mood of the recipient!
Instructions on how to make it at home:
Take thick cardboard from an old box. Cut out squares of 12, 17, 22 cm (5 pieces each). Leave a distance of 5 cm between the parts according to the approximate size of the sweets.
We glue the squares with tape in the shape of a cross on both sides. We leave a gap between the walls and the bottom so that you can easily open the box and assemble it.
Using glue or double-sided tape, we cover the sides of our “crosses” with wrapping paper.
As a result, you will have 3 colored “crosses”, each slightly larger than the other. We also seal the inside with paper.
Let's start making the lids. Cut out 3 squares 1 cm larger than the bases (13, 18, 23 cm). For them we make small stripes 2-3 cm wide.
We glue them together in the same way as the big ones.
We collect the edges with glue.
Cover with wrapping paper.
Now assembly! Glue each box to the next, from smallest to largest. The final box should be perfectly level.
Now the most interesting thing is to tape flat sweets, 3-4 cm thick, to the walls with tape so that the packaging closes. Use small candies, small chocolates, packages of cookies.
You can put any sweets, tea, coffee and other gifts in the center. For a child, a toy or kinder. We have written all possible options in the paragraph above.
Close the box and decorate it with a bow or other decor.
We assemble a box of sweets themselves
Now let's look at step by step how to make a box of kinders. But you can take any other candies of a similar shape.
We cover the foam blank with paper and glue wide double-sided tape on top. If its width is not enough, add a thin one higher.
Decorate with kinder chocolates.
We attach all the other candies inside with tape too, so that nothing falls out.
All that remains is to tie a ribbon around our chocolate box. Ready!
Tips and tricks
Experienced craftsmen have collected some tips for beginners that will help make the present more impressive:
- It is better not to put sweets scattered so that they do not get damaged. A good solution would be to use filler - it looks more attractive, aesthetically pleasing and solemn. Take your choice of artificial straw, grass, rose petals, natural tow, cut strips of colored paper, wallpaper or magazines. New Year's surprises can be filled with confetti, corrugated shavings, tinsel or "rain". It is more interesting for a child to look for a gift in small candies, nuts, chewing gum or dragees. As a gift for a man, wood shavings, straw or a special paper filler are suitable.
- As you already understood, you can also put a non-edible gift in the box, hiding it in the sweets.
- Make sure that it is convenient to remove the chocolates from the surprise without damaging the structure.
A box of goodies made with your own hands is always a timeless gift! Now you can buy almost any packaging in stores, but it’s so nice when a person took the time to invent and create everything on his own. Ideally, the recipient can keep the packaging and use it in the future, which means they can remember you and the past event. By the way, it will be very interesting for children to make such crafts as a gift to their parents or friends.
We wish you inspiration and creative ideas!
Delicious first aid kit
Very often, sweet vitamins are sold in gift shops, but you can easily make them yourself.
To do this, you will need small cute jars, multi-colored dragees and colorful paper on which you can write “Cure for depression”, “Cure for sadness”, “Cure for laziness”.
The jar is filled with dragees, sealed, and an inscription is hung on it. You can tie a bow at the neck.
Candy bouquet
Each of us has at least once encountered such a classic as a bouquet of sweets. And yet, it is still a great gift to show a small token of affection and a stylish addition to the main gift for a more significant celebration.
To make it you will need:
- Delicious round candies;
- Beautiful corrugated paper;
- Wooden skewers;
- Threads;
- Scotch;
- Tapes;
- Thermal gun.
How to quickly pack a small gift or candy
If there is a party or children's party planned, then you can prepare treats for little guests. In order not to serve sweets in banal candy bowls, you can pour candies into regular or decorated disposable cups. Then decorate them with openwork paper napkins and satin ribbons.
How to quickly pack a small gift
Gift packaging in a cup
sweet tree
Another version of a delicious bouquet, only more original and on a solid basis.
For production you will need:
- Candies;
- Thick paper;
- Scotch;
- Wooden skewer or sushi stick;
- Ribbon or jute rope;
- Construction gypsum;
- A small flowerpot of a suitable color.
Algorithm of actions
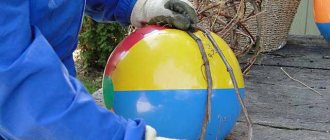
- Form a tight ball out of paper, wrap it with tape for strength, and stick a wooden stick in the center.
- Cover the surface of the ball with candy using a glue gun. Round-shaped sweets decorated in the form of baskets work well here.
- Wrap the stick with jute rope or ribbon using a glue gun, tie a bow at the top near the ball.
- Dilute the building plaster according to the instructions on the package, fill the flower pot 2/3 with it, place the free base of a wooden stick in it. Secure the workpiece so that it does not move while it hardens.
- After the mixture has hardened, close the plaster in the flowerpot using ribbons, decorative stones or other sweets.
Your cute souvenir is ready!