If there are old monitors and non-working laptop matrices in your house, do not rush to throw them in the trash. If you have a soldering iron and minimal knowledge of electrical engineering, useless items can be used to create LED lights that will do a great job illuminating a workspace in a room or garage. If you power your homemade LED design with a battery, it will become an excellent portable system. This article talks about how to turn an unnecessary thing into a useful device.
Lamp from a broken display
The author did not discover America through a window at all.
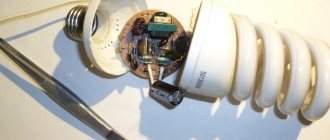
For three years now I have been collecting dead components lying around on the radio market, including matrices and displays from mobile phones. Well, and, of course, I use their filling for all kinds of lighting. The mobile backlight is usually powered by 8 - 18 V, depending on whether the LEDs are turned on. From this miracle, I simply throw away the glass of the matrix and solder more or less reliable contacts to the backlight pins. Power comes from a converter, for example, on a KA34063A, if in my laboratory it’s from 5V, if in the “field” version it’s from a mobile phone battery (there are also a ton of them on the market, i.e. spherical power).
In large matrices I usually put homemade rulers with LEDs from self-adhesive tape (in most free matrices the entire tape does not fit, you have to be tricky). I don’t know what Chinese enemy of the people came up with the idea of placing LEDs across the strip, but the width of the finished self-adhesive just doesn’t fit.
The matrices make not only good flat lamps, but also chic banners: you print any sign or text on the film and insert the matrices instead of glass.
Lamp from a broken TV: cool idea
The best thing you can do with a broken item or piece of equipment is give it a second life. Broken TVs can be an attractive home lighting solution. In this article, you will learn how to take apart your broken LCD TV or monitor and turn it into an amazing LED panel. It imitates daylight almost perfectly and is useful for photographers and directors who need good lighting in their work.
Required materials and tools
What you will need for this project:
- screwdriver;
- LED strips;
- faulty LCD TV or monitor.
The list is small, the task is not difficult, you can start with the guide below.
How to make a lamp from a broken TV
Disassembly involves removing the backlight from a damaged TV or monitor. They have a powerful white light inside, but they also have a Fresnel lens. This helps the light look very similar to a real skylight because of the way it diffuses light across the room.
- Lay the monitor horizontally and remove all screws on the back panel. Once you remove the plastic cover, you will need to remove all the screws from the inside and carefully remove all metal components and electronics. Be careful not to touch the boards as they may still have live voltage in the capacitors. You will need to remove the LCD panel until the backlight panel itself remains.
- The backlight panel usually has a diffusion layer, a fresnel layer underneath, another diffusion sheet, and an acrylic back panel. These are all very useful for your LED panel, but you will have to take them out temporarily.
- Now that all the layers have been removed, you have a metal backlight frame and its natural light. Newer models contain LED strips, but in older models you will find small CCFL bulbs.
- When it comes to powering your future LCD panel, you have two options. You can keep the original LCD strips or CCFL tubes, but this can be quite dangerous if you don't know what you're doing. The electronics with them are quite complex and they operate at high voltage. The preferred option is to remove them and add your own high CRI LED strips. They often come with an adhesive back, making them very easy to install. And if you need to remove CCFL bulbs first, be careful as they contain mercury.
- After you add the LED strips, you need to return the original layers of the panel. Start with acrylic, add the first diffusion sheet, a layer of fresnel and finally the last diffusion sheet. Place the original frame on top of everything. In case it no longer fits due to the LED strips, you can simply use gaff strip instead or make your own frame out of metal.
- Your LED panel is ready and now you just need to extend the wiring and add a socket.
You will still need it: 5 ideas on how to use an old monitor
Modern technology is developing by leaps and bounds. In the pursuit of technical progress, the question often arises: what to do with morally and physically outdated gadgets? It’s a shame to throw away electronics, and it’s unlikely to be sold on the secondary market for decent money. However, there can be quite a lot of ways to use old technology. On the Internet you can see interesting ideas for using old computer monitors.
Digital frame
One interesting way to use an unwanted monitor is as a digital photo frame. Similar devices are sold in many hardware stores, but they are quite small, and their cost clearly does not correspond to the functions and parameters of the gadget.
So, making a digital photo frame from an old monitor is not difficult. The simplest option is to use an old low-power system unit for this. Special software downloaded from the Internet is installed on it and files for the slide show are selected. There is no need to download any special software; you can use the standard Windows Photo Viewer program.
If you wish, you can go further and purchase a microcomputer. This device will cope with such work quite well, and unlike a conventional desktop PC, it will not take up much space.
It is better to decorate the monitor outline in the form of a regular frame. You can select it in the store according to the screen size or make it yourself.
Electronic calendar
Using a similar principle, you can make a very good electronic calendar from an old monitor. A special program is installed on an unnecessary system unit or a separate microcomputer. You can select it according to your requirements. There is software that allows you to display the time and even the weather if you have the Internet.
Aquarium
One of the most creative ideas for using an old CRT monitor is an aquarium. All contents are removed from the device body. For such an aquarium you only need a plastic housing. An aquarium should be selected for the internal cavity in accordance with the overall dimensions of the monitor. You can also try to do it yourself to adjust the parameters as accurately as possible, but it is not so easy.
Do not forget that aquarium inhabitants, both plants and fish, necessarily require light, filtration and aeration of water, as well as its thermal stabilization.
Digital mirror
An interesting idea to turn an unnecessary monitor into a smart digital mirror. To do this, you will need a regular mirror the size of the display itself, as well as a Raspberry Pi minicomputer. In addition, you will need to assemble a wooden frame in which all this will be assembled together. The display must be carefully removed from the housing and docked with the back of the mirror. The glow of the monitor will pass through the mirror, displaying the necessary information. This could be weather, time, calendar, or other information. At the same time, this interesting gadget can be used like an ordinary mirror.
Invisible monitor
An old LCD monitor can be turned into a device with an invisible image. It will be possible to see the information on the screen only with special glasses. To do this, you need to disassemble the device and remove the polarizing film from it. You need to make special glasses out of it, and put the monitor itself back together. The picture on the screen will now only be visible through glasses with polarized film, and without them the screen will appear white.
What is Ambilight
Ambilight (ambient lighting technology) is a technology invented and patented by Philips that provides background adaptive lighting on the company's television panels.
The system analyzes the color palette of the picture on the screen and turns on a similar glow around the perimeter of the TV. Everything works in dynamic mode and creates the effect of dispersion of the image outside the matrix.
It looks very impressive and allows you to immerse yourself even more in the atmosphere of the film or TV series. In this way, it is possible to visually increase the size of the screen and fill most of the viewer’s view with color.
Unfortunately, other electronics manufacturers are not trying to present their analogues or buy the rights to use Ambilight from the copyright holder. However, with the help of some gadgets from AliExpress you can create something similar.
LCD matrix as a table lamp or trunk light
↑ God once sent a piece to the crow... two pieces!
One spring, walking past a trash can, I saw a white plate with a steel edging. The device clearly did not fit into the basket properly and therefore attracted my attention. When I took out THIS, I was very surprised. Baaah, yes, this is a broken LCD panel from a 9/16 widescreen monitor! But something is clearly missing, such as high-voltage wires from the backlight. Having carefully examined it, I realized that the backlight was LED. There are as many as 6 lines in the cable. When asked where this wonderful miracle came from, I received the answer: yes, they forgot to remove the pencil from this laptop... But they hit the lid, the poor thing led. Yeees! People bought a lot of laptops, but the “shepherds” remained! So I ended up with two broken matrices.
The initial googling did not yield results on the m/s power supply for the lights... I put it aside, and there was no time... Naturally, I took out the glass and threw it away, leaving the light guide with diffusers, I looked at the LEDs, 40 pieces in 1 row. And now, six months later, I come across the panels again, already at home. Eh, I was - I wasn’t, a tester in my teeth, a foamy drink, an Internet keyboard. I came across a similar m/s and off I went, now I have a keyboard backlight above my desk, I made a backlight for a friend in the trunk of a car.
↑ The solution turned out to be simple
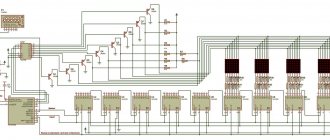
There are 4 wires to the backlight: common, +Upit, LED_EN and LED_PWM. Well, the power supply is more or less clear from 3.3 to 5.5 V, but the control turned out to be not difficult either. LED_EN turns on the backlight at a high level. LED_PWM is brightness, controlled by PWM pulses, I don’t remember the frequency, at 0% there is no light, but at 100% there is full brightness.
My version is powered from the computer, by the way, the converter is very critical to the quality of the power supply, it works very unstable on long wires, it is necessary to bridge the power supply with a capacitor on the board. I feed it from 5V through a switch (it consumes 0.8A), I made a pulse generator into the car using a KIS-3R33S module, the input is via a diode.
↑ And now the photos:
This is the only matrix board and a radiator with LEDs.
Well, it’s clear who and where
This is enlarged, the LED power supply itself, from the inscriptions it is clear where to supply power, but where the LED_EN and LED_PWM points are not clear, which confused me, and what to supply to them was also a mystery.
And this is the second board on it, it’s already clear where these points are, but what about the controls...
A friend has this in the trunk of his car, he fixed the lenses with metallic tape, you can see it at the edges.
Well, this is my mess behind the computer. Don't kick too hard at the debris, but it is clear that the side flow is not significant and the eyes hardly notice it. However, it is better not to look perpendicularly.
But the new matrix, the scarf, is a little different.
There are practically no inscriptions, but you can already understand from previous experience. Here I soldered a diode after the fuse, which is not correct, but physically stronger.
↑ Ideas for use
You can use it to view X-rays, make a luminous room number for your home, a backlight for your feet in a car, or just a slit light source, etc. You can make a light for a tent; when using a 12V 7Ah battery and a pulse stabilizer, it will shine for about 20 hours.
Is it worth the bother?
The background lighting looks very impressive, it is definitely worth a try for all those who like to watch movies or TV series on the big screen. When using Apple TV, to work with game consoles, or just for a smooth out-of-the-box experience, choose a more expensive out-of-the-box solution.
At the same time, be prepared for restrictions on the maximum picture resolution, the absence of some modes with high frame rates, or the absence of surround sound.
In other cases, it is better to try a more affordable and customizable solution based on a set-top box. If you are using a TV box based on a Windows computer, you will get the simplest and most trouble-free setup, but with boxes on Android you will have to tinker with the parameters.
In any case, get a very impressive addition for your TV or just beautiful background lighting for your interior.
If you cannot make these compromises, are not ready to spend time selecting settings and want the most hassle-free solution, choose Philips TVs with original patented technology.
To bookmarks
Making a lamp from a laptop matrix
Together with you, we managed to consider several ways of making lamps. Basically, we used materials that were quite standard for this matter - LEDs, light bulbs. This time we decided to present you with material on making a lamp from something original, namely from a laptop matrix.
We invite you to watch the video and then look at everything in detail.
So, what do we need to make an original lamp from a matrix: - an old matrix from a laptop; - stationery knife; - soldering iron.
The main work is to properly disassemble the matrix so as not to damage the cables. Doing this is not as difficult as it might seem at first glance, so let’s not delay and get to work.
First of all, remove the back film of the matrix. You can't remove it completely.
Next we move on to removing the front frame.
On the back of the matrix we see a board with a control controller and a driver for the LED strip, which is located inside the structure and provides illumination of the matrix. The matrix itself is connected to the controller via three cables.
We continue to disassemble. We release the matrix itself, on which two polarizers are glued on both sides.
Under the matrix there are light-scattering films. Many people mistakenly believe that the films under the matrix are polarizers, but this is not the case. These films are made according to the principle of Fresnel lenses. They are also jokingly called reality-distorting films.
Under all the films there is a diffuser made of organic glass, which is illuminated by an LED.
We put the films in place and separate the matrix, cutting off the cables with a stationery knife.
Next we need to remove one of the polarizing films. This is done extremely easily using the blade of a stationery knife.
What is the screen made of?
The modular assembly of an LED screen involves the creation of a large canvas from many individual modules. These are standard-sized blocks that consist of several dozen LEDs that act as pixels and an electronic control circuit. The control board controls the joint glow of the module, and also has cables and connectors for connecting with other modules. This kind of puzzle potentially makes it possible to assemble a screen of any size.
Today you can buy modules for assembly in electronics stores, in specialized departments on the market, or order them on international online platforms like AliExpress. In all three cases, the block will most likely be made in China, but this does not mean low quality by default. Good products come from the land of dragons. To choose it, you should consult with experts and read reviews about certain brands.
Basic functional characteristics of P10 modules:
- size: length – 320 mm, width – 160 mm, thickness – 20 mm;
- weight – from 600 to 700 g;
- pixel pitch – 10 mm;
- number of pixels per m2 (resolution) – from 256 ˟ 192;
- screen brightness – from 6000 to 7000 cd/m2;
- working life – up to 50,000 hours;
- half brightness angle – 120˚;
- comfortable viewing distance – 7 meters or more;
- maximum power consumption for street use is 500 W/m2.
In the basic version, LED blocks for assembling screens are protected from dust, moisture, and mechanical damage.
An alternative to electronic LED blocks is LED strip. It can also be laid out as a screen to broadcast images. However, this material has characteristic disadvantages. First, installing a large number of tapes in the form of a screen is more difficult, since they are not originally designed for this purpose. Secondly, LED strips do not have sufficient resistance to destructive environmental factors: temperature changes, contact with dirt, moisture and dust, and ultraviolet radiation.
Lamp from a broken display
The author did not discover America through a window at all. For three years now I have been collecting dead components lying around on the radio market, including matrices and displays from mobile phones. Well, and, of course, I use their filling for all kinds of lighting.
The mobile backlight is usually powered by 8 - 18 V, depending on whether the LEDs are turned on. From this miracle, I simply throw away the glass of the matrix and solder more or less reliable contacts to the backlight pins. Power comes from a converter, for example, on a KA34063A, if in my laboratory it’s from 5V, if in the “field” version it’s from a mobile phone battery (there are also a ton of them on the market, i.e. spherical power).
In large matrices I usually put homemade rulers with LEDs from self-adhesive tape (in most free matrices the entire tape does not fit, you have to be tricky). I don’t know what Chinese enemy of the people came up with the idea of placing LEDs across the strip, but the width of the finished self-adhesive just doesn’t fit.
The matrices make not only good flat lamps, but also chic banners: you print any sign or text on the film and insert the matrices instead of glass.
A broken display turns into a designer lamp (2 photos + video)
Modern electronic devices have a short lifespan, often breaking down or becoming obsolete, with the release of new technically advanced devices. However, don’t rush to throw away your old gadgets; British designer-engineer Matthew Perks has found a way to originally recycle, for example, computer monitors or TVs. Considering that when the display fails, the electronics most often break down, the engineer used the backlight system to create unusual flat lamps.
The enthusiast described in great detail the process of turning an old monitor into a designer lamp that can bring light into staircases, basements, and closets. At the same time, the large diameter of the screen and bright light create the illusion of a window through which sunlight streams.
During dismantling, the engineer carefully separates the monitor panel into several diffusion layers, a Frenkel layer and a set of LEDs. In this case, the LEDs from the monitor should be immediately replaced with LED strips in order to easily supply electricity to the lamp.
Next, ordinary wiring is installed, and the lamp body is constructed from scrap materials. A beautiful, bright and economical flat lamp will take up little space and create an unusual atmosphere of a constant sunny day.
Automatic night light-charger from an old LCD monitor
We will consider an old monitor to be one equipped with a single D-SUB input, because... There are fewer and fewer modern devices with such an output. Obviously, you can make a lamp from it: table, wall or ceiling. Due to the fact that the luminous surface does not heat up, it can be combined with any paper image. Without much difficulty, you can upgrade it to automatically turn on during the daytime and additionally use it as a USB charger.
* Lamp: just disconnect the cable from the LCD matrix and the monitor will shine evenly, but inconvenience is possible: you need to press the button to turn on the monitor or it may go into energy saving mode (i.e., turn off after a while).
For greater brightness, it makes sense to remove the LCD matrix.
* Controlled switching on: in the presented version there is an explicit division of the circuit into a power supply and a control unit.
The power supply contains a control signal for turning on the backlight equal to 5V (the value is pre-measured), therefore, to permanently turn on the backlight, it is enough to short-circuit it to the corresponding output of the power supply.
The original control unit becomes redundant.
* USB charging: since the old monitor has found a second life, it would not be superfluous to use the existing 5V voltage and bring it out.
* Automatic switching on: thanks to arduino, there is no problem buying ready-made modules of various sensors with digital output: yes/no. We are interested in the light sensor; for internal reasons, I took a fire sensor (IR range): less sensitive to daylight, but it (as it turned out) immediately implemented the necessary inverse logic (the presence of an insufficient level of illumination is characterized by the presence of voltage at the output).
* Assembly: it is better to solder an ordinary wire with a switch as a power cord; the detector circuit can be secured with double-sided tape under the outer casing of the monitor, so that it remains possible to make adjustments in assembled form; It is better to connect the sensor directly to a long wire so that the most suitable location can be fixed in place; Installing a USB socket can be somewhat troublesome, so in a simple version you can get by with a cut USB 'extension cable'.
How Ambilight and its analogues work
First you need to understand how it all works. A special module captures and analyzes the image on the screen to understand the color of the area around the perimeter of the matrix. After this, a similar signal is sent to the addressable RGB strip located behind.
Capture is performed several times per second, and the glow of the diode strip behind is updated at the same frequency. Of course, this requires serious resources. The higher the image resolution, the more pixels have to be processed during capture.
All solutions that replicate Ambilight technology are divided into two types: based on an external decoder or based on a set-top box.
◉ The first type is a separate box with an HDMI input and a similar output. Inside is a small single board computer (most often based on a Raspberry Pi) that accepts the output signal from any source. TV set-top boxes or consoles can be connected to the input. The capture process takes place inside, and the output image is displayed on the TV.
The advantage of this solution is ease of connection. No complex circuits, additional software or settings. The box is simply placed between the signal source and its receiver (TV).
The disadvantage of such a box is also obvious - most often it will produce a picture worse than at the input. The power of the module may not be enough to rebroadcast 4K, sometimes there will be no support for HDR, there are cases when the boxes do not support the required FPS or simply do not transmit surround sound. Here everything depends either on the power of the filling or on the standard of the HDMI port.