An inexperienced craftsman may think that making an eternal LED light bulb with your own hands is too difficult a task. But the instructions do not contain complex processes; special knowledge in electrical engineering is also not required. The only thing that is required from the master is attentiveness, preparation of the workplace, the correct choice of components and a set of tools at hand.
To make an eternal LED lamp, it is recommended to use high or medium power chips. It makes sense to start work only if there are no problems with the wiring, since network instability can lead to burnout of diodes or drivers, regardless of their quality.
Features of connecting LED bulbs
Appearance of LEDs
The scope of application of LEDs is quite wide - from the production of TV equipment to lighting in residential and commercial premises. However, not every craftsman knows how to connect small lamps. Everyone distinguishes three methods of LED installation:
- consistent;
- parallel;
- combined.
In addition, the LED lamp can be connected to a 220 Volt network. In any case, the connection is made only to direct current sources.
Without dismantling
Refusing to dismantle the cartridge is an easier way: there is no need to understand the circuit, make jumpers, climb into the middle of the cartridge and tinker with contacts. Before dismantling, you need to buy several Wago clamps. Remove the wires leading to the cartridge at a distance of 1-2 cm. Place them in the Wago clamp.
Do similar actions on the other side of the lighting fixture. All that remains is to supply a phase to the terminal block on one side and zero on the other. If you were unable to purchase clamps, twist the wires under the PPE cap.
Connection principles
Volt-ampere characteristics of an LED
To install LED lamps, there are several important principles that should be followed:
- It is important to observe polarity when connecting the LED. Otherwise, it will fail faster or will not light up at all.
- The location of the anode and cathode is indicated on the bulb base in the form of notches and green dots.
- It is prohibited to mount lamps of different colors in series in one line and on one resistor. This affects their performance and, in principle, their glow.
- Information about polarities can be found in the LED technical documentation.
For every 12 V you can connect no more than 6 LEDs.
Make a smooth increase in brightness when turned on
This modification is very relevant, for example, in a bedroom or children's room, when you want to gradually increase the brightness of the lighting. Turning on will last about 30 seconds. We will need to connect a posistor (this is an electronic component that plays the role of a heater and temperature sensor) in parallel with the LEDs. A posistor is also called an RTS thermistor.
The desired effect is achieved as follows: in a cold posistor the resistance is minimal. Current flowing through several LEDs heats it up, thereby increasing the resistance. As the resistance increases, another part of the LEDs is included in the circuit. This is how a gradual increase in brightness is achieved.
Pay attention to the resistance of the posistor used. It should be between 330-470 Ohms. You can find these in energy-saving lamps with a power of 32 W.
Types of power supplies
Transformerless Power Supply
Each 12V LED should only be connected to a power source of the same voltage. Moreover, the IP must have a stabilized output current. The easiest and most desirable way is to connect the LED to the following 12 V power sources:
- Transformerless power supplies (power supplies). They have a current-setting resistor at the output and a quenching capacitor. But in such power supplies there is no stabilizing protection. This greatly affects the life of the light bulbs during power surges.
- Car battery. If you connect an LED to a battery, you need to select a resistor based on power and resistance.
- Unstabilized power supplies. Their main components are a capacitor, a rectifier and a step-down transformer. Such power supplies are relevant for objects with stable voltage.
- Switching power supplies. As an example, you can take a computer power supply. If the user is not bothered by the noise of coolers, you can use it
The cost of a new 12-volt power supply depends on the design option (with or without a housing) and on the power, calculated in Watts.
Types of lamps
The sockets of LED lamps with pins are designated by the Latin letter G. The following numbers indicate the distance between the central parts of the pins. If there is a numeric value, the second digit indicates the diameter of the circle to which the pins are connected.
For example, a G13 base with a distance of 13 mm can be connected to Armstrong, LPO and LVO lamps. Often, instead of the G13 marking, the T8 designation is used.
LED lamp T8 with g13 socket
How to determine LED polarity
Determining the polarity of an LED by appearance
All 12 volt LEDs (white, red, blue and other colors) have an anode and a cathode (polarity). These must be taken into account when connecting LEDs. Polarities can be determined in one of the following ways:
- By design. One of the legs on the light bulb base is always several mm longer. This is the anode. It is marked with a “+” sign or a green dot.
- One bowl inside the flask. If you look closely, you can see two crystals on it. The larger one represents the cathode. The smaller one is the anode.
- Using a multimeter. To do this, the device must be set to “Dialing” mode. Then the probes of the device are brought to the cathode and anode. The first one is black, the second one is red. When they are positioned correctly, the light bulb should glow. If this does not happen, it means that the master incorrectly identified “+” and “-”. You need to change the position of the probes. If this does not help, the LED is simply faulty.
Sometimes craftsmen determine the polarity of LEDs using a battery. But it's painstaking. It is better to use the above methods.
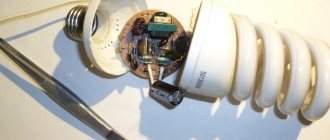
Recovery
This video inspired me to make my own light bulb:
We recommend: I stained linoleum with glue - I easily removed it in 10 minutes using regular dimexide
- We find a burnt out LED (or several).
- They are usually marked with a black dot. In my case, the entire LED was burnt out.
- We paint out the fire victim with a knife or screwdriver.
- We drip flux onto the exposed contact and apply a drop of solder.
This way we restore the circuit and the light bulb starts working again. But! There's one catch. The voltage then increases and the LEDs will light up one after the other. Perhaps the light bulb will work for another month. Or maybe just one day.
Methods for connecting LEDs to a 12 volt power supply
Connecting an LED through a voltage stabilizer
To connect an LED to 12 volts, if its voltage is only 3V, you will have to compensate for the excess of 9 volts through a resistor or zener diode (which is ineffective), or connect the ice lamps in series, three at a time.
Red and yellow LEDs can be connected in groups of five at a time, since the voltage drop is below 2.2 Volts.
Before calculating the resistor, you need to find out the operating voltage of each light bulb. It is measured independently or information obtained from technical documentation.
12 V LEDs are connected only through a stabilizer. When it comes to connecting a strip of lamps in an IP, it is important to know that they have a limiting resistor designed for each group of several LEDs.
Tips and Cautions
All of the above LED driver circuits from an energy-saving lamp, although they provide low-voltage power, have a galvanic connection to the AC network, so precautions must be taken when debugging.
The best and safest would be to use a separating transformer with identical primary and secondary windings. Having the same 220V at the output, the transformer will provide reliable galvanic isolation of the primary and secondary circuits.
Please rate the article. We tried our best:)
Did you like the article? Tell us about her! You will help us a lot :)
Serial connection
Serial connection of LEDs
If the master connects a 12 Volt LED in a serial circuit, the lamps are assembled in a chain. In this case, the cathode of each previous element is soldered to the anode of each next one.
With this assembly scheme, a current of 20 mA passes through all the bulbs. The voltage level here also consists of the sum of the Volt drop across each of them. Thus, it is forbidden to connect an arbitrary number of light bulbs to one circuit.
If you need to connect a large number of LED lamps in series, you need to take a power source with high voltage and power ratings.
The disadvantages of serial connection include:
- Failure of the entire light chain if one element breaks down.
- The need to purchase a more powerful power supply when installing a large number of lamps.
As an example of a serial connection, consider a standard Christmas tree garland. If one element breaks, the whole thing stops working. Therefore, you need to find the loose contact and solder it again.
Luminaires with electromagnetic ballasts
Older, Soviet fluorescent lamps, in addition to the starter, were equipped with electromagnetic ballasts. In this case, there will be no need to make significant changes. Remove the starter from the device, install an appropriately sized LED and continue to use the product.
There is absolutely no need to remove the throttle. The current consumption will be about 0.15 A, so such a part will act as a jumper. Otherwise, the design of the lamp remains unchanged.
Algorithm of actions
The connection of LEDs must be made taking into account the polarity.
To connect an LED to 12V DC, you need to learn the basic algorithm of actions:
- Determine the type of power supply, find out its output voltage and overall performance.
- Detect LED rated current, power consumption and voltage.
- Determine the possibility of connecting LEDs to the power supply according to the available parameters.
- Connect and solder the light bulbs observing polarity. The resistor is placed on any part of the chain.
Contacts are carefully isolated after completion of work.
What the manufacturer promises and actual service life
The packaging of LED lamps indicates very attractive service life. They amount to up to 50 thousand hours. A simple calculation gives an interesting result - if the device works 8 hours a day, the total service life will be about 17 years. However, there are strange discrepancies here too.
LED production technology is almost the same throughout the world. The design and operating principle of the device do not allow deviations from the basic methodology. This means that the finished product should have approximately equal parameters. However, in practice this is not the case. One package says 25 thousand hours, the other says 50 thousand. This discrepancy cannot be explained by design features or differences in operating conditions, since the light sources are almost the same.
Unscrupulous lighting manufacturers often overestimate the characteristics of lamps. There are two reasons for this:
- a banal marketing ploy. The user is more likely to buy an LED lamp with high performance, so there is a temptation to somewhat embellish the actual situation;
- difference in operating conditions and testing conditions.
If everything is clear with the first reason, then the second one needs to be dealt with. Factory tests are carried out in laboratory conditions that are optimal for the operation of lighting devices. The user purchases a lamp for home or other premises where working conditions are far from ideal. Therefore, it is always possible to explain the discrepancies between the declared and actual values of the lamp's lifespan by non-compliance with operating rules.
LED lamps require low voltage power - each emitting crystal consumes approximately 3-4 V of electricity. A driver is installed inside (sometimes outside) each lamp. This is a power source that converts the incoming 220 V AC into the amount of DC required for the operation of the crystal. Therefore, voltage drops in the network are not too dangerous for LEDs; the converted value will still correspond to the specified values.
How many LEDs can be connected to 12 Volts
To find out how many LEDs can be connected to 12 V, you need to divide Up by Up. Or it is allowed to proceed from an average value of 2 Volts for each light bulb. Thus, for every 12 V it is allowed to mount no more than 6 LEDs. If we take into account that some part of the voltage (about 2 V) must necessarily go to the quenching resistor, the number of diodes will decrease by one.
The LED voltage is not always 2 V. In addition, when connecting and connecting the LED, it is worth taking into account the shade of the light bulb and its brightness. To determine the exact number of lamps per twelve-volt power supply, you can use a special program.
Calculation of the efficiency of replacing fluorescent lamps with LED lamps
The table below shows power indicators for fluorescent and LED lamps with identical luminous flux values.
| Luminescent, W | LED, W | Luminous flux, Lm |
| 5-7 | 2-3 | 250 |
| 10-13 | 4-5 | 400 |
| 15-16 | 6-10 | 700 |
| 18-20 | 10-12 | 900 |
| 25-30 | 12-15 | 1200 |
| 40-50 | 18-20 | 1800 |
| 60-80 | 25-30 | 2500 |
Based on this diagram, it becomes clear that a 36 W fluorescent lamp can be replaced with an 18 W LED lamp. The transition to LED light sources is rational not only economically, but also from an efficiency point of view. To understand the difference, let's list the technical and operational parameters for each light bulb.
Advantages of LED lamps over fluorescent lamps
Luminescent source:
- Service life is approximately 2000 hours. The specific value is directly related to the number of on/off switches, but for this value it should not exceed 2000 cycles.
- Since the light flux is diffuse, that is, it diverges in different directions, the use of reflectors is required to increase illumination.
- After switching on, it takes a few seconds to reach operating brightness.
- Due to the use of a ballast, interference appears in the network.
- Over time, regardless of the number of on/off switches, the protective layer of phosphor degrades, which leads to a decrease in luminous flux by 25-30%.
- There are special requirements for operation and disposal, since the principle of operation is associated with mercury vapor contained in a glass flask.
LED lamp:
- Service life exceeds 10,000 hours regardless of on-off cycles.
- Directional luminous flux, no need for reflectors.
- Instantly reaches operating brightness when the lamp is turned on.
- Instead of a ballast, a driver is used, which eliminates the creation of interference in the network.
- The maximum reduction in brightness due to a longer service life is 10%.
- Reduced energy consumption.
- Environmental friendliness and safety.
Common Mistakes
LEDs will gradually fail, since the operating current is different for everyone.
Often, craftsmen make mistakes when installing LEDs. The most relevant of them:
- Connecting light bulbs directly without a resistor. In this case, the diodes simply burn out.
- Making a parallel connection using one resistor. Such an error threatens the gradual failure of all light bulbs. After all, each has its own operating current.
- Incorrectly selected resistor. In this case, too much current passes through the bulbs, which again leads to them burning out. If the resistance is high, the elements will not glow bright enough.
- Performing a series connection with different current consumption. There are two options here - the lamps will glow with different brightness intensities, or those designed for a lower current will burn out.
- Connecting ice lamps to a network with alternating current 220 without using a diode or other protective components. A voltage of 315 V is supplied to the light bulb, which instantly leads to its combustion.
If you take these errors into account and connect the LEDs correctly, the decorative lighting that the master decided to install at home will work for a long time and properly.
Working with the chuck
Since the luminous flux of fluorescent lamps extends in all directions (360 degrees), it does not matter in which direction the source and its socket are directed. However, when switching to LED products characterized by directional light, a situation may occur when the ceiling lamp shines not downwards, but to the side. The simplest solution in such situations may be to use swivel-type bases that can be rotated 90 degrees.
LED lamp with rotating base
Today, the transition to LED light sources is more relevant than ever. Even the cheapest lamps of this type consume at least 50% less electricity, have a longer service life, and are environmentally and electrically safe. If you don't understand basic electrical principles, it will certainly be much easier to purchase a ready-made LED light that will fully pay for itself in just one year.