Home / Tubers
Back
Published: 04/14/2020
Reading time: 9 min
0
16
- 1 DIY remote control pocket
- 2 How to sew a wall organizer with pockets with your own hands
- 3 Everything you need is at hand: bookmark sofa organizers 7
- 4 Interior Sewing Sofa Organizer Idea Fabric
- 5 Manufacturing instructions
Working materials
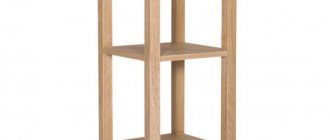
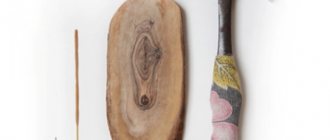
Any wood is suitable for manufacturing, but it is better to use durable hardwoods. Parts List:
- front strap 30*7.5 cm;
- back board 30*12.5 cm;
- central bar 30*10 cm;
- sidewalls 30*10 cm;
- board for the bottom 30*10 cm;
- plywood;
- screws;
- metal or wooden rods;
- varnish;
- brush;
- a circular saw;
- sandpaper;
- construction adhesive;
- screwdriver
Felt owl
It is very easy to sew such a toy. Depending on the size, the craft can be a small owl - a keychain or a comfortable sofa cushion. A bright owl made of felt with your own hands is made according to a pattern.
To work you need to prepare:
- felt of different colors;
- filler;
- fabric for finishing the belly and wings;
- needles, pins, scissors.
Preparing parts
Cut the stand elements and sand them with sandpaper until smooth. Cut off the corners on the sides. The partitions of the product from the back to the front go in height from larger to smaller; accordingly, cut the sidewalls at the angle of the running partitions.
The print will make your figure perfect: classic dresses of the year for women over 45
Will harmony reign or will diseases be attracted? Various signs about seashells
Vyacheslav Fetisov headed the central council of VOOP
DIY shaped pillow in the shape of an owl
To create a figured owl pillow you will need a life-size pattern. The material used is two types of dense fabric. Felt is used to make eyes, and leather substitute is used for eyelashes. Black buttons are used to decorate the pupils.
The main part is cut out by folding the fabric in half
The main feature of the figured pillow is that the owl's body consists of two main parts. Before starting work, you should transfer the pattern to the fabric, taking into account the seam allowances. Two wings are drawn in a mirror image.
Once the patterns appear on the fabric, they can be cut out. First of all, the beak is sewn to the main part of the body, and then the eyes and wings. Eyelashes made from a leather substitute will help make button eyes more expressive. If desired, you can use wool instead. All parts are attached using a zigzag seam along the contour. Only the button eyes are sewn on by hand.
The next step is sewing the owl. The form is folded right side inward and stitched. The main thing is not to forget to leave a hole at the bottom of the product. The toy is turned inside out and then filled with padding polyester. Before stuffing, the piece can be ironed. The hole is sewn up by hand.
Assembly of elements
Stepping 5-7 cm upward from the bottom of the sidewalls, screw the bottom board, install the back part along the lower edge of the sidewall, attach the central partition, placing it on the bottom, place the apron flush with the bottom of the sidewalls.
It turns out that the front and back parts will cover the hiding place.
Hook and loop
Another option is to use a universal hook and loop set. In addition to this, you will need:
- degreaser;
- double sided tape;
- superglue or a screwdriver with a metal drill - if you need to fix the structure more securely on the wall.
Step-by-step instruction:
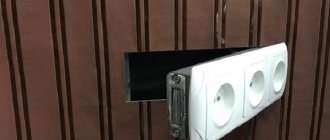
- The loop is attached to the wall in the chosen way. If double-sided tape is used, wipe the surface with white spirit.
- The plate with the hook is fixed on the back wall of the remote control, having also pre-treated the contact area.
Formation of a cache
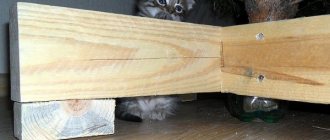
Cut the plywood to fit the area of the bottom of the stand. Make two small bars - you can make them from a board by sawing off two parts from the end. These parts should not be attached with self-tapping screws, since a smart wife may guess that the screws are screwed in in the wrong place.
An animal drawn by a 9-year-old boy from Russia will appear in IKEA stores
The woman with whom Anatoly Kot hid for several years
Lemon water: the right drinks to start your day with
In this case, glue will help. Glue two pieces of wood to the plywood so that they fit tightly between the sides. Plywood with two bars forms the second bottom of the stand for remote controls, so it should be without cracks when closed.
How to make an organizer
The following materials will be required:
- 2 knitting needles;
- textile;
- threads;
- needle;
- pattern;
- scissors;
- chalk.
IMPORTANT. It is necessary to do everything according to the pattern. You can find it on the Internet or make it yourself. If the picture is from the Internet, then it is best to print it. Because making a sketch “by eye” will not work.
Fastening
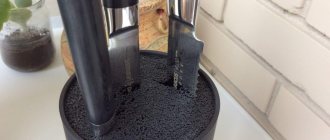
This will require 2 knitting needles. One of them will be thicker than the second.
The first knitting needle must be given a special shape. It should look like a double hook. This will serve as a fastener.
After the knitting needle has acquired the desired shape, you need to make a cover for it. To do this, you need to take a piece of fabric, fold it in half, and stitch it on both sides. In such a way that the knitting needle fits.
IMPORTANT. It is worth taking measurements very carefully. If you cut a smaller piece, it will most likely be an empty transfer of materials. In a pinch, it can be used for a pocket.
The basis
In order to make the base, you need to take 2 identical pieces of fabric and sew them together. For this it is best to use a sewing machine. It is worth doing 2-3 lines, this way the product will be durable and reduce the chance that the seams may come apart.
After the base is ready, you need to sew a fastener to it. It is attached to the outside so that it protrudes. This way the organizer can be hung on anything. The second knitting needle is sewn on the same side where the hook is located. With this help the product will keep its shape.
IMPORTANT. For greater rigidity, you can place a plastic or cardboard form inside the organizer.
Pockets
After the work has been done, you need to take measurements from the remote control. Then cut out a piece of fabric and sew it to the main part.
It is worth considering the thickness of the remote control. If this is not done, then it simply will not fit in your pocket.
After this, you need to make a few more branches. If you know exactly what items will be stored, then you should take measurements. Otherwise, you can make pockets of arbitrary sizes. The product can be considered complete.
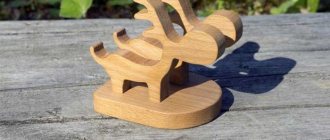
Wood varnishing
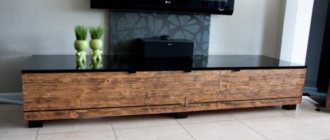
Apply two layers of varnish to the wooden surface with a brush. You can use colored varnish, for example, brown, which will transform the stand into a stylish wooden craft. To place money and gadgets in the hiding place, you need to remove the latches from the stand and pull out the box, put personal items and put the product back. Nothing complicated.
Found a violation? Report content
How to sew a pillowcase with a pocket for the TV remote control
Hello everyone who visited this page!
Today I will tell you a funny incident that prompted me to start sewing a pillowcase with a pocket for the remote control. Interesting? Then we read on... Well... he’s not there and that’s it. I was about to look for where I could buy it, but then my gaze accidentally (and apparently not by chance) stopped at the pillow that was lying peacefully in the chair.
That’s why I had the idea to sew a special pillowcase with a pocket made of dark fabric so that it wouldn’t get dirty too quickly. Moreover, I still had an embroidery sampler that was waiting in the wings. I waited.
Method 7: Buy a fashionable gadget
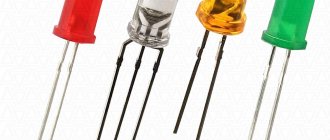
Of course, there is another way to find the remote control, phone, keys or even a cat in the house. You need to glue a special plastic Stick-n-Find sensor to the object, which transmits information via Bluetooth to the locator installed in the phone.
Stick-n-Find costs about 3,000 rubles, the set includes two sensors, two key fobs and instructions.
Another similar gadget, Pixie Point, is also a set of key fobs and tags and a special application for a smartphone. Key rings are attached to objects, and notifications are sent to your phone about where they are located. In my opinion, a very beautiful solution.
In addition, the Pixie Point app allows you to create virtual zones. This feature helps you not to forget necessary things in different places. For example, you got out of the car and left your wallet on the seat - the program will warn you about this. But if you forget your phone somewhere, nothing will help you.
One package of four key rings costs about 6,600 rubles.
What ways do you know not to lose the remote control? Tell us about the most unexpected places you found a TV remote control or phone.
Method 3: turn a pillow into a remote control
This interesting gadget is called Remote Pillow and solves the problem of losing the remote control once and for all. Because it is the remote control that can be used to control almost all types of TV, DVD and satellite TV receivers - the cozy velor pillow contains codes for more than 500 remote control devices. Channels are switched with a simple click of the pincushion button. Battery operated. Sold on Amazon and eBay.
Remote Pillow costs approximately 1300–2000 rubles.
All that remains is to decide where to store such a remote control. If you have a lot of throw pillows, this could be a problem.
A little humor.
And here are the guards who guard your remote control. True, it happens that they themselves are the cause of the loss. But they are so cute.
The remote control will not be lost if it has a beacon in the form of a balloon.
This is for those who are already completely fed up with the disappearance of the remote control.
How do you like this “stylish” storage?
The motto of this device is: “I carry everything I own with me.”
And this way of storing the remote control will appeal to men. They will never forget to put it back.
Decor features
When making a toy pillow, it is not necessary to strive for anatomical accuracy. It is better to use dense fabrics - they hold their shape well. Owl decorations:
- fringe imitating feathers;
- embroidery on shell material;
- buttons, beads for the image of eyes;
- lace, bows, tassels on the ears.
This way we will have a wonderful and useful decorative element for the room.
Felt owl pillows will look good in the interior of a children's room.
An original pillow that evokes positive emotions is a stylish detail designed to decorate the interior.
An interesting solution for the living room: a pocket for the TV remote control under the owl’s wing.
The size of the product and its appearance depend on the type of pattern and material used.
Owl guardian of remote controls
This pillow option is more suitable for the living room and can be given as a gift to both the hostess of the house and the head of the family if he likes to sit in front of the TV. The pockets on this pillow will perfectly accommodate several remote controls; they will always be at hand and you won’t have to frantically search for one of them.
The owl pillow has a pocket for one remote control sewn onto its body, and long wings folded toward the chest form two more pockets on the sides. To sew such an owl, take:
- cotton fabric of two or more compatible shades;
- interlining;
- pillow stuffing material;
- threads, scissors, pattern paper.