Geography is one of the most important and difficult to understand sciences. To simplify the process of studying it, you can make a globe yourself. To do this you will need a small amount of materials and some free time. It's best to try to make a real globe out of paper and paints. In this case, the finished product will be light in weight and will fit well into the interior of the room.
Huge globe made using papier-mâché technique
You will need: a fitness ball, PVA construction glue, film, rope, paper, newspapers, scissors, pencil, brushes and paints.
Master Class
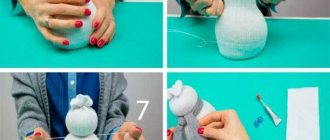
- Wrap the fitness ball in film and tie a loop for further hanging.
- Wrap the ball with rope.
- Hang the ball to make it easier to work with.
- Cut the newspaper into pieces, dip the paper in water, then attach it to the ball.
- Cover the ball with pieces of newspaper in several layers.
- Cover the ball with pieces of white sheets in several layers and wait until dry.
- Draw the outlines of the continents and oceans with a pencil.
- Paint the globe with paints and wait until it dries.
- Deflate the ball through the top hole and remove it along with the film.
- Cover the hole and outline it.
A huge globe made using papier-mâché technique is ready!
Working with plasticine
From this plastic material you can make any figure with your own hands, including a globe. Moreover, together with a young researcher, you can sculpt a model of the Earth with its internal structure - core, mantle, crust.
To work, you will need a package of plasticine with at least 6 colors:
- yellow;
- orange;
- red;
- black,
- blue or blue;
- green.
In addition, you need to prepare a board, a plastic knife, which is sold along with the material, a pencil, and thin paper (tracing paper).
We start sculpting a globe for children by forming the core. The base will be a yellow ball. We wrap it in a “cake” made of orange plasticine, then in a “cake” made of red material. The core of the Earth model is ready - the inner and outer core, the mantle.
The next layer is the earth's crust made of black plasticine. Then we cover the base with “oceans” - blue or blue plasticine. The layer must be perfectly even.
You can start designing the continents. To do this, you will need a world map of the appropriate size for the ball, translated onto tracing paper or newsprint.
It is not necessary to draw small islands on it; it is enough to indicate the continents.
We cover the “bodies” of the continents with green plasticine and carefully cut them out with scissors and stick them together with the paper base on the blue layer.
You can add realism by highlighting deserts, mountains, and glaciers on the continents with the appropriate color - brown, yellow, white.
For children over 8 years old, a different manufacturing technique is suitable - without cores and mantle, or the earth's crust. Blue plasticine is placed in an even layer on the base (a ball of foam plastic or other material), continents are designated - the craft is ready.
The final stage of work is creating the stand.
- We fashion 4 parts - a flat cake, a cone-shaped stand and two balls.
- We “place” the cone on the flatbread. We attach the balls to the globe with a toothpick.
- We install the craft on a stand taking into account the slope of the planet.
- We form a “rim” - bend the wire in an arc, cover it with plasticine to match the stand and secure it with pieces of a toothpick.
Beaded globe box
You will need: a wooden blank - an opening ball with a stand, a simple pencil, beads - blue, light pink and gold, thick wire, thin fishing line, instant glue, acrylic varnish, glitter, scissors, a screwdriver with a thin drill, a hammer, acrylic paints and a brush.
Master Class
- Draw the outlines of the continents on the ball.
- Weave a belt into 2 beads: one row is gold - this is the equator, and the second row is colored. During weaving, you should constantly apply the fishing line to the ball and orient yourself along the intended lines, that is, blue beads are water, and pink beads are land.
- Sew the belt into a ring, apply glue to the edge of the box (the middle of the ball) and put on the beaded belt, then wait 15 minutes for the belt to stick well.
- Weave the next row in the same way: string blue beads in place of water, and pink beads in place of sushi, do not forget to constantly apply to the ball and try on the continental lines. Only after careful fitting should you glue the fishing line with beads to the ball. It is worth noting that it is necessary to give each row time to dry so that the rows do not move and the work does not deteriorate.
- Braid the entire northern hemisphere, then the southern.
- Braid the stand with golden beads, just leave a small gap unbraided for the future hole.
- Prepare a piece of thick but flexible semi-circular wire and tap the end with a hammer to flatten it.
- Drill a hole in the base and glue the flattened end in, then leave to dry.
- Paint the inside of the box pink and wait until dry.
- Mix acrylic varnish with glitter, cover the globe and leave to dry.
- Weave a square rope of golden beads the length of the wire tail, cover the wire with it, and cut off the excess end of the wire.
- Glue the golden bead so that the end of the wire is not visible.
The globe-shaped box is ready! I recommend watching this video!
3D PEN DRAW A GLOBE WITH YOUR OWN HANDS | HACKS FOR HANDMADE 3D SIMO MINI
Preparatory activities
Before you start making a globe at home, you need to find or buy all the required materials, as well as prepare a special adhesive composition. If you complete these preparatory steps in advance, you can significantly simplify the bulk of the work and reduce the time spent.
Gathering the necessary materials and tools
In order for the process of making a globe to bring pleasure and not create additional problems, you need to carefully prepare the workplace and collect all the items necessary for work.
The table on which a person will carry out all manipulations with the product is covered with unnecessary newspapers or oilcloth. Only after this, prepare the following materials and tools:
- small saucepan;
- glass container;
- plastic plate;
- tablespoon;
- scissors;
- brushes of different thicknesses;
- newspapers;
- primer;
- acrylic paint;
- balloon;
- pure water;
- Wheat flour.
Preparation of paste
During the work, you will need to glue various elements to the base. This can be done using a natural mixture - paste. To prepare it, take 1 cup of wheat flour and 5 times more water.
Sweet gifts
The adhesive composition is prepared in the following way:
- Pour 4 cups of cold water into a small saucepan.
- The container is placed on the stove.
- Over medium heat, bring the liquid to a boil.
- Pour flour into a separate container and mix it with the remaining water.
- The resulting mixture is added to boiling water in small portions.
- The paste is constantly stirred and cooked over low heat for about 2 minutes.
- Remove the finished mixture from the stove and cool to room temperature.
Children's globe
You will need: a balloon, blue paint, a brush, newspapers, a glue stick, felt-tip pens.
Master Class
- Inflate the balloon.
- Cover the ball with pieces of newspaper in several layers.
- Paint with blue paint and wait until dry.
- Print out the continents, color them with markers, then cut them out.
- Glue the continents onto the ball.
The children's globe is ready!
Unicorn
You will need: a sleeve, colored paper, scissors, glue, glitter and colored cardboard, rainbow colored yarn, black marker, pink lipstick or pink pencil.
Master Class
- Cover the sleeve with colored paper.
- Wrap different colors of yarn around 3-4 fingers, then cut and shape into a mane and tail.
- Glue the mane and tail to the sleeve.
- Cut a triangle out of glitter cardstock and glue it on as a horn.
- Make ears from triangles of different colors and sizes, as shown in the photo.
- Glue the ears next to the horn.
- Draw eyes and eyelashes with a black marker.
- Draw on the cheeks with pink fondant.
The unicorn from the sleeve is ready!
Globe made of buttons
You will need: a foam ball and cube, blue and green buttons, acrylic paints, brushes, toothpicks, glue, aluminum plate.
Master Class
- Place the ball on the cube using toothpicks.
- Draw the continents on the ball.
- Paint the continents green and the water part blue.
- Apply glue to one continent and glue the green buttons. Thus, cover all the continents with green buttons, and cover the water part with blue buttons.
- Leave the structure to dry.
- Paint the cube with brown paint and wait until it dries.
- Remove the toothpicks and place the aluminum plate on the cube and place the button globe on top.
The button globe is ready!
How to make a solar system with your own hands: master class with photos
What you need to prepare for the craft:
- corrugated cardboard
- scissors and stationery knife
- decorative tape
- PVA glue
- needles and carnations
Additionally, you will need paints. To make the planets look more realistic, print the template on a color printer.
STEP 1. Cut out 9 circles of different diameters from cardboard and color each of them. Use rich colors that are associated with space - black, dark blue, purple.
STEP 2. Once the paint has dried, place the circles on top of each other and staple in the center. We used part of a sushi stick; A toothpick or any other rod is also suitable for this.
STEP 3. Cut out stars from decorative tape or colored paper and stick them on the base. Experiment with sizes and shapes!
STEP 4. Cut out the printed images of the planets and glue them onto cardboard circles of the appropriate size.
STEP 5. Secure them to the base using nails. The hat is stuck into the base of the circle, and the planet is placed on the needle. Glue the rings of Saturn onto thin cardboard and connect them to their owner with needles.
You can add more variety and interesting moments to your children’s daily routine if you learn a new activity. To do this, you just need to captivate the baby. One of the educational and very original activities is making crafts with your own hands.
Globe in vintage style
You will need: an old globe, white paint, a simple pencil, a charcoal pencil, a brush, an eraser, ink sponges of any color, spray sealant.
Master Class
- Separate the globe from the base.
- Paint the globe with white paint and leave to dry.
- Trace the outlines of the continents with a simple pencil.
- Trace the outlines of the continents with a charcoal pencil to make them more expressive.
- Blend the lines along the outline using an eraser.
- Coat the globe with a sealant spray.
- Dip your fingers into the ink sponges and mark your dream spot on the globe.
The vintage style globe is ready! I recommend watching this video!
How to Make a Globe from a Plastic Bottle
Main parts of the master class
- 1 part. Introduction. At the beginning of the master class, be sure to show the finished product and the result you will achieve in the end. Assess the complexity of MK, give brief recommendations before starting.
- Part 2. Tools and materials. It is better to give them in a bulleted list in the text. If necessary, you can add several sentences for each item to the list. If there are materials that require additional detailed description and some recommendations, then it is better to put this in a separate paragraph after the list.
- Part 3 – step-by-step description.
- Part 4 – tips and tricks.
- Part 5 – contacts. The last point is to indicate your coordinates where you can be contacted.
Cooking the paste
Before you make a globe from paper with your own hands, you need to prepare a binding solution - a paste. Pour four glasses of water into a saucepan and bring to a boil. Meanwhile, in another container, mix the flour with the remaining liquid. As soon as the water boils, gradually add the resulting mixture into it, stirring constantly.
Reduce heat to low and cook for a couple more minutes. Don't stop stirring otherwise it will burn. The finished paste can be placed in a cool place so that it cools faster.
Google Maps is a mapping service that provides satellite interactive maps of the Earth online
Google Maps is one of the most detailed digital maps in the world today. Wherever you are, if you have a smartphone, tablet or laptop with you, you can find the route to any object on the map, find the nearest cafe, library, bank branch, etc. The map is very similar to any online 3D earth globe.
- Enter your locality in the search bar. Use zoom to zoom in on the map if necessary.
- If you know the starting and ending points (for example, the Alexandra cafe and the Zorya club), enter them in the window on the left.
- Building a route on Google Map
If you need to swap points, click the arrows next to the input lines. You can add a third route point by clicking on the plus sign under the point entry lines.
To find any place, country, city, village, open Google Maps again. Enter the desired object in the search bar and press “Enter” or the magnifying glass icon.
Enter the name of the place you want to find in the search bar of the Google map
The location you entered will immediately appear on the map. On the left side of the block you can see basic information about the location found on the map. Here you can find the current temperature, local time and other interesting facts.
You may also be interested in Google Maps online in real time and of excellent quality.
Slide captions:
Slide 1
Free Powerpoint Templates Project work “Globe - model of the Earth” Completed by: 3A1 class student Artyom Balakhonov Supervisor: primary school teacher Elena Nikolaevna Medvedeva GBOU Secondary School No. 657, Moscow 2014
Slide 2
Goal: What is a globe? What types of globes are there? Why do we need a globe? Objectives: Find and study scientific literature on this issue Draw a conclusion Introduce classmates with the materials studied Create a mini magazine Make a model of the Earth Create a presentation
Slide 3
Hypothesis: I think that I’m not the only one who is interested in what kind of Earth it is? But others will also be interested in knowing this. A globe is a small model of the Earth that depicts its surface. The word "Globe" translated from Latin means BALL.
Slide 4
The first globe was created around 150 years ago. BC e. Crates of Mallus. The globe itself has not survived, but the drawing remains. A little history The first real globe was created in 1492 by the German geographer Martin Beheim and called it the “Earth Apple”. There was no America on it, and the distance between Europe and Asia was half as great as it actually is.
Best articles: Structure and role of the cytoskeleton in cells
Slide 5
Scientists' discovery Scientists have found the world's oldest globe. Globe Made from Ostrich Egg Shells An object approximately the size of a grapefruit made from the two lower halves of an ostrich egg. The ball depicts various types of ships, waves, sailors fleeing a shipwreck, monsters and monsters unknown to us. The geographical names on it are written in Latin, and two small islands are located on the site of North America. The origin of the globe is still unknown.
Slide 6
What types of globes are there? There were “sailor globes” Once upon a time, sailors took globes with them on long and dangerous journeys. Globes - “sailors” told quite a lot during their long service on ships. They were torn by storms and blown by fierce winds. There were “globe-dandies”, They spent their entire lives in luxurious royal palaces. These globes were decorated with gold, silver, and precious stones. A clock mechanism with a spring was placed on some globes, and the globe spun, like our planet. Thus, after studying the material, I came to the conclusion that globes are different
Slide 7
There is a “globe-astronaut”. It is installed on spaceships. A small globe - the astronaut spins non-stop during the entire flight at the same speed as the Earth. As soon as the commander of the spaceship looks at him, he immediately knows which ocean or country his spaceship is flying over at that moment. There are still many different globes. There is a “celestial globe”. It depicts constellations and the Milky Way. There are globes that depict all the countries of the world. There are globes with an uneven surface: all the mountains, all the hills on them are convex. There is even a lunar globe and a Mars globe
Slide 8
Making a model of planet Earth Thank you for your attention!
Design options
The ideal decoration option would be bright, vintage flowers, which almost every woman likes. But you can use your imagination and come up with your own flowers in neutral or pastel colors. Such a ball will look tender and cute.
For decoration, it is better to use acrylic paint, ideal for home decor. It applies like a cream, is perfect for wood and plastic, and has no strong odor.
————————————————-
It is known that a model of the globe was first built by the custodian of the Pergamon Library, Crates of Malossus, in the 2nd century. BC, but, unfortunately, it has not survived.
The first earthly globe that has come down to us was made in 1492 by the German geographer and traveler Martin Beheim (1459-1507). Beheim placed on his model, which was called the “earth apple,” the world map of the ancient Greek scientist Ptolemy. Naturally, this globe was missing a lot of objects.
"Earth Apple" by Boeheim
Later, globes became very popular. They could be seen in the chambers of monarchs, in the offices of ministers, scientists and merchants. Pocket globes in special cases were intended for travel. Medium-sized globes made for offices were often equipped with a mechanism that set them in motion, rotating them around an axis.
In the past, globes were installed on ships, but now on spacecraft.
Some globes exceed human height, and they contain not only colorful maps of the surface of the Earth or sky, but also information about different countries, plants and animals, and the hills are made convex.
source of abstract - https://interneturok.ru/ru/school/okruj-mir/3-klass/planeta-na-kotoroy-my-zhivyom/globus-model-zemnogo-shara
presentation source - https://5klass.net/zip/geografija/Globus-model-Zemli.zip
video source:
https://www.youtube.com/watch?v=Od0hNxGPtXw
Slide captions:
Slide 1
Free Powerpoint Templates Project work “Globe - model of the Earth” Completed by: 3A1 class student Artyom Balakhonov Supervisor: primary school teacher Elena Nikolaevna Medvedeva GBOU Secondary School No. 657, Moscow 2014
Slide 2
Goal: What is a globe? What types of globes are there? Why do we need a globe? Objectives: Find and study scientific literature on this issue Draw a conclusion Introduce classmates with the materials studied Create a mini magazine Make a model of the Earth Create a presentation
Slide 3
Hypothesis: I think that I’m not the only one who is interested in what kind of Earth it is? But others will also be interested in knowing this. A globe is a small model of the Earth that depicts its surface. The word "Globe" translated from Latin means BALL.
Slide 4
The first globe was created around 150 years ago. BC e. Crates of Mallus. The globe itself has not survived, but the drawing remains. A little history The first real globe was created in 1492 by the German geographer Martin Beheim and called it the “Earth Apple”. There was no America on it, and the distance between Europe and Asia was half as great as it actually is.
Slide 5
Scientists' discovery Scientists have found the world's oldest globe. Globe Made from Ostrich Egg Shells An object approximately the size of a grapefruit made from the two lower halves of an ostrich egg. The ball depicts various types of ships, waves, sailors fleeing a shipwreck, monsters and monsters unknown to us. The geographical names on it are written in Latin, and two small islands are located on the site of North America. The origin of the globe is still unknown.
Slide 6
What types of globes are there? There were “sailor globes” Once upon a time, sailors took globes with them on long and dangerous journeys. Globes - “sailors” told quite a lot during their long service on ships. They were torn by storms and blown by fierce winds. There were “globe-dandies”, They spent their entire lives in luxurious royal palaces. These globes were decorated with gold, silver, and precious stones. A clock mechanism with a spring was placed on some globes, and the globe spun, like our planet. Thus, after studying the material, I came to the conclusion that globes are different
Best articles: Pyramid of levels of organization of life on Earth: from atoms to the biosphere
Slide 7
There is a “globe-astronaut”. It is installed on spaceships. A small globe - the astronaut spins non-stop during the entire flight at the same speed as the Earth. As soon as the commander of the spaceship looks at him, he immediately knows which ocean or country his spaceship is flying over at that moment. There are still many different globes. There is a “celestial globe”. It depicts constellations and the Milky Way. There are globes that depict all the countries of the world. There are globes with an uneven surface: all the mountains, all the hills on them are convex. There is even a lunar globe and a Mars globe
Slide 8
Making a model of planet Earth Thank you for your attention!
Yandex Maps - satellite maps of the Earth in 3D online
The most famous search engine in Russia, Yandex, has its own interactive map service - Yandex Maps. They allow you to find the right place, build routes with any points on the map, print any section, view a street panorama, provide a map API and much more. There is an interesting section - people's maps, where you can independently edit any objects, houses, gardens, streets, wells, etc., after passing moderation they will appear on the Yandex Maps service.
To find any point on the planet:
- Enter the name of the place in the search field on the left and press Enter.
- Here you can build a route by clicking the yellow button under the search, and correct the data if, from your point of view, there are some inaccuracies in the descriptions.
- Building a route in Yandex Maps is a simple matter.
To do this, click the special button next to the search. The letter “A” will appear on the cursor, which indicates the initial segment of the route. Indicate the end point of the route on the map, and you will see detailed information on it on the left in the block.
Using Yandex Maps, you can, like a 3D model of a globe online, find any point on our planet Earth. To do this, you need to enter the name of the locality in the search bar or point with the mouse directly on the map.
LiveInternetLiveInternet
Quote from Melissa
Read in full In your quotation book or community! Coffee globe - ideas and master classes Another interesting idea for decorating with coffee beans. Such an original coffee globe can serve as an excellent gift for September 1st. Study master classes and get inspired by ideas!
The easiest way is to purchase a real globe and decorate it with ground coffee, coffee beans and twine.
Well, for those who are not looking for easy ways, I suggest using one of the two master classes presented below.
The first master class from the craftswoman merinka-Mary
Link - https://stranamasterov.ru/node/342013
We will make a coffee globe like this.
We take a plastic ball and pierce it on both sides with wooden skewers.
We wrap both ends with twine, so the ball is already fixed on the “axis”.
We glue the ball with coffee beans and glue the “meridians” from twine.
We form the future frame for our globe from wire.
Wrap the wire with twine. We make a stand, for this you can use a reel of tape: we wrap it with twine, pour plaster inside and install a rod for the globe.
Well, it's ready, all that remains is to decorate the stand.
And the second master class from Asya S
Link - https://stranamasterov.ru/node/422684
First of all, we make stands for our globes. For this you can use these bowls. Before pouring the plaster, line the bottom with cling film
After about half an hour, you can turn it over and shake it out. Remove the film and leave to dry for a day.
While the bases are drying, make the globes. To do this, we use plastic balls for dry pools and wooden skewers for barbecue.
We make 2 different globes. We paint one with acrylic paint and simply cover it with coffee beans, and wrap the second with twine.