Making your own toilet paper holder is easy, but a lot will depend on the materials used. They choose mainly creative, original or simple functional models. The result is a practical, durable design that can be used to attach a roll of toilet paper. The time required for production is determined taking into account the diagram and model. So, you can make a holder from ordinary wire in 3 minutes; sewing a doll will take several hours.
DIY wooden toilet paper holder
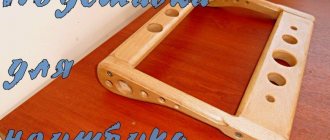
To make an interior item, as in the photo below, it is enough to purchase one small board of pine or spruce. It is cheap wood and easy to work with. To give the design parts the required shape, use an electric jigsaw. When the shelf for magazines and toilet paper is screwed together, you need to sand it with sandpaper.
The shelf can be painted in any color with acrylic paints or varnished, the surface aged with a wire brush or rubbed with wax. The cylindrical stick for the paper roll is made removable. To place it on opposite walls of the product, arc-shaped recesses are attached. Now you know how to make a toilet paper holder with your own hands. A step-by-step description of the work will help you create an original craft quickly and easily.
Design ideas
When choosing a doll for your bathroom, you need to focus on the design of the room. It must fit into the surrounding space so as not to be dissonant with it.
A doll with a bright and unusual color will look great in a bright interior - it will become a kind of “bright” spot. For an original bathroom design, a doll that echoes colors, motifs and ideas is suitable. Ideal when it is made in the same style as the interior. A doll in a Russian folk dress will fit into a bathroom decorated with wood.
Hot napkins with applique
Cute and comfortable runners will definitely come in handy in a kitchen with an expensive or too “delicate” dining table made of glass or soft wood. They will protect the tabletop from impacts, stains, contact with hot dishes, and will certainly cheer up the whole family.
First, you will have to sew three-layer rugs measuring 30x40 cm and quilt them crosswise on a sewing machine, and also trim the edges. After this, the most interesting part of handicrafts for the kitchen begins - decorating. Cut out cups, flowers, animal faces from contrasting fabric and sew them on the front of the tracks with your own hands. It would be nice at this stage to make small pockets into which it is convenient to insert cutlery or napkins. It takes a long time to create such pictures by hand, so it is better to use a sewing machine and a zigzag stitch.
If you create any other decorations for the kitchen using appliqué, it is better not to bother with seams, but to use glue. But then, for “cut-outs”, choose fabrics that will not fray over time, otherwise panels, potholders or other accessories will look untidy. By the way, wall pictures can be additionally decorated with elements of hand embroidery, ribbons, beads or sequins. This way, a DIY kitchen panel will become even more expressive.
Those who do handicrafts or are just learning a new type of creativity can come up with hundreds of other cozy and cute little things for their kitchen. Don’t be afraid that your crafts will not look like exquisite accessories from the store - this is the main beauty of hand-made.
How to choose and make?
You can make your own paper holders from several types of materials. You need to choose them in accordance with your own wishes, capabilities and needs, and sometimes based on the availability of certain materials at hand. Let's consider possible options for choosing material, for example, butt.
From fabric
Fabric is one of the most suitable and successful materials from which it is easiest to make a toilet paper holder. You can simply take the material, twist it into a rope and attach it to the wall. But there are also less simple, more unusual options. One of the options for making a fabric holder is a device in the form of a doll.
Having created a holder doll with your own hands, you can use it in different ways. For example, you can give a holder doll in a set, for example, with a set of towels. Or you can put it in your bathroom and delight yourself and your loved ones with a pleasant sight.
It should be noted that to make the doll you will need a large piece of fabric on the body, as well as small scraps from which you can sew clothes. In addition, you will need accessories: buttons and threads, plastic eyes, and other small elements for decoration.
To begin with, draw patterns on paper material. With their help they will then make parts of the torso and head. In this case, actual dimensions must be used. An allowance of about 0.5 cm should be left for the seams. After this, the patterns need to be transferred from paper to fabric material. In this case, it is better to iron the material. Fabric patterns are cut out. Afterwards you can sew the doll.
First the body is sewn together, then the head, arms and legs. At the same time, you need to remember that you need to leave a small hole for later filling. You can fill the doll using padding polyester or heavier materials, such as pebbles. After this, the arms, legs and head are attached to the body. For stability, you can insert wire into the arms and legs. This way the paper will hold up better.
This doll will be ready.
Wood
Wooden devices will be a stylish and neat accessory. You will need to use materials and tools in the form of planks, sandpaper, hacksaws and glue. First, prepare the side parts. After which you can do the crossbars. In this case, each board must be processed using sandpaper. The final stage will be connecting the parts together. Glue is used for this. After it dries, the wooden holder can be used.
It should be noted that you can use some kind of fasteners rather than glue. However, this will significantly make the structure heavier.
From foamiran
The doll, as one of the original holder options, can be made from foamiran. You can better understand the technique of making a product with the help of a master class.
Foamiran is a decorative material that resembles suede fabric in feel and appearance. It is also called foam rubber, foam EVA or revelur. The manufacturer sends the material to the market in thin sheets - about one millimeter thick. At the same time, the material has the properties of elasticity and the ability to take the necessary shapes. To start working with foamiran, you will first have to warm it up. You can use an iron or a heat gun for heating.
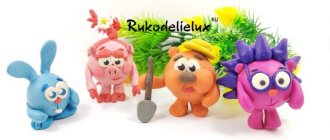
The variety of material properties provides the widest choice of possible variations in external design. For example, you can make a toilet paper holder in the shape of a pig doll.
Before starting work on the pig, you will need to carry out a preparatory stage, during which individual parts for the future doll will be created. So, you need to cut out a shape from which the muzzle and head of the pig doll will then be created. After this, you need to take foam plastic and cut out a number of blanks from it - balls, which will become the basis for creating the head and legs, as well as cone-shaped foam for the body. In this case, you should remember the proportions. You can make them “correct” or more comical. When choosing, rely on your own wishes and needs.
- After this, you need to prepare foamiran, which will be used to create legs, head, neck and clothes. You can also use other fabric, threads and ribbons, for example, for a hat, slippers and robe. For those whose flights of fancy cannot be stopped, acrylic paint, an iron, glue or a hot gun may also come in handy. In a word, everything that will serve as an auxiliary tool for creativity is appropriate here.
- After all the preparation described above, you can start working on foamiran. First you need to warm it up and smooth it with an iron. In this case, you need to remember about the appropriate color of the material - for example, for the muzzle you will need a flesh color. After preparation, the material must be pulled over the previously prepared foam face. In this case, you need to ensure that the foamiran fits tightly to the workpieces, especially in thin elements and small parts. After the material has cooled, you need to trim off the excess and glue all the protruding edges.
- Using paints, eyes, mouth, nose, eyebrows, eyelashes are applied to the face - whatever you want to draw there. After preparing the muzzle, you can proceed to the body and legs. The final stage will be the handles, which will serve as a holder for toilet paper.
The end result will be a funny pig doll that you can put in your bathroom or give to someone close to you. Children will especially enjoy this useful and decorative item.
Cool toilet paper holder made from toys
Let's say, for example, that you have a whole collection of funny figurines or toys at home. Perhaps your child (even if he is already over 40) collects them. From time to time, you throw out particularly old items or dump them in a corner where they collect dust. So here it is. Better yet, make your own toilet paper holder out of them!
DIY toilet paper holders made from old parts
Or you have accumulated parts from furniture, electrical appliances, a car, etc. at home. Look, maybe there is something there that would be ideal as a toilet paper holder? Most often, the part just needs to be slightly adjusted, painted and mounted on the wall. In the following photos you will see simple designs that nevertheless look very nice and unusual.
Themed toilet paper holders
Let's move on to projects that may require more practical skills and investments than those already discussed, but will definitely indicate the hobby of the owner of the house. Is your friend interested in sports and, in particular, skateboarding? This is a great excuse to give him a themed toilet paper holder. Take an old skateboard and repurpose the wheels into a holder. Your friend will be delighted!
Here's another idea. Do you love fantasy, are you a fan of Terry Pratchett and know everything about Discworld? However, it could be any author. A fantasy-style toilet paper holder with witchcraft boots will charm even people who are far from this topic.
Metal Floor Toilet Paper Holders
And finally we left holders, which, of course, can hardly be made by hand, unless you have a blacksmith's skill, but which are practical, beautiful and will add personality to your bathroom.
Doll toilet paper holder
These original ladies will surprise the visiting guests, waiting for them in a secluded place. Those who come will certainly want the same holder for themselves. You can sew it with your own hands to give to those who wish for a birthday or other holiday. When you get the hang of it, if you want, you will sew textile dolls of this type to sell them. This is a good source of income, since at the Crafts Fair such a handmade toilet paper holder doll costs more than 2,000 rubles.
We hope that these arguments have convinced you to take up interesting creativity right now. For it, you can use pieces of fabric left over from sewing some product.
So take:
- flesh-colored stretch fabric;
- soft filler;
- wire;
- fabric for doll clothes;
- a piece of cardboard;
- pattern paper;
- pencil;
- scissors;
- embroidery threads;
- hair yarn;
- igloo
First you will cut out and sew the body parts for the doll. Then cut out her robe, slippers, scarf, and create these clothing items. After this, you can decorate the vestments, the doll itself, and at this stage or earlier, embroider facial features.
So let's get started. To make it easier for you to understand the foreign pattern, we will do everything step by step.
- This is the body that makes up the toilet paper holder doll. Cut out two such pieces from stretch fabric. As you understand, the subtle part is the neck. Place the front and back of the body right sides together, machine stitch along the edge or hand sew. On the right side you see two small stops labeled abertura. It indicates that there is no need to sew up this piece of fabric in this place, since through it you will stuff the doll with filler.
- The next pattern is the head and shawl collar of the robe. We create the head from two parts of flesh-colored stretch fabric. The collar of the robe on the pattern is given with a fold. Place this piece on the fabric folded in half. Align the places of their folds, cut out with seam allowances, put this part aside for now.
- Fill the sewn head through the remaining hole, the boundaries of which are also marked on the pattern.
- By the way, using this technology you can sew a towel holder, then one doll will be responsible for the towel, and the other for the toilet paper.
- But these two young ladies cannot do without arms and legs, so the following pattern will help to cut them out with perfect precision. You will need to print or re-draw the image, cut out the pattern, lay it on the fabric, cut it with seam allowances.
- It's time to sew clothes for the doll, let's create her robe. Here is the front, which is called the shelf of the product.
- The next detail is the back. We make it one-piece. Place it on the fabric folded in half, outline the presented pattern, cut it out with a seam allowance of 7 mm on all sides, and 1 cm at the hem.
- When you unroll the resulting fabric piece, it will be one-piece. But you should have two shelves. All that remains is to cut out the details of the slippers and scarf of the beautiful doll. This is all included in the next pattern.
- On the bottom left is the sole, and above it is the upper part of the slippers, on the right is half of the girl’s scarf. As you guessed, you will need to cut a stylish headdress out of the fabric by folding the material before cutting it in half.
- So, you have already sewn the head and body, fill them with filler. In the narrow part of the head you have a hole through which you inserted holofiber or padding polyester. Thread the neck of the body into this cutout and connect these parts with an invisible seam.
- Stuff the limbs with filler, sew up the cut areas, and stitch these parts into place to the body.
- To sew slippers, attach the sole pattern to the cardboard and cut it out without allowances. For each sneaker you need two pieces of fabric, which are cut with seam allowances. Using the same technology, use two rag and one cardboard pieces to create toe caps for flip-flops.
- Place the elements of the sole in the following sequence: first, on the front side is the first piece of fabric, on top of it is cardboard, and on top of it, face up, is the second piece of linen. Sew the fabric along the edges of the arms using an invisible seam. Sew the toe of the shoe in the same way. Then stitch it on your hands to the sole. You can decorate slippers with fabric flowers.
- Let's take care of the doll's outerwear. To sew a robe, sew the sides of the front and back, and close the shoulder seams.
- Take two parts of the collar and sew the outer part of it on the wrong side. Iron the inner edges and sew them to the neck of the back and shelves. Fold in the center edges of both front panels and hem them. Make a belt for your robe. Sew a headdress for our doll according to the pattern, which will hold toilet paper or a towel. Embroider her facial features with threads and make her bangs out of yarn.
This or a similar textile doll is what you will get. You can make eyes from beads and put a cap on her head.
There are other options for making this item for the home.
Paper holders made from sanitary materials
Plumbing tubing and fittings are an excellent material for creating a shock-resistant paper holder. Both metal and plastic are suitable for work. Paper holders of various shapes can be assembled from metal products, both floor-mounted and wall-mounted models. Draw a diagram of the desired design on a piece of paper and ask a professional plumber to assemble it. All you have to do is wash, paint and replace the accessory.
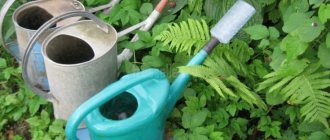
You can also make your own garden holder from plastic water pipes. To do this, you need to prepare two round metal brackets, 300 mm tubes with a diameter of 20 mm and several corners of the same size. First, you will need to cut one pipe with a length of 100 mm and two with a size of 70 mm. Then you need to assemble the letter “P” from the corners and tubes using a soldering iron or use glue.
Important! One of the corners should not be glued to the roll pipe, and the other to the support tube. This will allow you to disassemble the product in the future to replace the paper.
Then you need to fix the plastic pipes in metal brackets using special screws, and then the brackets themselves - to the wall using screws. The work is finished, this is how the holder is simply made.
Crafts from paper rolls
Since we have touched on this topic, we can expand on it to the end. Once a roll of toilet paper runs out, you are left with a cardboard core that is thrown away. But if you knew how many useful things could be made from such details, then you would leave it. Some people are already familiar with a small part of such work, but in these crafts they used solid bushings. And you can cut them, decorate the details in an unusual way, and get wonderful things for your home, such as, for example, this Christmas wreath.
Doll wardrobe
You will need: plywood 4 mm thick, white wood paint, cabinetry veneer, carbon paper, sheets of paper, pencil, ruler, jigsaw, jigsaw blade for straight and radial cuts, glue, sandpaper, brushes and sponges for painting, scissors, screwdriver, construction knife, 2 wooden sticks, furniture fittings (hanger hooks, 3 handles, self-tapping screws, 4 hinges).
Master Class
- Draw a sketch of the cabinet.
- Draw each detail on paper.
- Cabinet parts: 2 side walls and 2 rectangular parts for them, roof, bottom, back wall, partition, 2 shelves, drawer module, 2 doors and 2 patterned parts for them, 4 figured legs, upper horizon (shaped part), drawer (bottom, back, 2 sides, front panel and a rectangular part for it).
- Cabinet size: height 34 cm, width 22 cm, depth 9 cm.
- Transfer the cabinet parts onto the plywood using carbon paper.
- Use a jigsaw to cut out every detail of the future cabinet.
- Sand each piece of the cabinet with sandpaper.
- Glue the redwood veneer to the cabinet sides, drawer fronts and cabinet doors, then leave to dry.
- Paint the patterned pieces for the cabinet doors, the rectangle for the drawer and 2 rectangles for the side walls with white paint, then wait until dry and glue them on as decoration.
- Paint the 4 curly legs with white paint and leave to dry.
- Glue the 2 sides, the back wall of the cabinet and the legs as shown in the photo and leave to dry.
- Glue the box parts together.
- Glue the roof and the upper figured horizon.
- Glue the partition inside the cabinet, visually dividing it in half.
- Glue 2 shelves as shown in the image.
- Glue a wooden stick as a pipe for things.
- Make hangers from pieces of wood and hooks.
- Paint the inside of the cabinet, hangers, top horizon and inside of the drawer with white paint, then leave to dry.
- Attach handles to drawer and cabinet doors.
- Screw the hinges to the cabinet and attach the cabinet doors.
Article on the topic: DIY wooden gazebo furniture
The plywood doll closet is ready!
Useful tips
When creating home accessories, it is convenient to use scrap items and old things that can be given a “second life.”
A basic option for the lazy is to secure a small rope to the wall with tape. You need to make a knot that will prevent the roll from falling, twist the rope so that the paper hangs freely and can be unwound.
There are a lot of options for creating toilet paper holders with your own hands. You can use your imagination or use the option that seems optimal for a particular interior. There are solutions that are durable, while others are more decorative than practical, since they will not withstand long-term use, but will serve as decoration.
Important! The holder doll will become a bright “inhabitant” of the toilet room. It can be made neutral or stylized to suit the room.
Peculiarities
It is worth noting that none of the premises in a residential building or apartment can be considered secondary. Therefore, you should not deprive any of the rooms of your attention. These also include a bathroom or toilet room. Let's talk about the improvement of this room.
One of the distinctive features of the toilet room is the presence of a special holder into which rolls of toilet paper are placed. This is certainly a useful thing that provides the greatest comfort and convenience to residents.
You can create this convenient item with your own hands, and the model can be amazing and creative. Fabric, wood, plastic bottles and many other available materials can be used as materials for holders.
Thanks to our own production, you can get an original design solution, inimitable and unique. Let's consider possible options for style and design ideas.
Often there is an interior doll that can be completed step by step using instructions in Russian posted on the Internet. It can be made of nylon or ordinary tights. The work patterns are simple, such a stocking design will certainly decorate your interior.
Today, toilet dispensers manufactured by the Foma and Lukerya brands are quite popular.
Their range will appeal to those who do not want to make their own accessories. However, for those who are ready to make their own, you can look for inspiration among ready-made dispenser options.
Bottle preparation
In order to make such a useful device for toilet paper, we need a regular two-liter plastic bottle. Find a two-liter Coca-Cola bottle with a flared base. This is very important because the base is where the toilet paper needs to fit.
We measure 23 centimeters from the top of the plastic bottle and cut it using a stationery knife or sharp scissors. But before you are going to cut this part, it is better to make a mark using a regular marker or felt-tip pen.
A neighbor advised me to put a measuring cap in the machine before washing: life hack
A faded industrial building was turned into a studio home: the result
After the restrictions were lifted, Russians rushed to buy trips to the south
We measure approximately six centimeters from the base and cut it out.
The middle part can be thrown away, or you can make something useful out of it.
Place the two ends together to form a smaller Coca-Cola bottle.
Floor holders
How to make a floor-mounted toilet paper holder with your own hands? A floor holder is a rather cumbersome design, but if the area of the toilet allows it, then you can safely use this solution.
A floor-mounted toilet paper fixture can look like shelves. Imagine a tic-tac-toe field.
An accessory designed in this way looks very impressive and can decorate the room.
By the way, if you put “crosses” in some windows, for example, made of polystyrene foam, and in other rolls with paper, then the “tic-tac-toe” will delight you with its simplicity and originality.
Style and design
A charming paper holder made by yourself is often called a device. One of the excellent design solutions is to use textiles. The device can also be tied into a case. This item will look stylish. In this case, it is advisable to take into account the general style of the room so that the holder fits well into the interior.
The toilet paper holder can be made to look like a basket. In this case, it will be possible to store more than one roll at once. This stylish solution will, of course, please those who like to save space in their home.
The holder can also be made of wood. Making such models is not difficult, you just need to have the material on hand, a couple of tools and decide on the external design. And you can come up with an endless variety of design variations for wooden paper holders.
The accessory can be made in a nautical vintage style. This option is suitable for families with children or simply for sea lovers. Thanks to such a holder, a very special atmosphere will be created in the room. This style is suitable for combined bathrooms.
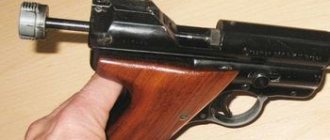
You can create a spicy version with your own hands that will appeal to both owners and guests. The most original and famous example is the holder in the form of a strongman, which is capable of holding two rolls instead of one. Men will especially like this model.
An original option would be an accessory in the form of a knight, which you can also create with your own hands. This will be a great opportunity to express your attitude towards the Middle Ages. Fans of the fantasy genre should pay attention to the toilet paper holder in the form of a fire-breathing dragon or in the form of a ferocious gargoyle.
A spectacular choice is the shabby chic style. This is a rather elegant option that will also suit lovers of the classics. The cloud holder is a shape characteristic of a minimalist style. This is due to the fact that this variation combines simplicity, beauty and style. An undoubted advantage of the holder model will be practicality. Children and those who like to fill space in the most rational way will like it.
The next variation is the most suitable for lovers of eccentricity. These are the most original and unusual options, which will not be understandable to everyone and will not be acceptable to everyone.
Industrial or rustic style
Even such a seemingly inconspicuous thing as a toilet paper holder can become the center of the entire room and determine its appearance, and you will see this now. Both of the following examples are made from things that, if you don't have them at home, can easily be purchased at a hardware store for very little money.
Curtain
For this DIY craft you will need quite a lot of them. To calculate the exact number, measure the length and width of the window you will be making the curtain for. Then, count the number of bottle bottoms, for example, for a 120*70 window you will need 84 bottoms, based on the fact that their diameter is approximately 10 cm.
- Cut out the bottom of the bottle to create a flower-like appearance;
- Lightly melt the edges in a clean, hot frying pan;
- Make holes on 2 or 4 sides using a hot knitting needle;
- Thread a silver thread or transparent cord through the holes;
- Fasten the resulting strips with “flowers” strung on them on a transverse board or thick cardboard, previously decorated.
Nightstand
You will need: 3 matchboxes, glue, cardboard, scissors, toothpicks, black paint, brush, drawer handles.
Master Class
- Pull out the inside of the matchboxes.
- Glue together the 3 outer parts of the matchboxes.
- Cut out the back, top and sides of the nightstand from cardboard, then glue them on. It is worth noting that the side parts should be slightly higher than 3 matchboxes.
- Prepare 18 toothpicks and try them on the lining of the drawers. Shorten the length of the toothpicks and glue 6 toothpicks onto each drawer.
- Glue the drawer handles.
- Remove and set aside the drawers.
- Paint the bedside table with black paint, wait until it dries and insert the drawers.
The nightstand is ready! I recommend watching this video!
Cool textile paper holders
Paper holders made of fabric occupy a special place, as they easily lend themselves to women's hands. Once upon a time, such products were called “newspaper boxes”, since there was no special toilet paper, and newspapers served a dual purpose.
There are many options for the execution of such attributes, so both the construction and design are entirely in the power of needlewomen. For those who use a sewing machine, there is no need to give special instructions on this issue.
A novelty was brought by cool crafts in the form of homemade dolls that act as paper roll holders. They are also made from fabric and tights. A wire is inserted into the hands of such figures, which acts as an axis for the roll. There are both wall and tabletop options. The theme and appearance of the dolls themselves are not limited in any way.
How much will it cost to make a doll?
Pig wall doll
The cheapest option is to make a doll from fabric scraps stored at home. However, material of the required quality and color is not always available. Therefore, you often still have to buy fabric.
The ideal option for the body would be lightweight knitwear. This fabric is easy to work with, it looks organic and is quite inexpensive: from 180 rubles per meter. The yarn needs to be thick and soft to make the hair fluffy and soft. The cost of a skein on average will be from 50 rubles per meter. The price of filler, for example, padding polyester, depends on the density: the lower threshold is from 30 rubles per meter.
But it’s really better to make an outfit for a doll from scraps or your own old clothes, so as not to increase costs. You usually already have threads and needles in the house. It turns out that sewing one doll will cost about 250-300 rubles.