Sliding or swinging? Swing gates are good because they are simple and cheap. But in winter, with a large amount of snow, they can only be opened by thoroughly working with a shovel. When you need to go to work, it’s not at all happy. Sliding or, as they say, sliding/sliding gates do not have this drawback. A solid structure covering the entire entrance moves to the side, hiding behind the fence. They can be supported on a regular or cantilever beam, or they can simply ride on rails. In any case, it is quite possible to make sliding gates with your own hands.
Constructions
The types of sliding (sliding, sliding) gates are:
- Console — with a guide beam (tire). The beam has a U-shaped profile; rollers move inside. This is the most popular type of sliding gate (see video below). Cantilever gates with bottom beam
According to their location they are:with bottom beam;
- top beam.
middle beam;
- Hanging. This structure also has a beam, but it rests on both posts on either side of the gate. It also has a special structure, similar to the letter “P” only with the edges curved inward. There are also rollers inside, on which the door leaf hangs. This is how the canvas moves.
Suspended structure - Sliding on rail. A rail is mounted in the ground, and rollers are attached to the lower part of the gate leaf. The canvas rolls along a guide. The design is the simplest, but its disadvantage is that the rail and the rollers themselves become clogged with snow, dirt, and leaves.
Sliding gates on a rail
Service
In order for the gate to work well, you must remember the following rules:
- Roller bearings should be inspected at least once a year. If damaged, they must be replaced. If the bearings are in good condition, they should be lubricated for quiet operation.
- Dirt and dust accumulate on photocells over time, so they need to be wiped with a damp cloth at least once every six months, and also if the gate does not respond well to commands from the remote control.
- You need to periodically inspect the gear rack - debris and sediment can also accumulate on it, which will impair the operation of the automation (inspection frequency - 1 time per season + several times in winter).
Which ones are better
It’s hard to say which design is better. If we talk about reliability, then the best choice is a suspended structure. Everything is easy and reliable, an almost indestructible system. Gates of this type have been used in enterprises for decades. Their disadvantage is that the beam limits the height of incoming vehicles, which is sometimes important. But today there are models with composite beams, which allow you to remove the lintel above the entrance when the gate is open, and then return it to its place.
The cheapest and easiest to implement is a rail system. These sliding gates are the easiest to assemble with your own hands. But problems encountered during operation make it unpopular.
Of all the above structures, the most expensive and difficult to implement is the cantilever one, however, it is the one that is installed most often: if done correctly, it does not cause inconvenience during operation. When choosing, you need to keep in mind that when installing it on the right or left of the gate, a distance is required that is one and a half times greater than the width of the leaf: in addition to the leaf itself, there is also a technical part that protrudes from the side by about half the length.
The types of sliding gates, design features and construction are discussed in detail in the video.
conclusions
After carefully studying the drawings, as well as step-by-step instructions, you can do all the work yourself. It is necessary to pay attention to the selection of necessary materials and get into the flow of work.
It is best to carry out work together with a person who has experience in this area. Then the quality and duration of work will pleasantly surprise you.
- Do-it-yourself folding table - step-by-step instructions for building and decorating a stylish design (80 photos)
Shelf for a phone - 100 photos of different models and tips for choosing a functional shelf
Decoupage furniture: the best ideas for decorating old furniture with your own hands. 130 photos of modern jewelry options
How to make cantilever sliding gates
This design is good because there are no beams above the passage. But it is the most expensive in the device. The point is not so much in the roller system, but in the need to construct a foundation with metal mortgages, to which the cantilever beam will then be attached. If there are already pillars, the foundation is poured in front of it and along the fence to the length of the technical extension, which is necessary to compensate for the load created by the canvas.
Complete set of cantilever gates
Even if you make cantilever sliding gates yourself, a set consisting of a guide beam, rollers, end rollers and catchers is usually purchased from a company. All spare parts are calculated based on the size of the canvas, frame material and type of cladding: weight is essential. Therefore, it is advisable to decide on all these parameters in advance.
Knowing the length of the supporting beam, you can calculate the required size of the foundation. The type is a strip foundation; a foundation pit is dug below the freezing depth of the soil (it is different for each region), into which reinforced supports are laid under plates with rollers, and racks are also installed. A set of upper rollers is then attached to these posts, holding the canvas and preventing it from swinging.
How to calculate the foundation for mounting a cantilever beam
There is nothing complicated in the calculation. The length of the foundation is almost half the length of the span. If the span is 4 meters (the width of the passage or the distance between the pillars), then the foundation should be 1.8-2 m. Its width is 40-50 cm, its depth is below the freezing depth of the soil for the region.
Foundation for a cantilever beam during the construction of sliding gates
The pit is dug another 10-15 cm deeper - under a gravel-sand cushion. This foundation is reinforced (like a strip foundation), in its upper part a channel (18 or 20) is welded to the reinforcement and the whole thing is poured with concrete. The channel is set to the “zero” level, that is, it must be level with the ground level or the material with which the yard is finished.
Prepared reinforcement and embedded channel
There is a cheaper and faster option, but in terms of reliability it is inferior to the one described above. Three metal screw piles are screwed into the ground, and a channel is welded to them.
Installation of roller bearings
Studs are welded to the embedded channel, and platforms with rollers are then bolted to them. Sometimes you can find options when the platforms are welded directly to the mortgage. It is not right. There is a fairly high probability that the foundation or fence post will shrink. Even a slight shift and your gate will not work. If the rollers can be removed from the studs, the studs can be welded and everything can be put back in place, then how to correct it if the platform is welded? Cutting down? Difficult, long, without guarantees. So in this case it is better to do everything according to the rules.
Example of fastening roller pads
When purchasing, pay attention to the roller carriages and the rollers themselves. These are necessarily sealed rolling bearings. They are usually arranged in two rows of 4 pieces each. The lubricant in them must be frost-resistant - the lower temperature limit is -60°C. Inspect the platform on which they are mounted. It must be steel, cast, good metal with a galvanized surface, coated with a protective lubricant.
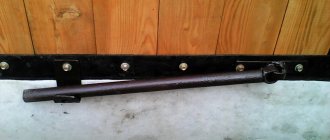
The support beam rolls onto the rollers, so they bear the main load
Roller skate. Everything should ride effortlessly and should not have any play (should not wobble from side to side). Then you can be sure that the gate will move easily and the sliding mechanism will work for a long time (some companies give a 10-year guarantee). After all, most of the load falls on the rollers, so their quality is key, as is the balanced design of the blade.
The remaining stages of installation will be more clearly described in the photo report: the gates were assembled independently, without the involvement of specialists.
Read about automatic swing gates here.
Installation of brick pillars
- The first stage of construction work is to prepare the opening for the sliding gates.
- The selected opening is limited by two brick pillars.
- Each table is equipped with 3 mortgages, which should be facing towards the yard.
- It is on the mortgages that the monasteries will subsequently be attached.
- A steel pipe can be used as fasteners for mortgages.
During the construction of pillars, special attention is paid to their strength, because the stability of gates and rollers depends on this criterion.
In addition, each pillar is installed on a foundation, the depth of which should be below the freezing level of the soil.
DIY sliding gates: photo report with explanations
These gates are made on the basis of a ready-made kit, they made the frame themselves, they also installed them themselves.
The gates were installed in Moscow, and accordingly the prices are in the capital. They were installed in 2010, since then the kits have become much cheaper. For example, the “fresh” price of a drive for a blade weighing no more than 400 kg (there are up to 1.2 tons) is about $100, but this is a budget option. During construction, components from Rolling Center (the best on the market at that time) were purchased with a 6-meter long drive beam. The upper catcher and bracket were also ordered separately. Everything with delivery cost about $600.
The following materials were also purchased:
- profile pipe 80*60 mm - 6 m, 60*40 mm - 18 m, 40*20 mm - 36 m;
- channel - 180 mm - 3 meters, 200 mm - 2.4 meters;
- reinforcement 12 mm - 6 m;
- electrodes - 2 kg;
- paint - 3 cans, brushes, rivets;
- cement M-400 - 5 bags;
- The corrugated sheeting was purchased during the manufacture of the fence.
Diagram of sliding gates with dimensions
First of all, we welded the frame for the gate with a counterweight. The frame (black) was made from a 60*40 mm profile pipe, the lintels and internal frame (lilac) were made from a 40*20 mm pipe. A guide beam is welded at the bottom with the cut down.
How the frame was cooked
The inner frame was welded with an indentation from the edge - 20 mm on each side. This makes it more convenient to attach the corrugated sheet later; if desired, you can also sheathe it from the inside.
How to weld a 40*20 mm profile pipe
First the foundation was poured. Reinforcement was installed in it, with a channel on top with the back facing up. Close to the channel there are two racks made of profiled pipe 80*60 mm. One post is adjacent to the post, the second is set vertically at a distance of 120 cm. Rollers are then hung on them, which hold the canvas from above. On the other hand, a 180 mm channel was installed along the return post.
A 180 mm channel was attached to the return post
On-site fitting
On the counter part, catchers are attached to the channel at the top and bottom, which will prevent the gate from dangling in the wind.
Stops installed on the receiving post
Upper and lower catchers
The next step is to install the roller plates. They are attached to mortgages. In this case it is a channel, so the space turned out to be large. When the foundation was made, it was made too high, so the plates were welded directly to the mortgage. This is impractical: if the roller breaks, changing it will be problematic. Usually a platform is welded, to which a platform with rollers is then bolted.
The roller platforms were welded and the rollers “ran over” them
The finished gate frame is simply rolled onto fixed rollers.
Photos of the sash on rollers from different angles
After installation, plugs are placed on both ends of the support beam. On the far side, a thrust wheel is installed, which in the closed position drives into the lower catcher, lifting the gate and removing the load from the rollers.
Installing the plug and thrust roller (the beam is upside down in the photo)
Now, to prevent the gate from “walking” in the upper part (they are currently not secured by anything), sets of upper rollers are attached to the posts (80*60 mm) - one per post. They are practically put on the frame. Now the rollers inside will hold it up.
The upper rollers are attached to the posts, gripping the top edge of the gate
This is what the installed top rollers look like
That's it, the sliding gates are assembled with your own hands and ready for use.
What sliding gates look like from the yard
If you have any questions, watch the video. It assembles a ready-made kit, the whole process will become clearer.
Installation
Installation of the shutters on the frame is allowed only after the concrete has completely hardened. The maximum strength gain occurs 28 days after mixing the mortar.
First you should do a trial installation. At this stage, you should ensure the evenness and strength of the structure, as well as the quality of closing and opening of the doors - they should open easily and not make any extraneous sounds, the doorway should be completely covered by the doors.
Installation of valves
Installing the shutter mechanisms is not particularly difficult.
Mounted or mortise locking devices are suitable as gate locks.
Please note that the castle will be exposed to low temperatures in winter. Cylinder mechanisms perform especially poorly in such conditions, so you should refrain from purchasing them.
The best option would be to install a lock with a lever mechanism.
Automation
Installation of automatic garage door control systems is not mandatory and is carried out only at the request of the owner.
The main component of automatic gate opening and closing is an electric drive. Its power must correspond to the force required to move the gate. Fulfillment of this condition directly affects the service life of the control system. The power reserve must be at least 30%.
The gate drive is a lever controlled by an electric motor through a gearbox. In addition to the main components, the system includes:
- signaling devices;
- photocell;
- Control block;
- lock.
According to the principle of operation, drive mechanisms are:
- linear;
- hydraulic;
- electromechanical;
- lever.
Linear actuators are the most common due to their affordable price and ease of installation. Such devices have the longest service life.
The linear mechanism allows for both external and internal opening of the door.
Gate insulation
Insulating a garage reduces heat loss in the room by up to 60%. Insulation is done from the inside. The most popular heat insulators are: penoplex, mineral and glass wool.
Before installing heat insulators, it is necessary to lath the sashes. This is done using wooden beams. The insulation sheets are laid evenly, from top to bottom, so that no gaps form between them.
After the insulation is laid, the surface of the sashes must be sheathed with a decorative coating. Lining or plywood are well suited for this. All remaining cracks should be insulated using polyurethane foam.
The thickness of the insulation is selected based on the geographical location of the object. If the garage is located in the northern regions of the country, insulation up to 15 cm thick should be used, and for the southern regions 5 cm will be sufficient.
Finishing
To protect the gate material from corrosion, extend its service life and give it an attractive appearance, the gate should be painted.
Before painting, the gate must be cleaned of dirt and degreased. When the degreaser has evaporated, the surface of the gate should be covered with 1-2 layers of primer, and when it dries, paint them.
Painting can be done using a brush, roller or spray gun.
A well-made gate will not only protect the garage and vehicle from unauthorized access, but will also prevent heat loss from the room, which will allow the vehicle to be serviced in comfortable conditions.
Making swing gates yourself and installing them is not particularly difficult, which will allow you to save a lot of money and get pleasure from the work you do yourself.
Selection of components
The availability of certain components directly depends on the height and width of the sash, as well as its weight. So, today on the market you can find a number of companies that provide high-quality equipment, namely:
- Combi Arialdo and Flatelli Comunello from Italy.
- Roltek and Doorhan from Russia.
- Alutech from Belarus.
Sash selection
Sliding gate leaf
The gate leaf is also subject to high demands. Its design must be sufficiently rigid and stable. This is important so that in the event of a strong gust of wind or ice, the sash functions well. Moreover, it must be equipped with additional stiffening ribs so that it does not sag under its own weight. All this should be taken into account when creating drawings.
Coloring
Painting the gate
All metal elements of the gate must be painted. Pre-degrease the surface. To do this, clean the surface and sand it with a sanding disc on a grinder. Wipe some areas, such as protected areas, with acetone. Now you can start priming. It is applied evenly. Moreover, the primer must be applied so that there are no drops or streaks. Thanks to such preparatory work, the paint will lie evenly. As a result, the entire gate structure will be completely protected from corrosion.
The paint should be applied in two layers and only after the first has completely dried.
Making stickers using digital printing
Digital printing is used to produce labels and stickers. To get a quality product, you first need to prepare a design layout, observing the selected color characteristics. After this, the layout is sent to a laser printer.
Recommended articles on the topic
- High-quality color tone adjustment, control of small details of the design layout. This processing is carried out on a computer, which allows you to obtain a high quality product.
- When using digital printing, it is possible to quickly and inexpensively print a test print, the analysis of which will allow you to identify and correct design flaws. Other types of printing require more expense to create a proof.
- Offset printing does not allow for quick checks of individual areas of the image. With digital printing, thanks to the development of a computer layout, this is possible.
- Due to the lack of forms, a large amount of waste paper, careful checking of the circulation, registers and adjustments, the cost of production is low, and the quality is high. Which is another advantage of digital printing.
However, with large circulations, the cost of products increases. This is due to high ink consumption. In such cases, the offset method is more profitable, as is printing on self-adhesive paper.
How to treat the surface → Room decoration → How to choose the right paint → Surface treatment technologies → Leveling and finishing the walls → Selecting and applying a primer → Removal from the surface → Stretch ceilings and technologies → Reviews and testimonials
Using paper for printing stickers - what can be made from self-adhesive paper
The use of self-adhesive paper is possible in various areas, for example:
Special technology for printing stickers
A special technique is used to print stickers on self-adhesive paper on heavy and complex surfaces. Thanks to a thermal transfer printer, printing on surfaces with unevenness and damage is possible. This makes it possible to print images on materials such as metal, fabric, etc. With this printer you can produce self-adhesive labels, logos, information stickers, text and images.
A thermal transfer printer is used to print on plates, handles, and T-shirts. Advantages of a thermal transfer printer:
- Possibility of printing on heavy-duty fabrics: linen, burlap, mesh, canvas.
- Printing on an uneven surface.
- Good printing of small details of the picture without loss of color saturation.
- High production speed.
- Wear resistance and durability of the product.
- High resolution printing.
Paper for a thermal transfer printer can be:
- with wax;
- with artificial resin;
- with wax and artificial resin.
Necessary tools for work
To carry out all the work, you will need to have the following tool:
- Inverter welding material. Such a unit will not damage the metal.
- Bulgarian.
- Air compressor for painting.
- Pliers.
- Drill.
- Roulette.
- Level.
- Riveter.
Pouring the foundation
In order to make sliding automatic gates, you should proceed to the next stage - pouring the base for the gate (foundation).
- To do this, take cement (two hundredth), river sand, fine gravel and mix the cement mixture in the following ratio 1:3:5.
- For a given amount of materials, you will need 1/5 of the water from their total mass.
- It is best to do this in the warm season, but if you have to do it in cold weather, then in this case it is worth adding special additives.
Before you start pouring the base, you should carefully check the entire structure for build quality and reliability. While pouring concrete, the pillars may move, so it is necessary to carefully control this fact using a level, both vertically and horizontally.
To make it durable, you should tamp it from time to time - this will help expel all the voids and distribute the concrete evenly.
Once all the concrete has been poured, it is necessary to level the surface using trowels. In hot weather, it should be covered to prevent rapid evaporation of moisture and further cracking of the concrete. You can water it several times a day. Then leave it until completely hardened - one week.
Types of self-adhesive paper
Paper for making stickers has a smooth and dense texture. A special glossy or matte film is applied to it, which performs protective functions. Good color rendition is characteristic of matte paper; in addition, there is no glare on it.
When printing on adhesive paper, it is important to position the sheets correctly and take into account the printing parameters. The outline around the elements allows it to be used as a separate segment.
What can you make from self-adhesive paper? In stores you can find a large selection of types and formats of self-adhesive:
- I most often use glossy paper for making photographs. It allows you to create a natural effect. There is also matte photo paper.
- Logos, barcodes, information stickers are printed on white, impermeable paper.
- If you are printing products aimed at attracting attention, it is recommended to use bright, colored, and even neon paper.
- If you need to print a large print run, it is better to use glossy or matte roll paper.
The cost of paper depends on its format and characteristics. To achieve the required result, you need to take into account various factors and know what kind of self-adhesive there is.