Young girls really look like half-blooming flower buds - they are just as tender, fresh and quivering. That is why a carnival costume in the shape of a flower, like no other, organically fits into the romantic image of a little charmer.
A flower costume will be appropriate at any costume ball: at a New Year's party, a flower girl will make the winter atmosphere warmer, Women's Day on March 8 will fill you with hope that very soon nature will be renewed with all sorts of natural lush colors, and at a flower festival it will truly become a real decoration.
What can you make your own chamomile from?
You can create daisies yourself from any available materials; the following are suitable for this:
- paper of different densities and textures;
- cotton pads;
- plastic dishes;
- satin ribbons;
- textile.
Materials for work
To create an original craft we will need the following materials:
- Corrugated paper.
- Colored paper, cardboard.
- Illustrated paper.
- Ribbons.
- Glue.
- Paints, brushes.
- Scissors.
- Decorative elements for decorating our bouquets.
As you can see, the set is small. However, even from this minimal set it is easy to make real decorative bouquets of daisies.
DIY chamomile fans, step by step with photos
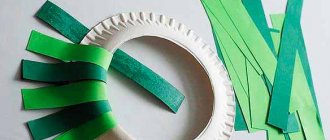
To create a daisy fan with your own hands, prepare 2 sheets of white cardboard, 3 sheets of white A4 paper, yellow paint, glue and scissors.
1. Cut out 2 blanks from cardboard. The first blank will be in the shape of a semicircle. You choose the size of the semicircle yourself; the larger it is, the wider the fan will be. You will also need to cut out a circle from cardboard with a diameter smaller than the previous one; it will serve as the core of the chamomile. Bend the circle in half.
2. Glue the core bent in half on both sides of the semicircle.
3. In the center of the core, cut a slot for the hand and apply yellow paint over its entire area.
4. Cut out the petals from white paper and glue first one side of the semicircle, and then the other.
The daisy fan is ready.
Use for divination
Chamomile has traditionally been used for love predictions. For example, unmarried girls told fortunes about their betrothed: a woman wove a wreath on the day of Ivan Kupala and sent it down the river. Near the shore where the wreath will remain, there she will get married and, if the ring does not sink, she will live a long life.
To find out who would be the first to marry, ladies threw a crown on a tree. If it catches on a branch and does not touch the ground, it means that its owner will soon have to wait for a marriage proposal.
Decorating her head with flowers, the girl turned into a bride and prepared for a family future: the expression “let's go down the aisle” means that people tied the knot.
The symbolism of the circle has been preserved even now during weddings, but instead of a flower wreath, a crown is placed on the head of the newlyweds.
For young people, there is a simpler version of fortune telling, which allows them to understand the feelings of their passion and get rid of doubts. So, having picked a chamomile, they tear off one petal at a time, saying: “loves”, “does not love”... Having reached the last leaf, you can find out the result.
Fortune telling by chamomile remains popular today
It is curious that the wild inflorescence usually has an odd number of petals, so in most cases the action will bring a positive response.
A wreath of living inflorescences is a decoration that will not last long. However, you shouldn't throw it away right away.
If the baskets still have an attractive appearance and the petals are not too wrinkled or fallen off, they can be used to create herbal infusions, rinses, creams and masks. Chamomile is known for its healing properties.
DIY daisy bouquet, master class
The most convenient way to create a bouquet of daisies is from crepe (corrugated) paper. Thanks to the structure of this paper, bouquets look like real ones.
For a bouquet of daisies with your own hands you will need:
- white and yellow crepe paper;
- green colored paper;
- scotch;
- ruler;
- toothpick;
- threads and scissors.
Divide a sheet of green paper into 4 parts in width and cut off a strip. We wrap the strip around a toothpick. This will form a stem. Glue the end of the paper with tape. After winding, remove the toothpick.
Cut a rectangle measuring 25x10 cm from white crepe paper, and 20x4 cm from yellow paper.
Take a yellow strip, cut it in half, fold it and make small cuts at the ends.
We also cut the white shelf of paper in half and fold the sheets towards each other. Apply a yellow stripe to the center of the white stripe.
We fold the strips like an accordion, find the center of it and tie it tightly with thread.
We round off the ends of the accordion using scissors.
We wrap the center of the accordion with a stem and secure the tip with tape.
We straighten the petals and the center of the chamomile according to the principle of creating pom-pom balls. If you are not familiar with this technique, check it out in our article: “Paper Balls”.
Using the same principle, create as many daisies as you want to see in the bouquet. Wrap the daisies in flower packaging or place them in a beautiful vase.
Daisy hat
You can make such a wonderful hat on your head for a daisy costume. Let's look at how it is created.
Necessary materials:
- green cardboard;
- White paper;
- scissors;
- pencil;
- glue;
- ruler;
- knife.
We take a sheet of cardboard, turn it over, measure it twice, five centimeters each, and draw lines.
Cut two strips along the lines using scissors.
We connect the length of the strips together using tape to create a headband for our hat.
Now we take white sheets and draw petals on them, and then cut them out.
We arrange the cut out petals along the inside of the rim.
Then we take glue and glue them.
Let the glue dry, then connect the strip into a ring according to the size of the head and secure it with tape.
After this, the petals need to be carefully bent, as in the photo below.
And the center of the flower will be a bright yellow bow. This is how you get a daisy hat.
DIY daisy headband, detail
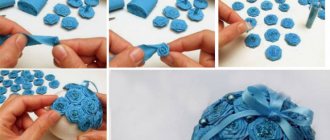
We bring to your attention detailed instructions for creating a headband from foamiran. All you need is foamiran in yellow, green and white colors, a glue gun, an iron and scissors, a ruler and a headband.
To create one daisy, a circle with a diameter of 7 cm is cut out of foamiran. The circle is divided into 16 equal parts and, 1 cm short of the middle, is cut.
The edges of each part are rounded. 2 such blanks are made.
The blanks are glued together.
A strip 0.5 mm wide and 20 cm long is cut out of yellow foamiran. One edge is cut into narrow strips.
The strip is twisted and the ends are glued together.
Next, the middle is glued to the flower.
Leaves 6 cm long are cut out of green foamiran.
To give the leaves a curved shape, place each one on the surface of a hot iron for a couple of seconds.
For a headband 37 cm long and 0.8 cm wide, prepare 8 of these leaves and 4 daisies.
Next, 2 leaves are glued to the back of each chamomile.
Glue the daisies to the headband.
Decorate with a ladybug.
Ballet tutu for a flower
We will make the skirt for this carnival costume in the form of a tutu, or tutu skirt. To do this, we need to take tulle and cut it into strips, the width of which should be about 10-12 centimeters. The length of the skirt will be 2 times the length of the stripes - take this into account when preparing them.
Next, take a wide elastic band and sew it together to create a belt. You can stretch the rubber band on a chair or let your little beauty stand in this rubber band for 10 minutes. Meanwhile, take the tulle stripes and start tying them with an elastic band. Just don't pull the knots too tight.
As you can see, to make a skirt for a carnival costume, you don’t need daisies, a sewing machine, threads, or seamstress skills.
The more stripes you tie at the waist, the more voluminous the skirt will look. You don't have to make it even and the same length. You can make some of the stripes at the back longer and then your skirt will have a train. It all depends on your imagination.
When you have finished tying the tulle strips, you can attach a satin ribbon to the belt. Use hot glue to secure the daisies that you bought at the office supply store to the skirt.
Don't forget about the following elements of the outfit: hairstyle, hair hoop, knee socks or socks, shoes, makeup or face painting.
DIY origami daisies made from paper, step by step with photos
1. Cut 8 identical squares from white A4 paper.
2. Bend the square diagonally, then unfold and bend 2 opposite ends of the square to the resulting bend line.
3. Without turning the workpiece over, fold the top and bottom sides in half.
4. Turn the workpiece over to the reverse side and bend it along the longitudinal fold line.
5. Turn the piece over, bend it in half and glue the center together with a pencil.
6. Using the same technique, prepare the remaining 7 squares.
7. Glue the petals together to form a flower.
8. Glue a circle of yellow paper in the center. Ready.
Simple application
Creating such daisies using the origami technique is very simple, and this activity will not take much time.
To work you will need:
- squares with sides five centimeters made of white paper;
- green paper;
- brown paper;
- colored cardboard;
- yellow paper napkin;
- scissors;
- glue.
This kind of work will be very interesting for children.
First, fold the sheet in half.
Fold the resulting triangle in half and unfold it back.
We turn the workpiece so that the corner faces down.
We fold both sides, connecting them to the fold line.
Then we turn the workpiece and bend the corners.
We turn the workpiece back, and now the first petal is finished. You will need eight such petals for one rose.
Related article: How to sew a bag with a flap from fabric with your own hands: pattern with description
Then we take a napkin and form a yellow core out of it.
Now all that remains is to collect the flower.
We assemble the entire composition on cardboard and glue it.
Below are diagrams for creating daisies using this technique.
Topiary of daisies, step by step with photos
To create a daisy topiary, prepare:
- artificial daisies;
- artificial leaves;
- tree branch;
- decorative pot;
- foam ball;
- stones;
- gypsum;
- glue gun
In a foam ball, we make holes for a tree branch, insert it and fill it with glue to fix it. The topiary ball is a mandatory element, but if you don’t find a foam ball in your city, you can make it yourself. How to make a ball yourself, read our article: “Do-it-yourself topiary.”
Fill the pot with plaster, place the end of the branch with the ball in it, and secure it. Wait for the plaster to harden.
To cover the plaster, place stones in the pot; you can also use any decorative elements.
Let's start decorating the ball. Glue on artificial daisies and leaves. You can also add other flowers, beads, etc. to the composition. Make sure that the ball is completely covered with decor and there are no bald spots.
Why did they weave in Rus'?
The concept of “wreath”, “crown” comes from the Old Slavonic word veno, meaning gift. This product has the shape of a circle, is made from herbs, flowers, branches and is put on the head of young girls as a decoration and amulet.
The wreath has an ancient history. Initially, it was braided for special holidays - weddings, sacred rituals, etc.
Women who knew how to weave a wreath on their heads from daisies were called wreath-makers.
The herbs they used were of paramount importance - their aroma had a beneficial effect on a person’s well-being and could relieve some diseases. In particular:
- Chamomile - purity, feminine nature and new life.
- Wormwood is a remedy for evil forces.
- Immortelle and viburnum - health, beauty.
- Cornflower - fidelity.
- Periwinkle - the eternity of the soul.
- Millennium - perseverance, inflexibility.
- Poppy - sadness, sympathy.
- Cherry, apple tree - devotion, maternal care.
- Forget-me-not - constancy.
- Marigolds - charm, honesty and reliability.
- Pivonia, mallow - faith, love, hope.
- Hops - mental ability, cunning.
The ancient Slavs braided wreaths on special occasions.
According to custom, on the last day of the harvest, a wreath had to be braided from an armful of ears of corn and plants and decorated with ribbons, and then placed on the head of a beautiful young girl. With songs and dances, she and other villagers carried him to their village.
Do-it-yourself daisies from spoons, step by step with photos
Tools materials:
- plastic spoons;
- green plastic bottles;
- wire;
- yellow plastic bottle caps;
- glue gun;
- soldering iron;
- nippers or side cutters.
Plastic spoons will serve as petals for the flower. Therefore, the larger the spoon, the larger the petals will be. Using wire cutters or side cutters, we bite off the handles of plastic spoons.
Using a soldering iron, we make holes in the lid into which we insert spoons in 2 rows in a checkerboard pattern.
To securely fix the spoons in the lid, fill the tips of the spoons with hot glue.
Cut off the top and bottom of a plastic bottle. Cut the middle of the bottle in a spiral.
From the top of the bottle we form a sepal, and from the remains of the middle of the bottle we cut out leaves, the edges of which we singe with a candle or lighter.
We wrap the wire with a plastic spiral. To keep the wire in place, heat it over a candle and add leaves at the same time.
We put the sepal on the resulting stem, and fix the end of the wire in the inside of the lid, fill it with hot glue.
A bouquet of these daisies can be used to decorate a windowsill or garden plot.
Crochet voluminous hat with cone pattern
What we need:
- 200g yarn (50% wool);
- hook No. 5
We will knit in circular rows. At the beginning of each of them we knit 3 VP lifts. We start working with 5 VPs, which we close in a ring. Further:
1r. – repeat the pattern 1СН+1ВП 18 times;
2 rub. – 1 SSN under the VP of the previous row. 1 relief. st in the girth of the knitted st behind the back wall. Go to next. VP;
3-4 r. – 2 dc between the bottom two stitches, 2 relief. Stick behind the back wall, move to the next. arch;
5-7 r. – 2 dc between the lower sts, 3 relief sts;
8-12 r. – 2 dc between the bottom 5 stitches, 4 relief. St. behind the back wall, transition to the next arch;
13 rub. – perform the same as 5th;
14 rub. – knit as 3rd;
15-16 r. – we knit only sc.
Hats with chamomile or cones can be crocheted or knitted. The technique is quite simple, and the result is magnificent.
DIY beaded daisies, step-by-step instructions with photos
To create a daisy from beads you will need:
- mix of white cuttings;
- mixed green cuttings;
- yellow beads;
- wire with a diameter of 0.4 mm;
- wire with a diameter of 0.6 mm;
- wire cutters;
- tape;
- wire with a diameter of 3 mm.
We collect white beads on the wire and count 0.5 cm per axis. Make a loop at the end.
We weave 2 pairs of arcs. When the arcs are woven, we twist the working wire with a loop, and bite off the ends of the wire with wire cutters.
Twist all the wires together. For 1 chamomile you will need to make 12 such petals.
We make the leaves according to the same pattern as the petals, using wire 0.6 mm in diameter. The length should be 10 cm.
We collect beads onto a wire with a diameter of 0.4 mm, count 3 cm and twist them. We retreat a couple of millimeters and make the same loop. We make 7 such loops that will form a sepal.
Let's start with the middle of the flower. Cut a 10 cm long wire from a skein and string 3 yellow beads onto it. Next, we wind the working wire with already strung yellow beads and, according to the principle that the petals were woven, we weave 2 pairs of arcs + 1 row.
We collect a flower. Wrap tape around the top of the wire. The length of the wire is 20 cm. We wind the middle of the flower to the top using wire. We wrap the tape over the top again.
Then we wrap 6 petals using the same principle. We wrap the tape with tape and wrap the second row of the remaining petals.
We wrap the sepals and cover the wire with tape.
Winding tape over the entire length of the stem, we attach 2 leaves to it.
Having made several of these daisies, you can assemble them into a beautiful composition.
What do you need for weaving?
A regular wreath should be made from freshly picked chamomile shoots. It is advisable to choose well-bloomed, upright and not yet wilted inflorescences on long stems.
There is no need to remove the leaves from them - they will complement the product. The more flowers there are, the longer they will need to be tied and the wider the wreath will be.
Basic rules on how to weave a wreath of daisies:
- In order not to damage the delicate petals, you should try not to touch them while working, but only hold the stems.
- Unlike other flowers, such as dandelions, chamomile is larger, so there should be enough free space between the elements.
- The caps and stems should be on level 1 in the row.
- A wreath made from different varieties will look more interesting. A beautiful combination is an ordinary field chamomile with a blue one.
- You can strengthen the product using thread garters located in several places around the perimeter.
Even a child can make a wreath of daisies. Weaving it actively develops fine motor skills and creative skills.
DIY daisy card with photo, step by step
To create a daisy card you will need:
- White paper;
- sheet of double-sided cardboard;
- a sheet of yellow paper;
- foam double-sided tape;
- glue stick;
- pen;
- ruler;
- scissors.
From double-sided cardboard, cut out a square measuring 15x15 cm for the base (ours is green) and cut off the sharp corners.
Cut strips measuring 10x2 cm from white paper, fold them in half and round the corners. In total, you need to cut and decorate 12 such strips.
Cut out 2 circles with a diameter of 4.5 cm from yellow paper.
Glue 6 petals one by one into the center of the green square and cover with a yellow circle.
Glue the remaining 6 petals in a checkerboard pattern.
Glue the remaining yellow circle to the center using double-sided foam tape.
In the middle of each petal, write a wish or compliment. The postcard is ready.
Magical decoration and strong protective amulet
On the one hand, chamomile is translated as “day eye” (daisy), and the appearance of yellow-white baskets symbolizes revival - the onset of spring and the awakening of nature.
On the other hand, the plant is a “thunderflower”, that is, it blooms in the month of June - the period of thunderstorms. This in turn reminds us that the plant is not as fragile as it might seem at first glance. By its existence it demonstrates strength and endurance.
It is believed that the symbol of the ring, be it a wreath, hoops, rolls or stones with holes, has magic and power against the evil eye and negativity.
Mystical circles were hung not only on people, but also on animals, houses and roofs, trees and pillars in the hope of preserving their livestock or property.
The wreath can be complemented with any wildflowers and herbs
DIY daisies made from sausage balls, step by step with photos
Daisies are created from 2 sausage balls ShDM 160 and ShDM 260 (ShDM is the size of the balls).
- Inflate a larger balloon, leaving the tip of the ball about 4-5 fingers uninflated.
- Conventionally divide the sausage into 6 equal parts and twist the body of the ball into sausages.
- We tie the ends of the ball together.
- Bend the first bubble in half and 2 turns, twist the first petal.
- In the same way, twist 3 more petals.
- Wrap petal No. 5 around one of the ready-made petals, and twist the last petal.
- Straighten the chamomile.
- Inflate the ball into a smaller sausage and twist a bubble at its tip several times.
- Fold the bubble in half and screw the tip to its base.
- We will thread the stem with the core into the center of the flower.
The flower is ready.
Option 3
Make huge daisies for a children's party! A4 sheet is suitable for one petal. Use wire as a leg. Such a daisy will forever remain in the child’s memory as a huge joyful event! You can use this chamomile for office parties - everyone will appreciate the fun atmosphere and effort!
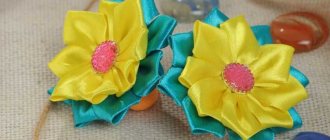
DIY daisy made from satin ribbons, step by step with photo
The secret to creating daisies from satin ribbons is that the satin ribbons are pre-gelled.
It's easy to do:
- 100 ml of water is poured into a bowl and 1 spoon of instant gelatin is added.
- Gelatin with water is heated on the stove until the gelatin is completely dissolved. Gelatin should not boil!
- Satin ribbons are lowered one by one into cooled gelatin for 1 minute.
- The gelatinized ribbons are removed and excess moisture is removed with your fingers.
- The ribbons are hung at one end without touching each other until completely dry.
1. Cut out templates of chamomile petals and leaves from cardboard. 2. Trace the templates on the green and white tapes with a pencil. Cut it out. For one flower you will need 2 petals and 1 leaf.
3. Using a soldering iron or a hot needle, make 1 hole in the center of each flower.
4. Wrap a wire 8 cm long with tape. 5. We thread a wire through a small button, which will serve as the middle.
6. Generously apply glue to the button and place it in a jar of cornmeal or yellow glitter.
7. Alternately glue 2 blanks with petals.
8. Glue the leaf to the stem.
Chamomile is ready.
The more fabric, the fluffier
The lower part of the outfit will consist of 2 skirts. The top one will play a decorative role, and the bottom one will play a volumetric role. The white petals will be on top. You can sew them directly to the green skirt or sew them separately, connect them together and tie them at the waist like an apron. You can choose any technique, the outfit will still look amazing.
You can also make a half-sun-shaped skirt. Due to the fact that the tulle petticoat will give good volume, it will look very airy. You can immediately make the pattern on the fabric. Fold it in half, measure the circumference (this will be the waist). Measure the length of the skirt from the waist line, draw a bend and you can safely cut the skirt. Use a zigzag stitch to sew the bottom of the skirt. You can leave the petticoat as a separate part of the suit, or sew it to the skirt. This is not important.
DIY wreath of daisies on your head, details with photos
This master class will use satin ribbon daisies from the previous master class. In total, you will need 21 daisies per adult head. You will also need 65 cm long floral wire, satin or organza ribbon and tape.
Wrap the floral wire with daisies. Try to place flowers on both sides of the wire.
To disguise the wire and make the wreath look natural, wrap the wire with tape.
Wrap the wreath with matching organza ribbon, leaving tails at the beginning and end for tying.
The wreath turns out beautiful and looks natural.
Interesting ideas for crafts
Making crafts in the shape of daisies can be used not only for the situations considered, but also in other cases:
- Origami figures for home decoration.
- Modular flowers for decorating a wall in a children's room.
- Hanging daisies for children's toys.
Many ideas from authors and needlewomen can be found on various web resources, where both photos of finished models and step-by-step instructions for work are presented.