Good afternoon, our dear readers! The economical operation of the engine is largely influenced by the quality and composition of its lubricant, as we have already seen from our previous publications. Operating conditions are especially difficult in the winter season. In many cases, regardless of viscosity, we may need to heat the engine oil. What it is and how to use it correctly - we’ll talk further.
DIY engine heater
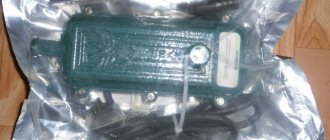
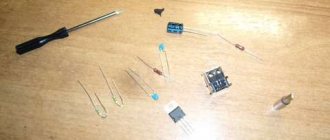
An engine heater is necessary for every car in order to start without problems in any frosty winter. You can buy a factory heater and install it on your car, but if you don’t have enough money for a factory one or you want to make an engine heater yourself, you will need special skills and materials. In order to make a good heater with your own hands, you will need the following components. 12 mm gun casing, glow plug, relay, copper wires and this will probably be enough. First of all, you will need to drill a hole in the side wall of the sleeve; you will also need to make a hole in the bottom in which the thread for the candle will be cut. After which the sleeve is attached to the suction pipe. This design is installed in the car tank and a wire with a voltage of 12 volts is supplied to it. The operation of such a homemade heater is that voltage is applied to the spark plug installed in the sleeve, which gradually heats it up, and the spark plug itself already heats the fuel in the car tank, which is supplied to sleeve through the suction pipe. After installing such a system, you don’t have to worry about your car not starting at low temperatures. Now you can start your car in any case, even if the temperature outside is below 30 degrees below zero. If the temperature is not very low, try to start your car without turning on this system, since with frequent use and at not very low temperatures it may break down. To protect this system, felt materials are used, which are placed on the manufactured structure. Before starting a homemade heater, you need to check it very carefully; it must work very clearly and accurately. This heater cannot be used with water; install it only in combination with antifreeze. Carefully check the cooling system; there should be no sediment in it. You can turn on the heater only when the engine is not running, as otherwise a breakdown may occur after which it will be very expensive and time-consuming to restore your engine. In order to avoid making mistakes and causing irreparable damage to your car, follow certain safety rules. If your car has a V-twin engine, then you need to install the heater on both sides, this will allow the heater to work more efficiently and will allow your car to start faster even at the lowest temperatures. With a careful approach and proper execution of all work on the manufacture of an engine heater, you will be able to make a high-quality and reliable heating system with your own hands, and it, in turn, will give you the opportunity to start your car without problems in any weather. When installing the system, be very careful and careful, this will allow you to avoid making any mistakes.
Heating of the coarse filter
The filter heating circuit can be implemented and diesel fuel fluidity can be ensured by the following modifications: the drain valve is replaced with a glow plug or the heating element is mounted in the body of the fitting through which fuel is supplied. In the process of implementing these schemes, you will need special equipment in the form of a lathe or contact specialists who can produce handicraft parts.
Please note that removing the drain valve will not allow you to subsequently remove excess water from the fuel supply system that may be present in the diesel fuel. You should resort to this heating method only if you are completely confident in the quality of the diesel fuel being filled.
To carry out the work, the coarse filter (separator) is removed. After this, you need to machine a sleeve from steel, which will act as a substitute for the drain cap. Next, a thread is cut to securely attach the element to the filter housing. After this, a hole is drilled in the bushing and an internal thread is cut with a tap, through which the stud will be attached.
Then the glow plug is screwed in, the positive wire is fed to the heating element, the negative wire is fed to the stud. The finished solution is screwed into the separator body. All work related to the implementation of the electrical circuit implies the same requirements that were put forward when creating heating of the fuel intake from the on-board network of a diesel vehicle.
We also recommend reading the article on how to increase the power of a diesel engine. From this article you will learn about how you can increase the efficiency of the engine by installing a special tuning box and the main advantages compared to chip tuning.
There is also a simplified method for installing a glow plug, which does not require recessing individual additional elements. To install a glow plug in the valve fitting, you need to drill a hole, cut a thread in it and screw in the glow plug. The power supply is connected in the same way. It should be added that the second scheme is similar to factory solutions for heating diesel fuel.
How to install and connect an engine heater yourself
Do-it-yourself oil pre-heater
Heaters (with the exception of those that operate on the principle of natural circulation of liquid) are connected to a break in the lower (return) hose of the heater. Connecting to the top (supply) hose is not only less efficient, but may damage the heater. The reason for this is the low level of coolant in the cylinder head. For the heater, it is necessary to prepare a mount that will allow it to be clearly fixed. There should be free space around the heater, this will protect the body from damage while driving on uneven roads. All electrical wires must be laid by tying them into a single bundle and attaching it to the engine and body using clamps that are sold at any auto store. This will avoid chafing or broken wires. To connect the autonomous heater to the fuel tank, you will have to lay a separate fuel line. This will avoid serious interference with the operation of the vehicle's fuel system, and will also ensure that the heater operates if the fuel pump located in the tank is turned off.
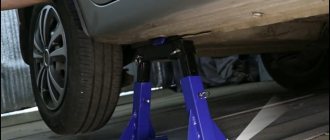
- Roll the car onto a pit or lift and carefully inspect the engine compartment. Find and equip a place to install the heater. Put it there, but don't plug it in. Make sure the fuel line, wires and hoses fit properly and are not in contact with other parts.
- Then check and replace the thermostat if necessary. If you do not do this, the heated coolant will circulate not through the inner circle (cylinder block, cylinder head, heater), but through the outer circle (inner circle + radiator). Because of this, the efficiency of the heater will decrease several times. If you are installing an autonomous heater, first lay the fuel line. Make sure that it will not be damaged when the bottom of the car hits an unexpected bump. Make sure the connection to the fuel tank is tight.
- Drain the coolant. If it was not possible to locate the heater next to the lower hose of the heater, then prepare a hose of a suitable internal diameter (on most cars it is 16 mm). Unscrew the heater hose clamps and remove it.
- Prepare sections of suitable length from the engine to the heater and from it to the stove. Install them and secure with clamps.
- Connect and route all wires through the engine compartment. After this, fill the cooling system with antifreeze or antifreeze (take into account the increased volume of the system), start the engine and make sure that there are no leaks anywhere. And only then connect the fuel line. After connecting it, apply power to the fuel pump and make sure that no fuel leaks appear anywhere within 15 minutes.
Fuel intake heating
Diesel fuel freezes already in the fuel tank. For this reason, preheating it when there is a big minus outside the window allows you to restore the fluidity of diesel fuel. You can raise the temperature in the fuel tank in different ways. One of the simplest is the solution to lower a regular 50-watt light bulb into the tank, which is located near the fuel intake. During operation, the light bulb heats up, the paraffin dissolves, and the system is able to pump diesel fuel.
The second way is to independently build an electric heating of diesel fuel with your own hands. Such heating will be similar in principle to a heating coil. To solve the problem you will need to get to the fuel intake grid. Then small diameter holes are drilled in the body at an equal distance from each other. It is recommended to make about 5 such holes on each side.
Please note that independent implementation of this electric heater circuit must be carried out taking into account the fact that the design must necessarily have a fuse. You will also need to equip the circuit with a special button to turn on the heating. An additional element is a relay for automatically turning off the current supply.
Next, you will need a wire whose material has high resistance. Tin wire works well for this task. The specified wire must be threaded through the prepared holes in the housing, creating a heater. The free ends will need to be connected to the power supply when finished.
Autonomous
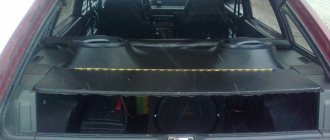
DIY car blanket dimensions, materials and sewing method
Heaters that operate autonomously from external power sources are, in turn, divided into air and liquid. The first ones serve to access the warm flow into the cabin, but the second ones only serve to heat the engine.
You can read separate articles on this topic:
- Webasto engine preheater;
- Eberspacher engine preheater;
- BINAR engine pre-heater.
Their installation is much more complicated than installing a “modified boiler”, but there are also many more functions. Thus, heaters of these types are usually equipped with remote-controlled key fobs, or can be in contact with mobile gadgets. The price for such “goodies” is also appropriate.
A distinctive feature of autonomous preheaters is the ability to install them in the place where it is convenient. Essentially, these are modified internal combustion engines that have their own fuel and water pumps, glow plug, combustion chamber and sensors.
On the other hand, one can understand car enthusiasts who are trying to save money and do what they can do themselves. This is evidenced by numerous videos on the Internet, where car enthusiasts share their experiences.
Kinds
Apart from homemade devices, which are extremely dangerous to operate due to objective reasons of non-compliance with assembly technology, there are 2 main types of heaters:
- autonomous liquid;
- electric.
Electric models operate by connecting to a 220V power supply. That is, the car should be located near the outlet. The possibility of using such devices is present in garage conditions. Such equipment is inexpensive, has a simple design and does not require complex work when connecting. But the device is very dependent on the presence of a nearby power source.
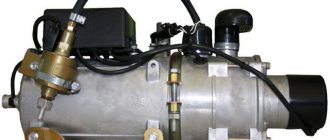
KAMAZ engine pre-heater
The heating itself is carried out due to an electric heater immersed in the cooling liquid. In simple terms, an electric heater can be described as a boiler.
The coolant circulation process occurs due to the temperature difference. Hot antifreeze goes up the cooling jacket, and cold liquid goes down. For the PPD to work effectively, the heating element should be located at the lowest possible point in the cooling system. But provided there is a built-in pump, it becomes possible to install it anywhere while simultaneously increasing heating efficiency. When the coolant temperature reaches the desired value, the thermal relay is activated and turns off the heater.
Such a heater has its own motor with a spark plug, combustion chamber, etc. After a signal is given to turn on the heating, fuel and air enter the combustion chamber, mix and ignite. The power itself is supplied from the battery. The heat obtained by combustion is transferred through the walls of the heat exchanger into the cooling liquid. The PPD pump pumps coolant through a small circuit, that is, antifreeze passes through the cylinder block jacket and the heater radiator to heat the interior.
In fact, the use of a heater makes it possible to do without a cold start of the engine. Almost everyone knows about the disadvantages and side effects of a cold start. They are especially dangerous at very low ambient temperatures. This explains the popularity of PPD in northern regions, where temperatures can fall far beyond -10 degrees Celsius, sometimes reaching extreme values.
Pre-heater device
How to make a preheater with your own hands instructions.
DIY car engine cleaning products
First we need a standard tee for an inch pipe. It is necessary to wrap a heating element into one of the ends of such a tee, which, by the way, can be picked up in the same plumbing store where you will purchase the tee. If the seller finds it difficult to help you with your choice and purchase, then the words “TEN for instantaneous water heaters for 1-1.5 kW” should help him offer you what you need. Ideally, it is desirable to find a similar heating element with a built-in thermostat.
A small pipe 10-15 cm long is screwed into the opposite end of the tee, which is necessary so that the coolant in the resulting chamber heats up faster and better.
It is necessary to screw adapter plugs into the remaining unused end of the tee and the end of the pipe opposite the tee, allowing a flexible hose to be connected at this location.
During assembly, all connections must be reliable and tight.
Now, the heating unit is ready, now it needs to be connected to the engine cooling system.
Most often, the best connection location will be a break in the lower hose of the cooling system, which supplies coolant to the car's interior heater.
Next, a wire of the required cross-section for your power is connected to the contacts of the heating element. Subsequently, voltage will be supplied to this wire, which is necessary for the operation of the created system.
The next step in making an engine preheater with your own hands will be to install an electric pump to circulate fluid in the system. For these purposes, you can use ready-made options - pumps for pumping coolant from Gazelle cars, or you can look for something else. It is quite possible that such a pump is in your car itself, then a similar one can be used for our purposes.
When you find the pump, it should be connected in front of the heater we assembled - through a standard open relay to the car's hog network or through a step-down transformer with a rectifier to the same socket (220V) as the heating element of the heater.
The preheater is ready.
The operation of this system is as follows: half an hour to an hour before the trip, we connect our heater to the network (during this time, at an outside temperature of about -25°C, 1.5 kW is able to heat the engine, although not to positive temperatures, but to about zero for sure, and make it easier thereby starting the last one), and before leaving – turn it off.
Video
I recommend reading:
How to polish a windshield with your own hands?
Replacing the cabin filter in Opel Astra.
Antifreeze (antifreeze) is thrown out of the expansion tank - reasons, ways to solve the problem.
Why does the idle speed fluctuate?
12V antifreeze heater
Nuances that must be taken into account when assembling the heater with your own hands:
- The heating device is powered from a 12-volt source, which is a battery (on trucks it is a 24V battery). During the cold season, the battery discharges quickly, so in winter you can use an additional transformer to power the unit.
- All contacts and conductors must be carefully insulated to eliminate the possibility of current leakage and short circuits.
- It is recommended to additionally wrap electrical circuits with electrical tape, this will increase their service life.
What will you need?
To complete the task you will need:
- two pipes made of thin metal - the diameter of the first should be 8 cm and the thickness - 1 mm, the diameter of the second is determined by the dimensions of the hoses of the car’s cooling system;
- two heating components (you need to make them yourself);
- set of wires;
- 10 amp safety device and switch to activate and deactivate heater;
- soldering iron with consumables or welding machine;
- scissors for cutting metal;
- steel sheet 1 mm thick;
- grinder for cutting pipes or other similar tool.
Algorithm of actions
| Image | Step |
| |
| |
| |
| |
|
Installing a homemade heater
After assembling the heating equipment, the following steps are performed:
- The device must be wrapped with electrical tape.
- The pump is installed in the cooling circuit of the vehicle in the direction of the flow of consumables.
- After this, you need to connect one cable to ground, and the second to the positive terminal of the battery. A 10 amp fuse device must be used to protect the power line. For simplified operation, you need to install a switch.
- To operate two heating devices, you will need a 12-volt battery with a parallel connection. It is possible to use a 24-volt battery, but in this case the connection must be in series.
The photo shows a heating system connection diagram
Battery powered
This type of heater includes heat accumulators. While the engine is running, the coolant heats up to a temperature of 95-100 degrees and circulates through the engine channels. The heat accumulator is a well-insulated reservoir (vacuum thermos) with a capacity of up to 15 liters, through which the coolant passes before entering the radiator.
Such devices include the popular Gulfstream system, which is produced in modifications for 2.5 and 4 liter engines. The differences between the models are in the volume of the thermos - 10 and 15 liters. This thermos keeps the coolant hot for up to 2 days. After power is supplied to the electric motor, hot liquid begins to circulate through the cooling system, heating the engine. The engine warm-up time takes 5-15 minutes depending on the air temperature.
In addition to the heat accumulator, stores sell various devices that, according to the manufacturer, heat the oil and make it easier to start a cold engine. But in reality, the only effect from these devices is a completely dead battery, which is unable to crank the engine shaft. The reasons for this are obvious - it is necessary to warm up not only the oil, but also the coolant, and this requires a lot of energy. Battery life is not infinite. To warm up the engine to normal temperature, 0.5-1 kWh of energy is required. At a voltage of 12 volts, this will require from 40 to 80 Ampere hours. And the capacity of a car battery is 55-75 Ampere hours. As a result, there is no energy left to start the engine.
Emergency heating or how to heat the oil in the engine crankcase before starting in cold weather
Increased fuel consumption from frequent warm-ups is successfully forgotten when the mortal body is immersed in a warm cabin. Another concern is the unattended operation of the engine, you never know what can happen. And the neighbors on the first floor are not happy with the exhaust fumes, and conflict is not far away.
Old-fashioned methods
A proven way to heat up the oil is to heat the crankcase with an open fire. A blowtorch or a bunch of wood chips neatly stacked under the object to be heated will help you get a fire. Plus - there is no need to re-equip any machine system.
- Directing the same blowtorch to the required location is difficult, and sometimes even impossible, due to the small clearance or installed protection.
- Open flames pose a high risk of fire because they are concentrated near rubber and plastic parts.
Modern methods
Safe recipes for heating the oil in the crankcase before starting are based on obtaining heat from an electric current. Where to get it from depends on where the car is stored: in a street parking lot, autonomous power supply from the battery is preferable; in a garage, it can be powered from a household network.
The electric heater is different from that used in the antifreeze heating system from the muffler, but is similar to the glow plug, which is an integral part of the flow-through coolant heater. Generally speaking, there are several electrical oil heating schemes:
- External “heater”: a heating plate (220 V) is installed on the outside of the bottom engine cover.
- Electric dipstick: Through the hole for the oil dipstick, a flexible element is temporarily integrated into the crankcase, which heats up when electric current from a standard battery (12 V) is passed through it.
- Modified drain plug: instead of the standard plug, a part with a built-in heater (12 V) is mounted.
- Heating element: a tubular heating element (220V) is integrated inside the crankcase.
The heating rate and type of power supply are the main guidelines when choosing an idea. The best qualities among autonomous devices are shown by the electrical probe. A 220 V heating element heats the fastest, but its installation is fraught with difficulties.
INSTALLATION ON VEHICLE
We cut the lower hose supplying antifreeze to the car's heater and connect the heat exchanger and the pump from the Gazelle in series into the gap to force the antifreeze to circulate in a small circle. If the pump is not attached to the engine, we connect the “minus” to its housing. When installing the pump, the main thing is not to make a mistake with the direction of the antifreeze flow (there is an arrow on the pump).
We connect one wire to the negative of the battery, and the second through a 7.5-10 A fuse and a switch to the positive. I have an LED connected parallel to the spirals through a resistance of 2 kOhm to visualize the operation of the device. Also, over time, I installed a time relay in the “+” wire gap for 30 minutes (photo 11), so as not to drain the battery in vain. On the side of the car’s center console I installed toggle switches for turning on the antifreeze heating (photo 12).
When, after a long stay in the cold, I need to start the car, I turn on the heater for 20 minutes, then start the engine and, without turning off the heating, start driving or warm up the engine at idle speed. The needle on the temperature sensor does not rise, but from the way the starter turns, it is clear that the engine is much lighter, and it seems that it starts not at -30°C, but at 0°C.
After the engine is started, with the heater turned on, it warms up approximately 1.5 times faster.
This is how, for a small amount, you get pre-heating of the engine, not tied to a 220 V electrical network.
I use this heater all winter. Frosts reached -35°C, the car started up confidently!
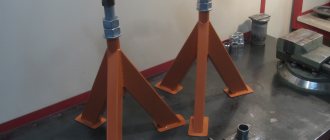
- Main parts of the heat exchanger.
- Two plates are welded inside to increase heat transfer.
- To ensure tightness, all seams are welded with a Kempi welding machine.
- Asbestos sheets were used as electrical insulation.
- Asbestos liners will prevent the coils from shorting to the body.
- Nichrome spiral for some household appliance.
- Heating elements.
- The covers are tightened with 25 mm studs.
- The assembled heat exchanger must be checked for leaks.
- The outside of the heat exchanger is wrapped with foam film for thermal insulation.
- To avoid draining the battery, I connected a time relay.
- The power switches are located on the side of the center console.
Refinement of the fine filter
The fine filter loses its throughput even with a relatively small degree of paraffinization of diesel fuel. This does not allow the engine to start and can lead to malfunctions of the fuel injection pump, the fuel chamber of which is not supplied with fuel. Among the methods for heating diesel fuel with your own hands, heating this fine filter element stands out.
To make your own fine filter heater, you will need about 10 meters of copper wire, which has varnish insulation. You also need to have tools and materials for soldering (soldering iron, some tin and rosin), as well as insulating tape. Additionally, you will need to have a relay, a 10 or 15 A fuse, and a switch button.
Copper wire is wound in frequent turns around the body of the filter element. Contacts for supplying current are connected to its ends. The negative wire is supplied from the battery, a relay and a power button are installed on the positive one. It is optimal to make the positive contact from the ignition switch in order to avoid discharging the battery if the driver forgets to turn off the heating himself.
We make a pre-heater for the engine. What do you need to know about it?
It is best for beginners to consider making their own pre-heater using its most basic representative - a device that simply heats up the coolant in the engine. True, such a heater requires an outlet near the place where the car is parked overnight. Therefore, let's assume that this requirement does not pose a problem for you. Let's continue.
So, the heater in our case will consist of a heating heating element, which will cut into a small circle of the cooling system, and a pump that forces the coolant to circulate through this system when the engine is turned off.
In addition to the heating element, the heater itself will require some fittings, pipes and fittings. It will consist of and with their help and be connected to the motor cooling system. Now the details.
What to do to quickly warm up the car interior
use the cabin stove correctly
Immediately after starting the stove, do not direct hot air onto the icy glass - it may crack.
Set the speed to moderate and turn on the recirculation mode. This way the stove will slowly heat the air inside the cabin, without trying to warm the icy air from the street. In the meantime, you can go clean your car of snow and the glass of ice.
As soon as the interior has more or less warmed up, the recirculation mode can be turned off and the warm air flow can be directed to blow on the windshield - at the same time, eliminate the fogging of the windows (in the recirculation mode it is higher due to the fact that the stove does not remove the humidity inside the cabin to the outside).
remember about heating systems
If your car has heating systems for the steering wheel, seats or windows, these are also quite serious sources of heat - and they can significantly affect the rate of heating of the interior as a whole. Therefore, feel free to turn the seat heating to maximum.
Heating the windows, windshield and rear, will not help warm the air in the cabin, but they will prevent the air already warmed by the stove from blowing out through the windows - so turn them on too.
buy an electric heater
You can buy a portable electric air heater that connects to the cigarette lighter socket. This is a pocket-sized and affordable alternative to serious pre-heaters such as Webasto.
The device will come in especially handy when you have to warm up frozen hands after clearing snow.
But remember that by turning on all the interior heating systems at the same time, and adding a portable electric heater to them, you are putting a lot of strain on the battery. Therefore, you should use everything at once only with a charged, working battery and in such a way that the duration of the trip allows you to charge the battery from the generator while driving.
start moving
There is no point in standing in a parking lot for 10-20 minutes, waiting for the engine to warm up normally while idling: you are simply wasting fuel.
While driving, modern cars warm up much faster: after just a couple of hundred meters, hot air will begin to flow from the stove.
The main thing is to drive the first 700-900 m of the journey as carefully as possible in relation to the engine and transmission, avoid sudden maneuvers, do not “turn” the engine above 2000 rpm, shift the gearbox smoothly and carefully.
As soon as you set off, you can slowly increase the speed of the cabin heater fan.
To determine the moment when the engine has warmed up enough to start moving, look at the tachometer.
Immediately after starting the engine, the speed needle will probably swing slightly higher than the standard idle speed. For example, instead of 800-850 rpm it will be around 1000-1200 - with a difference of 200+ units.
After a couple of minutes of warming up the engine at idle, the tachometer needle will drop to the standard value - this will be a signal that the engine has reached operating temperature, you can drive.
cabin filter clogged
If you forget about the standard replacement of the cabin filter, the stove may also fail or barely work. Also added to this is the problem of car windows quickly fogging up. The solution is to replace the cabin filter.
The cabin heater fan is faulty
Most often, fan bearings or graphite brushes fail; in this case, the fan needs to be replaced. It could also be due to a blown fuse.
heater radiator clogged
It is possible that dirt, insects, leaves and other debris have gotten into the radiator of the interior heater. Or the channels are clogged with sediment from poor-quality coolant. The solution is to flush the radiator and replace it with a new one.
Thermostat is stuck
The thermostat (valve) of the cooling system regulates the circulation of antifreeze throughout the large or small circle of the cooling system. If it gets stuck in the open position, the stove will work worse.
The owner should be alert if more than 5 minutes pass after starting the engine and turning on the heating, and no warm air comes from the stove. In this case, the problem is solved by replacing the thermostat.
low antifreeze level
When the coolant level drops and it stops flowing into the radiator in the required quantity, the heater may fail. The solution is to find and fix the leak, add fluid to the reservoir.
Electric engine heaters
The first electric heaters appeared on the streets of Scandinavian cities about 20 years ago. Russian newspapers and magazines then wrote about these units as wonders. Over time (or due to a decrease in winter air temperatures in Europe), the devices began to find use in other countries.
The operating principle of an electric engine heater is quite simple: the device itself is attached to the cylinder block, which is connected via a wire to an external 220 V outlet. Its power is small, but it is enough for efficient operation. Some types of such units are also adapted to heat the interior of the car with a certain amount of heat.
Video - electric pre-heater SEVERS M:
In addition to heaters connected to a remote socket, there are types that receive energy from devices that supply electricity to the car itself.
Each of them has its own advantages and disadvantages. The first is good because it doesn’t “eat up” battery power, but it does cause problems with finding sockets. The remarkable thing about the second is that it operates regardless of the presence of wires, but consumes the current that is generated for automotive equipment.
Well, now the very “root” of what we are talking about here. What is a pre-start electric engine heater? If you have ever seen a boiler, then it will immediately become clear to you what the principle of operation of this thing is. Only instead of a glass, it is inserted into the hole in the cylinder block, usually blocked by a plug, and heats up antifreeze, not water.
The only difference from a boiler is that this device is equipped with a timer or thermostat to turn off the heating when the coolant reaches a certain degree of heating.
Advantages and disadvantages
The advantages of Longfey preheaters include:
- Small overall dimensions, which makes it easy to find a place for its installation;
- The presence of a pump ensures uniform heating of the antifreeze in the system due to forced circulation;
- Availability of overheating protection systems (when a certain temperature is reached, the device turns off);
- A wide selection of models allows you to choose a device for any car;
- Connecting the Longfey heater will not cause any difficulties and does not require modifications to the motor;
But they also have certain disadvantages that relate not only to the devices of this particular manufacturer, but to the design and operation features of all devices of this type:
- To connect, you need a 220 V socket, so such devices cannot be used if the car is located far from housing;
- Requires compliance with safety precautions when using;
- The breakdown is detected only during the process of starting the car (the device was turned on, hoping that it would work, but then it turns out that the engine is not warmed up);
But all the negative aspects do not become a reason to use this device in a car. But at the same time, for everything to work normally, the Longfey preheater needs to be installed correctly.
What is a dipstick and how to use it?
The dipstick for heating the oil consists of four main parts - a long wire with a clamp that is connected to the power source (12 V), a short wire connected to ground, a central part and the heater itself. On the central part of the dipstick there is a dive limiter and a red line - a mark that should be below the oil level.
Procedure for working with the heating probe:
- Before heating, it is necessary to move the limiter so as to ensure that the red mark is immersed below the oil level. Because the hole in the engine is too narrow and limits viewing; a regular oil dipstick will help to correctly measure this distance. It should not be less than the distance between the dipstick head and the actual oil level mark in the engine.
- Place the device into the dipstick hole.
- Connect the heater clamps to the power source.
- Leave the device turned on for 10-15 minutes.
- Unplug and remove the dipstick.
After using the device, wipe it with a clean cloth to remove any remaining lubricant. This measure will protect the engine from getting old oil residues into it in the future.
Some nuances
A few details about the features of using both types of heaters. If you take a regular passenger car, the volume of lubricant and coolant is not much different (on average, 3.5 liters of oil are poured, and 4.5 liters of antifreeze). That is, theoretically, approximately the same energy will be required to heat both liquids. But there is one nuance - the oil is in one place - the pan, and the antifreeze is located throughout the system. Therefore, in the case of using a device for heating the coolant, circulation is required, but when heating the oil this is not necessary.
And one more thing - the antifreeze needs to be heated quite strongly (at least to 50-60 degrees), but the oil does not require this; you can only slightly increase its temperature to increase fluidity.
Due to these features, it is not advisable to use a 12-volt heater to heat antifreeze, since proper heating will require a lot of energy. Therefore, autonomous devices are mainly used to influence the lubricant, but those operating from a 220 V network are installed in the cooling system.
Next, we’ll look at how to make a pre-heater with your own hands for a VAZ or any other car. Note that there are a lot of variations of homemade devices, but we will describe only two devices that are relatively easy to manufacture.
Why does engine oil freeze and how to avoid it?
The main reason why the oil acquires a crystallized state lies in its incorrect selection. The car owner must select lubricant compositions not only according to the engine manufacturer’s approvals, but also according to the SAE classification. This classification gives an idea of the weather conditions in which certain petroleum products can be used. SAE divides fluids into three types: summer, winter and universal.
The labeling of summer oils includes only a digital indicator - 20, 30. Pouring such lubricant under the hood in winter is strictly prohibited. No oil heater can restore it to functionality. More precisely, he will be able to restore its fluidity, but for a short period of time. In this case, it will be impossible to defrost it in the system channels.
Winter (with the number and letter W in the marking - 5W, 10W) and universal (combining the designations of the two previous types of lubricants - 5W-30, 10W-40) are less susceptible to crystallization, but when choosing them it is important to take into account the limit of low-temperature capabilities. Lubricants marked 0W can withstand up to -40 degrees, 5W – up to -35, 10W – up to -25. Based on this information, it is not difficult to select fuels and lubricants for the area in which the car is operated.
The second reason that causes engine oil to harden is its poor quality. Low quality technical lubricants are typical for either cheap petroleum products or counterfeit ones. To protect your car from unsuitable liquids, you should visit only branded stores, and also carefully inspect the containers before purchasing them.
The weak point of counterfeit products is the appearance of the packaging. Chips, cracks in the canister, unreadable labels and a torn fixing ring are all signs of questionable products.
When choosing an oil, it is also very important to pay attention to its chemical base. Natural ingredients change their structure when exposed to low and high temperatures, so they cannot withstand harsh weather conditions for a long time. Unlike natural ones, artificial substances remain stable throughout their entire service life. That is why in winter it is recommended to give preference to synthetic or semi-synthetic oils.
If the technical lubricant was selected correctly, but the temperature outside the window has dropped below the limit of oil capabilities, then the car can be revived in several ways.