Today we will look at the following question: how to make a sling with your own hands. Of course, a sling is inferior to a homemade crossbow, but it can be easily made even from a trouser belt - we thread the belt into the buckle, tighten the resulting ring on the right hand, hold the end of the belt between the index finger and thumb, put a stone in the middle and the sling is ready for battle.
Of course, such an improvised sling is not very convenient, but it is always with you.
In general, you can make a sling from any rope and leather jacket. As in the photo above.
However, if there is no leather jacket, then you can simply use rope. Paracord is optimal for making a sling; we unravel a paracord bracelet and make a sling from it. This, by the way, is the answer to the question – why does a survivalist need a paracord bracelet?
The sling was used as a weapon as early as 1000 BC. Even among the troops there were slingers who rained down a hail of stones on the advancing enemy line.
If you throw small stones a little larger than the first phalanx of the thumb (this is only suitable for small game and birds), then the weight of a stone of 200 grams (0.2 kg) its energy will be equal to (0.2 kg x 30 m/sec x 30 m /sec):2= 90 joules. This is more than the 85 joules of the current Wasp cartridge.
At the same time, a stone from a sling has an impulse of 6 kg * m / s, and the OP is only 1.4 kg * m / s; in terms of impulse, the stone significantly outperforms even a bullet from a Makarov pistol - that is why a hit from a sling is so devastating Effect!!!
If you take a stone weighing 300 grams, then its energy (0.3 kg x 30 m/sec x 30 m/sec): 2 = 135 joules, and this exceeds the energy of a hunting cartridge (120 J).
So, based on these calculations, the sling should be banned on the territory of the Russian Federation! However, try to prohibit wearing a belt or paracord bracelet and picking up stones! 
I don’t want to write about making a sling; I’m attaching a translation of Chris Garrison’s article on how to make a sling.
Of course, here we are talking about making a sling at home, but it is very well described. You can also weave a sling from paracord as a “homework” task.
What is “Postavushka”
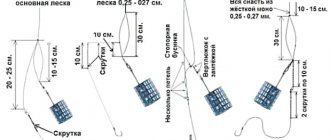
“Postavushka” is the name given to bottom tackle for catching predatory fish. The device consists of a piece of fishing line 7-8 meters long and 0.4-0.5 millimeters in diameter (fishing cord is preferred for winter fishing), to the end of which a sinker weighing 4-12 grams is attached.
The photo of the pike “set” shows that the design is not complicated, installation of the tackle is practical because it is based on loops.
general information
The material conservation process consists of 3 stages.
1. Selecting a breed. Since we are talking about decorative products, it is clear that wood with good texture is subjected to processing. In this regard, for stabilization, it is better to focus (from affordable ones) on chestnut, elm, maple, birch, and also some fruit trees. For example, cherries.
2. Impregnation of wood. There are several technologies for this process:
- Cold processing. The simplest option, but it is implemented only for samples of small cross-section (thickness). Disadvantages are the low degree of wood stabilization and the significant duration of the process. Such preservation takes a lot of time (up to 2 weeks). Walnut, linseed, tung, and hemp oils are used as impregnations.
- Hot processing. It is used for large-sized products when it is necessary to achieve deeper penetration of the impregnating composition.
- Vacuum processing. For such impregnation of wood, a special chamber is needed. In the process of pumping out the air, the moisture contained in it also comes out of the wood. The freed pores are easily filled with an impregnating composition.
- Processing under pressure. Pretty much the same. The difference is that here the forced air “cleanses” the pores of the wood.
3. Polymerization. Doesn't always happen. Some impregnating compositions are characterized by the ability to harden under natural conditions. But if additional drying of the workpiece is required, then at the last stage of stabilization it is exposed to high temperatures.
It turns out that the choice of a specific wood conservation technique at home depends mainly on your own capabilities. Let's look at the most affordable technologies.
How does "Postavushka" work?
The peculiarity of the design is its simplicity.
- The scaffolding unwinds.
- A hook (double or triple) is attached.
- The fry is hooked and sinks to the bottom.
- The tackle is fixed with a pole or other suitable method.
However, the “delivery” system does not signal a catch, so fishermen need to know some nuances in order to get the hang of detecting a bite and getting the fish.
How to make a “Supply” with your own hands
Since the tackle cannot be purchased in a store, you can make a “stand” for pike with your own hands. The design is simple and assembled from available materials.
Materials you will need:
- Flexible tube or rubber hose - a piece 10-12 cm long;
- Pole or strong stick;
- Scaffolding with a cross section of 0.4-0.5 mm. (winter option - fishing cord);
- Sinkers weighing 4-12 grams;
- Double or triple hooks;
- Small swivel;
- Knife, awl.
Factory girders
There are many models of winter vents on the shelves, both good and with shortcomings. Usually, a fisherman comes to the need to make his own or modify existing gear with his own hands after some experience in winter fishing with flags. Platform flags are most often used, but besides them there are other designs. More information about the types of winter vents
By making a set of homemade pike girders with your own hands in winter, the fisherman solves several problems:
- My own vision of the configuration of the kit - usually 10-20 pieces, all the same, so that it is convenient to use and transport.
- A solution with smooth rotation of the reel is especially important in the dead of winter for passive fish. The downside is to avoid having a beard when unwinding.
- The job of the flag is to prevent the bait fish from pulling away, but allowing the bite to occur.
- Reinforcement of the structure - on store vents it is often simply weak and breaks quickly. There is only one correct approach to winter skiing – the simpler, more reliable, the better. In the cold you don’t want to tinker with difficult structures.
Step-by-step assembly instructions
If you follow the instructions, assembly is quick. And this is how to make “sets” for pike:
- To begin with, at one end of the hose cut with an awl, two diametrically opposite holes are made at a distance of 2 cm from the cut.
- A piece of scaffolding is threaded into the resulting holes in such a way that a loop is formed, through which the “post” will be attached to a pole or stick.
- Next, the fishing line is inserted into these same punctures, which will be used directly for fishing and is tightly fixed here. The unsecured part of the line is wound in the middle of the piece of hose, but not completely.
- A leash is attached to the free end of the line, a small swivel and a hook are attached to it.
- A knife is used to make a longitudinal cut on the opposite end of the tube, and the scaffolding is passed through the gap and thus secured, preventing unwanted unwinding. This fixation will allow the fishing line to freely slide out of the groove and unwind during a bite.
- The selected sinker (the weight of the weight depends on the strength of the current) is attached to the line.
- Pre-installation is complete. The final stage is carried out immediately before the start of fishing. It will be necessary to place the tube on the pole, securing it with a loop. The last step is to attach the bait to the hook.
The described design is intended for fishing in the coastal zone. In this situation, the “postavushka” is attached to a stick (pole), which is stuck into the bottom soil. However, there is a version of the model that uses a weight (anchor) and a float, which allows fishing from a boat at great depths, because sometimes it is difficult to throw the tackle far from the shore.
In addition, when making a “postavushka” you can use different types of hooks. Some fishermen use a metal leash, others do without it at all.
Girders on the crossbar
The simplest homemade girder for winter fishing, which can still be seen sometimes on the reservoir. The equipment and flag are attached to a wooden block, which is placed above the hole. There are several die options:
- With reel.
- With reels.
- In each option - with winding a loop of fishing line into brackets for setting a flag or a signaling device under the reel.
The simplest option is two reel nails and brackets into which a loop of fishing line is inserted, pressing a flag on a spring. The disadvantage is obvious - the supply of fishing line is simply a loop lying on the ice. The line may freeze or get tangled in the wind.
The principle of fishing with the “Postavushka”
Pike lives in shallow water near the shore due to the abundance of food in the form of small fish. However, when there is snags at the bottom, catching a predator becomes difficult or impossible. In such situations, “postavushka” is used.
The fishing method is time-tested, simple, does not require large expenses and has several stages and features. Therefore, you should figure out how to place “posts” on a pike.
- First you need to prepare live bait. Roach, ruff or small perch are suitable.
- Then decide on a promising fishing spot where pike are found, and the depth is 1-3 meters.
- In some cases, the tackle is used in areas with a depth of up to half a meter, for example, in reeds or reeds.
To increase the catch, several gears are installed at a distance of 10-15 meters.
A bite is determined by a change in the position of the fishing line. In the absence of a bite, the “post” is taut and positioned horizontally. When a predator swallows live bait, the tackle becomes deformed or changes its position to a vertical one.
Live bait for pike fishing
Young pike feed on fry of perch and carp species. In older individuals, the range of preferences is much wider, it includes fry of smelt, roach, vendace, crucian carp and perch. The choice of bait depends on the area in which the bait is used.
If fishing takes place on a bank overgrown with reeds, you should choose the fry, which usually swims near the surface. This could be a small rudd, bleak or verkhovka.
If you plan to fish in a place with a not too cluttered and relatively flat bottom, preference should be given to species that are distinguished by their vitality. Choose, for example, crucian carp or perch.
Wood stabilization options
Treatment with Anacrol-90
This technique is called impregnation. In essence, this is a complex conservation that uses elements of the different technologies described above. At home, taking into account the small dimensions of the parts being processed, this is the optimal solution.
What you will need:
- Vacuum installation. It can be assembled from plastic or glass containers. To pump out air, you need a vacuum pump, and to raise pressure, you need a compressor with a pressure gauge. Plus – taps and connecting pipes.
- Drying chamber. At home, an electric oven, a convection oven, and an oven are used.
Procedure for stabilizing wood:
- The workpiece is placed in the selected vessel with the expectation that it is completely covered by the impregnating composition.
- Air is being pumped out. The creation of a vacuum is evidenced by the complete absence of air bubbles that the wood releases at the beginning of the process.
- The period of "rest". A break from work is taken for about ⅓ hour. This time is enough for the impregnating agent to at least partially fill the pores of the wood.
- Creation of excess pressure. It rises with the help of a pump (and compressor). The value is controlled by a pressure gauge and should be within 3±1 ati. It depends on the type (and therefore density) of wood.
In this state, the process is interrupted for about half an hour. This is necessary so that the impregnating solution, under pressure, penetrates as deeply as possible into the sample material.
Sufficient processing is indicated by the behavior of the workpiece. If the impregnation is successful, then the wood acquires even greater density (hardness), which means it should be immersed in the solution, to the very bottom. If necessary, the process is repeated. How many times this will have to be done depends on the practical experience of the master and the correct selection of equipment.
The final stage of stabilization is drying the wood. Actually, this is called polymerization, which gives the workpiece special properties.
Method 1. Produced at a temperature of 100 – 110 ºС in a drying chamber. The criterion for sample readiness is uniformity of structure, absence of wet spots. Method 2. The wooden piece is wrapped in cellophane and boiled for about 45 minutes.
If you want to give the wood some shade, you can purchase either colored Anacrol or add a dye to it.
Epoxy resin treatment
The technology is the same, but there are certain difficulties. An alcohol solution of resin is used, so its preparation requires a lot of experience. The fluidity of the impregnation, and therefore the quality of wood stabilization, depends on the correctly chosen concentration. It is better to purchase an imported product, although it is expensive. The advantage is that different types of resins differ in consistency, so it is easy to select the desired composition and use it without prior preparation.
This technique is not suitable for stabilizing softwood.
Saline treatment
This stabilization technology is used less frequently, but this makes it no less effective. The solution is prepared per liter of water - a tablespoon of salt. After thorough mixing, a wooden blank is placed in the container, and the dishes are placed on the fire. Heat treatment (boiling) is carried out within a couple of hours, and high-quality preservation is ensured. The sufficiency criterion is that the solution stops releasing foam.
Much controversy arises around the question of when to preserve – before or after sample preparation. Some authors note that subsequent mechanical processing of stabilized wood is a rather complex process, requiring not only experience and time, but also special tools. That is why the required sample is first made from the workpiece, and only then the material is preserved.
Although there is an opposite opinion - first of all, impregnation, then finishing the product to a textured appearance. This discrepancy is caused by the fact that the type of wood and its condition (presence of cracks, fibers, degree of humidity, etc.) are not taken into account. Therefore, the algorithm of actions must be determined independently, based on the quality of the sample.
Impregnating compositions must be purchased with a reserve. A certain part of the funds will be spent on experimental work, since stabilization of a particular product should not be started immediately. Only by understanding how impregnation and the selected type of wood interact can you adjust your actions and achieve the desired result by choosing the optimal mode. This mainly concerns the value of the pressure created in the tank.
Features of fishing not “Postavushka”
A large pike tries to drag the bait to the depths. Smaller specimens, having caught the fry, as a rule, do not swallow it immediately.
- Predators try to pull the bait into the reeds or algae.
- If the pike feels the tension in the line, it may let go of the bait and swim away. Pinching will help prevent this.
- With it, the fish will not notice the tension of the line and will try to take the bait to depth. After it swallows the prey, the catch can be taken out.
- For productive fishing, it is necessary to remove the catch in a timely manner and update the fry. If there is no bite for a long time, you should change your fishing spot.
Since pike fishing with this structure does not require constant monitoring, you can control the gear in the morning and evening or once every three days. It all depends on the activity of the live bait. Therefore, you can fish with one fishing rod and a dozen “supplies” - the fishing rod will serve as a tool for obtaining bait.
Sling for survival!
The sling is a fairly common throwing weapon among all nations, known since ancient times and used in real military battles right up to the 16th century.
The undoubted advantage of the sling is the speed and ease of manufacture, the cheapness and availability of both the weapon itself and its ammunition, which most often served as ordinary stones weighing from 200 to 400 grams! However, the disadvantages are also obvious: low efficiency due to low accuracy, because even experienced slingers were not always able to take into account all the features of a particular ammunition, let alone beginners who had just picked up a sling.
However, a stone fired from a sling can not only cripple an enemy, but also kill him, hitting him, for example, in the head or chest. The sling was also widely used for hunting! After all, a stone fired from a sling flies much further and faster than a stone thrown by hand. Accordingly, in conditions of survival with the help of a sling, it is quite possible to get food for yourself or to protect yourself, of course, provided that you have a good throw and an accurate hit, and to achieve this you need to practice properly!
How to make a sling?
A sling can be made from a variety of materials, but in any case it consists of a stock for a projectile and two laces (straps or something similar), one of which is attached tightly to the hand (for example, to a finger, so that when thrown, the sling does not fly away together) with a stone), and the second one holds on (so that when it is released, a stone or any other projectile can be thrown).
Leather sling.
Throwing technique.
There are several throwing techniques. The first of which is horizontal, involves spinning the sling over your own head (see picture below). Stand with your feet shoulder-width apart and your throwing weapon raised above your head, with the supplies already inserted as shown in the picture. The sling should be held in tension. Next, you need to make a rather sharp first movement in order to impart enough rotation to the sling so that the projectile does not fall out prematurely. After you have sufficiently spun the sling (usually 3 turns are enough) and it approaches your target, you should release the held end of the sling, this way the sling will open, and the laws of physics will carry the stone forward.
According to the second technique, the rotation occurs from the side, and the end of the sling is released approximately when it reaches 45 degrees.
Next is a very inspiring video on the topic. 2016, a man creates a sling out of wicker, with his bare hands without any tools, and then tries it out!
To everything else, we would like to add that a sling can indeed be very useful in survival conditions and become an excellent tool for a survivalist, however, like any other weapon, it requires special care in use. Be careful to prevent harm to yourself and others. Do not use for illegal purposes or for entertainment!
© SURVIVE.RU
5 1 vote
Article rating
Post Views: 6,327
Related posts:
Differences between winter “deliveries” and summer ones
The method of catching fish using “postavushki” is universal; you can fish all year round. However, seasonal fishing methods differ.
In winter, fishing takes place from an ice hole. When fishing, there is a risk of the gear freezing if left for a long time. Winter “supply” for pike has an undeniable advantage: the structure is installed under the surface of the water, so there is no danger of freezing.
Another difference is the way the device is installed. The “postavushka” is fixed on top of the hole - the line is wound around the crossbar and placed across the hole on top.
In the warm season, using a “postavushka” has some advantage. The vitality of live bait is much higher, which makes the bite more likely and active, saving bait. In winter, it is worth changing the bait more often and avoiding the use of low-hardy fish, such as bleak and gudgeon.
Despite the prevailing opinion that this type of fishing is boring due to the lack of dynamics, many fishing connoisseurs are keen on the method of fishing using a “post-hook”. The method is effective, easy to perform and inexpensive. But for fishermen to be convinced of this, it’s worth trying. And let their business be cool!
Homemade winter girders with a flag and a reel
Store-bought and homemade flags for winter pike fishing are made according to the same pattern. The design includes a platform that is installed on the ice. A holder with a reel is attached to the platform so that the fishing line goes into a hole or slot into a hole in the center of the base.
A flag is attached to a platform or holder on a strip of metal or plastic, which is inserted into a reel when the tackle is loaded. When the reel is triggered and untwisted by the pike, the alarm is released - the angler sees the predator’s grip from afar.
Do-it-yourself winter zherlitsa on a platform
Platform winter racks on a flat base are more convenient and practical than tripods or on one leg. The base closes the hole, the freezing process proceeds more slowly. If the platform is insulated or covered with snow on top, the hole does not freeze at all. The tripod is less stable in the wind and does not protect the hole from freezing. A one-legged poke will not stick into the ice if there is not enough snow on the surface.
Therefore, the most universal option for any conditions is a winter flag on a flat base. Store-bought winter platforms are usually made of thin plastic that will break or warp over time. Such a perch is light; in order to avoid being blown away by the wind, you have to secure the tackle.
You can cover it with snow, and in cold weather you can stick it on freezing water by wetting the ice. Or just put something heavy on top of the platform. Thin plastic in winter hardly protects the hole from freezing - you need to additionally go through and clean it with a slotted spoon.
It is better to replace the base with a home-made, stronger, heavier one. The simplest option is to cut platforms from moisture-resistant plywood. In order not to sweat with a jigsaw and cutting out a circle, we make square ones. The center of gravity will be lower, and the gear will no longer be blown away by the wind.
We cut out all the bases using a jigsaw according to one template so that they are the same, drill a hole in the center for the fishing line, make a cut for it, and paint it with waterproof paint. If the upper part with the reel is satisfactory, we simply attach it to the new platform so that the fishing line fits evenly into the hole during installation.
If you have already started making tackle with your own hands, then it is better to finish the job, make a normal rod and reel. The simplest option is a winter shed made of polypropylene pipes. Here you don’t even need to do magic with the fastening - we buy a standard clip-mount for the pipe, screw it onto the platform with self-tapping screws. You can even have two on top of each other. The vent turns out to be collapsible - for transportation we take out the pipe with the coil, disconnecting it from the base.
This is a reliable option, much stronger than factory plastic, and inexpensive to boot. We make the length of the tube as we want, but usually 20-40 cm. In order to correctly measure the position of the clip on the platform, we carefully measure it before screwing it on. To do this, we attach a ready-made pipe with a reel and a fishing line lowered from it with a weight at the end.
Homemade coils
A homemade reel for winter fishing on girders can be made from polystyrene foam, wood or an old fishing line reel with your own hands. You can also buy ready-made ones from the store - especially for winter girders. Or use existing ones. However, you will have to do some magic to build a rod that will attach the reel to the pipe stand.
It is necessary to achieve smooth, even rotation without bearings. Therefore, the axis on which we attach the reel must be chosen carefully, bothering with washers, screws, and the degree of tightening. And so 10-20 times, according to the number of girders.
Foam spool
Wooden reel
Fishing line reel
A simple option for making your own tackle is to supply ready-made reels for fishing rods, which cost pennies. They already have a bracket, an axle, and a fastening system. We’ll just adapt them for the girders. The simplest, cheapest winter reels from the store will do. Only when purchasing do we check that they spin normally. We choose such that the coil stands on a metal axis and is tightened with a nut. We wrap the coil to the stand pipe with electrical tape using standard fasteners or place it on self-tapping screws.
A winter bait reel does not require a ratchet, a release lever, or a reverse brake. Therefore, we disassemble and remove the insides - the lever, the spring. We just need a wire coil that rotates freely - clamping is done with a flag when setting.
Many home-made workers do not take out the guts of the coils when making vents - in vain. Someday the brake lever comes off spontaneously when you bite - you will lose the trophy. And for transportation, you can simply secure the reel with an elastic band.
The smooth, easy running of a winter reel has a downside - spontaneous reset of the loops during acceleration, inertial beard. The coil needs to be remade - it's as easy as two fingers. There is no need to reinvent the wheel, install some kind of anti-twist loops. We remember - simplicity and reliability are important - you cannot complicate the design.
Option two:
We put felt pads under the fastening bolts - you get a homemade clutch with your own hands. The freedom of rotation of the coil is adjusted by tightening the nut.
It’s even easier - we make an eccentric with our own hands. To do this, we wrap tin solder or copper wire around the handle and glue it so that it does not come off. You can simply glue a 3-5 gram weight to the edge of the reel.
Homemade winter flags or store-bought ones
Something, but for the optimal signaling option, ordinary store-bought flags, which can be bought for 10 rubles apiece, are better suited. It happens that on them it is necessary to additionally glue the junction of the fabric with the iron so that the flag itself does not fly away when triggered.
You can make a flag for winter fishing on girders with your own hands. But a spring of the required elasticity, such as from an alarm clock or an officer’s cap, may simply not be found in your garage. You can use plastic, metal tape measures, iron strips from windshield wipers - but usually these materials are too soft. When installed, such a flag does not fix the reel well; there are many idle bites when there is wind or lively baitfish. It's easier to put up store flags.
We tape the signaling device to the tube from the back of the coil with electrical tape. This is easier to transport than if it is attached to a platform, as on some store designs. We are experimenting with the length of the working part and the place where the spring is attached to the PVC pipe. It is necessary to achieve such a position that the flag reliably fixes the reel during small pokes of live bait and wind, but works reliably when biting.
On one leg and tripod (Taganka)
We have already talked above about the advantage of winter girders on a base over tripods and one-legged structures. However, if the angler decides to purposefully make such flags, it is even easier, since there is no need to cut out the platform. A tube with a reel is already a one-legged poke that can be stuck into the snow above a hole without a platform. There are no difficulties here - the reel with the flag can be attached to a simple stick.
It’s more difficult with a tripod girder with your own hands - here you need to bend the legs themselves, 3 pieces, and connect them together at the top. Can be riveted or bolted. We attach a coil and a flag to this structure. However, why such troubles - with a platform it’s better, easier to manufacture.