Hello, dear reader! Today I’ll tell you how I made a powerful WiFi antenna with my own hands. Of course, my hands are golden, they just grow from the wrong place, but that didn’t stop me either. First, let's look at the so-called antenna gain. Do not worry! I will not use abstruse phrases or operate with any complex terms, but this needs to be dealt with.
This value is measured in isotropic decibels and is designated as “dBi” or “dBi”. You don’t have to remember the phrase, but the letters are worth remembering. Home routers usually have low-power antennas of 2-4 dBi. But as practice shows, in country houses or large office premises this indicator is not enough.
Therefore, today we will make a homemade antenna from 10 to 20 dBi. There is no point in doing more and more powerfully. The thing is that with increasing amplification power, the signal beam becomes more directional and narrow. And the coverage radius becomes smaller. Take a look at the picture above. That is, it is possible to catch such a signal, but it is much more difficult, since the beam becomes too narrow.
Such antennas are also called directional. They can be constructed if you need to combine, for example, two country houses into one network via a bridge. Moreover, if they are located at a distance of up to 10 km.
Now let's look at frequency. Modern routers have two bands: 2.4 GHz and 5 GHz - this is the frequency of data transmission. It’s clear that the latter range has greater speed, but it also has one minus. As you probably remember from 7th grade physics, the higher the frequency of the wave, the faster it decays. That is, the coverage radius at 5 GHz is clearly lower.
After much thought, the best option for home use was a square antenna. It has such a shape that the gain can be increased to 20 dBi. And even with such power, the signal beam will not be so narrow. For the home, it will act as an omnidirectional antenna with a large radius.
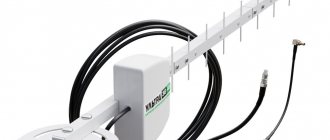
In the second chapter, I will tell you how to make a powerful Wi-Fi antenna-gun for a router with your own hands. The panel antenna will significantly amplify the adapter's signal, but in a narrower direction. I will also talk about its further use at the very end.
Types of Wi-Fi antennas
In terms of use, all Wi-Fi antennas are divided into two classes:
- for outdoor use (outdoor),
- for indoor use.
These antennas differ primarily in their size and gain. The outdoor class implies large dimensions and the ability to attach to any support (surface). High gain in such antennas is achieved by design features. Such devices are usually used for wireless data transmission between points that are located at a considerable distance from each other. It is preferable to install them in the line of sight.
Depending on the type of antenna, Wi-Fi is characterized by a higher or lower gain - one of the most important parameters of any receiving and transmitting equipment
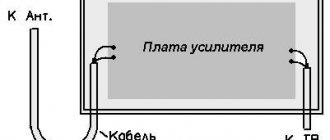
Indoor class antennas are designed for indoor use; they are smaller in size and do not have outstanding gain and power. Internal antennas are attached either directly to the transmitting/receiving gadget, to the wall, or placed on the surface. The antenna is connected to the device board either directly or via a cable.
Tips and safety precautions
When making such precision equipment as a microwave antenna, it is recommended to take note of a few tips:
- Tip 1. When working with copper wire, when creating bends, you need to operate not with the external, but with the internal value of the length of the biquadrate edge described in this article - Lin = 30.5 - 3.6 = 26.9 (mm). With a tolerance of 0.5 mm, this value can be rounded to 27 mm. Also, to ensure verification, it is better to create a template drawing, for example, for a device, on a real scale, drawn with lines 1.8 mm thick, and then, by applying the future antenna to it, check the manufacturing accuracy.
- Tip 2. If the wire initially has small bends (waves), do not try to straighten it with pliers, this will not lead to the desired result. Instead, you need to find a wooden block and fix it on the table (clamp, screws, etc.). Put on fabric gloves and, stepping back from the edge of the wire 30 - 40 cm, firmly grasp it. The end must be taken with pliers, then from the beginning to the gripping point, bending the wire over the edge of the beam, pull it several times with force (in one direction). With this method, all minor irregularities will be completely eliminated. If the length of the leveled area is not enough, you need to repeat the procedure from the end of the leveled area and above, but placing pieces of hardboard between the jaws of the pliers so as not to scratch the copper.
- Tip 3. In the case when galvanized steel is used, soldering of elements must be done using soldering acid. If aluminum was chosen as the material, connections are made using rivets or threads (bolts and nuts), soldering this metal at home without specialized equipment is impossible.
- Safety precautions when carrying out installation and soldering work. The first thing to remember is that when working with metals you need to use safety glasses. If you plan to use machines with rotating elements (emery wheel), the use of gloves is strictly prohibited. Sleeves should be no longer than elbow length, and hair should be tied back with an elastic band or beret. The second important rule is compliance with standards when performing soldering. The room where work is carried out must be well ventilated. The use of safety glasses is mandatory. When rosin, flux or acid is exposed to high temperatures, vapors are formed that can enter the lungs, so it is advisable to use a tight-fitting respirator with carbon filters.
Additional Wi-Fi antenna in an apartment or house
The main reason for needing an additional Wi-Fi antenna is to strengthen a weak signal. This situation may arise in the following cases:
- The Wi-Fi access point is located at a considerable distance (if the room is large), there are obstacles (walls, ceilings);
- The router is not powerful enough.
Also, an additional Wi-Fi antenna may be needed if you need to organize a “router - several client points” network, or if you need to connect several PCs together over the air.
Advantages and disadvantages
Modern antennas, including those for the Wi-Fi standard, do not have any disadvantages, which was largely made possible thanks to the use of modern electronic components.
The move away from pin-type telescopic models made of metal, still used today in analog radio reception, has made it possible to significantly reduce dimensions, cost and weight. The main components from which antennas are made are plastic, its derivatives, and polymer materials.
Modern design and miniature size allow you to place it in any setting or even decorate it with interior items. A special connection interface makes the antenna as efficient as possible and minimizes signal loss at the connecting contacts. A large selection of models makes it possible to select a product that best meets the technical parameters of a specific coverage area.
Connection
The method for connecting the Wi-Fi antenna depends on the type of router, adapter or other device you are using. In most cases, you will have to open the gadget, find the place where the standard antenna is connected (soldered), and similarly attach (solder) a homemade cable. It is very convenient when the gadget provides an independent connection for an external antenna; this can be done in the form of:
- connector in the battery compartment, on the back cover of the device, inside the case, etc.;
- the so-called pigtail (usually located directly on the device board).
If the adapter has a removable standard antenna, a homemade design can be connected instead.
In any case (excluding the option with soldering), you will need an appropriate connector, which can be purchased at a radio store.
Photo gallery: options for connecting an external antenna
The connector for connecting an external antenna can be hidden under the cover of the router
Antenna connectors may vary in size and design
You are lucky if your router has an output for connecting an external antenna headset
You can install the pigtail socket on the body of the gadget yourself if you are confident in your own abilities
A tiny connector on the device board is used to connect a special pigtail extension cord
Sometimes the fastest and most reliable option is to solder a cable instead of a standard antenna
Create it yourself
Assembling such a device is not difficult, but it will take some effort.
Biquadrat
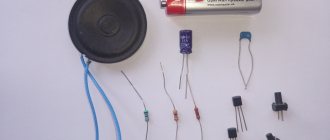
To assemble such a device you need the following materials:
- wire;
- coaxial cable;
- wooden slats;
- pliers, hammer, knife.
Note! Before assembling the antenna, you need to carry out a qualitative calculation. There are specialized sites on the Internet that offer online calculators
Alternatively, you can use this site.
Assembly steps:
- Calculate concepts such as polarization and wave frequency. Maintain linearity.
- Make a vibrator and reflector from copper. All parts must be in the corners, one of which they touch.
- Select one side according to the formula: wavelength, which must be divided by four.
- Assemble the structure. It is recommended to make an oval shape without pulling the sides together.
- Attach the antenna wire to the approach points on both sides. To block one direction of the diagram, you need to mount a fetal screen, which is also made of copper. It should be positioned at a distance of 0.175 mm from the working wavelength, and then placed on the wire braid.
Ultra-long
A fairly common name for such a catcher is “gun”. It is assembled from several steel disks with different diameters, which are secured with pins. Stages of assembly of such devices:
- The first step is to cut copper disks of appropriate diameters.
- Screw each of the disks onto special studs.
- Connect the wires to the last two plates.
- Connect the structure to the modem.
From an aluminum can
The simplest antenna, in which an ordinary can acts as an amplifier. To create it you need to cut off the lid. The result will be a barrel-shaped figure. Then you should strip the two ends of the wire: solder one to the bottom of the can, and connect the other to the antenna connector.
Powerful from sheet metal
In this case, the reflector is created from a metal sheet, which is recommended to be rounded. There are no special requirements for the vibrator; a biquadrat can be used. If there is no steel, it is recommended to use plywood or cardboard, which is wrapped in foil. The gain in this case will be slightly less.
A Wi-Fi antenna, even one you assemble yourself, will allow you to use your friends’ wireless network over long distances. There are several types of catchers. The choice of a specific one depends on the distance and terrain, as well as the user's tinkering abilities. In fact, everything is easy and simple, the main thing is to understand the assembly diagram and calculate the parameters.
Settings
Setting up a homemade Wi-Fi antenna comes down, first of all, to installing it in the right direction. In this case, the following conditions must be observed:
- take into account the signal propagation vector of the Wi-Fi signal receiver/transmitter;
- take into account the presence of barriers between transmitting and receiving devices;
- take into account that hard surfaces reflect the signal, while soft surfaces, on the contrary, absorb it;
- If possible, install the antenna within line of sight relative to the receiver/transmitter.
For greater efficiency, the antenna should be directed towards the access point.
At the setup stage, the cable length should be reduced as much as possible, this way you will get rid of unnecessary signal losses and improve its quality.
Materials and tools
Before moving on to the instructions on how to make a biquadrat on Wi-Fi, you need to decide on a set of tools and materials that will definitely be needed during work:
- pliers, duckbills, side cutters (nippers), metal scissors, knife, soldering iron or soldering station;
- solder, flux, soldering acid;
- copper wire with a diameter of 1.8 mm (section 2.5 sq. mm);
- sheet metal up to 1 mm thick (aluminum, galvanized iron, even one-sided foil PCB will do);
- coaxial cable with a characteristic impedance of 50 Ohms;
- connector (if required, with an adapter) for connecting to a router, less often N-type, more often RP-SMA.
Important! You should be very careful about the type of connector, because RP-SMA and SMA are structurally identical, but at the same time they are physically incompatible; you need to choose it specifically for your equipment
How to test changes
The simplest and most affordable option for testing a homemade Wi-Fi antenna is to measure changes in the speed of the Internet channel. To do this, a comparative study of the results is carried out alternately with a connected standard antenna and a self-made one. You can carry out such measurements, for example, on the Speedtest resource. The system will automatically select the optimal server, check ping, download and upload speed.
To confirm the result, it is recommended to test the Internet speed 2-3 times
What do experts advise?
It is quite simple to amplify the signal; for this it is important to know certain subtleties and carry out the installation correctly. So, high-quality communication is achieved by observing the following rules:
- In order for the signal to be distributed evenly throughout the room, the router should be installed as close to the center of the room as possible;
- The equipment should not be installed on the floor or near heating radiators, as this will significantly impair communication transmission;
- The standard equipment of modern routers is usually omnidirectional, so it is recommended to purchase more powerful antennas;
- There are many methods that allow you to improve the signal yourself. The simplest is foil glued to cardboard and installed in the desired direction;
- The signal can be strengthened by replacing the adapter;
- If you install a repeater, this device will significantly increase the signal transmission range.
At the moment, almost everyone uses Wi-Fi, but not everyone likes the speed of the Internet. Fortunately, now there are many ways to improve the quality of transmission, where the choice of a specific one depends on various parameters. It is also recommended to clean the registry from time to time, clearing it of unnecessary information.
In the modern world, a wireless network – wifi – is widely used. For its operation, special equipment is installed - routers equipped with antennas. The latter come in several types, each with its own characteristics, advantages and disadvantages. When asking the question “how to make wifi faster,” you need to understand that there are different methods, both free and requiring investment.
Reflector
The main task of the iron screen behind the emitter is to reflect electromagnetic waves. Correctly reflected waves will superimpose their amplitudes on the vibrations just released by the active element. The resulting amplifying interference will make it possible to propagate electromagnetic waves as far as possible from the antenna.
To achieve useful interference, the emitter must be positioned at a distance that is a multiple of a quarter of the wavelength from the reflector.
The distance from the emitter to the reflector for biquad and double biquad antennas is found as lambda / 10 - determined by the features of this design / 4.
Lambda is a wavelength equal to the speed of light in m/s divided by the frequency in Hz.
Wavelength at a frequency of 2.4 GHz is 0.125 m.
By increasing the calculated value five times, we obtain the optimal distance - 15.625 mm.
The size of the reflector affects the antenna gain in dBi. The optimal screen size for a biquad is 123x123 mm or more, only in this case can a gain of 12 dBi be achieved.
The sizes of CDs and DVDs are clearly not enough for complete reflection, so biquad antennas built on them have a gain of only 8 dBi.
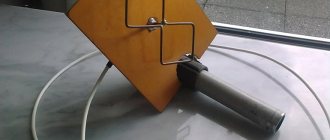
Below is an example of using a tea jar lid as a reflector. The size of such a screen is also not enough, the antenna gain is less than expected.
The shape of the reflector should only be flat. Also try to find plates that are as smooth as possible. Bends and scratches on the screen lead to the dispersion of high-frequency waves due to disruption of reflection in a given direction.
In the example discussed above, the sides on the lid are clearly unnecessary - they reduce the signal opening angle and create scattered interference.
Once the reflector plate is ready, you have two ways to assemble the emitter on it.
- Install the copper tube using soldering.
To fix the double biquadrat, it was necessary to additionally make two stands from a ballpoint pen.
- Secure everything to the plastic tube using hot glue.
We take a plastic box for discs for 25 pieces.
Cut off the central pin, leaving a height of 18 mm.
Use a file or file to cut four slots in the plastic pin.
We align the slots to the same depth
We install the homemade frame on the spindle, check that its edges are at the same height from the bottom of the box - about 16 mm.
Solder the cable leads to the emitter frame.
Taking a glue gun, we attach the CD to the bottom of the plastic box.
We continue to work with a glue gun and fix the emitter frame on the spindle.
We fix the cable on the back of the box with hot glue.
Reasons for connection errors
It is important to determine its specific root cause, which predetermines the method of dealing with the malfunction. The SSL_ERROR_NO_CYPHER_OVERLAP error often occurs when using Mozilla Firefox as the browser used; a similar error can also occur when using other browsers
Mozilla Firefox logo
At a certain stage of operation, the program ceases to perceive the SSL protocol as secure, blocking by default all sites that use this standard. The browser does not allow you to work correctly with sites that use the SSL protocol, limiting access to them. The reason for such a precedent may be an attempt to open a page with viruses that threatens the security of the PC, or due to a software conflict when loading trustworthy resources.
How can you increase the signal reception and transmission power of a router?
First, let's understand the terminology of devices that are used to receive and transmit Wi-Fi signals. In a normal situation, the provider provides the Internet using a cable or fiber-optic connection. After it, the owner of the house or apartment installs his own router, which receives this signal and then distributes it using a wifi connection. A router can also be used to distribute the signal over wires, but modern devices can combine both of these functions in one device. But if you need to transfer the Internet even a short distance from home, a problem may arise. At a distance of several tens of meters, the signal may be lost. And then it needs to be strengthened. Often this problem can be solved by an external directional antenna for a router made by yourself. Without much difficulty, such a device can amplify the signal up to 10 dB. In addition, there are separate receivers for such a signal. They have the name access point. If you use an antenna for such a device both for signal reception and transmission, then the maximum signal can be transmitted over a distance of 10 km. Provided line of sight of both devices is ensured.
Instructions for strengthening Wi-Fi at home
- We need to make a mount on which our antenna will sit. I still have some old CD packaging. Take and cut off the core approximately slightly above the middle. After this, you need to make small holes with a round needle file. So that you get 4 notches in the form of an even cross.
- Now you need to take a piece of copper wire with a diameter of 2-4 mm and make a resonator out of it. It will act as the main scatterer of the radio wave beam. Now, using pliers, you need to exactly make 2 squares with an edge length of 29-31 mm. The most important thing is to make sure that there is free space between the corners of contact of the squares.
- And so now we need a coaxial cable. We solder the core to one corner, and solder the braid to the other end.
- We coat the bottom of the box with glue and glue the disk there. It will serve as a reflector of the radio wave beam. You can, of course, glue foil, but the disk looks more aesthetically pleasing. Now we carefully push the wire into the hole and also glue the squares to the semicircular grooves that we made earlier.
- We also seal the top with glue to ensure the reliability of the structure.
- We also seal the back so that the wire does not tear out. You can glue one wire, fill everything with glue - no need.
- Now you just need to connect the coaxial cable connector to the SMA port, to which the antennas are screwed. Everything is simple there, we solder the central core to the center of the SMA, and the braid to the outer part.
- For those who like to solder, you can open the router and directly solder our antenna to the board. But you need to understand that this is quite unsafe for the router, and if you don’t understand this, then you shouldn’t bother. Plus, you can damage the board itself if you don’t have the right soldering iron.
- In the end, you should end up with something similar to my “homemade” one. It doesn't look very good, but it penetrates walls at a frequency of 2.4 GHz - with a bang! It's quite suitable for a large country house. If installed correctly, it will be great for catching even when not on the street.
Active amplifiers
Includes repeaters and access points. These means distribute the signal in all directions. The coverage radius depends on the power of the equipment. They are purchased in addition to the router and connected via an outlet.
Access point
It is the main component of any wireless data transmission system. Acts as a transmitter. To strengthen the signal, connect the device in repeater mode. During setup, specify several operating principles - base station or repeater.
Repeater
The device is designed to increase network coverage and strengthen the signal. Acts as a repeater. That is, it transmits a signal from the starting point to other equipment. The area is increased through the use of additional antennas installed on the device body.
How does a repeater work? What it is?
An example of how a repeater works should be considered. The central router can be located in the living room. In this case, the signal practically does not reach the kitchen. To avoid the problem, install a repeater. It is recommended to place it closer to the dead zone. Once connected and configured, Internet levels will be provided throughout the entire home.
When purchasing equipment, consider the following properties:
- the data transfer speed of your network;
- the frequency at which information is read or written;
- number of antennas for the router;
- connectors for connecting additional equipment.
The equipment is mainly used in private apartments or houses. At production facilities, in companies, firms, and enterprises, more powerful solutions are used. In such cases, it is recommended to install an access point.
Connecting and setting up a repeater
After you have purchased the device, you need to get it working. Active devices require mandatory configuration. Passive ones simply connect to the system. For this you will need a laptop. Follow these steps:
- Connect the device to the network via the power cable. Wait for it to turn on. The LED on the panel should turn green. Activating the equipment takes a few minutes.
- The signal will begin to propagate in the room when the second indicator lights up. The name of the new connection will appear in the list of available networks on your computer.
- Connect without any preliminary setup.
- Launch your browser and go to your control panel.
- Please login.
- Select repeater mode and connect to the router.
- Update your data. The network will be automatically configured.
Setting up a router for use as a repeater
To do this, follow these steps:
- Go to the settings menu.
- Go to the wireless networks section and select the operating channel value.
- After this, the setup will automatically end.
Setting up a Wi-Fi repeater
To ensure that the equipment works properly, it is recommended to do the following:
- Consider the signal propagation radius.
- Pay attention to possible repeater obstacles.
- Soft surfaces absorb the signal, hard surfaces repel it.
- Install amplifiers in the visible range.
To achieve installation efficiency, it is recommended to point the antenna towards the router. After all the settings have been made, the system should function properly using the repeater.
Drawing of a double homemade biquadrat
The first examples of homemade WiFi signal distributors appeared back in 2005.
The best of them are the biquadrate designs, which provide a gain of up to 11–12 dBi, and the double biquadrate, which has a slightly better result of 14 dBi.
According to usage experience, the biquadrate design is more suitable as a multifunctional emitter. Indeed, the advantage of this antenna is that with the inevitable compression of the radiation field, the signal opening angle remains wide enough to cover the entire area of the apartment when installed correctly.
All possible versions of a biquad antenna are easy to implement.
Required Parts
- Metal reflector—a piece of foil-textolite 123x123 mm, a sheet of foil, a CD, a DVD CD, an aluminum lid from a tea can.
- Copper wire with a cross section of 2.5 mm2.
- A piece of coaxial cable, preferably with a characteristic impedance of 50 Ohms.
- Plastic tubes - can be cut from a ballpoint pen, felt-tip pen, marker.
- A little hot glue.
- N-type connector - useful for conveniently connecting an antenna.