The chestnuts themselves almost fall into our hands, as if they are asking us to make something interesting out of them. And today we will see what crafts can be easily and simply made from chestnuts, even for kids. And which ones are worth working on so that it turns out perfectly beautiful. We'll mostly stick to a fall theme, but we might do something all-season!
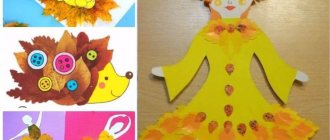
If you have already made crafts from vegetables and leaves and need new ideas, then I offer you a huge collection of crafts. There are simple ones for kids, and there are also real decor that can decorate your home.
DIY crafts on the theme of autumn from chestnuts
There are many options for autumn crafts. These are very cute little animals, trees or mushrooms. Often applications and crafts made from chestnuts are supplemented with dry leaves, acorns and twigs.
Autumn chestnut beetles
This is the simplest craft for kindergarten kids. Suitable for children 3-4 years old. The child must do everything himself, relying on the adult’s tips.
Materials:
- Chestnuts
- Dry shells with thorns from chestnuts
- Plasticine
- Dry twigs
Instructions:
- Take 2 chestnuts. One of them will be the head of the beetle, and the second will be the body
- Glue two chestnuts together with plasticine
- Glue half a shell with chestnut spines onto one of them and cut it in half
- It should look like wings. Stick on your eyes
- Using plasticine, glue the branches. These will be the paws
- Also attach mustaches. Place the beetles on dry yellow leaves
Beetle from chestnuts
Beetle and ladybug from chestnuts in the photo below.
DIY beetle and ladybug made from chestnuts
Applique with beetles made of chestnut or hazelnut and plasticine in the photo below.
Chestnut mushrooms
This is also a craft for preschoolers. An ideal activity for children in the nursery group.
Materials:
- Plasticine
- Chestnuts
- Knife
Instructions:
- It is necessary to prepare the chestnuts. To do this, cut off the peel from below with a sharp stationery knife.
- This will make the hat even at the bottom. Remove the skin completely from the second chestnut and cut out the stem of the mushroom.
- Give the kids pieces and ask them to glue them together using plasticine and give them some plasticine of a different color
- Invite the children to make dots like for a fly agaric. You can place mushrooms on prepared leaves
Mushrooms from chestnuts Mushrooms from chestnuts and acorns
Preparing chestnuts for work
The first thing you need to do is choose what kind of craft you want to create from the fruits and determine what its dimensions will be. The larger the desired product, the greater the number of chestnuts that will need to be obtained.
It is worth considering what part of the chestnuts will be used in the work - their green, prickly shell or the brown fruit. In addition, you will need to take into account their size and shape.
The timing of harvesting the fruit is also important, because the earlier you pick it, the less dense the chestnut will be, which means it will be easier to make holes in it and separate it from the shell. The optimal time for this activity is from September to mid-October.
After harvesting, chestnuts should be washed with running water, lightly wiped and dried.
Hedgehog made of chestnut and plasticine
A very simple craft that preschool children can handle.
Materials:
- Plasticine of different colors
- Chestnut peel with thorns
- Chestnuts
Instructions:
- Take a nut and glue a piece of plasticine to it. Align it into a cone shape. This will be the hedgehog's nose
- Stick on the paws. Put a little plasticine on top of the chestnut and glue a scarf with thorns
- Make eyes from light plasticine and glue a circle to the tip of the nose
chestnut hedgehog
Christmas tree
To create this forest guest you need to prepare the following materials:
- cardboard (preferably hard);
- large, medium and small chestnuts;
- hot glue;
- heat gun;
- spray paint;
- tinsel, pine cones, acorns, small soft toys, beads, beads.
How to make a Christmas tree:
- give the cardboard a cone shape. The larger this figure is, the larger the tree will be;
- take a large chestnut and glue it to the bottom;
- arrange the remaining fruits of the same size in circles;
- when you run out of large chestnuts, move on to medium ones;
- as you move towards the top, the size of the fruit should become smaller;
- Having finished applying the chestnuts, paint the product and wait for it to dry;
- Decorate the Christmas tree with your chosen decorations.
House of chestnuts
This is painstaking work, so it is better to entrust it to older children. If you plan to involve children 3-4 years old, you will have to help them.
Tools:
- Scissors
- Cardboard (not colored)
- Glue
- Dry leaves
- Scissors
Instructions:
- Cut out 7 rectangles. One of them will be the bottom of the house, 4 will be the walls, and 2 will be the roof
- Cut out 2 triangles for the roof. Now glue the house model together with glue
- Fill the walls with chestnuts. Try to glue them close to each other so that there are no gaps
- Cover the roof with dry leaves. You can add a clearing around the house
House of chestnuts
Cheburashka from chestnuts
Unusual craft made from chestnut.
Tools:
- 2 large chestnuts and 6 small ones
- Toothpicks
- Awl
- Plasticine
Instructions:
- Take 2 large chestnuts and use toothpicks to connect them. To do this, first pierce the holes with an awl.
- This will be the body and head. After this, attach the ears to the head using toothpicks.
- Next, attach the arms and legs. Make eyes, nose and mouth from plasticine.
Cheburashka from chestnuts
How to make a caterpillar from a tomato
Every fall we have to fantasize about crafts for kindergarten. What are they used to make crafts for thematic exhibitions? Crafts made from vegetables and fruits have become the main characters lately.
We are familiar with such a vegetable as the green tomato, which is denser than its red relative. Therefore, green tomatoes are suitable as crafts.
You can hold the tomatoes together using toothpicks. The legs can be made from small tomatoes or rowan berries.
Caterpillar legs made from carrot rings will look great
And carrots can also make an original fantasy hat.
The caterpillar can still be so funny
Chestnut bear
A simple craft that a preschooler can make.
Materials:
- Plasticine
- 2 large chestnuts
- Awl
- Toothpicks
Instructions:
- Combine 2 large chestnuts. This will be the stomach and head
- Use plasticine to make legs and glue ears
- Using small pieces of plasticine, glue on the eyes, nose and mouth.
Chestnut bear
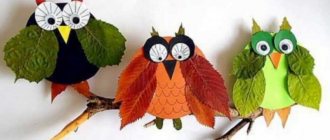
Owl from chestnuts
A very cute and unusual craft that requires acorns to make.
Materials:
- Plasticine
- Acorns
- Chestnuts
Instructions:
- Take one large chestnut. Separate the caps from the acorns
- Glue the acorns to the chestnut using plasticine
- Glue the pupils in the center of the chestnut hats
- Make a beak, legs and wings from plasticine
Owl from chestnuts
Ant from chestnuts
A simple craft. Will interest small children. Before collecting an ant, take a walk in the park and choose beautiful and large chestnuts.
Materials:
- 2 chestnuts
- Plasticine
- Toothpick
- Awl
Instructions:
- Connect 2 chestnuts together. To do this, make a hole with an awl and insert a toothpick
- Make paws using plasticine or twigs
- Using small plasticine balls, make eyes and a mouth.
Ant from chestnuts
How to make a caterpillar from acorns
Anyone who has seen what a caterpillar looks like understands perfectly well that making one from natural material is not at all difficult. Acorns are one of the best and most convenient materials for creating crafts.
Acorns are a malleable material that can be easily pierced and can be held together with matches, toothpicks, and even twigs. And children love to hold them together with plasticine.
A simple caterpillar made from acorns can be made quickly by simply connecting acorns using plasticine
Plasticine will help not only to hold the acorns together, but also to draw the face of the caterpillar
You can use acorns with caps to create the body of a caterpillar and fasten them with toothpicks
It would seem that such a simple craft as a caterpillar can be so simple and original.
Chestnut horse
Also a craft for preschoolers. If you are going to let 2-3 year old children make crafts, use an awl to make holes.
Materials:
- Plasticine
- Chestnuts
- Awl
- Toothpicks
Instructions:
- Poke 5 holes in one chestnut with an awl
- 4 for legs and one for head
- Attach the second chestnut using a toothpick. This will be the head
- Attach the legs, and make a mane and tail from plasticine
- Glue the eyes and mouth
Chestnut horse
DIY chestnut beads
The easiest option is to poke holes in the chestnuts and string them on a fishing line. But such beads are quite boring. You can combine chestnuts with acorns. Below are ideas for chestnut beads.
DIY chestnut beads DIY chestnut beads DIY chestnut beads
Interesting crafts for children over 7 years old
This is the period when the child actively learns about the world around him through reading. From acorns and other gifts of autumn, you can make entire compositions with your own hands based on fairy tales, stories and even encyclopedias.
We read “The Wizard of Oz” with the children - make Ellie, Toto, Scarecrow, Cowardly Lion and Tin Woodman from oak fruits.
The child became acquainted with dinosaurs in the encyclopedia - create a world of prehistoric lizards from acorns and scrap materials.
My son became interested in knights - organize a tournament of acorn warriors.
While walking in the park or going out into nature, collect herbariums, twigs, acorns, and cones. Brainstorm with your children what can be made from what nature gives us.
Fantasize, bring your ideas to life, because this is another reason to spend time with your child, communicate with him, and become the closest person to him.
DIY New Year's crafts from chestnuts
You can make a lot of interesting decorations and crafts for the New Year from chestnuts. These can be either Christmas tree decorations or decorative items for the holiday table.
Options for New Year's crafts made from chestnuts:
- Christmas tree
- Christmas decorations
- New Year's topiary
- Bouquet for the New Year's table
- Door wreath
DIY New Year's crafts from chestnuts
DIY Christmas tree made from chestnuts
A very cute and unusual tree.
Materials:
- Chestnuts
- Liquid Nails
- Cardboard
- A flower pot
- Styrofoam
- Decoration materials
Instructions:
- Make a cone from thick cardboard and glue it with glue
- Fill the pot with some kind of filler. You can use crushed stone
- Secure the cone in the pot. Using glue, glue the chestnuts from bottom to top.
- It is necessary that there are no gaps left. When the whole tree is assembled, you can glue the pine cones
- Paint some chestnuts with golden paint. New Year's tinsel is often used for decoration.
DIY Christmas tree made from chestnuts
- The finished chestnut tree can be painted with any paint and decorated with toys.
Using chestnuts when decorating gifts
Basket
Perfect for putting a gift or a bouquet of fresh flowers in it.
Let's prepare:
- base (basket with or without handle);
- chestnuts;
- decor (beads, bows, flowers, sisal);
- glue, paint, varnish.
Step-by-step master class:
- Glue the chestnuts to the outside of the basket and its handle.
- We decorate the craft by filling the voids between the fruits.
- We cover the product with paint and varnish.
- We distribute the sisal inside the basket.
You can use the same technique to decorate a wicker box. After the gift has been given, it can be used to store small items or decorations and at the same time please the eye, decorating the dressing table.
DIY Christmas toys made from chestnuts
These Christmas tree decorations can be made together with the kids. Below are ideas for creating Christmas tree decorations.
DIY Christmas decorations made from chestnuts DIY Christmas decorations made from chestnuts
VIDEO: Chestnut topiary
Topiary from chestnuts Topiary from chestnuts Topiary from chestnuts
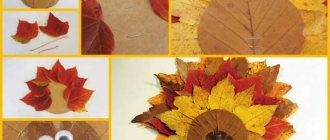
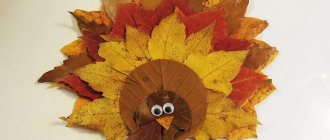
Pictures from chestnuts
From chestnuts you can make both simple paintings with children and more complex canvases. In this case, chestnuts are dyed and combined with other materials. Usually these are also natural materials, such as straw, acorns, and spikelets. Below you can see options for various paintings.
Pictures from chestnuts
Crafts for younger students
More complex crafts can be made together with children of primary school age.
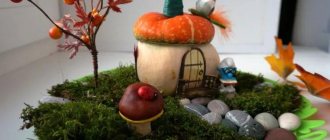
Fairytale house
To work you need to prepare:
- low cardboard box as a base;
- box for the house;
- plasticine;
- chestnut tree nuts;
- dried leaves;
- PVA glue.
Operating procedure.
- The cardboard base must be covered with a thin layer of plasticine. Attach tree leaves to the edges.
- The base box for the house is supplemented with a cardboard roof.
- Cover the workpiece with plasticine or glue, carefully fix the nuts.
- Complete the house with windows and a door made of paper.
- It is not difficult to make a chimney from plasticine.
- Secure the dried house to the base.
- It is easy to decorate the roof with twigs or dried grass.
- Supplement the base with a decorative pond made of blue plasticine.
Additions to a fairytale hut can easily be made from materials of natural origin.
DIY chestnut basket
The basket is assembled using the principle of beading. In this case, instead of beads there are chestnuts. It is necessary to make through holes in them.
Materials:
- Awl
- fishing line
- Chestnuts
- Needle
Instructions:
- Take 5 chestnuts and string them on a fishing line. Lock it in a ring
- Now, in another row, place the chestnuts in the indentations. This way you will have something similar to a container
- Gradually fill the spaces in the previous rows with new chestnuts
- When the container is the required size, make a handle
DIY chestnut basket
DIY chestnut vase
The easiest way to make such a vase is from a plastic bottle. You can take two or five liter containers.
Materials:
- Plastic bottle
- Chestnuts
- Dye
- Glue
Instructions:
- Cut the top off the bottle to create a cylindrical container.
- Using paint, paint the container with gold paint. Stained glass or acrylic paints are suitable
- When the container is dry, glue the chestnuts using liquid nails
DIY chestnut vase DIY chestnut vase
You can make a lot of interesting and unusual crafts from chestnuts. This is a way to entertain kids and also develop their speech and fine motor skills.
Decorative vase
To create this product you will need:
- chestnut fruit;
- hot glue;
- heat gun;
- finished vase or jar;
- brown paint;
- acorns, dried flowers, beads, etc. (for decoration).
How to do:
- apply chestnuts to the base. They should be arranged in rows. It will be more convenient to start from the bottom and work your way up to the top;
- It is better not to glue anything to the bottom of the vase, otherwise it will turn out unstable;
- paint over the gaps with brown paint;
- place decorative decorations on them. All voids must be closed.