On June 12, Russia celebrates a holiday important for all citizens of a powerful power - Russia Day. Celebrations take place throughout the country and both young citizens and adults take part in them.
Props for the holiday are prepared in advance. A handmade national flag looks very touching. You can immediately see how much warmth ordinary people put into these crafts.
One of the main state symbols is the flag. Adults can prepare for the holiday together with children. For example, you can make a postcard with the Russian flag on it. In addition, such work contributes to the study of state symbols.
Applique postcard
The craft is made with your own hands and its central part is the tricolor flag of Russia. The applique postcard is decorated with the image of a dove. It is called a symbol of peace. The bottom of the card will be decorated with flowers to match the flag.
It is worth noting that to create a beautiful craft or create a master class, you cannot do without specialized sites where these instructions are described in detail and shown in the photo, for example, the portal master-klassi.ru has a huge selection of ideas for creating crafts.
You will need for the postcard:
- cardboard sheet of rectangular shape and high density. The size is chosen at your discretion, the color of the sheet also does not matter;
- corrugated paper in three flag colors. The roll is white, the second one will be blue and the third roll will be red;
- glue;
- medium sized scissors.
The work is divided into two parts. The first half of the work is the design of the image of the flag itself. The second stage is its decoration.
For the base, a rectangle is cut out of a sheet of cardboard. In equal portions you need to cut small squares for the craft from corrugated paper in the three colors of the flag.
They form dense balls that will cover the surface of the cardboard. The balls are formed using the clumping technique, which means that a large number of lumps will be made.
Borders are drawn on the cardboard with a pencil, dividing the sheet into three stripes. This will help you carefully glue the lumps according to the colors.
To do this, the cardboard is covered with glue over the entire surface. The lumps of colors are pressed onto the cardboard. This creates three stripes that imitate the stripes on the flag.
The lumps are placed close to each other. The work is finished when the surface is completely filled with these lumps. The Russian flag craft will look voluminous.
Decorative elements for applique are being prepared. Work begins with making flowers. They will add a festive mood to the craft. You will need colored paper to match the colors of the flag. Square-shaped blanks are made from white and blue paper.
Fold each square in half several times. The wide side of the workpiece is cut with a bird. Templates are obtained in two colors to form a flower.
The blue flower is glued to the white one. Balls are formed from red paper and glued to the center of a two-color flower. These flowers decorate the bottom of the card.
A white dove will hover over the flowers. In the center of the postcard is placed her figurine, cut out of white paper.
- How to sew a decorative mini bag with your own hands
- Crafts from cotton pads - beautiful ideas and tips on how to make decorations and toys with your own hands (70 photos)
- DIY New Year's crafts: 70 photo ideas and a master class on making crafts for the holiday
Russia Day: what crafts to make for June 12 with your own hands
One of the most important public holidays is Russia Day. Russians celebrate it on June 12. On this holiday, festive events are held throughout Russia: concert programs, exhibitions of children's creativity, fairs and more.
Are you planning to participate in one of these holiday exhibitions? Then you will need an idea for a DIY craft for Russia Day.
I suggest you familiarize yourself with several interesting ideas for crafts for Russia Day. You can easily make them yourself.
Russia Day: DIY crafts
DIY toys for developing fine motor skills
Thematic panels are rightfully considered bright and original crafts. They will look impressive. Create your own panel in the colors of the flag from colored paper strips using the quilling technique, using the cut-out appliqué technique from colored napkins or quilling paper, and even from dyed pasta.
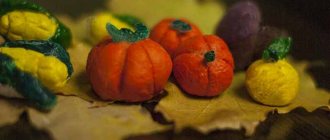
If there is plasticine in the house, children can use it too. It will turn out original.
If you want your child to amaze everyone with his creativity, then together make a three-dimensional bird with the country’s flag using the quilling technique.
Another bright idea using the quilling technique with birch trees, a clear sun and a flag. Can be framed as a painting.
You can use different grains to make themed panels and paintings. They need to be painted in the desired colors and laid out in the desired shapes.
Master class “Coat of arms and flag of the Russian Federation”
- Olga Nuzhdina
- Master class “Coat of arms and flag of the Russian Federation”
- In order to get started we will need:
- - outline of a double-headed eagle,
- - paper napkins (pale yellow, bright yellow, red, white and blue,
- - glue (preferably wallpaper, it does not leave marks,
- — whatman paper in A2 or A1 format.
- We took the Eagle picture from the Internet, divided it into 4 parts and printed it out.
- The parts were connected and glued to whatman paper. To the middle (St. George the Victorious)
- It wasn’t made from pieces, we printed it out again, glued it and colored it, but you can just print it on a color printer.
It is better to take single-layer napkins. We took 5 types: pale yellow, bright yellow, red, white and blue. They need to be cut along the folds and into 4 more parts so that the balls from them are not very large.
To make it easier for children to navigate what and what color, it is better to start with the outline of the eagle itself. We made it with bright yellow napkins. Then we made outlines of the colors of the Russian flag . First we laid out the middle in blue, then along the edges. The eagle itself was painted pale yellow.
- Since the case was quite long, we worked in subgroups of 9 people, taking turns.
- These are the symbols of the Russian Federation we got .
- And the corner of patriotic education was supplemented and knowledge of the symbols of Russia was consolidated .
Master class “Autumn Maple Leaf” 1. For work we will need a sheet of white paper on which the outline of a maple leaf is depicted; PVA glue, brush, brush stand.
Master class on making a poster for May 9, made with threads and gouache Master class on making a poster for the Victory Day with children of the preparatory group.
Equipment and materials: Whatman paper, simple pencil.
Source
Crafts for kids for Russia Day - June 12
The following crafts are perfect for the littlest creative lovers.
For example, you can make this interesting three-dimensional greeting card with a beautiful bouquet of paper flowers made in the colors of the flag.
Try making a cute sun with rays of white, blue and red. As you work, you can explain to your child the meaning of each color. White color symbolizes purity and peace, blue color symbolizes fidelity and faith, and red color symbolizes strength, energy and blood.
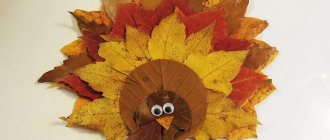
A cute and touching children's craft - a dove of peace. It’s easy to make using paper palms in the colors of the flag.
If you don’t know how to decorate your child’s outfit for the holiday, then a flower boutonniere will come in handy. You can make it yourself from wide satin ribbons.
Also, together with your children, you can make a three-dimensional applique on the theme of Russia Day. Every child can make small flags out of paper. All you need is a little patience and parental help.
Step-by-step master class
What you need to prepare
To make a coat of arms using quilling, you need to prepare the following materials and tools:
- paper ribbons in yellow and orange shades;
- thick red cardboard base;
- pictures with the image of the coat of arms;
- PVA glue;
- awl or toothpick;
- round ruler for quilling;
- pins;
- pencil;
- carbon copy.
As a base, you can take thick cardboard, for example, from a box, and stick red paper on top or paint it with paint. The bottom edge of the base must be cut with a curly brace so that the corners are rounded and a pointed tip is obtained in the center. To cut smoothly, it is recommended to use a mock-up of the coat of arms.
For this MK it is necessary to prepare templates for a double-headed eagle and a horseman.
The contours and lines of the coat of arms are quite clear, so it will not be difficult to make all the necessary quilling elements based on them. The drawing can be transferred to the base using carbon paper or made a sketch on cardboard by tracing the outline of the cut out eagle.
However, the drawing does not have to be transferred to the base. It is recommended to print the image of the coat of arms of the required size and assemble all the basic figures directly on it. For convenience, the design can be placed on a soft surface, for example, on a chair, and, using pins, the strips can be wound directly onto the eagle.
The shield with the image of the horseman must be painted (blue cloak and red background), and then cut out along the contours. It is too small for quilling, so at the end of the work the shield with the rider is simply glued to the eagle’s chest.
Symbols of Russia for elementary school
The education and training program for elementary school students includes tasks for studying the symbols of Russia, namely: the flag and coat of arms of the motherland, the melody and words of the national anthem.
If in kindergarten children superficially study the symbols of the country, then in the first grade they become more deeply acquainted with the meaning of the coat of arms and ensign, and learn the words of the anthem by heart. During the study, children realize the importance of the functions of state symbols and learn to feel proud of being a citizen of the Russian Federation.
It is especially important to teach the symbolic meaning of the coat of arms and flag, because they have excellent potential for the spiritual and moral education of children. And what is important here is not the fact of memorizing the appearance of the symbols, but their significance for every resident of the country.
For example, when studying the flag, children learn that the white stripe on the flag represents nobility, the red stripe represents love and courage, and the blue stripe represents loyalty. When talking with children about the flag, you need to try to explain to them that the people of Russia are distinguished by their friendship, courage and love for their homeland.
The coat of arms of Russia has multifaceted meaning. The golden double-headed eagle represents two ancient Russian symbols - the sun and the solar chariot - which are found on embroidered shirts, women's clothing, and towels of our ancestors. In the deep understanding of the coat of arms, the double-headed eagle is the guardian of our borders.
They begin to teach the Russian anthem from the first grades, presenting it to children as a symbol of national unity. It sounds solemnly at every school event and celebration.
Symbols of Russia in kindergarten, symbols of Russia for preschool children
In kindergarten, introductory lessons are held for preschoolers on the topic “Symbols of Russia.” The purpose of such classes is to introduce children to state symbols, tell their history and significance for every resident of the country.
During the lesson, children are given a general explanation of the meaning of symbols. They try to instill in preschoolers a sense of pride and admiration for these symbols of the country. Additionally, children are introduced to other symbols of the state - the constitution, the president, and public holidays.
The most accessible and interesting way to convey information to children is a laconic presentation, an interesting lesson in the form of a game, or placing visual aids in kindergarten - stands with symbols.
Source
Crafts competition on the theme of state symbols
The 4th city competition for the best knowledge of official and state symbols among students of educational institutions was held at the Young Technicians Station.
The competition is held in accordance with the state program “Patriotic Education of Citizens of the Russian Federation”.
The exhibition featured works from all schools in the city. This year PU-15 and school No. 7 took part for the first time. A total of 77 works were presented, which is almost twice as many as last year. About a thousand people came to see the exhibition.
Flag layout
The craft can be designed as a layout for the Russian Flag Day. A group of children, for example, in a kindergarten, can be involved in making flag crafts.
For the layout you will need children's palms cut out of colored paper. Each child will feel their importance in life by looking at the end result.
To work you will need to prepare the following material:
- 2 types of corrugated cardboard. One is A4 sheet size. The second one has side parameters of 6x12 cm. There should be two such sheets.
- Paper in three colors: white, blue, red. Paper size A4.
- Paint brush, red gouache.
- PVA glue.
- Pencil.
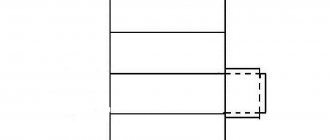
The base for the flag is made of corrugated cardboard. A rectangular shape with sides 25x35 cm is cut out. To attach the base, you need to make slits 3 cm deep.
From the corners below it is 5 cm apart towards the center. A photo of step-by-step instructions for making a Russian flag model will help you clearly understand the work process.
- Crafts for Mother's Day - how to make simple and beautiful original decorations and toys with your own hands (130 photos + video)
- Eyes for crafts: how to make templates and a master class on making eyes from various materials (100 photos)
- Craft angel - 105 photo ideas on how to make your own angel quickly and easily from scrap materials
Next you need to prepare stands for the flag. Prepared rectangles with sides 6x12 cm are cut so that one of the corners becomes semicircular. The slots for fastening are made identical to the slots in the base.
Two important elements are connected: the stand with the base. The part of the stand that is visible in front of the base is covered with red color on the front side.
Palms are cut out, 8 pieces of each color. Palms are glued to the base from top to bottom in rows. First the white palms are glued on. The parts are placed overlapping.
It is necessary to place your palms so that the base is not visible between them. It is recommended to apply the adhesive base to the wrist area. Your fingers should be free of glue.
The craft will be ready when three stripes imitating a flag are glued.
Both works can be exhibited at an exhibition of children's crafts dedicated to Russia Day and Flag Day. Some ideas in the design of two crafts can be used in a wall newspaper.
- Crafts from matches - 125 photos of original ideas for professionals and simple crafts for beginners
- Crafts with children: a review of interesting and exciting ideas for creating toys and decorations (115 photos)
- Crafts from tights: 60 photos of basic ideas and sewing original crafts with your own hands
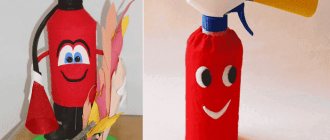
Plasticine tank
As a good option for crafts on a military theme, you can choose a tank model. These combat vehicles are an integral symbol of courage and heroism. During the Great Patriotic War, these mechanisms provided enormous assistance in protecting our country from the Nazi invaders.
To make a plasticine tank you will need:
- plasticine;
- cardboard;
- matches.
You need to assemble military equipment with your own hands according to the following scheme.
- Knead the plasticine and roll the shape into a trapezoid or rectangle. To save plasticine, you can stuff cardboard inside the figure.
- Roll two sausages out of molded material and make a border around the body of the machine.
- Make a circle out of plasticine. This will be a turret that needs to be attached to the hull of the future tank.
- The match must be inserted into the tower, having previously made a plasticine edging on it.
- Caterpillars are made from round-shaped “sausages”. Black circles made of plasticine are installed inside them, which will symbolize the wheels of military equipment crafts.
- All that remains is to decorate the tank with decorative elements (hatch, inscriptions, etc.).
You can do this DIY tank together with your child. Along the way, you can tell your child about historical events in which this technique was the hero. The resulting piece can be given as a gift to dad or other family members.
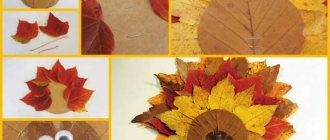
Application on the theme “Russian flag”
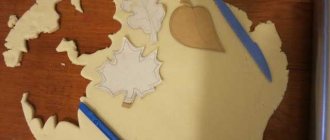
This version of the application can be developed for both small and older children. The background will be the outlines of the Russian borders on the map.
The territory is divided into three lanes. Flowers of the desired shades are glued to each strip. For kids, it is better to prepare templates of simple flowers.
Older children can use a template to cut out flowers that grow in Russia. For example, daisies are cut out for a white stripe. For blue - cornflowers. Poppies are suitable for the red stripe.
The flowers are cut out the same way. They differ from each other only in the design of the middle. For chamomile it is a yellow circle, for cornflower it is blue “snowflakes”, for poppy it is a black circle and an even smaller green circle is glued to it. The map of Russia can be cut out of colored paper, or drawn with pencils or paints.
It will be fun for kids to do a job using spaghetti. The basis is a colored sheet of paper. A flag is drawn with a pencil on the entire sheet.
Glue is spread on the canvas and spaghetti is laid out carefully, close to each other. Next comes the paints. They cover spaghetti in three colors: white, blue and red.
The wooden handle is finished with brown paints. Children will be able to do this kind of work and will be interested in learning about the symbols of the country.
Every year, on public holidays, exhibitions of children's work are organized, where interesting crafts are exhibited. The number of participants is not limited. The priority is given to the originality of the craft.
Binoculars
You will need: yellow cellophane, 2 sleeves, scissors, tape, black paint, brush, green and black paper, glue, rubber band, wine cork, string or elastic band.
Master Class
- Cut out 2 circles of yellow cellophane and tape them to the circumference of the sleeves as binocular lenses.
- Paint the circumference of the wine cork with black paint and cover it with green paper.
- Cover the bushings with green paper and glue the black stripes as shown in the image.
- Glue the bushings together and secure with a rubber band. After a while, remove the rubber band.
- Glue the taped cork between the bushings.
- Prepare an elastic band or rope of the required length, make a hole in the side of the bushings and secure the elastic band.
The binoculars are ready!
Military truck made of plasticine
As a gift for February 23, you can also make a Katyusha military vehicle. This equipment, which terrified the enemies of the Soviet army, will be a good surprise for collectors of military equipment. Every man will be delighted with such an unusual craft from the war years.
To make a truck you will need brown or dark green plasticine. The model assembly diagram is as follows.
- Roll out a rectangle for the truck bed.
- Attach four large black wheels to the bottom of the car body.
- Construct a cabin from plasticine of the same color. Secure this rectangle to the body.
- Make two additional wheels. Install them on the cabin.
- Make two small sausages from plasticine. These will be protective aprons over the wheels of military equipment.
- You need to attach a piece of plasticine in the shape of rockets to the body.
- Headlights and taillights need to be glued to the front and back of the model.
Note!
- DIY crafts for March 8 step by step - a review of the most beautiful crafts for International Women's Day (120 photo ideas)
Diaper cake for a girl - 180 photos of ideas for original diaper cakes + DIY instructions with examples of finished products
Craft letter: TOP-140 photos and simple diagrams for creating crafts with your own hands. Options for unusual letter ideas + step-by-step master class
Plasticine airplane
Military winged equipment can also be made from plasticine. To do this you will need a set of molding material and a little imagination.
- You need to form a ball from a piece of plasticine. Next you need to stretch it into a sausage. This will be the body of the future aircraft.
- From a material of the same color (preferably gray or dark green), you need to mold two wings in the form of a rectangle. It is also possible to depict the wing as a triangular figure.
- Install the pre-formed triangle into the tail of the aircraft. Sculpt windows and airplane doors on the body. You can also decorate the wings and tail of military equipment with a red star.