When setting a festive table, decorating with napkins is not the last place. Ordinary paper ones, bought in a store and placed next to each plate, look boring and uninteresting. Products made from fabrics are elegant and noble, but they get dirty easily and require thorough washing.
A beautiful flower made from the most ordinary napkins will help you decorate the most ordinary meal.
Manufacturing will not be difficult and will not take much time.
“Kill two birds with one stone”: you can decorate the table, giving it an original look, and without spending a lot of money and effort, you can make a charming napkin holder in the shape of a lotus with your own hands.
The availability of the material and its low price are also a nice touch.
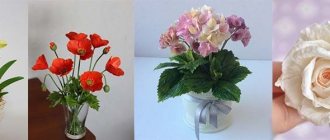
Flowers made from napkins in interior decor
How to make a flower from a napkin to create floral arrangements, and use them to decorate a space for individual holidays, as well as knowledge of basic flower making techniques will help you quickly and cheaply decorate your interior.
You can decorate the entire room with flowers from napkins or make individual accents.
In most banquet halls, this element is often used to create a festive atmosphere. Volumetric bright flowers made from napkins decorate the entrance to the hall, the place for the “heroes of the occasion” and the arches.
Tables and chairs are decorated with flowers made from napkins in the form of roses or daisies instead of fresh flowers. Such flowers are used for hanging on the ceiling, because they weigh very little.
You can use flowers from napkins to decorate photo zones. Durable designs retain their shape perfectly, do not fade and add additional detail to the picture. So, flowers from napkins are attached to curtains, imitating a flower wall, and also scattered on the floor.
Paper flowers are used to make bouquets that decorate the space. Volumetric bouquets are indistinguishable from bouquets of fresh flowers. You can use flowers from napkins as decoration for large interior items. They can be used to lay out floor vases, a fireplace, a coffee table or shelves.
From a napkin you can make any flower, as well as a stem and leaves for it.
The most natural way to make this pliable material is to produce fluffy and multi-layered flowers. Thanks to thin layers, it is napkins that allow you to achieve the airy effect of structures.
The process of making flowers from napkins takes little time. It is not complicated, so children can also participate in it. And the resulting ready-made flowers can easily be used not only for table setting, but also for decorating any room.
Origami lotus
The following manufacturing example can help you not only get a beautiful flower, but also use it for table setting. Many people are afraid to deal with the origami technique, but we will convince you that making such a lotus is very simple. If in doubt, familiarize yourself with the origami technique before starting work.
It will consist of modules, and for them we will need four light green napkins and forty pink ones. Your lotus can be made from other shades. Let's add a small piece of soft wire to the list. Get ready to make a lotus flower from napkins:
- Let's start with pink. Place the napkin with the corner up. Bend it in half to form a triangle. Iron the fold.
We unfold the part with the even side facing us. Place the sides towards the center. - Turn the figure over with its back side facing you. Bend the protruding corners. Turn the workpiece over again. The first part is ready. We repeat the work with the remaining petals. The total number of parts should be forty pieces.
- Let's move on to the light green napkin. We unfold it so that we get a rectangle. Fold it in half and iron the paper.
- Unfold, a fold line should form in the center. We bend triangles along it on each side from above and below, forming corners. After this, we bend the straight sides to the center line. Fold in half. We repeat the work with the remaining paper.
- We collect the light green parts into a stack and bend them in half. We determine the center and bandage this place with soft wire. Place the workpiece with the bent ends down. We straighten the tops to form pockets.
- Take one piece of pink color. Fold it in half and straighten the pocket located at the top. We insert the fingers into two compartments inside the part and place them in the light green blanks and the space between them. We arrange the parts in a circle. After this, we place the remaining parts in the pink elements. The flower will begin to shrink towards the top.
Ready. You were able to see that even a lotus is not difficult to make. It will definitely become the highlight of your holiday table.
Materials and tools that will be useful in making flowers from napkins
Making flowers from napkins does not require complex and expensive materials. All of them can be found at home or in an office supply store at an affordable price. The set of necessary tools and materials are always different, because a lot depends on the type of flower, composition and decorative elements.
Napkins can be of different shapes, single-layer or multi-layer.
The chosen color is of great importance. You can combine several flowers in one flower or make buds of different colors and combine them into a bouquet. The correct size of the napkin determines the dimensions of the flower itself.
For voluminous compositions, you need to choose the largest napkins.
In your work, you can combine paper of different sizes to create three-dimensional structures. When finished, this gives additional airiness to the flower.
In addition to the basic material, you will need:
- cardboard or newspaper sheets for preparing templates;
- glue for paper (PVA glue, office glue or glue stick are suitable);
- green colored tape (trap tape);
- thin wire (preferably green or brown);
- stapler with staples (it is better to take a full-fledged large stapler that can easily penetrate a stack of napkins);
- scissors (sharp and thin for small parts);
- toothpicks;
- small narrow-nose pliers or tongs;
- simple soft pencil;
- compass.
Dandelion
Step-by-step master class on decorating a dandelion from cellulose material:
- Prepare a three-layer yellow table napkin. Separate each layer.
- Take 2 thin pieces and fold them 4 times, then bend the parts the same number of times.
- Place all tiers on top of each other and fasten them in the center with a stapler. For strength, fix them again by placing the staples crosswise.
- Cut a circle from the yellow stapled stack.
- On the edges of the created round figure, make cuts 10 mm long at the same distance from each other.
- Lift the top layer up and squeeze it with your fingers in the center.
- The same manipulations must be done with the next tiers. You can lift multiple layers at the same time.
- A tube rolled up from a thin strip of paper is suitable as a stem.
- Leaves can be cut from a 4x12 sheet of paper. It needs to be bent in half and cut diagonally with cloves. Glue them to the bottom of the stem.
Types of napkins
Wipes are a piece of cloth, paper or other material that is designed to clean or protect various surfaces.
They vary depending on the type of material on:
- abrasive;
- microfiber;
- artificial material;
- paper
Only the latest napkins are suitable for making bright floral crafts.
How to make a flower from a napkin beautiful and natural is to choose the right type of paper napkin. They vary in size and can be small, medium or large.
Small napkins are most often used to make flowers, because the petals themselves rarely exceed 10 cm in length. To make large flowers for interior decoration, it is better to use large napkins.
Napkins differ depending on the number of layers of paper, which can be up to 4. Napkins with 1-2 layers are dense, hold their shape well, so they are used for appliqués and origami. If there are more than 3 layers in a napkin, then each of them will be thin and pliable.
They are chosen for making delicate and lush flowers. At the end of the work, the layers are separated, which gives the desired volume.
Some napkins have a design on the outer layer that is printed on thicker paper. These are the best for decorating surfaces using the decoupage technique.
- To make flowers, it is better to choose plain , with small or small embossing on the surface. The choice of color depends on the desired result. So, to obtain more natural flowers, it is recommended to choose napkins in delicate natural shades or white.
- To create bright, contrasting interior compositions, rich shades , including acid colors, are suitable. For petals in one bouquet or flower, you can choose 2-3 shades of the same color or several colors, which will also look appropriate.
- Napkins also differ depending on the type of edge . They can have an even cut or lace perforation along the edge of the napkin. The former are more often used for making petals and leaves, while the latter are used for decoration.
Rules and tips for creativity
The handcraft and choice of materials can be chosen and executed according to your taste and preference. But it is necessary to follow some rules so that the finished product definitely pleases the master:
- It is preferable to use single-layer napkins for light, airy flowers, since they will not withstand difficult and heavy crafts.
- The napkins used must be used in a single color palette, and the inner and outer parts must match in shade to ensure that the product is as neat as possible.
- When creating flowers, it is not advisable to use scented materials, however, after finishing the work, you can achieve the desired effect using essential oils or perfumes with a floral aroma.
How to fold a peony from a napkin onto a table with your own hands?
Step-by-step instructions Peonies are beautiful not only “live”, but also “napkin”. They can be used to decorate not only a holiday table, but also to “fit” into any composition of paper flowers.
Even a novice craftsman can create a paper peony, but first, you need to stock up on materials for the creative process:
- Paper napkins (choose your own color)
- Green A4 paper
- Glue
- Stapler
- Scissors
- Toothpicks
Instructions
- Fold the paper napkin in half twice, the result should be a square
- The figure is converted into a triangle by folding diagonally
- Next, one corner of the triangle is bent to the largest side of the figure.
- The resulting angle is cut in a semicircle
- Repeat the same manipulations with 3 more napkins.
- Cut petals are placed on top of each other
- Afterwards, collect each leaf one by one towards the center of the flower, slightly squashing them for plausibility.
- When all the petals are folded, fasten them with a stapler, for reliability
- Put the peony aside and take an A4 sheet of paper and cut it in half. Fold the remaining half in half and cut along the fold line. You will get a square
- Now fold this square like an accordion diagonally
- Cut the resulting accordion in half and glue the wide part
- Glue the finished leaf together with the bottom of the flower. Peony is ready.
Carnation
Let's start with one of the simplest flowers - the carnation. The finished product looks like a real flower. And by making several of these carnations you can get a beautiful bouquet. For manufacturing you will need the following materials:
- green crumpled paper;
- a strip of double-sided light green paper;
- threads;
- glue stick;
- pen rod;
- stapler;
- scissors;
- ruler.
Let's move on to step-by-step production:
- Let's start working with a napkin. Ours is pink, you can replace it with red or white. We unfold the material and place the lower part slightly above the center line. Cover with the top layer.
- Turn the napkin over with the narrow side facing you. We cut the sides along the fold lines. We measure ten centimeters in width for each side obtained. We measure thirty centimeters in length. We cut off the excess.
- Fold them in half and cut along the fold line. We put the parts one on top of the other and make an accordion. We bend the resulting workpiece in half, mark the center and secure the paper in this place with a stapler. You need to make three such products. We tie them together with a thread in the middle.
- Making a stem. We take double-sided light green paper with dimensions of 4 by 29 centimeters. We treat the tip of the paper with glue and screw it onto the rod from the pen. Towards the end of the paper, once again grease everything with glue.
- We wrap the workpiece from a napkin. We glue it with glue and fix it with a stapler for reliability. The edges of the napkin need to be fluffed with scissors. After this, we begin to separate the layers by lifting them up. We omit the last layer.
- From corrugated paper we cut out leaves and a piece that looks like grass.
We attach it under the flower, hiding the lower petal. We attach the leaves and wrap the stem with a thin strip of paper.
The instructions on how to make such flowers from napkins with your own hands for beginners can be considered complete. But if you want to add a natural touch to the carnation, you can add a little white paint on top.
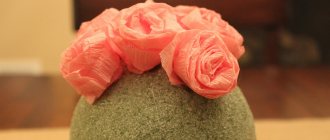
Red blossoming rose
To make a beautiful scarlet rose with a blossoming bud, you will need two large napkins (about 20x20 cm). Cut each of them into four parts and put them together. Secure the middle with a stapler or thread.
From the resulting square of napkins you need to form a circle, cutting off the edges with scissors. Now, one by one, each layer needs to be lifted and formed into a petal, giving it a wave-like shape.
To make the rose even more magnificent, take more napkins for work. You can decorate your interior with beautiful buds or make a decoration for your outfit.
Poinsettia flower
A master class on making poinsettias will show you how to make flowers from napkins for the Christmas holidays:
- Select a cellulose material that is bright red in color and leave it folded. Then you need to bend the material diagonally.
- After this, fold the original fabric again to form a smaller triangle configuration.
- Finally, fold the piece in half again.
- On the resulting figure, outline the outlines of future petals and cut out the folded product along the contours.
How to make flowers from napkins: poinsettia
- Carefully straighten all tiers of the craft. The result is 4 parts, each of them has 4 petals.
- Place the resulting blanks one on top of the other, moving them slightly relative to each other.
- The core of the poinsettia should be made from a yellow napkin. To do this, you need to cut out a small square with scissors. Place a small pellet formed from the same starting material in its central part.
- Roll up the pieces to create a stamen. Make 5 such cores.
- In the middle of the red inflorescence, using scissors, cut a small hole into which you need to insert the stamens.
- On the reverse side, tie the poinsettia with a thick thread and cut off the excess.
Roses can be made from colored paper towels.
Step-by-step master class on making inflorescences:
- Unfold the square-shaped multi-layer napkin entirely and cut off 4-5 cm on one side to form a rectangular shape.
- The resulting workpiece should be folded lengthwise so that one half does not completely cover the other part.
How to make a rose from a paper towel: step by step
- Then you need to wrap your finger with the source material to form a rosebud.
- The main task is to twist the flower so that a narrowed, dense edge remains, because subsequently you need to attach the inflorescence to the stem, also made of napkins.
- Spread the finished bud and leaves.
To decorate a rose from commercially available lace round blanks, follow these steps:
- Make a small cut on each circle and form an aesthetically beautiful bud.
- The lower segment must be thoroughly twisted in order to continue making a stem from another paper piece.
Mimosa sprig
Mimosa is a beautiful delicate flower that decorates bouquets for the spring holidays. However, you can prolong the contemplation of this beauty by making a sprig of mimosa from napkins with your own hands.
This could be a wall panel or a voluminous plant that you put in a vase in your living room.
First you will have to work hard to form many flowers, each of which is made from a narrow strip of napkin cut into “grass”. Next, you need to cut the green napkin into leaves with fluffy edges.
You don't need a stem for the applique, but to make a bouquet you will need wire - wrap it with a green napkin, attach leaves, and cover it with many flowers.
Chrysanthemums
To decorate the chrysanthemum you will need multi-colored napkins:
| Raw material color | Quantity, pcs. |
| Green | 4 |
| Pink | 30 |
Beautiful chrysanthemums are obtained not only from paper, but also from viscose napkins.
Step-by-step master class on making a flower from cellulose:
- Fold a regular green napkin in half.
- Bend the edges of the workpiece into small triangles towards the center.
- Fold the piece toward the center along the long line, then fold it in half again.
- Repeat similar steps with the remaining paper towels.
- Fold the pink napkin in the middle to form a triangle.
- Once again bend the craft into a smaller triangular shape.
- Fold the edges towards the center.
- Turn the product over to the reverse side and bend the corners.
- Fold the piece in half. Apply the rest of the cellulose material in a similar way.
- Place the finished green blanks one on top of the other and tie them in the middle with wire.
- Distribute the pulled napkins in a circle.
- String the pink parts row by row onto the green ones, while grabbing the adjacent petals.
DIY flowers from napkins – photo
You can get even more ideas in our photo gallery. Here we tried to collect a lot of finished works that will demonstrate examples of making flowers from napkins with your own hands.
Decorate the interior, holiday table or gift wrapping - the process will definitely bring a lot of fun!
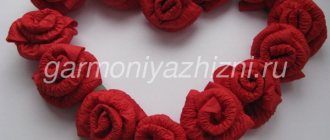
heart
A very interesting idea to make a three-dimensional heart from napkins. This type of decor would look great at a children’s party, against the backdrop of a cake or other goodies.
When making such an original heart, it is important to adhere to the following points:
- A heart-shaped design is pre-prepared on cardboard and cut out with scissors.
- Parents, if desired, can trace the child’s hand on paper and cut out the sketch.
- Then the sketch is glued to a cardboard base.
- Balls are rolled alternately from red and white napkins. The strips are pre-cut, which are then carefully rolled into balls. The base is filled with red, and the handle in the center with white.
- The balls are glued with glue, starting from the outline of the hand, then the center is glued, and then the exposure along the edges.
- If desired, you can glue a ribbon to the heart.
You can write wishes on the back of the heart and give it to the hero of the occasion, or use the craft as a decoration for the main table setting.
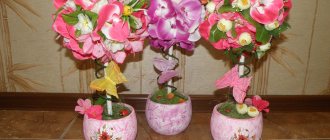
Magic topiary for Decorative
In the interior, a tree or topiary created with one’s own hands is considered a symbol of happiness and prosperity, which is why it is so often given as a gift for birthdays and holidays. Its crown is made from various materials, including paper napkins. miniature The versatility of the plant lies in its symbolism and practicality. Anyone will be happy to have a representative of such flora, and the interior of a room in the house will be transformed if a paper miracle appears on it, similar to a bouquet of inflorescences. Decorative and color elements depend on who you plan to give the topiary as a gift to. If this is a gift, made with your own hands, intended for the whole New Year, for a family or an anniversary, then it is better to choose neutral colors or make the tree multi-colored. Let it lift the spirits not only of children, but also of adults.
manufacturing For the original decorative element you will need: • the desired color of napkins. By the way, if necessary, the tree crown can be painted. Plastic ball base for. If there is no ball, use a round piece of foam or make one from papier. Masha, one method is shown in the photo - we cut out 3 hearts from the box, glue them together and get a ready-made base for topiary in the shape of a Stick! • hearts, acting as a miracle trunk. It could be the tree branch itself. so that, the main thing is that it is without knots.
• corrugated paper, in which I often pack bouquets, burlap or. • Plaster, glue, scissors, stapler. • decor Elements - all kinds of beads, coffee beans, ribbon, braid, rope - depending on your idea.
2. You need to make enough miniature bouquets of napkins to fill the entire spherical crown. Napkins of different shades in the same color scheme look beautiful. Our topiary successfully combines white and pink Flowers. napkins resemble the shape of a clove or For. 3. To plant a dandelion tree, take a pot and pour it into a plaster solution, diluted to the consistency of thick sour cream. We leave the planted tree for a day until the plaster hardens.
4. Decor. We wrap the pot in corrugated paper for decorating bouquets or paint it with acrylic paint and tie it with ribbon or a crown. We decorate the decorative item with lace, ribbons, chains, and beads. The main thing is not to overdo it so that the craft does not look tasteless. Three to five elements are enough. Using the same principle, you can plant a flower napkin from a bouquet in a pot.
Learning to make your first flowers
How to make flowers from napkins? I will explain step by step for each type of inflorescence below. If you want to make a bouquet of identical flowers of different shades, then it is best to do them in one go - this way you can make the flowers more or less similar, in the same style.
Or a slightly different option, first cut out the folded curves with scissors, then straighten the napkin and fold it like an accordion (the more frequent the accordion step, the more voluminous the result will be). We tie it with thread and straighten the petals:
These pompoms can be used to decorate gift boxes in an original way; it looks very aesthetically pleasing and festive!
Flowers can be flat - for example, lotuses, and voluminous - for example, roses.
Pineapple on a plastic plate
To decorate the holiday table, you can also make a pineapple out of paper. In the master class for this purpose, modules are formed from 11 green napkins according to the scheme from the description above. They are fastened together in a circle with a stapler or sewn together with thread. In this case, the pockets of the modules are placed towards the center. The resulting base is placed on a plastic plate, with the convex part facing up. The green petals are connected and a yellow row is inserted. Both rows are placed without reaching the core. The next row is filled with orange modules, a little closer to the center. With each row the petals are inserted more tightly. The corners are raised, forming scales and a narrow top. If necessary, the shape can be adjusted by hand. The green napkin is straightened out, and the resulting large square is folded diagonally. In one sharp corner the triangle folds like an accordion, and towards the second there are smooth folds. All three folded leaves are inserted into the hole at the top.