Tips from experienced housewives
If the products have become hard, then it is not necessary to throw them away or leave them on rags, because the problem can be corrected in simple ways. It is also important to find out why this problem arose in order to prevent it in the future. It is also worth getting into the habit of washing such laundry on a delicate cycle and not adding too much powder. There is no need to use emollients during the rinsing phase. Possible causes of rigidity Why such a problem could arise: 1. Incorrect washing mode selected. Because of this, the fibers deteriorate and the product becomes dull.2. Dirty tap water.3. Washing water is too hot.4. Poorly selected powder or gel.5. Drying on a radiator, not naturally.
DIY rugs made from T-shirts: you can start assembling and not finish weaving
From towels
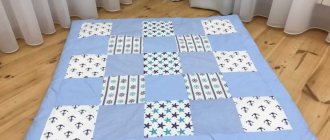
The rug can be plain or multi-colored, depending on the source material
. This rug has a number of advantages. Firstly, you only have to spend about an hour to create it, secondly, if you use old towels, its cost will be close to zero, and thirdly, you can do handicrafts with your children, attracting the younger generation to useful work in the form of a game .
Tools and materials
Everything you need can be easily found in every home:
- Products made from terry fabric. These can be not only towels, but also bathrobes and even socks, if there are enough of them available.
- Scissors.
- A large needle with a wide eye makes it most convenient to assemble a rug. You can use any.
- Sewing pins.
- Strong threads.
- For a rug made of knots, you need to prepare a piece of plastic mesh with small cells. You can purchase it at a hardware or gardening store.
You should pay attention to the fact that terry can be either cotton or mixed with synthetics. The first one instantly absorbs moisture, but it takes longer to dry. The second dries quickly, but is not very hygroscopic. If the bathroom does not have heated floors, a 100% cotton rug will have to be hung on a heated towel rail or radiator after use.
Step-by-step instruction
The sequence of work depends on which manufacturing method is used. However, in all cases, the first step will be to cut the material into strips about 7 cm wide. For option No. 3, it should be adjusted depending on the size of the cells on the selected mesh fabric.
Option number 1 - braids
Since the strips have already been prepared, you can immediately begin assembling:
- Sew three strips together, positioning them so that two of them are next to each other, close to each other, and the third lies on top, half covering each of the first two. This option will make the beginning of the braid neat. You can also fasten them by folding them in a stack.
- Now you need to braid the braid. It should not be loose or too tight.
- As the braid lengthens, it is rolled into a snail.
- To prevent the structure from falling apart, the braids are secured with sewing pins.
- When one of the terry strips ends, another is attached to it, sewing overlapping. You can stitch end-to-end, but with this method the joints will be very noticeable. It is advisable to take strips of different lengths, then the rug will turn out more neat. You can sew the strips together before starting work even at the stage of cutting towels.
- When the rug reaches the desired size, you need to sew the braids together from the wrong side. How to do this is shown in the figure.
- If you sew the rug from the front side, trying to make the stitches invisible, the finished product can easily be machine washed.
- The end of the braid is secured with a needle and thread in the same way as the beginning, and then sewn to the rug from the inside out, rounding its shape.
- There is another way - to sew a snail from braids onto a backing of the appropriate shape, cut from a towel, making through stitches in the middle of the braids (where the strips intersect and a notch is formed). It is more labor intensive.
Option number 2 - shells
This method allows you to show more imagination and creativity.
This method allows you to make a rug of any shape (fancy, asymmetrical), but it requires more time and perseverance:
- First you need to fold all the strips in half with the right sides facing out and stitch them on a sewing machine or sweep them by hand. The first option is preferable.
- After this, you need to roll each strip into a snail shape and secure it with a sewing pin. If the strips are too short, it is possible to sew several together. It will even make the rug more interesting and give it some charm. You can also make shells of different sizes.
- To prevent the strips from unfolding, the finished round pieces must be stitched through with a so-called gypsy needle. Some needlewomen use a glue gun even at the winding stage, placing droplets of glue at a distance of 5–6 cm from each other. The disadvantage of this connection is that the rug cannot be washed in a machine.
- When all the elements are ready, you need to lay them out so that the canvas of the desired shape is formed.
- The last stage of work is assembly. Shells located nearby should be sewn together, preferably both at the top and bottom.
Option number 3 - nodules
You can make either a plain or multi-colored rug.
This rug is very easy to make, but looks like an expensive factory product. The work will not take much time:
- You need to cut a rectangle, circle or other shape from a plastic mesh. This will be the base for the rug.
- Cut the prepared terry cloth strips into pieces about 12 cm long.
- Thread each into the cells and tie with a double knot. You should try to keep the nodules as close to each other as possible.
- If the mesh slides along the bathroom floor, you can sew pieces of terry cloth to it in several places or randomly smear it with glue from a gun, which, when hardened, becomes like rubber and gives an anti-slip effect.
Bath slippers
Old towels can be used to create soft house slippers. In addition to terry material, you will need:
- flip-flops (worn out);
- soft filler (batting, thin foam rubber, etc.);
- paper for pattern:
- sewing supplies (needles, threads, scissors).
No special seamstress skills are required. Any flip flops should be washed and dried. Display each part of the shoe (sole and upper part) on paper, and then cut a towel using the paper pattern.
All that remains is to cover the flip-flops with terry cloth, placing batting or foam rubber between the layers for softness. When the fabric wears out, you can simply rip out the seams and replace the top material with new material.
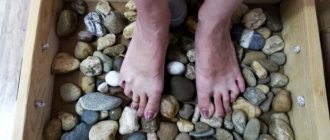
Suberic
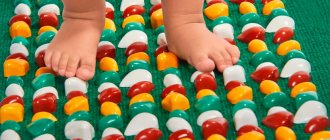
Walking on a cork rug is not only very pleasant, but also useful.
Cork is an ideal material for a bathroom rug. It does not absorb moisture, bacteria and mold fungi do not multiply in it. And it is also very pleasant to the touch.
Tools and materials
To make such a rug you will need:
- Wine bottle corks, about 150 pcs. They can either be collected by drinking an intoxicating drink, or purchased at a wine shop.
- A sharp knife and board for cutting corks.
- Quick-setting adhesive for wood and rubber (“Moment” or any other).
- A thin rubber mat of the desired size that will serve as a backing.
DIY making
The process is extremely simple and does not require any special skills:
- First you need to cut the corks lengthwise into two parts.
- When everything is ready, start assembling. To do this, stick halves of corks onto a rubber mat; they can be arranged in different ways (for example, alternating rows laid lengthwise and crosswise). Using your imagination, you can lay out patterns from colored corks.
To make the mat durable, you should follow the instructions on the glue package.
Pillow
The towel can serve as a filler for a new pillow. If the material looks more or less decorative, use it as a top layer. Pillows can be very different: square and round, large and miniature, in the form of a cushion or a crescent for relaxing on the road.
If the towels are frayed in places, cut up the best parts and sew a patchwork pillow. And if a lot of rags have accumulated, you will get a blanket.
Tip: Pets love to rest on terry pillows. Make a personal bed for your cat or dog - they will appreciate it. You can also sew toys for your pet: pigtails, balls, teasers.
Items made with your own hands are valued higher and bring joy every day. Especially if they used materials that almost went into the trash. Every towel can have a second life, you just need to use your imagination.
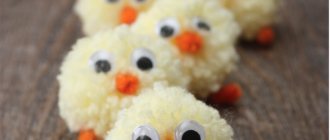
From pompoms
It is not necessary to buy new skeins of thread, you can take the remains of different ones.
A bath mat made from pompoms turns out so beautiful that you can make it not only for yourself, but also as a gift.
Tools and materials
For production you will need:
- Threads. It is advisable to use thick yarn that does not contain wool.
- Scissors.
- Plastic mesh with small cells (canvas).
Creation at home
Making a rug begins with winding pompoms. Their size may vary depending on the preferences of a particular person. You should not make very small pom-poms - they will quickly become flat, as a result of which the product will take on an unpresentable appearance.
The process of winding pompoms can be done in two ways.
Winding pompoms - a quick way
This option should be used when pompoms are made from a large and solid skein of thread. To secure the yarn, you will need a table with a sufficiently large distance between the legs. You can also use a chair, but then the number of pompoms produced at a time will be much less. Some needlewomen make a special machine, driving two large nails into the board at a distance from each other.
The work consists of the following stages:
- Yarn is wound between two supports. The number of turns should be sufficient to obtain a dense and elastic pompom.
- The wound “sausage” is tightly tied with thread at regular intervals. Their ends should be long, since when assembling the rug, it is through them that the pompoms will be attached to the mesh.
- After this, you can cut the threads that are held by the table legs or nails and remove the workpiece.
- Now you need to divide the “sausage” into individual pompoms, cutting the segments in half between the transverse constrictions. You should make sure that the cut is exactly in the center, otherwise the pompoms will turn out uneven.
- All that remains is to fluff the pompoms so that they become perfectly round and no constrictions are visible.
Winding pompoms one at a time
This method is used when they are made from leftover threads:
- The threads are wound around several fingers folded together (the more fingers, the larger the pompom you get). You need to make at least 50 turns.
- A long piece of thread is cut off, and the resulting workpiece is tied with it in the middle.
- The resulting loops on the sides need to be cut with scissors.
- After fluffing the pompom will take a round shape.
Assembly
When a sufficient number of pompoms have been prepared, begin assembling the rug:
- Cut out the plastic mesh according to the shape of the future rug. It can be made in the shape of a heart, a flower, a circle, or simply rectangular.
- Using tails from constriction threads, tie the pompoms to the mesh until the entire canvas is filled.
- The rug is ready.
Mop cover
Many people have long had a new type of mop in their home with modern soft attachments. Such attachments have to be changed periodically, and they are not cheap.
Recent Entries
Patchwork with knitting needles: instructions for using the technique for beginners and amateurs How and with what to paint laminate flooring and is it possible to do it at all: we talk about the intricacies of the process Wedding invitations: a review of the best ideas with a detailed description of the manufacturing process
You can save money if you make them yourself, especially since terry towels are great for washing any floor covering.
The lower part of the mop is measured. Suitable pieces of material are cut according to the measurements taken. The edges are carefully trimmed so that terry threads do not remain on the floor during cleaning.
If the mop folds, you can make special fastening pockets on the sides of the mop. If the base is fixed, then a couple of large buttons are sewn onto the nozzle so that it does not slip off during cleaning.
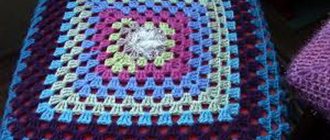
Crochet
Crocheting is not that difficult to learn.
To make such a rug, you need to have at least minimal crocheting skills.
Tools and materials
List of what you need to prepare for work:
- Big hook. Its number must correspond to the size of the yarn or strips of fabric that replace it.
- Thick threads. Woolen ones should be avoided; The best choice would be yarn that contains cotton and acrylic. If they are made of pure synthetics, you need to check them for hygroscopicity (make sure they absorb water quickly enough).
- Scissors.
- Lots of old T-shirts and pajamas if rag strips are used instead of thread.
- Thread and needle.
- Sewing pins.
Manufacturing instructions
The procedure depends on the chosen knitting method.
From old T-shirts
All you need to make is time and a little inspiration.
This rug doesn't cost a penny. Moreover, it will help to reuse things that would have been thrown away, which will be, albeit small, but a contribution to preserving the environment on the planet.
Step-by-step manufacturing instructions:
- Cut the T-shirts into strips 2–3 cm wide and sew the ends together to create a long, continuous strip. Wrap it in two balls. To save time, you can cut things into spirals starting from the bottom. The sleeves need to be torn off, and the part where the neckline begins is cut off.
- Wrap a few turns of the strip around your finger and loosely tie the resulting ring with single crochets.
- Take the second ball and lay a strip over the knitted row; so that during further knitting the loops wrap around it and it remains inside the fabric.
- Continue knitting in the round with single crochets until the rug reaches the desired diameter. To prevent the edges of the circle from turning inward, you need to expand the fabric, periodically knitting two loops from one.
In a similar way, you can knit a rug from threads, using a fabric strip only as an internal filler.
Floor cleaning cloth
Who said you can't clean the floor with old towels? It is possible if they are not fleecy, but dense. There is a bad omen that washing the floor with towels means loss of well-being and loneliness. If you don't believe in old wives' tales, you can save on buying cleaning rags.
We will sew a special rag attachment for a mop:
- Place the mop on the towel and measure the width of the product.
- Draw the letter “H”, the width will be the jumper in the letter. You need two such parts.
- Sew them from the wrong side and turn them inside out.
- You will need special Velcro for fabrics. Sew it to the edges of the horizontal stripes. This way the rag will stay on the mop and you won’t have to constantly adjust it. Velcro can be replaced with buttons.
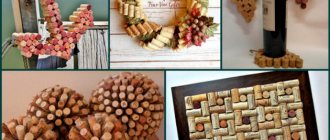
Design ideas
The traditional shape of a kitchen towel is a rectangle. But add just a little imagination and you’ll get other interesting variations:
- Kitchen hand towels with holders - they can be hung on the handle of a cabinet or oven as in the photo below (scroll);
- Small towels rolled into a roll. They are fixed together with buttons. The buttons must certainly be plastic, because kitchen towels are often washed. This roll is designed for a special napkin holder (vertical or horizontal);
- Products with children's appliqués, embroideries, prints - especially for children to instill cleanliness and neatness.
Decorating an ordinary towel
So, we have threads, a hook and ready-made colored fabric inserts. With just this set you can give ready-made towels clear and bright outlines and unique originality.
Everything is quite simple here:
- Decorate with appliqués;
- And we crochet it around the perimeter.
Advice! In order for the knitted edging to remain juicy and colorful for a long time, it is necessary to check whether the threads will fade when washed in hot water.
However, you should not focus only on the usual rectangular shape. Add a little imagination, just a little skill, and you will no longer be tormented by the question of how to sew a kitchen towel yourself.
LiveInternetLiveInternet
—Search by diary
—Subscription by e-mail
- My works and photographs (67)
- HOME AND FAMILY (1016)
- Children are our happiness (120)
- Useful tips (46)
- Family relationships (37)
- For children, crafts with children (184)
- home economics (331)
- travel (183)
- feng shui, psychology, esoterics (115)
- All about beauty and health (893)
- for weight loss, diet (89)
- Perfumes, aromas (16)
- health, traditional medicine (370)
- beauty recipes for the face (199)
- hair care (85)
- hand and foot care (96)
- FOR THE HOME – handmade (2543)
- lampshades, night lights, lamps (126)
- Vases, flowerpots, baskets (240)
- wreaths (182)
- interior design (325)
- cardboard furniture (30)
- DIY furniture (152)
- Miniatures (20)
- mosaic (65)
- panels, frames, mirrors (252)
- crafts, interior decoration (556)
- bedspreads, curtains, rugs (378)
- repairs, interior decoration (57)
- DIY CANDLES. Decor (56)
- DIY topiary (132)
- Floristry (105)
- Fashion and style (366)
- FOR THE COTTAGE AND GARDEN handmade (381)
- Wooden furniture and buildings (79)
- indoor, garden plants (95)
- Garden figurines and sculptures (64)
- construction at the dacha (53)
- handmade for Garden and Cottage (97)
- HANDMADE from simple materials (1169)
- HANDMADE FROM CARDBOARD (227)
- from waste material (260)
- from branches, snags, birch bark (90)
- from wine corks (17)
- made of pebbles and stones (28)
- from coffee beans (75)
- from corn leaves, talasha (10)
- from light bulbs (17)
- made of lightning (27)
- from sticks, honey spatulas (42)
- from food products (56)
- from plastic bottles (110)
- from natural materials (102)
- button (28)
- from shells and corals (21)
- from pumpkin and seeds (17)
- from cones and acorns (44)
- from egg trays (32)
- nuts, seeds and pistachios (18)
- PAPER HANDMADE (1026)
- corrugated paper, napkins (85)
- boxes, baskets, panels (219)
- coffee filters (17)
- sheet music, book pages (112)
- origami, kusudama, quilling (177)
- papier mache (108)
- Paper Art (8)
- scrapbooking, pergamono (110)
- Paper FLOWERS (287)
- Flowers made of corrugated and crepe paper (120)
- VINTAGE (611)
- vintage pictures, prints (54)
- Vintage hand-made (318)
- burlap, jute, twine (261)
- prints on furniture, pillows (58)
- shabby chic / Shabby chic (49)
- EMBROIDERY (702)
- embroidery with beads, sequins (11)
- satin stitch embroidery, cutwork (65)
- children's embroidery (65)
- carpet embroidery (50)
- cross stitch, patterns (407)
- ribbon embroidery (75)
- 3D embroidery (22)
- plastic canvas (20)
- Useful tools for embroidery (42)
- KNITTING (2828)
- vases, baskets, sachets (77)
- knitting for children (221)
- knitting for men (46)
- knitting from bags (21)
- knitting. toys (246)
- knitted items, crafts (214)
- knitted jewelry, accessories (125)
- jackets, cardigans, vests (261)
- magazines, books on knitting (46)
- crochet rugs, ottomans (138)
- blouses, pullovers, jumpers (232)
- socks, slippers, knitted shoes (77)
- dresses, tunics, coats (139)
- Blankets, pillows, bedspreads (193)
- napkins, cup holders (153)
- Crochet tablecloths, curtains (46)
- bags, wallets, cosmetic bags (187)
- tops, sundresses, swimsuits (119)
- patterns, equipment, usefulness (177)
- sirloin, combined (45)
- crocheted and knitted flowers (150)
- Hats, shawls, scarves, snoods (208)
- skirts, shorts, trousers (48)
- DECOUPAGE (514)
- decoration (323)
- decoupage on fabric (34)
- volumetric decoupage (39)
- spot painting (12)
- stencils, templates, pictures (151)
- egg crackle (27)
- TOYS, DOLLS handmade (1028)
- Toys using the felting technique (38)
- toys, felt crafts (159)
- coffee toys, crafts (71)
- dolls made of nylon, from socks (107)
- textile dolls, Tilda (183)
- soft, textile toys (284)
- Christmas toys (36)
- Crafts, toys for children (207)
- COOKING recipes (1545)
- chicken dishes (49)
- fish dishes (45)
- in a slow cooker and microwave (29)
- preserves, jams (37)
- sweet pastries (187)
- Georgian, Caucasian cuisine (124)
- roast (42)
- appetizer, main courses (120)
- from zucchini, eggplant (64)
- carving (31)
- candies, cookies, desserts (97)
- culinary benefits (156)
- meat dishes (37)
- drinks (55)
- pies, pasties, pancakes (54)
- pizza, pies, khachapuri (140)
- salad recipes with photos (148)
- pickles, preparations for the winter (105)
- soups, liquid dishes (41)
- cakes (107)
- fruit cakes (51)
- decoration of cakes, salads (81)
- MOLDING (710)
- gypsum, clay (58)
- marzipan, mastic (145)
- plastic, polymer clay (299)
- salt dough (189)
- cold porcelain (209)
- MASTER CLASS / Tutorial (5216)
- NEWSPAPER WEAVING (720)
- Weaving from newspapers. MK (651)
- newspaper weaving ideas (72)
- HOLIDAYS, crafts and gifts (1967)
- Bouquets and gifts made of sweets (70)
- paper in gift decoration (90)
- unusual gifts (74)
- New Year, Christmas (862)
- Handmade cards (37)
- Easter (411)
- Gifts for lovers (167)
- Gifts for women (100)
- Gifts for men (24)
- wedding (151)
- Halloween - Halloween (92)
- NEEDLEWORK. TECHNIQUES (1662)
- Accessories, handmade jewelry (474)
- various techniques (15)
- felting (28)
- decor items (383)
- decor, shoe decoration (19)
- decorative bottles (84)
- leather (60)
- kinusaiga, patchwork without needle (33)
- books, magazines on needlework (82)
- DIY SOAP. Decor (22)
- drawing (31)
- fabric painting (29)
- painting objects (119)
- nylon flowers (22)
- flowers made of ribbons, flowers made of fabric (481)
- Techniques: WEAVING (288)
- beading. decorations (94)
- Tapestry, Isothread, Tenerife (26)
- macrame, tatting (73)
- beaded flowers and trees (84)
- UTILITIES (223)
- make money on the Internet (53)
- diary pictures (24)
- Liru (80)
- useful programs, links (94)
- WordPress site (3)
- SEWING (1647)
- Denim ideas (111)
- Pincushions (76)
- From T-shirts (55)
- baskets, plates, vases (98)
- shoes, slippers (79)
- clothing alterations (187)
- pillows, pillowcases, ottomans (173)
- sewing utilities (79)
- patchwork, patchwork (331)
- bags, wallets, cosmetic bags (304)
- sewing for children (188)
- sewing for animals (24)
- sewing. skirts (22)
- we sew ourselves (502)
- This is interesting (1026)
- cars (25)
- for the soul, prayers (7)
- online stores (290)
- beautiful photographs, pictures, paintings (56)
- incredible but true (10)
- useful services, websites (493)
- jokes (68)
- I. Miscellaneous (93)
- videos, clips, music, films (79)
- Songs for the soul (30)
- Wants and wishes (7)
— Regular readers
-Statistics
Fabric holder
You can restore order in the bathroom, and also free the shelves from the accumulation of various bottles and tubes by hanging a fabric holder. A place on the wall or door is suitable for it, and you can sew such an organizer from an old towel.
You only need to fold the material a few times, to which you need to attach small pockets for various small items. To attach the organizer to the wall, wrap the top of the towel around any strong stick, sew the fabric together and hang the holder on a hook or regular nail.