In the autumn and summer, you can make a variety of crafts from maple leaves, which are not only suitable as children’s work for school or kindergarten, but will also become a worthy decoration for your home.
The most common interior item of this type is roses made from collected leaves. Their creation does not require special skills and takes only a few minutes of continuous painstaking work. Understanding the technique of forming such flowers will facilitate the process itself and bring extremely positive emotions to its creator.
How to make a rose from maple leaves with your own hands step by step: master class
For those who love roses and crafts made from natural materials, tips on creating artificial bouquets from maple leaves . Their shape and structure lends itself perfectly to work. In addition, you can collect leaves completely free of charge in the park with your children - this is interesting and useful for spending time together.
For work, both fallen yellowed and still green leaves will be useful. You can twist them into such a beautiful bouquet that its beauty can outshine even real roses. In addition, a bouquet of leaves is durable . We can safely say that such a craft breathes “second life” into dry foliage.
Maple foliage is an ideal material for creating bouquets
Work step by step:
- Take a nice, smooth, clean sheet, place it in front of you and fold it in half. (see photo No. 1)
- Roll half the leaf into a tube. This should not be done too tightly, because the flower needs to be lush and voluminous. (see photo No. 2)
After the core of the flower is ready, you need to start creating petals from other leaves.
Work step by step:
- Take the second maple leaf
- Place the core inside the sheet
- Alternately fold the sharp edges of the leaf so that when folded you get petals (see photo No. 1)
- After you have completely rolled the sheet, you can secure it with thread. (see photo No. 2)
- In order for you to get a voluminous and lush rose, you will need to roll about five or six maple leaves into one flower. (see photo No. 3)
- Secure each new rolled leaf with regular sewing thread, and make several flowers for the bouquet. (see photo No. 4)
Step-by-step rolling of roses from maple leaves
To make a flower wrapper, wrap the bouquet in several maple leaves so that their sharp edges stick out in a circle.
Tube (wrapper) for a bouquet of roses made of maple leaves
Bouquet with three roses from maple leaves
"Edible" vase
Fruit and vegetable compositions are quite massive, so that they last longer and look complete in appearance, you can put them in a homemade vase. Pumpkin or large zucchini will do. You need to choose a beautiful, dense and suitable-sized fruit.
Next we follow the instructions:
- Cut off the top, like on a watermelon.
- We clean the inside of seeds and pulp.
- Remove excess liquid and dry.
- We place a floral sponge inside; you can also use a regular kitchen sponge. Any container suitable in diameter will also work: a glass or tin jar, a glass, the base cut off from a plastic bottle.
- Pour water there and place the composition. We check that the legs reach the water.
The second option without water is suitable for the bouquets described above. In this case, cut off the top of the pumpkin, where the tail is, and turn this place down. Check the stability of the stand and cut until the pumpkin is level. We take skewers with vegetables and fruits and stick them into the peel. The pumpkin pulp is dense, this will help to hold even large specimens. For beauty, the pumpkin can be decorated with ribbons, lace, and foil. From natural remedies: rowan and rosehip berries, acorns, pine cones, straw.
How to make a bouquet of roses from maple leaves with your own hands?
Maple leaves in the autumn season are distinguished by a variety of rich color shades:
- green
- yellow
- orange
- brick
- burgundy
- red
- brown
- brown
The more colorful foliage you use to create a bouquet, the brighter and more beautiful your bouquet will turn out.
You can stick to one shade of foliage to get. For example, only yellow or red roses. But it is much more interesting to work with completely different marbled leaves.
Yellow roses from maple leaves:
- Take a small leaf and fold it in half
- Gently roll the sheet into a tight tube
- Take a large maple leaf and place a curled leaf in its center.
- Turn the big sheet back
- Start rolling the leaf so that voluminous petals grow around the core.
- Secure the product with thread
- Roll a large number of roses into a bouquet
- Wrap the entire bouquet with wedge foliage to make the product more luxurious.
Step 1: Rolling up the center of the bud Step 2: Rolling the leaves around the core Step 3: Rolling up the petals Step 4: Adding volume to the flower
Step 5: Secure the Rose with Thread
Step 6: Creating roses for the bouquet
Step 7: Adding splendor to the bouquet
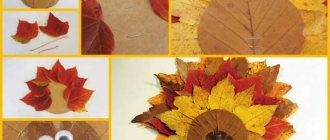
Applications with flowers on the theme of autumn in the middle group
For the older group, you can offer ideas for applications or panels. They are made from leaves, dried flowers, cereals and seeds.
An idea with a vase with twigs inserted into it. Only the side edges and bottom are glued. The top is left free to allow material to be inserted.
Use a box of chocolates as a base and frame for the panel.
Leaves, pine cones and coffee beans create such an autumn bouquet.
Different types of pumpkin seed flowers for applique.
Use pine branches.
All bones, seeds and grains stick well to hot glue.
Leaves and flowers made from paper are no worse than natural materials.
You can also take a regular frame for the base.
You can make simpler applications in the form of bouquets, or you can make them more complex.
How to make flowers from maple leaves with your own hands?
The soft maple leaf lends itself perfectly to rolling. You can use it to make a lush rose or a thin bud.
Ideas for creativity, folding flowers from maple leaves:
Roses from maple leaves, option No. 1 Large round roses from maple leaves, option No. 2
Red roses with a green stem made of maple leaves, option No. 3 Multi-colored roses made of colorful maple leaves
Preliminary processing
The life of a craft made from unprocessed leaves will last about 2-3 weeks, and prepared materials are more durable. Wipe even leaves without holes or dark spots with a slightly damp sponge to remove dust, cobwebs or other small particles. Dissolve 0.6 liters of water and 0.3 liters of glycerin in a bowl. Put the mixture on the fire, bring to a boil, cool to room temperature. Stir thoroughly and pour into a deep plastic container. We immerse the peeled leaves in this solution, stems down, to a level of 7-8 cm, and seal tightly with a lid. Place in a cool, dark place away from sunlight.
For complete processing, it is necessary to keep the material in this solution for 10 to 14 days.
The more “meaty” and denser the leaf, the more time it needs. You can tell that it has been saturated with glycerin by the drops of dew that form on a wide surface. After this procedure, they become flexible, soft, elastic and glossy. This will affect the appearance of the finished flowers and extend the life of the craft by months.
When the natural material is removed from the container with glycerin, it must be dried. To do this, wipe the surface with a soft cloth, leave it to dry in its natural state for a couple of days, or hang it with cuttings on a string using clothespins. You can try ironing it through two layers of thick paper or fabric. But this method is not so good; it is used when the time for preparing natural material is limited. Natural drying will more effectively preserve softness and glossy shine.
When there is little time and there is definitely not enough time to do such a long pre-treatment, the leaves are simply washed and left to dry a little. And the finished product is sprayed with colorless hairspray to fix and add shine. There is a second method: using a soft brush with long bristles, the finished product is coated with a layer of sunflower oil. In a day or two it will be absorbed into the structure. The product will not be greasy, but will remain shiny for a long time.
How to make a bouquet of flowers from maple leaves with your own hands?
The secret of an elastic flower from maple foliage is soft leaves that have not yet dried out so much that they break and burst. Fresh green leaves also roll very well.
Maple leaves that are harvested in November are good for crafts - high air humidity and frequent precipitation do not allow the leaves to dry out.
Each leaf that you roll to make rose petals should be secured . This is done with ordinary thin sewing thread or tape . Just pull it tight without tying it in a knot.
Bouquets of maple leaves:
Colorful bouquet of maple leaves and barberry
Bouquet with lush roses from maple leaves
A bouquet of a large number of roses made from maple leaves. A bouquet of dry maple leaves.
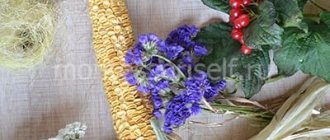
Bouquets are edible and not very
Autumn is generous with gifts. If you use your imagination, you can put together a unique bouquet from literally anything: seasonal vegetables and fruits combine very organically with each other. Such gifts have become very popular and cost a lot of money. But you can do it yourself.
The main secret is to choose small and beautiful vegetables and fruits so that the composition does not fall apart under the weight.
Fruits used:
- tangerines;
- apples;
- lemons.
From vegetables:
- onion;
- garlic:
- pepper;
- carrot;
- corn cobs;
- cabbage inflorescences.
Additional decoration will include:
- rowan; same
- bird cherry;
- rose hip;
- coniferous branches;
- Natural flowers.
If a bouquet is planned, then the fruit or vegetable is strung on a kebab skewer, which is then hidden in a backing made of leaves or purchased wrapping paper. You can purchase it both at a flower shop and at gift wrapping places. Or you can prudently save the wrappers from donated flowers. Alternatively, give not only a useful, but also a tasty gift in a vase, also made from improvised materials.
Note: any element can be decorated with paint, varnish, glitter, or even rhinestones.
How to save maple leaves for crafts?
The well-known method of preserving a maple leaf by putting it in a book , unfortunately, is not suitable for preparing material for creating flowers. In this way, the leaf dries out and makes it quite brittle.
There are other ways to preserve maple leaves:
- Leaves can be waxed . To do this, melt the wax of one candle on the stove or in the microwave. After this, the sheet is dipped alternately into hot wax on both sides.
- The paraffin sheet should be left on the newsprint to dry and absorb excess wax.
- The sheet may darken, but will retain its softness, which is very useful for crafts.
- You can also “bathe” the leaf in a glycerin solution. To do this, dissolve half a glass of glycerin in a glass of water.
- The leaves are completely dipped and then tied and hung to dry. The sheet should be dried for about four days.
Features of creating paintings
Creating compositions from dried flowers belongs to the decorative style of floristry. This does not require special skills or expensive materials. The raw materials will be gifts of nature that fit on a flat surface. These can be dried plants, seeds, flowers, petals, stabilized moss.
The panel assembly process is very simple. Dry plants are laid out on canvas or paper, forming a harmonious composition. For fixation, glue is used, in some cases double-sided tape. This picture is left to dry. After which it is placed in a frame under glass to extend its service life and prevent the accumulation of dust on the inflorescences. Despite the simplicity of working with dried flowers, the technique of creating oshibana panels has some secrets.
Drawing an oak leaf
Below is an example of how to draw an oak leaf step by step. Based on this, you can draw another leaf of any tree. Here everything depends on your artistic attentiveness and observation.
As we can see from the following sketches, first we need to draw the central axis and borders of the sheet. Next, draw the veins or wreaths of the leaves. After this, at the third stage we draw the appearance of the sheet - a wavy arc. And the last step is the general appearance and finishing touches - small shadows at the center and at some of the veins, so that the viewer and you can clearly see that the oak leaf is not flat, but has volume and some shapes.
Ceram Kioto offers hinged ventilated facades Moscow. Curtain facades made of porcelain stoneware imitating natural stone, wood and other materials. Facade of any complexity and for any building from professionals.
Sources
- https://purmix.ru/urok/kak-narisovat-klenovyj-list-karandashom-pojetapno.html
- https://gidrukodeliya.ru/kak-narisovat-klenovyy-list
- https://linedot.ru/uroki-risovanija/list-klena/
- https://heaclub.ru/kak-narisovat-klenovyj-list-poetapno-karandashom-dlya-nachinayushhih-osennij-klenovyj-list-risunok-shablon
- https://art-assorty.ru/577-kak-risovat-listya.html
Use leaves as fall prints
Leaves make great stencils and stamps, which opens up many different options for fall decor. Stamps can be used to decorate, for example, kitchen towels. However, you shouldn’t limit yourself to this. You can use beautiful prints to decorate objects like art, placemats, throw pillows, and more.
When creating stamps using leaves, you need to take them in different sizes and shapes. You also need to place the drawings randomly to create an imitation of the fact that they are scattered on the surface of the products. The only thing to avoid is having one sheet facing down and the other facing up. You need to create an imitation of the fact that the leaves are simply falling beautifully.
Creating an autumn mood
The process of making maple leaves from accordion paper can be traced using the example of a master class.
The first step is to make a template: download a ready-made one on the Internet, and then print it on a printer. You can simply attach the paper to the monitor and redraw half of the finished template (then fold the paper in half), or you can immediately draw the entire diagram with your own hands. The sheet itself can be made from either colored or white paper, which can be decorated later. We cut out the picture we got, and in the end we got a pattern.
The next step is to paint the leaf in all the shades of autumn and imitate smooth transitions. Then wait until the paper dries. Decorate again on the reverse side.
We outline all the contours with a black felt-tip pen or a thin marker. This procedure will help make the leaf more expressive and neat.
The fourth step is to fold the sheet horizontally like an accordion as shown in the photo.
Then you need to fold the leaf in half, bending it in the middle, and fasten it with glue. You need to leave a small hole near the bend line in order to insert the wire in the future.
The last step is to cut off a piece of thin wire and knitting thread and attach one end to the leaf. Now the accordion maple leaf is ready, if you make a lot of such details, you can make beautiful autumn maple garlands.