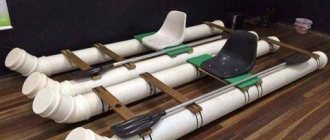
The standard design for drying clothes is ropes stretched between supports. The not very aesthetic appearance is compensated by practicality, but there is always a chance to make the dryer beautiful, simple and mobile. At the dacha there are always many more reasons to do laundry than in a city apartment, and the question of where to dry freshly washed clothes was very pressing for me. I didn’t want to clutter up the yard with ropes, so I took advantage of the brilliant idea of assembling a dryer from PVC pipes that were left over after installing the plumbing system. The result is a light, comfortable hanger that can always be increased or decreased in size.
How to carefully bend a PVC pipe
If the pipe is simply heated and bent, a crease will form. A beautiful bend is made in different ways. The simplest: heat and bend slightly. Let it cool, heat it up again, bend it a little more, and so on until the desired bend is obtained.
Second method: seal the end with tape, fill the pipe with sand, seal the other end. Heat and bend. Sand will prevent the pipe from breaking at the bend.
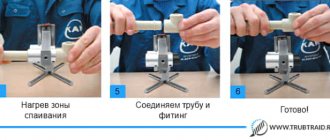
Final assembly
Separate the upper and lower parts, degrease the plastic on the vertical pipes of the base. Apply a small amount of primer to the top of the pipe, followed by a few drops of glue.
Connect the curved module to the base, carefully aligning the fit of the connecting fittings to the pipes. Do the same for the remaining racks.
The dryer turned out to be compact, it is very convenient for country life. It is convenient to carry it to the right place; the weight allows you to entrust this activity even to children. Clothes and linen hung on pipes do not have the crease that inevitably occurs when drying on a thin rope or wire. The trial version of the design is being actively used, and a larger creation has been added to it, which completely solves all needs. In addition to the obvious benefits, this product has another advantage. Using plastic pipes is a great way to recycle them with clear benefits for your wallet and the environment.
Found a violation? Report content
Docking
Cuttings of different lengths are joined using couplings, angles and tees. All connecting elements are sold in plumbing stores and are not expensive. For plumbing, pipes are soldered using a special electric curling iron. A clothes dryer does not require sealed joints. The corners can simply be heated, and the end of the pipe will easily fit into the widened hole. This is how simple and complex frames are assembled. You can use glue.
Designs of homemade dryers.
- frame;
- consoles;
- racks;
- stairs;
Tools and materials
I made the first dryer of a small size, based on the availability of materials. It was also necessary to understand the assembly principle and the main nuances of operation. From PVC pipes and fittings you can assemble a lot of useful things for your home with your own hands; they will not look brilliant, they will not become a decoration, but they can solve many everyday problems. Any person without experience or specific knowledge can design and install the structure.
What you will need:
- PVC water pipes.
- Connecting fittings (T-shaped connectors, tees, swivel angles).
- Hacksaw or miter saw.
- Sandpaper.
- Primer for PVC.
- Glue, cement for PVC pipes or manual welding.
When working with adhesives, be sure to use personal protective equipment, wear gloves, goggles and a mask, and assemble in a well-ventilated area.
Who is she - the woman who won the heart of Anatoly Kot
“Rose gold” will add zest to your look: fashionable coloring ideas
Vyacheslav Fetisov headed the central council of VOOP
Frame
You will need 4 pipe pieces and 4 angles. The frame is attached to the wall with hooks or hinges, in the bathroom or on the balcony. Stretch ropes across the frame - you can simply tie them. Or make a series of holes in the pipes and secure the ends of the rope in them.
The frame hangs on the wall. To dry clothes, it must be raised to a horizontal position. Support the free end with a stand, tie it to the ceiling or wall - as convenient for the hostess.
You can make any number of cross members in the frame using tees. It is more convenient to hang things on them than on ropes.
The third option for making a dryer
In autumn and winter, shoes inevitably accumulate in the apartment, which need to be dried regularly. For this purpose, it is highly undesirable to use a heating radiator, which will damage your shoes.
But a homemade dryer made from plastic tubes will be useful in every family and will be safe. You need to prepare the following in advance:
- reinforced pipes with a diameter of 1 inch (2.54 cm);
- corners, tees, crosses (according to the number of shelves);
- 2 Mayevsky cranes;
- stops for the base;
- roulette;
- marker;
- hacksaw or knife;
- level.
Advice! At the initial stage, the number of dryer shelves, their dimensions, and the height between them are determined (depending on the number of pairs of shoes and the availability of free space in the apartment).
Further actions:
- Using a knife, an appropriate number of pipe blanks are made, strictly monitoring the length (it must be the same, otherwise the quality and aesthetics of the design will suffer).
- The most difficult part is to assemble the lower base shelf, on which the arrangement of other elements will depend. By adjusting the height of the stops, the base is perfectly level.
- After checking the level, solder the vertical posts (if necessary, cut them to height).
- As the assembly of all levels at the top is completed, Mayevsky taps are screwed into the tees. This will allow air accumulated in the pipes to be removed if the structure is left idle for a long time.
- The dryer is attached to the wall, and each horizontal tube is fixed in at least two places.
- All that remains is to supply water from the heating system to the product and make sure there are no leaks.
Advice! To increase the efficiency of use, it is worth placing trays made of rubberized material under the shelves of the dryer so that dirt does not fall on the shoes located below. On the top shelf of this design you can dry hats, socks, and other small items by placing a plastic grid in advance.
Racks
Before you begin assembling a more complex structure, you need to make a drawing or sketch. So as not to make a mistake with the number of corners and tees. On the sketch it is easy to calculate the length of all horizontal and vertical pipe cuts, taking into account the dimensions of the joints.
The simplest stand is a parallelepiped. It can be supplemented with any number of longitudinal and transverse jumpers. Place the rack near the radiator, hang small things on top, and put shoes underneath to dry.
A large rectangular sheet drying rack requires additional supports in the middle. It will be more stable if the sides are made in the shape of a trapezoid.
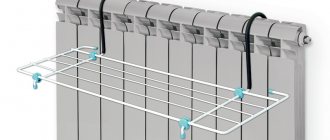
The first version of the clothes dryer
A radiator dryer made from PVC pipe is an ideal solution for a small apartment, especially if there are small children in the family. Its production will take no more than 20 minutes, and the service life of the finished product will be quite long.
The dryer is attached to any working heating radiator, or several designs are made and a mountain of laundry is dried at once. In addition, this device is great for drying wet shoes and rugs.
To work you will need:
- PVC pipes with a diameter of 2-2.5 cm;
- tees, 90 degree angles;
- soldering iron for PVC pipes or gas torch.
How to do:
- First, measurements are taken to determine the type of dryer mounting, which directly depends on the design of the battery.
- Cut the longitudinal elements to the required length (3 pieces or more).
- By soldering, the side parts of the future dryer are prepared so that later longitudinal parts can be inserted into the tees.
- To complete the work, middle tubes are soldered inside the tees and a product is obtained for drying things.
Making a metal chair
Metal furniture is easy to make by connecting straight sections of pipes and using the method of bending tubular elements on a “Snail” type machine. The order of operations is as follows:
- The tube is plugged at one end.
- The workpiece is filled with fine sand.
- Plug the other end.
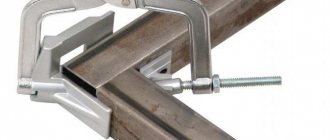
- Place the piece in the machine, securing it between the pin and the protrusion on the disk.
- By applying force, bend a section of the profile pipe to the required angle.
- To apply less effort, you can heat the bend with a blowtorch until it turns red.
- To get the bend as it should, you will need to use plaz (cardboard or plywood with the outline of the part applied).
- The elements can be connected by welding or threaded connections. For fastening, it is permissible to use wooden bushings into which self-tapping screws are screwed.
- After welding, the resulting seam is cleaned with a file or grinder so that the joint becomes smooth.
To make a simple chair from a profile tube (20x20 or 20x40), you will need:
- welding machine with electrodes No. 3;
- angle grinder (grinder);
- file, sandpaper;
- measuring tool;
- drill with attachment.
The dimensions of the frame are selected based on personal preferences. The seat can be made from boards, plywood or furniture board. If you want to get an all-metal chair, you should cut the required number of tubular elements for the seat and attach them to the frame by welding or bolts.
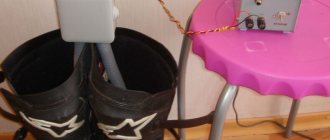
We turn an unnecessary heater into a shoe dryer
Winter is already beginning to gradually lose its ground, which means that visits to a country house will become more and more frequent: it’s time to prepare for the next dacha season. And to make working more pleasant in damp and slushy weather, Vet27 offers to make a shoe dryer. After all, it is much more comfortable to work in the garden or vegetable garden in shoes that have dried after yesterday's work. And in the evening you can dive into warm slippers and finally relax. In addition, such an interesting idea for the hallway will provide additional heating for the corridor.
To make a shoe dryer, you will need very little (everything is at hand and easily accessible!): an old heater in working condition, some wood, river pebbles and, preferably, a faithful friend nearby - if not to help, then to lift your spirits!
- oil heater 500 W;
- block 30x50 mm;
- screws and metal corners for fastening;
- small stones;
- paint.
We start with something simple: we free the heater from unnecessary elements: legs, handles, fasteners, etc. Now let's move on to more painstaking work: you need to assemble the base for the future dryer from a sawn block.
Vet27 built something like two frames with a heater sandwiched between them. To prevent moisture flowing from frozen and wet shoes from getting onto the electrical elements of the device, the forum member left the power supply with an indicator and cord behind the body of the dryer.
Paint the timber, assemble all the structural elements and secure the radiator to the housing. Don't forget about the feet - they are needed to keep the floor and the dryer itself from heating up. Choose the size and design of the legs depending on the interior of the hallway and your imagination. Be sure to check the homemade dryer for functionality, then place pebbles on the radiator.
Make the legs higher, and then you can attach an additional shelf or grid below for drying, for example, gloves.
Vet27 was pleased with his invention: the dryer has been working flawlessly for several months. The fact that the radiator is located horizontally did not affect its operation. The forum member added a timer to the design, installing it on an outlet. Thus, the device can work almost around the clock, resting for an hour every three hours.
Let's talk about pipes
On the Internet you can find quite a lot of products that can be made from plastic material. If we talk about a summer cottage, then such design options as all kinds of shelves, folding chairs, dryers and even greenhouse frames are possible. This is not the entire list for the manufacture of which PVC pipes can be used.
Even a children's highchair can be made from plastic pipes
The question often arises: is it possible to make similar products from polypropylene pipes? Of course yes. But there are some nuances. Firstly, the products will be gray in color, and secondly, a soldering iron will be required to connect them.
But still I would like to note the advantages of PVC pipes:
- products made from them have a beautiful aesthetic color;
- simple and convenient to connect, like a Lego set;
- If you do not use glue for joining, you will get a collapsible structure, which is very convenient for transportation.
Propylene material does not have such features.
If the goal is to make a strong single structure, then glue is used to connect the elements.
Types of ceiling dryers
All models are conditionally classified into several types. They differ in appearance, installation method and capacity.
Based on the type of construction, ceiling dryers are divided into the following categories:
- Stationary . The most primitive and simple mechanism, which consists of ordinary ropes or fishing line stretched between slats. The main disadvantage of such a dryer is that it cannot be adjusted in length and height. In addition, to hang laundry, you will have to use a chair or stepladder.
- Sliding . A more convenient and technologically advanced model. Consists of a frame with tension ropes. It is attached to the ceiling with consoles, with the help of which the height of the dryer is adjusted (the structure can be lowered by 40-50 cm).
- Telescopic . This mechanism has sliding metal holders, thanks to which not only the height, but also the distance between the strings is adjusted.
- “Lianas” (wall-ceiling) . Stationary massive model with extended functionality. It consists of tubes that are connected by ropes to fastening blocks. The control mechanism is located on the wall. This design allows you to adjust the height of each individual tube. The only drawback of such a dryer is the complexity of installation.
According to the type of installation, clothes drying devices are divided into two types:
- Removable . Most often, this opportunity is present in two-tier models, which have a large capacity and take up a lot of space.
- Stationary . The most common type of ceiling dryer design is used for all types.
In addition to the listed options, new technologically advanced and modern models have appeared over the last decade:
- Automated . A type of retractable dryer with a remote control unit, which is mounted in the ceiling. In addition, such structures have several fans that facilitate the drying process and time. The standard model can support weights up to 30 kg.
- Two-tier . They are distinguished by the presence of a lower tier with a large number of strips, which are connected to each other by metal fasteners. The upper part of such a dryer is stationary, the lower part is removable, and can be removed after use.
- Ceiling with movable hinges . Characterized by the presence of hangers for clothes. They consist of two profiles fixed to the ceiling with cross-shaped brackets. The roller system allows you to raise and lower the device to the desired height.
Basic rules for making a homemade ladder
The main task of a bathing ladder is to ensure safe descent and ascent.
Therefore, during construction, important factors should be taken into account:
- the ladder must be strong and durable;
- it should be securely fixed - mounted to the pool or put rubberized tips on the legs;
- the steps are also, if necessary, covered with anti-slip pads;
- the ladder must be placed in a well-lit place, regardless of the time of day;
- height depends on the height of an adult or child;
- The age of the swimmers should also be taken into account - the elderly should be provided with additional safety.
Making a hanging dryer for a heating radiator with your own hands
Let's consider making a popular version of a dryer made of plastic pipes with three lines for clothes. We will need the following materials and tools:
- polypropylene pipe with a diameter of 20 mm and a length of about 3.5 m;
- tees of the appropriate size 4 pcs;
- corners of the same diameter 4 pcs;
- plugs of the appropriate size 4 pcs;
- a special soldering iron for pipes or glue for plastic;
- scissors for cutting plastic pipes or a hacksaw for metal.
First, let's cut off the pipes necessary to assemble the structure. It is convenient to use a special pipe cutter, but this operation can also be performed with a regular hacksaw for metal.
You can adjust the dimensions of the parts based on specific conditions. For this example we will need:
- 4 segments 6 cm long between the lines for placing linen;
- 2 pieces 11 cm long to form hooks;
- 2 pieces 25 cm long for vertical hook elements;
- 3 pieces 80 cm long as lines for placing laundry.
As a result, we receive a complete set of parts necessary to assemble the structure.
If you have a soldering iron for joining heating and water pipes, the dryer can be assembled using it. If you don't have a special tool, you can use glue. For details on how this is done, read the article “How to glue polypropylene and polyethylene, including foam, what glue is used to glue it to concrete or metal?”
Material selection criteria
As a rule, ceiling dryers are made of aluminum, plastic, stainless steel or wood. Each of these designs has its advantages and disadvantages, therefore, in order to decide on the material for making a dryer at home, you should carefully study them:
- Aluminum . The lightest, but at the same time fragile material. With a large volume of laundry, aluminum dryers can bend and break. In addition, this metal oxidizes in air, forming a black coating on the surface that can spoil things. Not the easiest material to make a homemade dryer. Making a frame from aluminum pipes at home is quite difficult.
- Stainless steel . These dryers are the most durable, but also the heaviest. It is important to consider that the metal frame will create a significant load on the ceiling mounts, so standard hooks will not be suitable for installation. This design option can withstand the maximum volume of laundry, but manufacturing at home will require additional tools and welding skills. For beginners, creating a metal ceiling dryer with your own hands is almost impossible.
- Plastic . Lightweight and easy-to-use material that does not stain laundry or oxidize. Plastic dryers are the most fragile, and the home manufacturing process is very expensive and time-consuming.
- Tree . The most suitable and affordable material, easy to process, environmentally friendly, quite durable, does not oxidize and does not stain things. The only drawback of wooden structures is that with frequent use the body begins to swell from water.
vote
Article rating
Video
The video will tell you how to make a collapsible fish dryer, which you will need when fishing:
Electronic engineer with many years of experience. For several years he was involved in organizing the repair of household appliances, including washing machines. Loves sport fishing, water tourism and travel.
Found a mistake? Select it and click the buttons:
There is a washing machine “for bachelors”. Linen washed in such a unit does not need to be ironed at all! The thing is that the device does not have a drum: some things can be placed inside the container directly on hangers (for example, jackets and shirts), and smaller things (for example, underwear and socks) can be placed on special shelves.
Astronauts, while in Earth orbit, solve the problem of dirty things using an original method. Clothes are dropped from the spacecraft and burn up in the upper atmosphere.
Washing machines have something to do with the origin of the expression “money laundering.” In the 1930s, American gangsters used a network of laundries as a cover for their illegal activities. By passing off the proceeds of crime as proceeds from cleaning clothes, they turned “dirty” money into “clean” money.
There are a variety of balls that are used in the washing machine. Antistatic ones will prevent the fabric from sticking to the body after washing, balls with special loops will “comb” the lint and prevent the appearance of pills, and silicone ones with pimples will prevent fluff from matting when washing outerwear.
Plastic pipes. Interior ideas
Crafts made from pipes look fresh and not hackneyed in the interior; a significant plus should be seen in the cost of the material. You can create unique things without investing just your time! Below are examples of what you can easily make from leftover pipes.
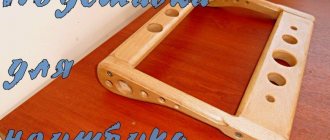
Work organizer
We advise you to start making crafts with the organizer. It couldn’t be simpler - cut the pipes at the same angle and glue them to a solid base. You can arrange them in a fancy shape, paint them in your favorite color, or leave them natural. Now the workplace will be in perfect order.
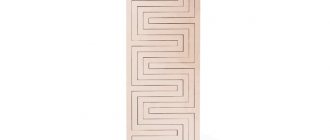
Frames for mirrors and openwork partition
To make a frame you will need pipes of different diameters, thick paper (cardboard), a jigsaw, glue and a mirror. Trace the outline of your mirror on cardboard and remove it. Now, cut the required number of pieces and create a beautiful frame for your mirror. In places of contact, spread the pieces with glue, ensure that the parts adhere to each other and leave the frame alone until the next day.
Using the same principle, you can make an openwork partition for zoning a living space. This design of large diameter circles looks beautiful.
Clothes hanger
There is a huge variety of hangers these days. It all depends on the task at hand. If you have a small hallway, then a stand-up hanger will be what you need; if you need to make a hanger for a child’s room, then a U-shaped one with a stable base and additional branches for hanging a backpack will be an excellent solution. For little money you will get a designer item! It should be noted that you can decorate the resulting product in a color that matches the interior.
Pots and vases for flowers
Crazy hands make cool flower pots from sewer pipes of large diameters, and flowerpots from thin ones. You can get a stylish composition from such flowerpots by installing them on a common base made of painted plywood. You can decorate the pots with stickers, you can paint them with acrylic paints and varnish them, you can print family photos on self-adhesive film and wrap homemade flowerpots.
Shoe shelf
Use the remaining pipe from the sewer wiring as a stylish shoe rack. The diameter of the pipe must be at least 150 mm so that you can comfortably place your pair of shoes. Cut the pipe into pieces 25-30 cm long (slightly longer than the length of the boots).